2021 ALFA ROMEO STELVIO clock setting
[x] Cancel search: clock settingPage 27 of 280
25
Locking The Doors With A Depleted Battery
Proceed as follows to lock the doors if the
vehicle battery is depleted:
1. With the doors unlocked insert the emer-
gency key from the key fob or a screwdriver
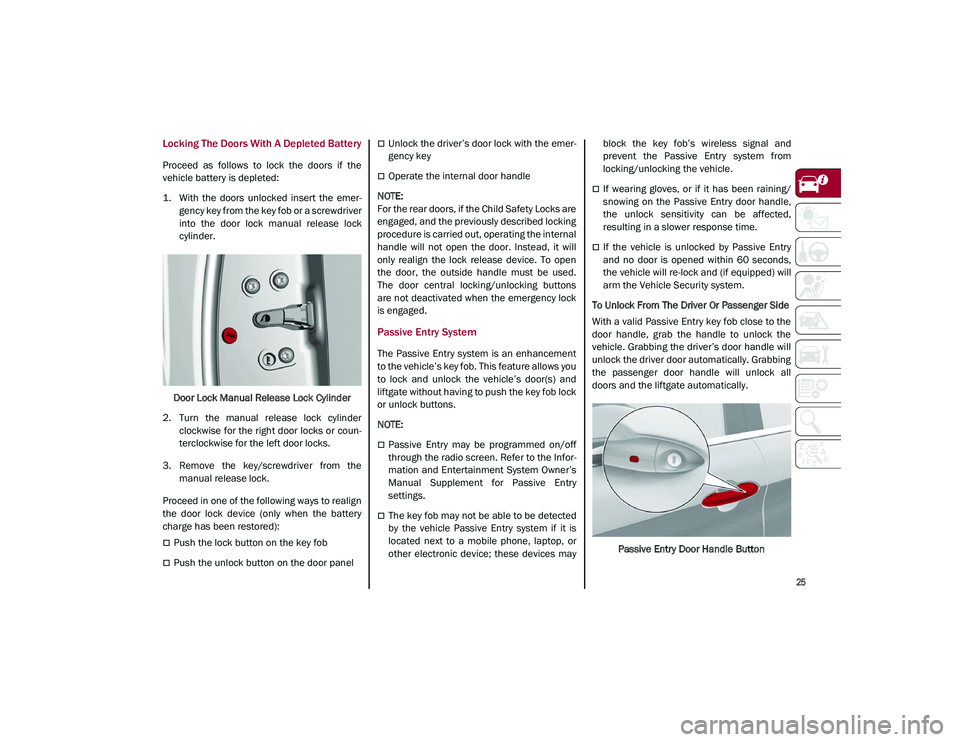
into the door lock manual release lock
cylinder.
Door Lock Manual Release Lock Cylinder
2. Turn the manual release lock cylinder clockwise for the right door locks or coun -
terclockwise for the left door locks.
3. Remove the key/screwdriver from the manual release lock.
Proceed in one of the following ways to realign
the door lock device (only when the battery
charge has been restored):
Push the lock button on the key fob
Push the unlock button on the door panel
Unlock the driver’s door lock with the emer -
gency key
Operate the internal door handle
NOTE:
For the rear doors, if the Child Safety Locks are
engaged, and the previously described locking
procedure is carried out, operating the internal
handle will not open the door. Instead, it will
only realign the lock release device. To open
the door, the outside handle must be used.
The door central locking/unlocking buttons
are not deactivated when the emergency lock
is engaged.
Passive Entry System
The Passive Entry system is an enhancement
to the vehicle’s key fob. This feature allows you
to lock and unlock the vehicle’s door(s) and
liftgate without having to push the key fob lock
or unlock buttons.
NOTE:
Passive Entry may be programmed on/off
through the radio screen. Refer to the Infor -
mation and Entertainment System Owner’s
Manual Supplement for Passive Entry
settings.
The key fob may not be able to be detected
by the vehicle Passive Entry system if it is
located next to a mobile phone, laptop, or
other electronic device; these devices may block the key fob’s wireless signal and
prevent the Passive Entry system from
locking/unlocking the vehicle.
If wearing gloves, or if it has been raining/
snowing on the Passive Entry door handle,
the unlock sensitivity can be affected,
resulting in a slower response time.
If the vehicle is unlocked by Passive Entry
and no door is opened within 60 seconds,
the vehicle will re-lock and (if equipped) will
arm the Vehicle Security system.
To Unlock From The Driver Or Passenger Side
With a valid Passive Entry key fob close to the
door handle, grab the handle to unlock the
vehicle. Grabbing the driver’s door handle will
unlock the driver door automatically. Grabbing
the passenger door handle will unlock all
doors and the liftgate automatically.
Passive Entry Door Handle Button
21_GU_OM_EN_USC_t.book Page 25
Page 44 of 280
GETTING TO KNOW YOUR VEHICLE
42
NOTE:
If the indicator light stays on constantly,
programming is complete and the garage
door/device should activate when the
HomeLink® button is pressed.
To program the two remaining HomeLink®
buttons, repeat each step for each
remaining button. DO NOT erase the chan-
nels.
If you unplugged the garage door opener/
device for programming, plug it back in at this
time.
Reprogramming A Single HomeLink® Button
(Canadian/Gate Operator)
To reprogram a channel that has been previ -
ously trained, follow these steps:
1. Place the ignition to the ON/RUN position.
2. Press and hold the desired HomeLink® button until the indicator light begins to
flash after 20 seconds. Do not release the
button.
3. Without releasing the button, proceed with “Canadian/Gate Operator Programming”
step 2 and follow all remaining steps.
EXTERIOR LIGHTS
Headlight Switch
The headlight switch is located on the left side
of the instrument panel, next to the steering wheel. The headlight switch controls the oper
-
ation of the headlights, parking lights, instru -
ment panel lights, instrument panel light
dimming, interior lights and rear fog lights.
In addition, there are buttons for the Park -
Sense system and Engine Stop/Start
Ú
page 86.
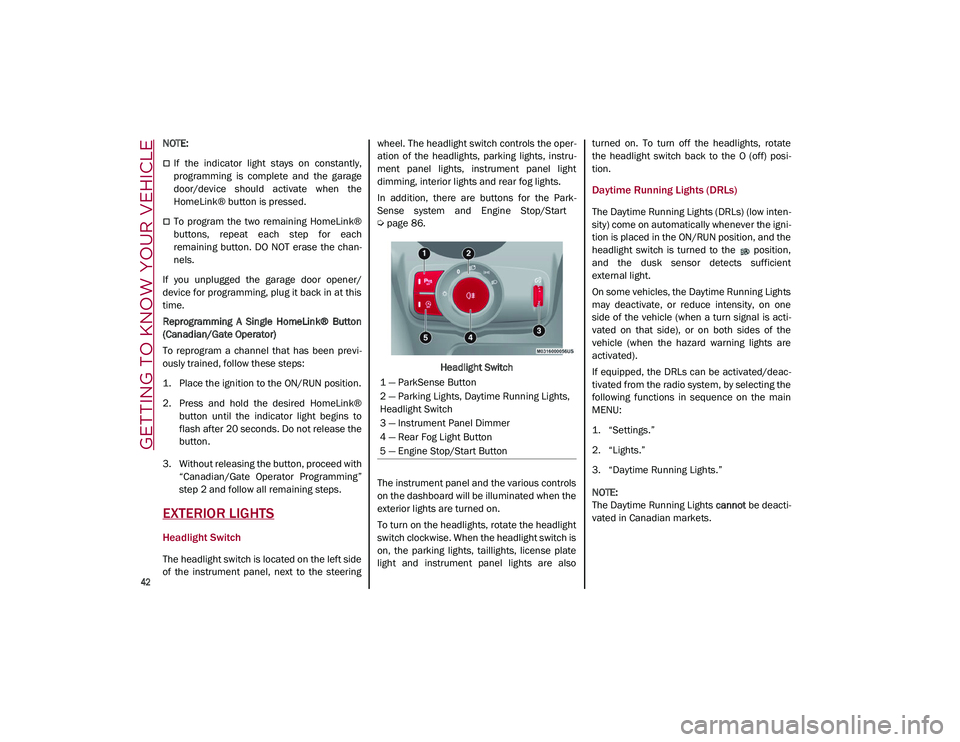
Headlight Switch
The instrument panel and the various controls
on the dashboard will be illuminated when the
exterior lights are turned on.
To turn on the headlights, rotate the headlight
switch clockwise. When the headlight switch is
on, the parking lights, taillights, license plate
light and instrument panel lights are also turned on. To turn off the headlights, rotate
the headlight switch back to the O (off) posi
-
tion.
Daytime Running Lights (DRLs)
The Daytime Running Lights (DRLs) (low inten -
sity) come on automatically whenever the igni -
tion is placed in the ON/RUN position, and the
headlight switch is turned to the position,
and the dusk sensor detects sufficient
external light.
On some vehicles, the Daytime Running Lights
may deactivate, or reduce intensity, on one
side of the vehicle (when a turn signal is acti -
vated on that side), or on both sides of the
vehicle (when the hazard warning lights are
activated).
If equipped, the DRLs can be activated/deac -
tivated from the radio system, by selecting the
following functions in sequence on the main
MENU:
1. “Settings.”
2. “Lights.”
3. “Daytime Running Lights.”
NOTE:
The Daytime Running Lights cannot be deacti -
vated in Canadian markets.
1 — ParkSense Button
2 — Parking Lights, Daytime Running Lights,
Headlight Switch
3 — Instrument Panel Dimmer
4 — Rear Fog Light Button
5 — Engine Stop/Start Button
21_GU_OM_EN_USC_t.book Page 42
Page 46 of 280
GETTING TO KNOW YOUR VEHICLE
44
Parking Lights
To turn on the parking lights and instrument
panel lights, rotate the headlight switch clock-
wise to the position. All of the parking lights
will turn on for eight minutes, and opening the
door activates an audible warning.
To leave only the lights on one side (right/left)
illuminated, move the multifunction lever
(located on the left side of the steering wheel)
to the side that you want to remain on. With
the parking lights on, the indicator light on
the instrument panel will illuminate.
To turn off the parking lights, rotate the head -
light switch back to the O (off) position.
Headlight Off Delay
To assist when exiting the vehicle, the “Head -
light Off Delay” feature will leave the head -
lights on for up to 90 seconds. This delay is
initiated when the ignition is placed in the OFF
position while the headlight switch is on, and
then the headlight switch is cycled off. Head -
light delay can be canceled by either turning
on the headlights or side lights, or by placing
the ignition in the ON position.
The function can be activated from the radio
system by selecting the following functions in
sequence on the main menu:
1. “Settings.”
2. “Lights.”
3. “Headlight Off Delay.”
Rear Fog Lights
The rear fog light switch is located within the
headlight switch.
Push the button, located in the center of
the headlight switch, to turn the rear fog lights
on/off.
The rear fog lights turn on only when the head -
lights or parking lights are also turned on. The
lights can be turned off by pushing the
button again or by turning the headlight switch
to the O (off) position.
When the engine is stopped with the rear fog
lights on, they will be off the next time the
engine is started.
Adaptive Headlight System (AFS) — If
Equipped
This is a system combined with Xenon head -
lights (Bi-Xenon 35 W headlamp, if equipped)
which directs the headlights horizontally, and
continuously and automatically adapts them
to the driving conditions around bends or
when cornering.
The system directs the headlights to light up
the road in the best way, taking into account
the speed of the vehicle and the bend or
corner angle, as well as the speed at which the
steering wheel is turned.
The adaptive lights are automatically activated
when the vehicle is started.
Turn Signals
Move the multifunction lever up or down to
activate the turn signals. The arrows on each
side of the instrument cluster flash to show
proper operation.
The or turn signal will blink on the instru -
ment panel.
Lane Change Assist
Lightly push the lever up or down once, without
moving beyond the detent, and the turn signal
will flash five times then automatically turn off.
To turn off the flashing before the end of the
cycle, move the lever in the opposite direction
until the first click (about half way).
INTERIOR LIGHTS
Courtesy lights are turned on when the front
doors are opened or when the dimmer control
is rotated to its farthest upward position. The
glove compartment light turns on automati -
cally when the glove compartment is opened
and turn off when it is closed. The door cour -
tesy lights illuminate when one of the front
doors is opened, and turn off when it is closed.
The liftgate courtesy lights turn on automati -
cally when the liftgate is opened and turn off
when it is closed. All of these lights turn on and
off regardless of the ignition status.
21_GU_OM_EN_USC_t.book Page 44
Page 55 of 280
53
NOTE:
The MAX-DEF function remains active for
approximately three minutes once the engine
coolant reaches the proper temperature.
When the function is on, AUTO mode will deac-
tivate. The only manual operations possible
are adjusting blower speed and turning off the
Rear Window Defrost.
Pushing the button switches off the
MAX-DEF function.
Air Temperature Adjustment
Rotate the driver or passenger Temperature
Adjustment Knob clockwise for warmer
temperatures or counterclockwise for cooler
temperatures. The set temperatures are
shown on the radio system.
Push the SYNC button to sync the driver and
passenger air temperatures.
Rotate the passenger Temperature Adjust -
ment Knob to cancel the SYNC function. This
will set a new passenger side temperature.
Rotate the Temperature Adjustment Knob fully
clockwise to engage the HI (maximum heating)
setting or fully counterclockwise to engage the
LO (maximum cooling) setting. To deactivate
these functions, rotate the Temperature
Adjustment Knob to the desired temperature.
Rear passengers’ temperature is linked to
driver side selection.
AUTO Button
When the AUTO button is pushed (indicator
illuminated), the Climate Control system auto -
matically adjusts the following settings:
Quantity and distribution of air flow in the
passenger compartment
The air conditioner
Air recirculation
Cancels any manual settings
Selecting the AUTO function illuminates the
indicator on the A/C button.
If air distribution or the fan speed is manually
adjusted, the AUTO button indicator will turn
off to indicate that the Climate Control system
is no longer in AUTO mode.
After a manual adjustment, push the AUTO
button to resume the automatic system.
SYNC Button
Push the SYNC button (indicator illuminated)
to sync the passenger side air temperature
with the driver side air temperature.
This function makes temperature regulation
easier when the driver is traveling alone.
Turn the passenger Temperature Adjustment
Knob or push the passenger side Air Distribu-
tion Selection Button to change the passenger
side air temperature and return to separate air
temperature management.
Blower Speed
Turn the Blower Speed Knob to increase or
decrease the blower speed. The speed is
displayed with lighted indicators in the radio
system display.
Maximum fan speed = all indicators illumi -
nated on the radio system display
Minimum fan speed = one indicator illumi -
nated on the radio system display
The fan can be turned off by rotating the
Blower Speed Knob counterclockwise to the
off position (all segments on the radio system
display are turned off).
NOTE:
To restore automatic control of the fan speed,
push the AUTO button.
Air Distribution Selection
Push the Air Distribution Selection button on
the faceplate to change the mode of air distri -
bution.
NOTE:
In AUTO mode, the Climate Controls automati -
cally manage the air distribution. When set
manually, the respective symbols on the radio
system indicate the air distribution setting.
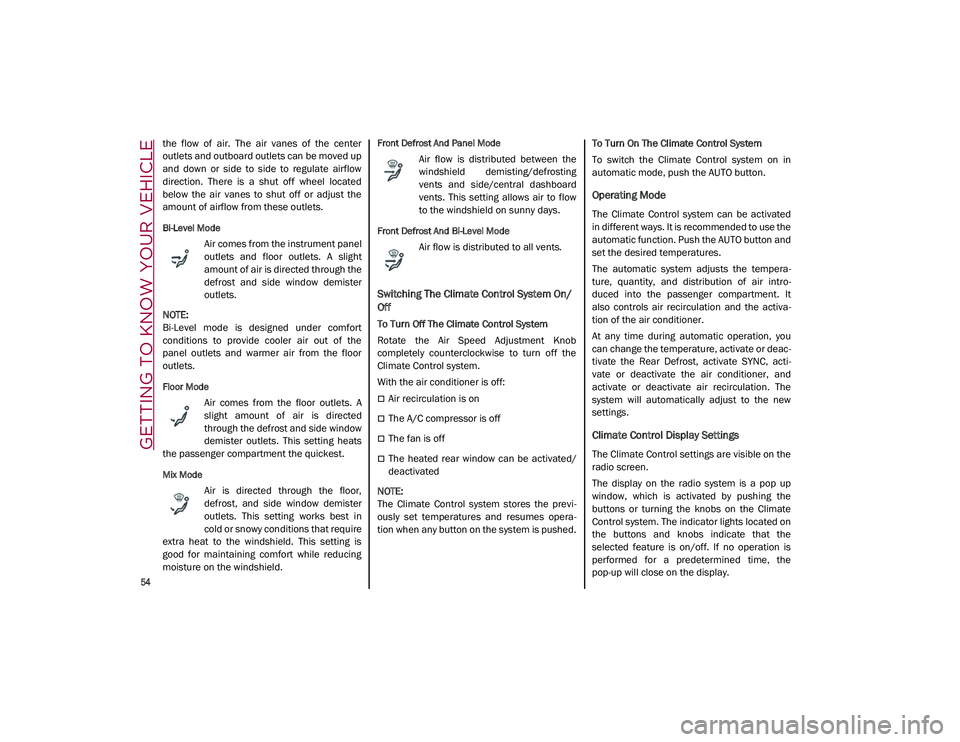
Panel Mode
Air comes from the outlets in the
instrument panel to ventilate the
chest and face. Each of these outlets
can be individually adjusted to direct
21_GU_OM_EN_USC_t.book Page 53
Page 56 of 280
GETTING TO KNOW YOUR VEHICLE
54
the flow of air. The air vanes of the center
outlets and outboard outlets can be moved up
and down or side to side to regulate airflow
direction. There is a shut off wheel located
below the air vanes to shut off or adjust the
amount of airflow from these outlets.
Bi-Level Mode
Air comes from the instrument panel
outlets and floor outlets. A slight
amount of air is directed through the
defrost and side window demister
outlets.
NOTE:
Bi-Level mode is designed under comfort
conditions to provide cooler air out of the
panel outlets and warmer air from the floor
outlets.
Floor Mode
Air comes from the floor outlets. A
slight amount of air is directed
through the defrost and side window
demister outlets. This setting heats
the passenger compartment the quickest.
Mix Mode
Air is directed through the floor,
defrost, and side window demister
outlets. This setting works best in
cold or snowy conditions that require
extra heat to the windshield. This setting is
good for maintaining comfort while reducing
moisture on the windshield.
Front Defrost And Panel Mode
Air flow is distributed between the
windshield demisting/defrosting
vents and side/central dashboard
vents. This setting allows air to flow
to the windshield on sunny days.
Front Defrost And Bi-Level Mode
Air flow is distributed to all vents.
Switching The Climate Control System On/
Off
To Turn Off The Climate Control System
Rotate the Air Speed Adjustment Knob
completely counterclockwise to turn off the
Climate Control system.
With the air conditioner is off:
Air recirculation is on
The A/C compressor is off
The fan is off
The heated rear window can be activated/
deactivated
NOTE:
The Climate Control system stores the previ -
ously set temperatures and resumes opera -
tion when any button on the system is pushed. To Turn On The Climate Control System
To switch the Climate Control system on in
automatic mode, push the AUTO button.
Operating Mode
The Climate Control system can be activated
in different ways. It is recommended to use the
automatic function. Push the AUTO button and
set the desired temperatures.
The automatic system adjusts the tempera
-
ture, quantity, and distribution of air intro -
duced into the passenger compartment. It
also controls air recirculation and the activa -
tion of the air conditioner.
At any time during automatic operation, you
can change the temperature, activate or deac -
tivate the Rear Defrost, activate SYNC, acti -
vate or deactivate the air conditioner, and
activate or deactivate air recirculation. The
system will automatically adjust to the new
settings.
Climate Control Display Settings
The Climate Control settings are visible on the
radio screen.
The display on the radio system is a pop up
window, which is activated by pushing the
buttons or turning the knobs on the Climate
Control system. The indicator lights located on
the buttons and knobs indicate that the
selected feature is on/off. If no operation is
performed for a predetermined time, the
pop-up will close on the display.
21_GU_OM_EN_USC_t.book Page 54
Page 74 of 280
GETTING TO KNOW YOUR INSTRUMENT PANEL
72
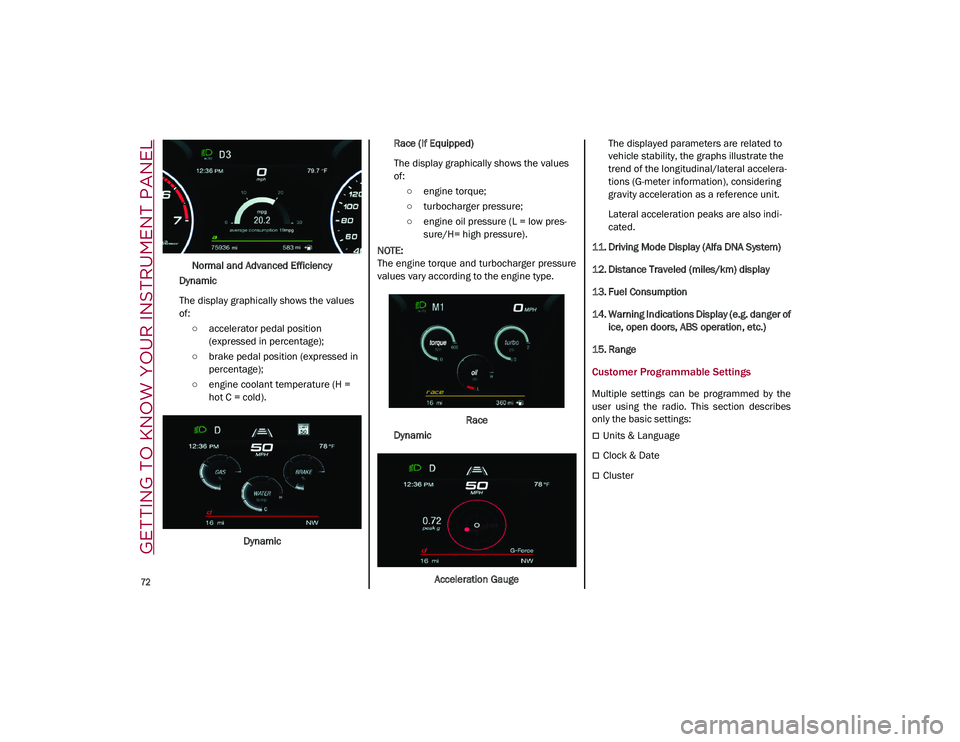
Normal and Advanced Efficiency
Dynamic
The display graphically shows the values
of: ○ accelerator pedal position (expressed in percentage);
○ brake pedal position (expressed in percentage);
○ engine coolant temperature (H = hot C = cold).
Dynamic Race (If Equipped)
The display graphically shows the values
of:
○ engine torque;
○ turbocharger pressure;
○ engine oil pressure (L = low pres -
sure/H= high pressure).
NOTE:
The engine torque and turbocharger pressure
values vary according to the engine type.
Race
Dynamic
Acceleration Gauge The displayed parameters are related to
vehicle stability, the graphs illustrate the
trend of the longitudinal/lateral accelera
-
tions (G-meter information), considering
gravity acceleration as a reference unit.
Lateral acceleration peaks are also indi -
cated.
11. Driving Mode Display (Alfa DNA System)
12. Distance Traveled (miles/km) display
13. Fuel Consumption
14. Warning Indications Display (e.g. danger of ice, open doors, ABS operation, etc.)
15. Range
Customer Programmable Settings
Multiple settings can be programmed by the
user using the radio. This section describes
only the basic settings:
Units & Language
Clock & Date
Cluster
21_GU_OM_EN_USC_t.book Page 72
Page 75 of 280
73
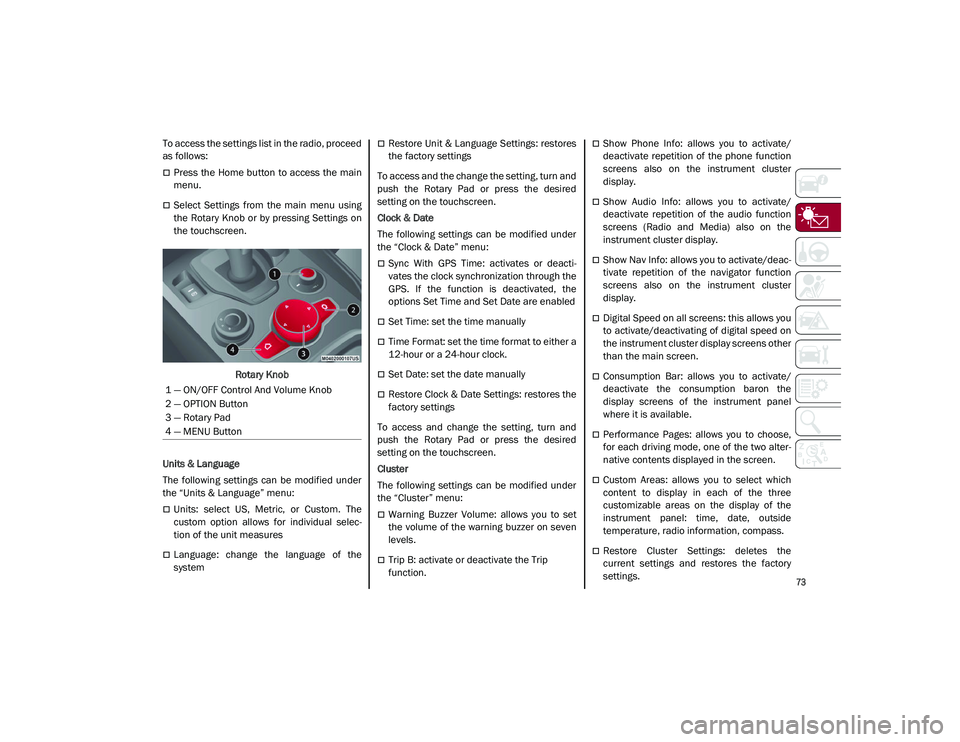
To access the settings list in the radio, proceed
as follows:
Press the Home button to access the main
menu.
Select Settings from the main menu using
the Rotary Knob or by pressing Settings on
the touchscreen.Rotary Knob
Units & Language
The following settings can be modified under
the “Units & Language” menu:
Units: select US, Metric, or Custom. The
custom option allows for individual selec -
tion of the unit measures
Language: change the language of the
system
Restore Unit & Language Settings: restores
the factory settings
To access and the change the setting, turn and
push the Rotary Pad or press the desired
setting on the touchscreen.
Clock & Date
The following settings can be modified under
the “Clock & Date” menu:
Sync With GPS Time: activates or deacti -
vates the clock synchronization through the
GPS. If the function is deactivated, the
options Set Time and Set Date are enabled
Set Time: set the time manually
Time Format: set the time format to either a
12-hour or a 24-hour clock.
Set Date: set the date manually
Restore Clock & Date Settings: restores the
factory settings
To access and change the setting, turn and
push the Rotary Pad or press the desired
setting on the touchscreen.
Cluster
The following settings can be modified under
the “Cluster” menu:
Warning Buzzer Volume: allows you to set
the volume of the warning buzzer on seven
levels.
Trip B: activate or deactivate the Trip
function.
Show Phone Info: allows you to activate/
deactivate repetition of the phone function
screens also on the instrument cluster
display.
Show Audio Info: allows you to activate/
deactivate repetition of the audio function
screens (Radio and Media) also on the
instrument cluster display.
Show Nav Info: allows you to activate/deac -
tivate repetition of the navigator function
screens also on the instrument cluster
display.
Digital Speed on all screens: this allows you
to activate/deactivating of digital speed on
the instrument cluster display screens other
than the main screen.
Consumption Bar: allows you to activate/
deactivate the consumption baron the
display screens of the instrument panel
where it is available.
Performance Pages: allows you to choose,
for each driving mode, one of the two alter -
native contents displayed in the screen.
Custom Areas: allows you to select which
content to display in each of the three
customizable areas on the display of the
instrument panel: time, date, outside
temperature, radio information, compass.
Restore Cluster Settings: deletes the
current settings and restores the factory
settings.
1 — ON/OFF Control And Volume Knob
2 — OPTION Button
3 — Rotary Pad
4 — MENU Button
21_GU_OM_EN_USC_t.book Page 73