2018 MERCEDES-BENZ CLA COUPE ECU
[x] Cancel search: ECUPage 244 of 326

!Mercedes-Benz recommends that you only
use roof carriers that have been tested and
approved for Mercedes-Benz vehicles. This
helps to prevent damage to the vehicle.
Position the load on the roof rack in such a
way that the vehicle will not sustain damage
even when it is in motion.
Depending on the vehicle equipment, ensure
that when the roof carrier is installed you can:
Ropen the panorama roof with power tilt/
sliding panel fully
Ropen the trunk lid fully
You will find information on the maximum roof
load in the "Technical data" section
(
Ypage 320).
An incorrectly secured roof carrier or roof load
may become detached from the vehicle. You
must therefore ensure that you observe the roof
carrier manufacturer's installation instructions.
Attaching the roof carrier
XOpen and fold the covers :upwards care-
fully in the direction of the arrow.
XOnly secure the roof carrier to the anchorage
points under covers :.
XObserve the manufacturer's installation
instructions.
Features
Cup holder
Important safety notes
GWARNING
The cup holder cannot hold acontainer secure
whilst traveling. If you use acup holder whilst
traveling, the container may be flung around
and liquid may be spilled. The vehicle occu-
pants may come into contact with the liquid
and if it is hot, they may be scalded. You may
be distracted from the traffic conditions and
you could lose control of the vehicle. There is
ar isk of an accident and injury.
Only use the cup holder when the vehicle is
stationary. Only use the cup holder for con-
tainers of the right size. Alwaysc lose the con-
tainer, particularlyift he liquid is hot.
GWARNING
If objects in the passenger compartment are
stowed incorrectly, they can slide or be
thrown around and hit vehicle occupants. In
addition, cupholders, open stowage spaces
and mobile phone brackets cannot always
retain all objects they contain. There is arisk
of injury, particularlyint he event of sudden
braking or asudden change in direction.
RAlwayss tow objects so that they cannot be
thrown around in such situations.
RAlwaysm ake sure that objects do not pro-
trude from stowage spaces, parcel nets or
stowage nets.
RClose the lockable stowage spaces before
starting ajourney.
RAlwayss tow and secure heavy, hard, poin-
ted, sharp-edged, fragile or bulky objects in
the trunk.
!Only use the cup holders for containers of
the right size and which have lids. The drinks
could otherwise spill.
Observe the loading guidelines (
Ypage 237).
The stowage compartmentsint he doors provide
space for bottles:
Rfront:c apacity up to 34 fl. oz. (1.0 l)
Rrear: capacity up to 17 fl. oz. (0.5 l)
242Features
Stowage and features
Page 245 of 326
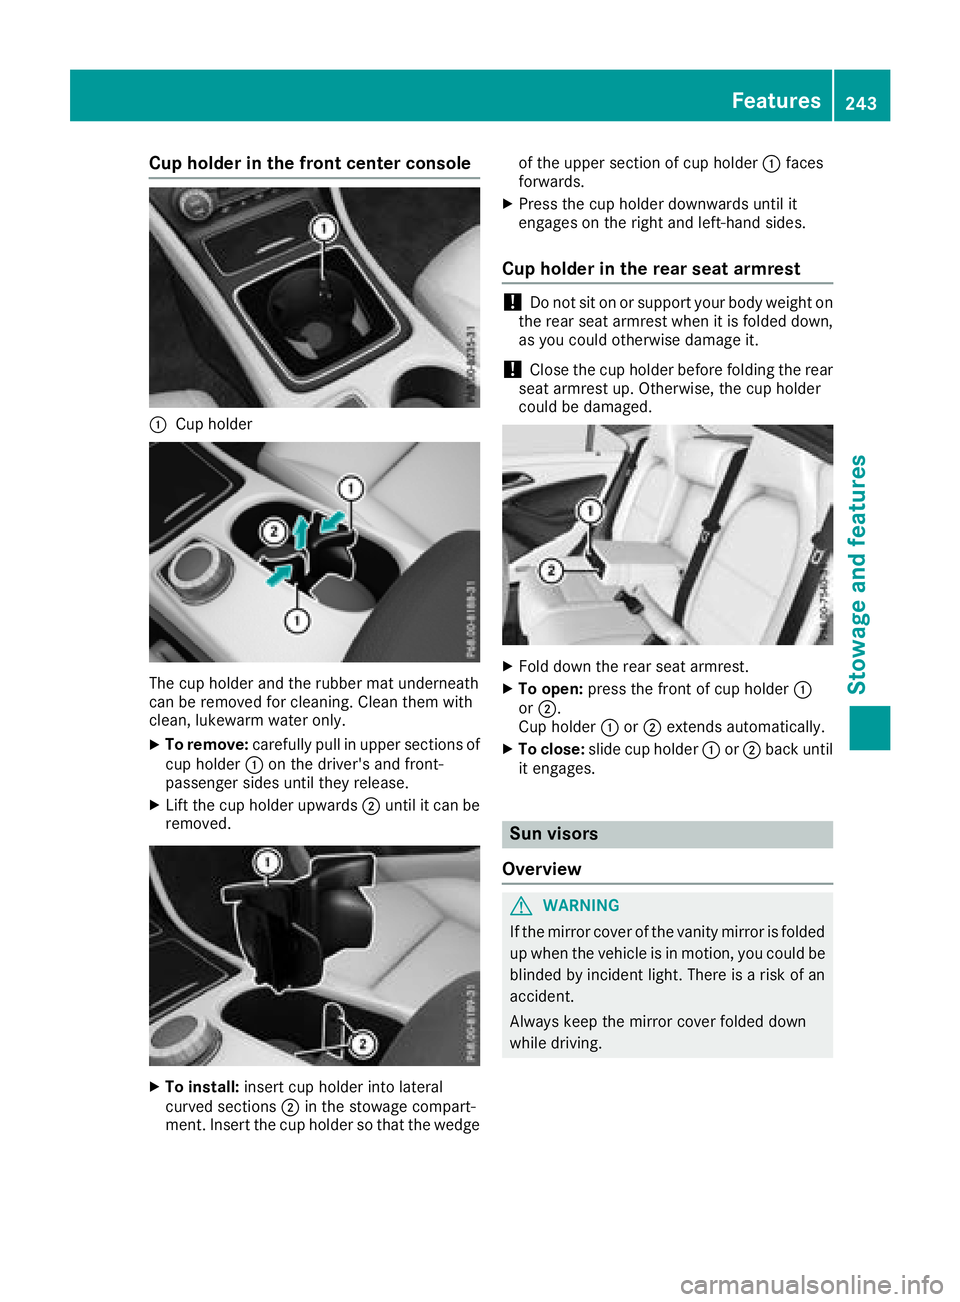
Cup holder in thefront center console
:Cup holder
The cup holder and th erubbe rmat underneath
can be remove dfor cleaning. Clean them with
clean, lukewarm wate ronly.
XTo remove: carefullypull in upper sections of
cup holder :on th edriver'sa nd front-
passenger sides until they release.
XLiftt hecup holderu pwards;until it can be
removed.
XTo install: insert cup holder int olateral
curved sections ;in th estowage compart-
ment. Insertt hecup holdersot hatthe wedge of th
eupper sectio nofcup holder :faces
forwards.
XPress th ecup holder downwards until it
engages on th erigh tand left-hand sides.
Cup holder in th erears eat armrest
!Do no tsit on or support your body weighto n
th er ear seat armres twhen it is folded down,
as you coul dotherwise damag eit.
!Close th ecup holderb efore folding th erear
seat armres tup. Otherwise, th ecup holder
coul dbed amaged.
XFoldd own th erear seat armrest.
XTo open: pressthe frontofc up holder :
or ;.
Cup holder :or; extends automatically.
XTo close: slide cup holder :or; back until
it engages.
Sun visors
Overview
GWARNING
If th emirror cover of th evanity mirror is folded
up when th evehicle is in motion,y ou couldbe
blinded by incidentl ight.Thereisar iskofa n
accident.
Always keep th emirror cover folded down
while driving.
Features243
Stowage and features
Z
Page 248 of 326
Have the system checked at the nearest
Mercedes-Benz Service Center or contact the
following service hotlines:
Mercedes-Benz Customer Assistance Center at
1-800-FOR-MERCedes(1-800-367-6372) or
1-866-990-9007
Em ergencyc all
Important safety notes
GWARNING
It can be dangeroustor emainint he vehicle,
eve nify ouhave pressedt he SOS button in an
emergency if:
Ryo us ee smoke insid eoroutsid eoft he vehi-
cle ,e.g.ift hereisaf irea fterana ccident
Rthe vehicl eisonad angerouss ection of
road
Rthe vehicl eisnot visible or canno teasil ybe
see nbyothe rroadu sers,p articularly when
dark or in poo rvisibility conditions
There is ariskofana ccident and injury.
Leave the vehicl eimmediatelyint his or simi-
la rs ituations as soona sitissafetodos o.
Mov etoas afel oc ation along with othe rvehi-
cle occupants. In such situations, secure the
vehicl einaccordance with nationalr egula-
tions, e. g. with awarning triangle.
General notes
Observe the notes on system activation
(Ypage 245).
An emergency cal lisdialed automaticall yifan
ai rb ag or Emergency Tensioning Device is trig-
gered .You canno tend an automaticall ytrig-
gered emergency cal lyours elf.
An emergency cal lcan also be initiated man-
ually.
As soona sthe emergency cal lhas been initi-
ated, the indicator lamp in the SOS button
flashes. The ConnectingC all
message
appears in the multifunctio ndisplay.
The audi ooutputi smuted.
Once the connectio nhasbeen made, the Call
Connectedmessage appears in the multifunc-
tio nd isplay. All important informatio
nonthe emergency is
transmitted, for example:
Rcurrent location of the vehicl e(as determined
by the GP Ssystem)
Rvehicl eide ntificatio nnumber
Rinformatio nonthe severity of the accident
Shortly afte rthe emergency cal lhas been initi-
ated, avoice connectio nisa utomaticall yestab-
lishedb etween the Customer Assistance Center
and the vehicl eoccupants.
RIf the vehicl eoccupants respond ,the
Mercedes-Benz Customer Assistance Center
attempts to get more informatio nonthe
emergency.
RIf ther eisnor esponsefrom the vehicl eoccu-
pants, an ambulance is immediatelys ent to
the vehicle.
If no voice connectio ncan be established to the
Mercedes-Benz Customer Assistance Center,
the system hasb eenu nabl etoi nitiate an emer-
genc ycall.
Thi scan occur, for example, if the relevant
mobil ephone network is not available .The indi-
cato rlam pint he SOS button flashesc ontinu-
ously.
The CallF ailed
message appears in the mul-
tifunctio ndisplay and must be confirmed.
In this case, summon assistance by other
means.
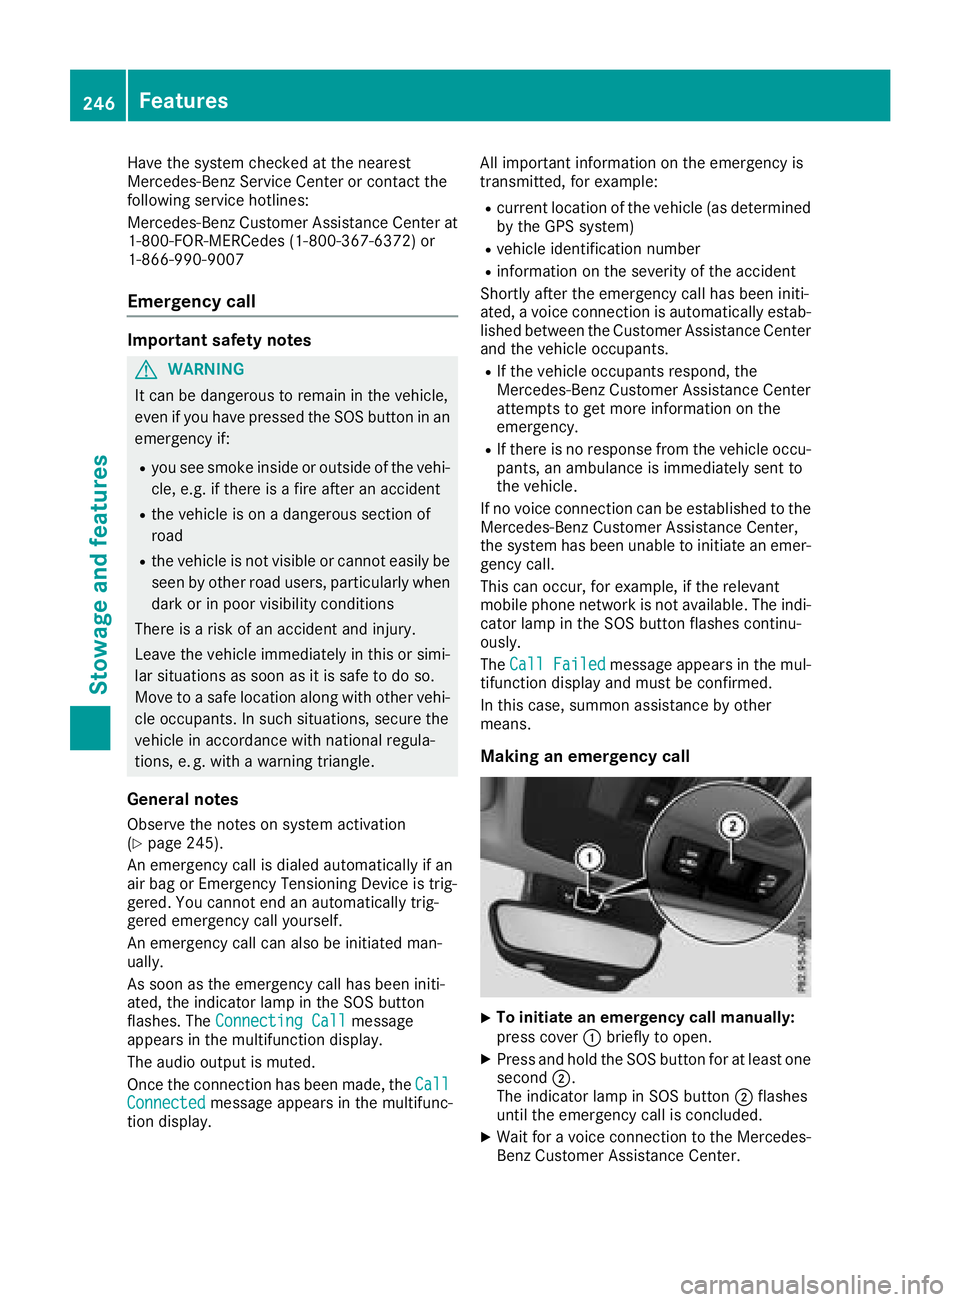
Making an emergenc ycall
XTo initiate an emergenc ycallm anually:
press cover :briefl ytoo pen.
XPress and hol dthe SOS button for at leas tone
second ;.
The indicator lamp in SOS button ;flashes
unti lthe emergency cal lisconcluded.
XWait for avoice connectio ntothe Mercedes-
Benz Customer Assistance Center.
246Features
Stowag eand featur es
Page 257 of 326
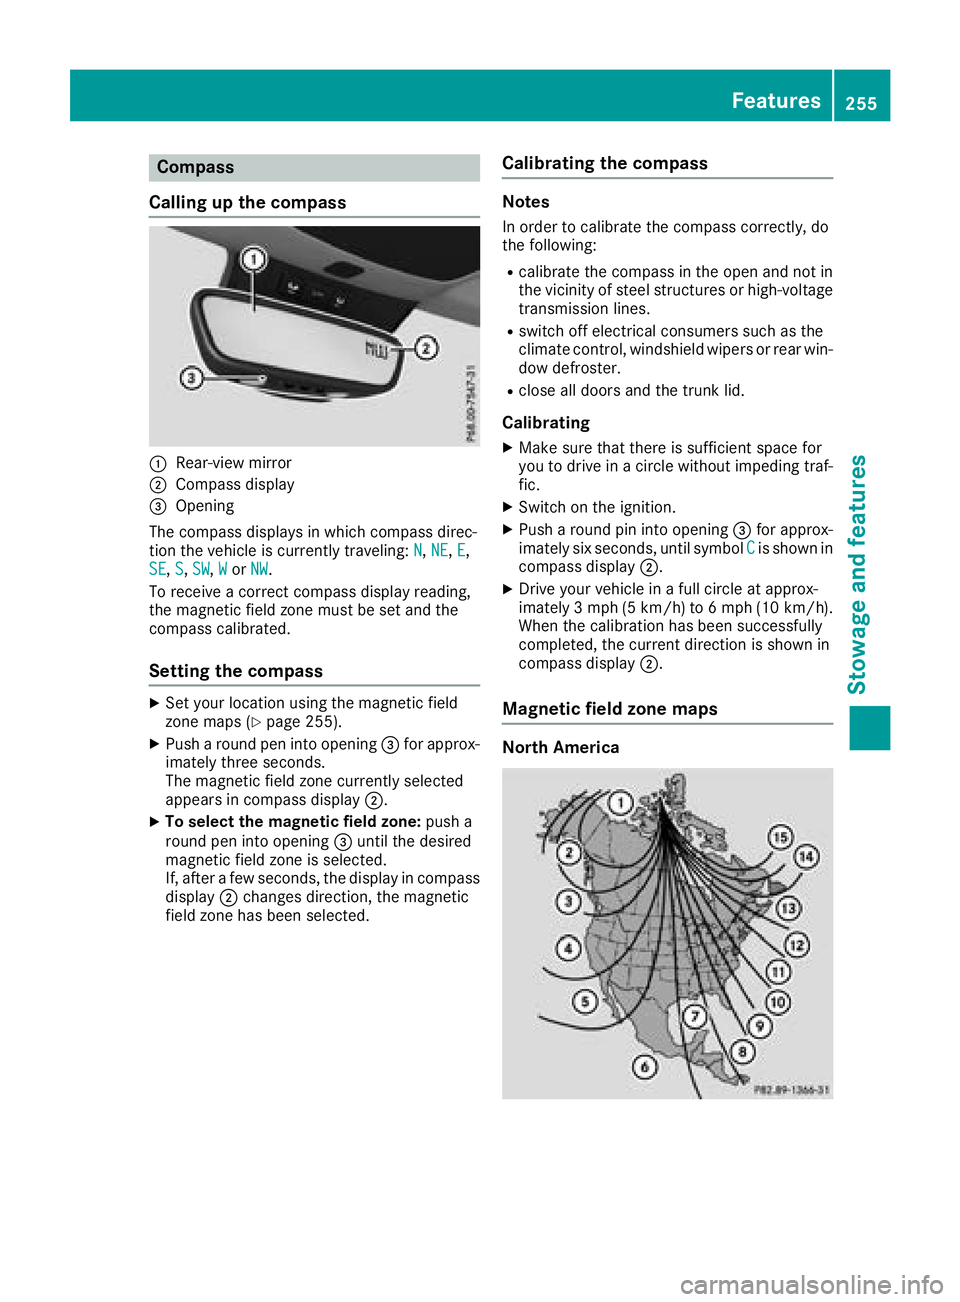
Compass
Callin gupthe compass
:Rear-view mirror
;Compass display
=Opening
The compass displays in whichc ompass direc-
tio nt he vehicle is currently traveling: N
,NE,E,
SE, S,SW,Wor NW.
To receive acorrec tcompass display reading,
th em agnetic fiel dzonem ust be set and the
compass calibrated.
Settin gthe compass
XSet your locatio nusingt hemagnetic field
zone maps (Ypage 255).
XPush aroun dpen int oopening =for approx-
imately three seconds.
The magnetic fiel dzonec urrently selected
appearsinc ompass display ;.
XTo select themagnetic field zone: push a
roun dpen int oopening =until th edesired
magnetic fiel dzoneiss elected.
If,a fter afew seconds, th edisplay in compass
display ;changes direction,t hemagnetic
fiel dzoneh as been selected.
Calibratin gthe compass
Notes
In order to calibrat ethe compass correctly, do
th ef ollowing:
Rcalibrat ethe compass in th eopen and no tin
th ev icinity of steel structures or high-voltage
transmission lines.
Rswitch off electrical consumers suchast he
climate control, windshield wipersorr ear win-
dow defroster.
Rclose all doorsa nd thetrunk lid.
Calibrating
XMakes ure that there is sufficient spacef or
you to driv einacircle without impedingt raf-
fic.
XSwitch on th eignition.
XPush aroun dpin int oopening =for approx-
imately six seconds, until symbol Cis shown in
compass display ;.
XDrive your vehicle in afull circle at approx-
imately 3mph (5 km/h )to6mph (10 km/h).
When th ecalibration has been successfully
completed, th ecurren tdirection is shown in
compass display ;.
Magnetic field zone maps
North America
Features255
Stowage and features
Z
Page 258 of 326
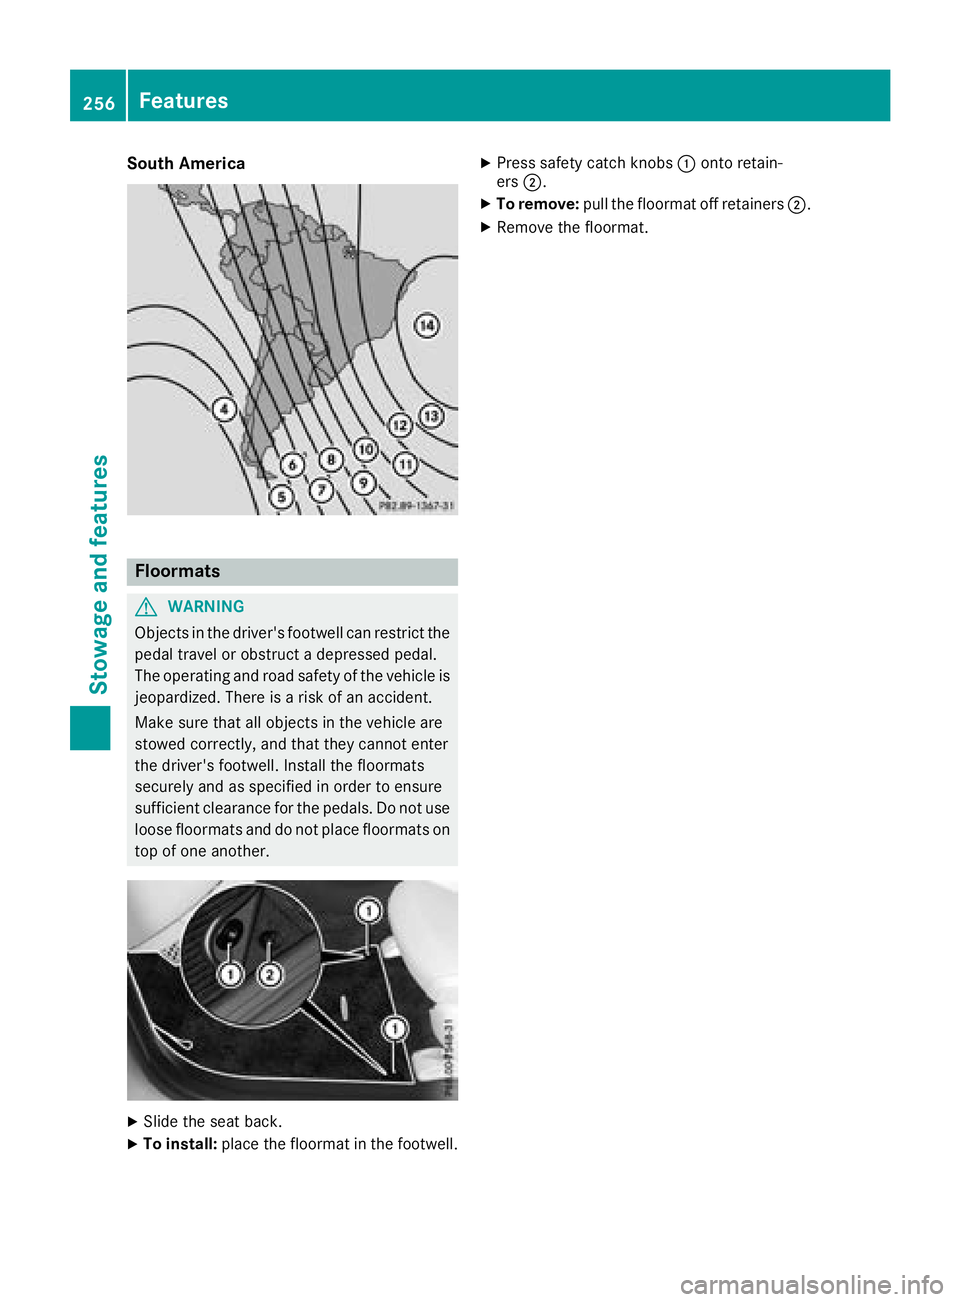
South America
Floormats
GWARNING
Object sinthe driver's footwell can restrict the
pedal travel or obstruct adepressed pedal.
The operating and road safety of the vehicle is
jeopardized. There is arisk of an accident.
Make sure that all object sinthe vehicle are
stowed correctly, and that they cannot enter
the driver's footwell. Install the floormats
securely and as specified in order to ensure
sufficient clearance for the pedals. Do not use
loose floormats and do not place floormats on
top of one another.
XSlide the seat back.
XTo install: place the floormat in the footwell.
XPress safety catch knobs :onto retain-
ers ;.
XTo remove: pull the floormat off retainers ;.
XRemove the floormat.
256Features
Stowage and features
Page 261 of 326
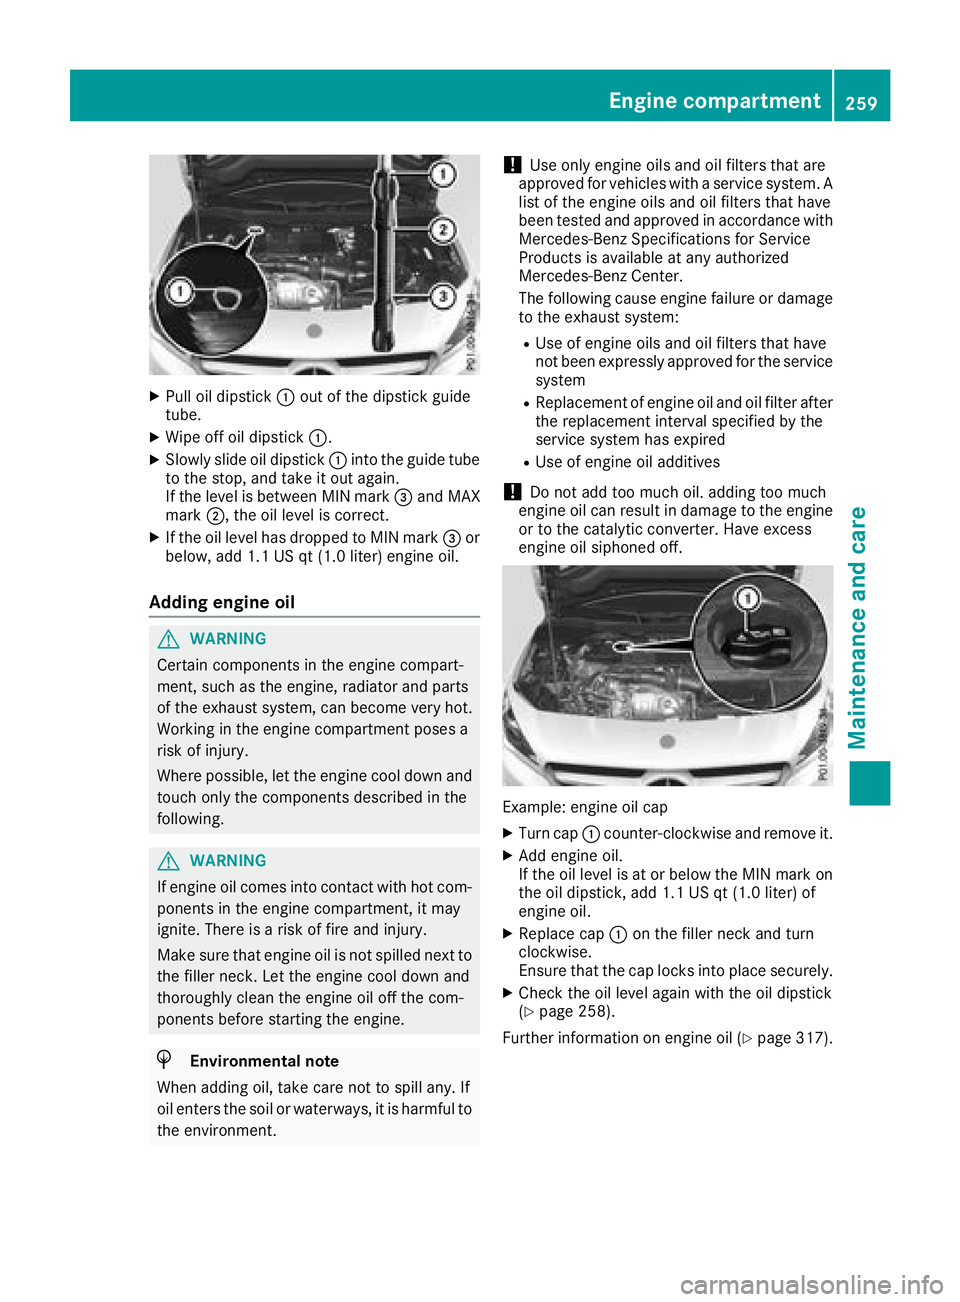
XPull oil dipstick:out of the dipstick guide
tube.
XWipe off oil dipstick :.
XSlowly slide oil dipstick :into the guide tube
to the stop, and take it out again.
If the level is between MIN mark =and MAX
mark ;,the oil level is correct.
XIf the oil level has dropped to MIN mark =or
below, add 1.1 US qt (1.0 liter) engine oil.
Adding engine oil
GWARNING
Certain components in the engine compart-
ment ,such as the engine, radiator and parts
of the exhaust system, can become very hot.
Workingint he engine compartment poses a
risk of injury.
Where possible, let the engine cool down and touch only the components described in the
following.
GWARNING
If engine oil comes into contact with hot com- ponentsint he engine compartment ,itmay
ignite. There is arisk of fire and injury.
Make sure that engine oil is not spilled next to
the filler neck.L et the engine cool down and
thoroughly clean the engine oil off the com-
ponentsb efore starting the engine.
HEnvironmenta lnote
When adding oil, take care not to spill any. If
oil enter sthe soil or waterways, it is harmful to
the environment.
!Use only engine oils and oil filters that are
approved for vehicles with aservice system. A
list of the engine oils and oil filters that have
been tested and approved in accordancew ith
Mercedes-Benz Specifications for Service
Products is availableata ny authorized
Mercedes-Benz Center.
The following cause engine failure or damage
to the exhaust system:
RUse of engine oils and oil filters that have
not been expressly approved for the service
system
RReplacement of engine oil and oil filter after
the replacement interval specified by the
service system has expired
RUse of engine oil additives
!Do not add too much oil. adding too much
engine oil can result in damage to the engine
or to the catalytic converter. Have excess
engine oil siphoned off.
Example: engine oil cap
XTurn cap :counter-clockwise and remove it.
XAdd engine oil.
If the oil level is at or below the MIN mark on
the oil dipstick ,add 1.1 US qt (1.0 liter) of
engine oil.
XReplace cap :on the filler neck and turn
clockwise.
Ensure that the cap locks into place securely.
XCheck the oil level again with the oil dipstick
(Ypage 258).
Further information on engine oil (
Ypage 317).
Engine compartment259
Maintenance and care
Z
Page 267 of 326
Cleaning wiper blades
GWARNING
You coul dbecome trapped by th ewindshield
wipersift heys tart moving while cleanin gthe
windshield or wiper blades.T hereisarisko f
injury.
Always switch off th ewindshield wipersa nd
th ei gnition before cleanin gthe windshield or
wiper blades.
!Only fold th ewindshield wipersa way from
th ew indshield when vertical. Otherwise, you
will damaget hehood.
!Do no tpull th ewiper blade. Otherwise, the
wiper blade coul dbedamaged.
!Do notclean wiper blades to ooften and do
no trub them to ohard .Otherwise, th egraph-
ite coatin gcoul dbed amaged. This could
caus ewiper noise.
!Holdthe wiper arm securely when folding
back .The windshield coul dbedamaged if the
wiper arm smacks against it suddenly.
XFol dthe windshield wiper arm saway from the
windshield.
XCarefully clean th ewiper blades withad amp
cloth.
XFol dthe windshield wiper arm sback again
before switching on th eignition.
Cleaning th eexterior lighting
!Only use cleanin gagents or cleanin gcloths
whicha re suitable for plastic light lenses.
Unsuitable cleanin gagents or cleanin gcloths
coul dscratch or damag ethe plastic light len-
ses.
XClean th eplastic lenses of th eexteri or lights
withaw et sponge and amild cleanin gagent,
e.g .M ercedes-Ben zcar shampoo or cleaning
cloths.
Cleaning th emirror turn signals
!Only use cleanin gagents or cleanin gcloths
that are suitable for plastic lenses.U nsuitable
cleanin gagents or cleanin gcloth scould
scratch or damaget heplastic lenses of the
mirror tur nsignals.
XClean th eplastic lenses of th emirror tur nsig-
nals in th eexteri or mirror housing usingaw et
sponge and mild cleanin gagent, e.g.
Mercedes-Ben zcar shampoo or cleaning
cloths.
Cleaning th esensors
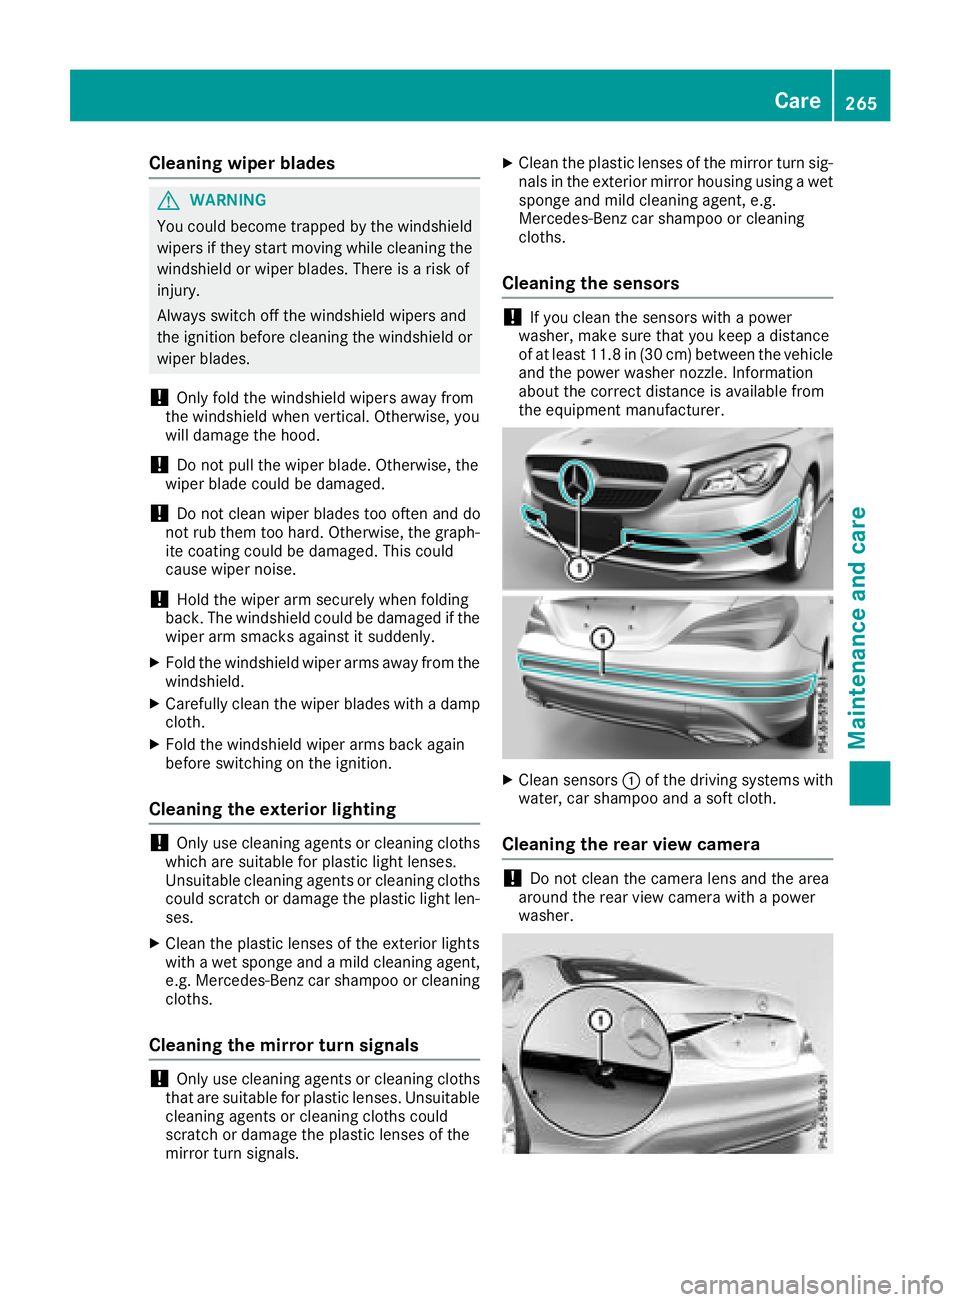
!If you clean th esensorsw ithapower
washer, mak esure that you keep adistance
of at least 11.8 in (30 cm)between the vehicl e
and th epower washer nozzle. Information
about th ecorrec tdistanc eisavailabl efrom
th ee quipment manufacturer.
XClean sensors :of th edriving systems with
water, car shampoo and asoftc loth.
Cleaning th erearv iew camera
!Do no tclean th ecamera lensa nd thearea
aroun dthe rear view camera with apower
washer.
Care265
Maintenance and care
Z
Page 272 of 326
Warning triangle
Removing/replacing the warning trian-
gle
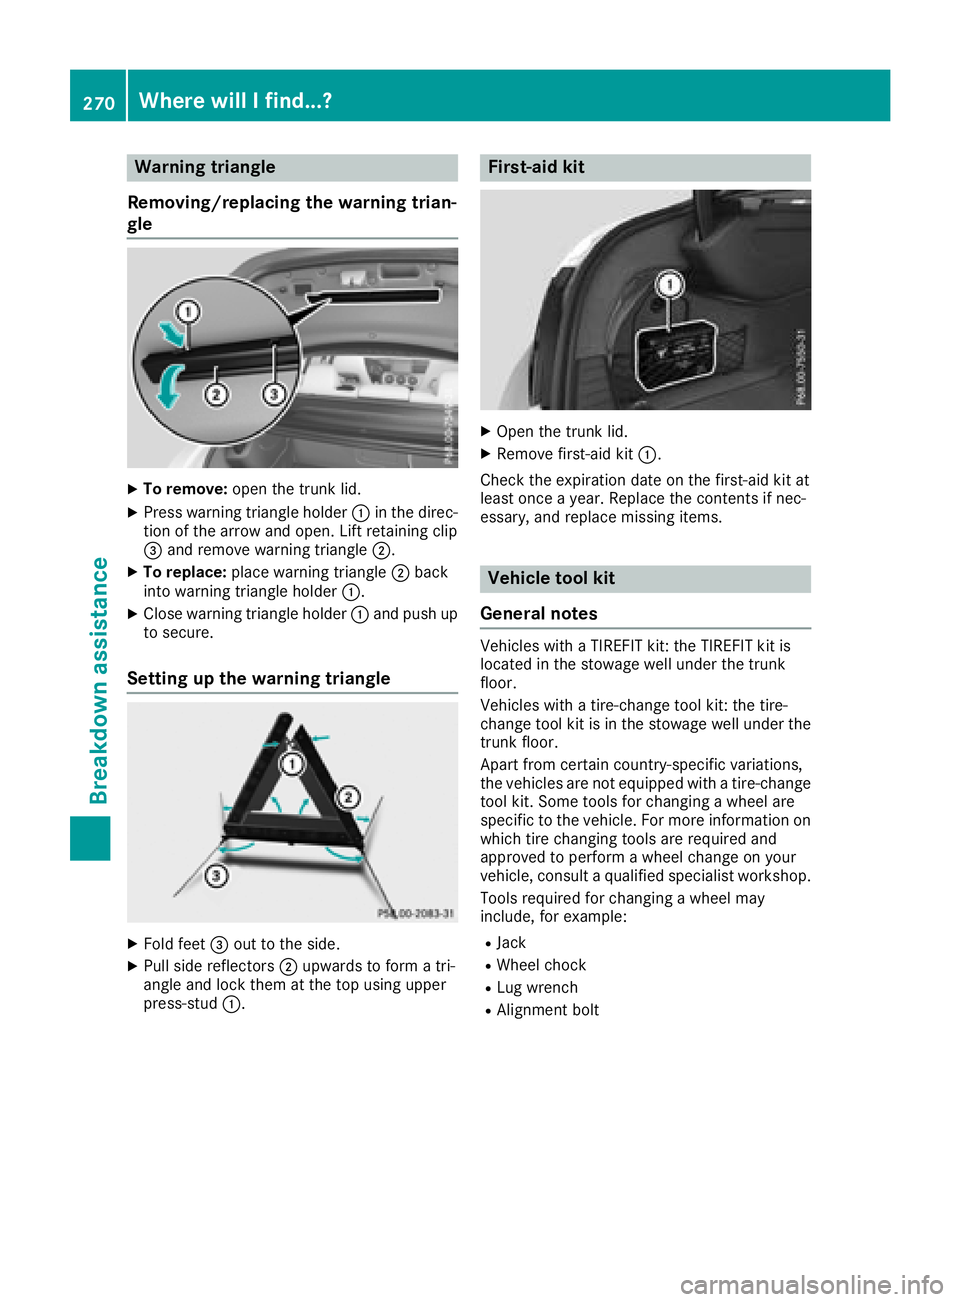
XTo remove: open the trunk lid.
XPress warning triangl eholder :in the direc-
tion of the arrow and open. Lift retaining clip
= and remove warning triangle ;.
XTo replace:place warning triangle ;back
into warning triangl eholder :.
XClose warning triangl eholder :and pus hup
to secure.
Setting up the warning triangle
XFold feet =out to the side.
XPullside reflectors ;upwards to form atri-
angl eand lock them at the top using upper
press-stud :.
First-aid kit
XOpen the trunk lid.
XRemove first-ai dkit:.
Check the expiration date on the first-ai dkit at
least once ayear. Replace the contents if nec-
essary, and replace missing items.
Vehicle tool kit
General notes
Vehicles with aTIREFIT kit: the TIREFIT kit is
located in the stowage wellu nder the trunk
floor.
Vehicles with atire-change tool kit: the tire-
change tool kit is in the stowage wellu nder the
trunk floor.
Apart from certain country-specificv ariations,
the vehicles are not equipped with atire-change
tool kit. Some tools for changing awheel are
specific to the vehicle. For more information on which tire changing tools are required and
approved to perform awheel change on your
vehicle, consul taqualified specialist workshop.
Toolsr equired for changing awheel may
include, for example:
RJack
RWheelc hock
RLug wrench
RAlignment bolt
270Where will Ifind...?
Breakdown assistance