2018 MERCEDES-BENZ CLA COUPE ECU
[x] Cancel search: ECUPage 228 of 326
Warning/
indicator
lampNSignal type
Possiblec auses/consequences and M
Solutions
?NThe red coolant warning lamp comes on while the engine is running.
The coolant levelist oo low.
If the coolant levelisc orrect, the airflow to the engine radiator may be blocked or
the electric engine radiator fan may be defective.
The coolant is too hot and the engine is no longer being cooleds ufficiently.
XObserve the additionaldisplay messages in the multifunction display.
XPullover and stop the vehicles afelyand switch off the engine, paying attention
to road and traffic conditions.
XSecure the vehiclea gainst rolling away(Ypage141).
XLeave the vehiclea nd keepasafe distance from the vehicleu ntil the engine has
cooledd own.
XCheck the coolant levela nd add coolant, observing the warning notes
(Ypage2 60).
XIf you have to add coolant frequently, have the engine cooling system checked.
XMake sure that the air supply to the engine radiator is not blocked,e .g. by snow,
slush or ice.
XDo not start the engine again until the coolant temperature is below 248 ‡
(120 †). Otherwise, the engine coul dbedamaged.
XDrive to the neares tqualified specialist workshop.
XAvoid heavy loads on the engine as you do so, e.g. driving in mountainous terrain
and stop-and-go traffic.
?NThe red coolant warning lamp comes on while the engine is running. Awarning
tone als osounds.
The coolant temperature has exceeded2 48‡(120 †). The airflow to the engine
radiator may be blocked or the coolant levelm ay be too low.
GWARNING
The engine is not being cooleds ufficiently and may be damaged.
Do not drive whe nyoure ngine is overheated. This can cause some fluids which
may have leaked into the engine compartment to catch fire.
Steam from the overheated engine can also cause serious burns which can occur
just by opening the hood.
There is arisk of injury.
XObserve the additiona ldisplaym essages in the multifunction display.
XPullover and stop the vehicle safely and switch off the engine, paying attention
to road and traffic conditions.
XSecure the vehicle against rolling away (Ypag e141).
XLeav ethe vehicle and keep asafe distance from the vehicle until the engine has
cooledd own.
XCheck the coolant levela nd add coolant, observing the warning notes
(Ypag e260).
XIf you have to add coolant frequently, have the engine cooling system checked.
XMake sure that the ai rsupply to the engine radiator is not blocked, e.g. by snow,
slush or ice.
226Warning and indicator lamps in the instrument cluster
On-board computer and displays
Page 230 of 326
Tires
Warning/
indicator
lampNSignal type
Possible causes/consequence sand M
Solutions
hNThe yellow tire pressure monitor warning lamp (pressure loss/malfunction) is lit.
The tire pressure monitor hasd etecte dalossofp ressure in at leas tone of the tires.
GWARNING
Tire pressures thata retoo lo wposet he following hazards:
Rtheym ayburst, especially as the load and vehicl espeed increase
Rtheym aywear excessivel yand/or unevenly, which mayg reatlyimpai rtire trac-
tion.
Rthe drivin gcharacteristics, as well as steerin gand braking ,maybe greatly
impaired
There is ariskofana ccident.
XStop the vehicl ewithou tmaking any sudden steerin gorbraking maneuvers. Pay
attentio ntothe trafficc onditions as yo udoso.
XSecure the vehicl eagain st rolling away (Ypage 141).
XObserve the additional displa ymessage sinthe multifunctio ndisplay .
XCheck the tire sand,ifn ecessary,f ollowthe instructions for aflatt ire
(Ypage 271).
XCheck the tire pressure (Ypage 294).
XIf necessary,c orrect the tire pressure.
hNThe yellow tire pressure monitor warning lamp (pressure loss/malfunction)
flashe sfor approximately one minute and thenr emains lit.
The tire pressure monitor is faulty.
GWARNING
The system is possibl yunabl etor ecognize or register lo wtire pressure.
There is ariskofana ccident.
XObserve the additional displa ymessage sinthe multifunctio ndisplay .
XVisitaq ualified specialis tworkshop immediately.
228Warning and indicator lamps in the instrument cluster
On-board computer and displays
Page 235 of 326
Connectingamobile phone
(COMAND)
Requirements
For telephony via th eBluetooth®interface, you
require aBluetooth®-capable mobile phone. The
mobile phonem ust support Hands-Free Profile
1. 0ora bove.
Multimedia system:
XSelect VehicleQSystem Set‐tingsQActivate Bluetooth.
XActivate Bluetooth®O.
Mobilep hone:
XActivate Bluetooth®and,ifn ecessary, Blue-
tooth®visibilityf or other devices (see the
manufacturer'so peratinginstructions).
The Bluetooth
®device names for all of onem an-
ufacturer'sp roductsmightbei dentical. To
mak eitp ossible to clearly identif yyour mobile
phone, chang ethe device nam e(see th eman-
ufacturer'so peratinginstructions).
If th emobile phones upportsthe PBA P(Phone
B oo kAccess Profile) and MAP( Message
Acc ess Profile )Bluetooth
®profiles, th efollow-
ing informatio nwill be transmitte dafter you
connect:
RPhoneb ook
RCall lists
RTextmessages and e-mail
iFurther informatio nonsuitable mobile
phones can be foun dat:http://
www.mercedes-benz.com/connect
iIn th eUSA,you can get in touch witht he
Mercedes-Ben zCustome rAssistanc eCenter
on 1-800-FOR-MERCedes (1-800-367-6372 ).
In Canada, you can get in touch with the Cus-
tomer Relations Center on 1-800-387-0100.
Searchin gfor and authorizing (connect-
ing) amobile phone
Before using you rmobilep hone with the multi-
media system for the first time, you willn eed to
search for the phone and then authorize (con-
nect) it. Depending on the mobilep hone, author-
ization either takes place by means of Secure
Simple Pairing or by entering apasskey.T he
multimedia system automatically makes the procedure that is relevant for you
rmobilep hone
available. The mobilep hone is always connec-
ted automatically after authorization. Further
information on using amobilep hone with the
multimedia system (see the Digital Operator's
Manual).
If the multimedia system does not detect your
mobilep hone, this may be due to particular
security settings on you rmobilep hone (see the
manufacturer's operating instructions).
Only one mobilep hone can be connected to the
multimedia system at any one time.
Searchin gfor am obile phone
Multimedia system:
XSelect Tel/®QConn.DeviceQSearc hfor PhonesQStartSearch.
The available mobilep hones are displayed.
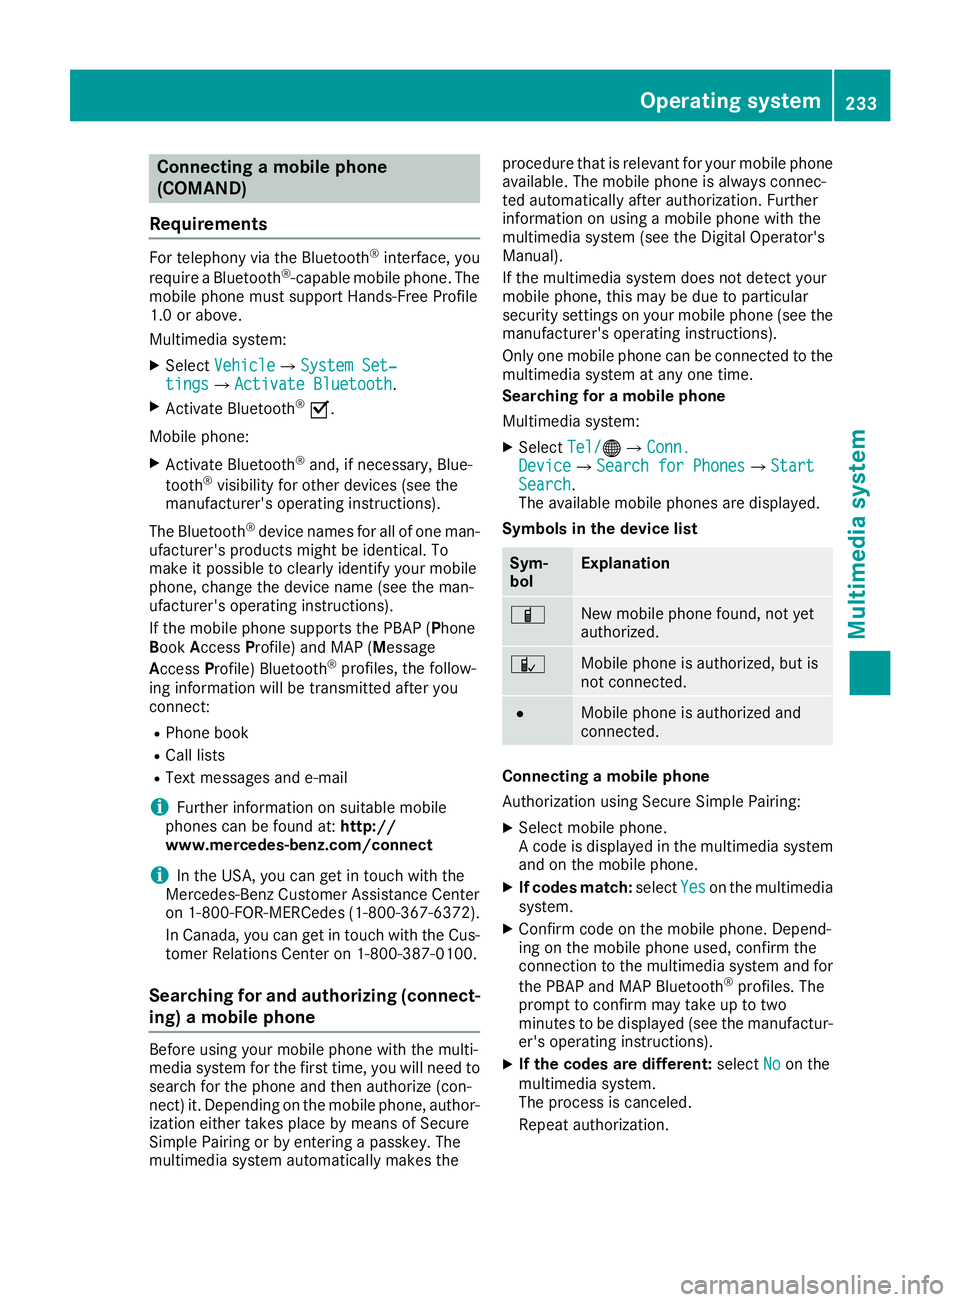
Symbols in the devicel ist
Sym-
bolExplanation
ÏNew mobilephone found, not yet
authorized.
ÑMobilep hone is authorized, but is
not connected.
#Mobilep hone is authorized and
connected.
Connecting amobile phone
Authorization using Secure Simple Pairing:
XSelect mobilep hone.
Ac ode is displaye dinthe multimedia system
and on the mobilep hone.
XIf codesmatch: select Yeson the multimedia
system.
XConfirm code on the mobilep hone. Depend-
ing on the mobilep hone used,confirm the
connection to the multimedia system and for
the PBAP and MAP Bluetooth
®profiles. The
prompt to confirm may take up to two
minutes to be displaye d(see the manufactur-
er's operating instructions).
XIf the code sare different: selectNoon the
multimedia system.
The process is canceled.
Repeat authorization.
Operating system233
Multimedia system
Z
Page 236 of 326
Authorization by enteringapasskey( passcode):
XSelect the Bluetooth®nameoft he mobile
phone.
The input menu for the passkeyisd isplayed.
XChoos eaone to sixteen-digitn umbercombi-
nation as apasskey.
XEnter the passkeyont he multimedia system.
XPress¬to confirm.
XEnter and confirm the passkeyont he mobile
phone. Depending on the mobil ephone used,
confirm the connectio ntothe multimedia sys-
tem and for the PBAP and MAP Bluetooth
®
profiles. The prompt to confirm mayt ake up
to two minutes to be displayed (se ethe man-
ufacturer's operating instructions).
Connectin gamobilephon e(Au dio 20)
Requirements
For telephony via the Bluetooth®interface, you
require at leas tone Bluetooth®-capable mobile
phone depending on us eofone-telephone
mode ortwo-telephon emode.The mobile
phone must support Hands-FreeP rofile1.0 or
above.
In two-telephon emode youc an us eallthe
functions of the multimedia system with the
main telephone .Witht he additional tele-
phone ,you can receive incoming calls.
Multimedia system:
XSelect VehicleQSystem Set‐tingsQActivate Bluetooth.
XActivate Bluetooth®O.
Mobil ephone:
XActivate Bluetooth®and ,ifn ecessary,B lue-
tooth®visibility for othe rdevice s(seet he
manufacturer's operating instructions).
The Bluetooth
®device names for al lofone man-
ufacturer's products might be identical .To
make it possibl etoclearly identify your mobile
phone, change the device nam e(seet he man-
ufacturer's operating instructions). If the mobil
ephone supports the PBAP ( Phone
Book Access Profile )and MAP ( Message
A ccess Profile) Bluetooth
®profiles, the follow-
ing informatio nist ransmitte dafteryou connect
the main telephone:
RPhone book
RCall lists
RText messages and e-mail
iFurther informatio nonsuitabl emobile
phones can be found at: http://
www.mercedes-benz.com/connect
iIn the USA, yo ucan getint ouch with the
Mercedes-Benz Customer Assistance Center
on 1-800-FOR-MERCedes (1-800-367-6372).
In Canada, yo ucan getint ouch with the Cus-
tomerR elations Center on 1-800-387-0100.
Searching for and authorizing (connect-
ing) amobile phone
Before using your mobile phone with the multi-
media system for the first time, you will need to
search for the phone and then authorize (con-
nect)i t. Depending on the mobile phone, author-
ization either takes place by means of Secure
Simple Pairing or by enteringap asskey. The
multimedia system automatically makes the
procedure that is relevant for your mobile phone
available. The mobile phone is always connec-
ted automatically after authorization. Further
information on using amobile phone with the
multimedia system (see the Digital Operator's
Manual).
If the multimedia system does not detect your
mobile phone, this may be due to particular
security settings on your mobile phone (see the
manufacturer's operating instructions).
Searching for amobile phone
Multimedia system:
XSelect Tel/®QConn. DeviceQCon‐nect New Device.
XSelectConnect via vehicle.
XSelect mobile phone.
Connecting amobile phone
XOne-telephone mode :select Main Phone.
XTwo telephone mode: selectAdditional
Phone (Incoming Calls Only)when a
mobile phone is already connected.
234Operating system
Multimedia system
Page 237 of 326
XAuthorizationusingS ecur eSimple Pai r-
ing:
Ac odeisd isplayed inthem ultimedia system
and on th emobile phone.
XConfir mcodeont hemob ilephone. Depend-
ing on th emobile phoneu sed, confirm the
connection to th emultimedia system and for
th eP BAPa nd MAPB luetooth
®profiles. The
prompt to confirm may tak euptotwo
minute stobed isplayed (see th emanufactur-
er' so peratin ginstructions).
XIfth ec odes are different :select Noon the
multimedia system.
The proces siscanceled.
Repeat authorization.
or
XAuthorizatio nbyentering apasskey
(passcode): enterany one- to sixteen-digit
number sequenc ewhichy ou have chosen
yourself int othe passke yinput menu.
XPress ¬to confirm.
XEnterand confirm th epasske yonthe mob ile
phone. Dependin gonthemob ilephoneu sed,
confirm th econnectio ntothemultimedia sys-
te ma nd for th ePBAPa nd MAPB luetooth
®
profiles. The prompt to confirm may tak eup
to two minute stobedisplayed (see th eman-
ufacturer' soperatin ginstructions).
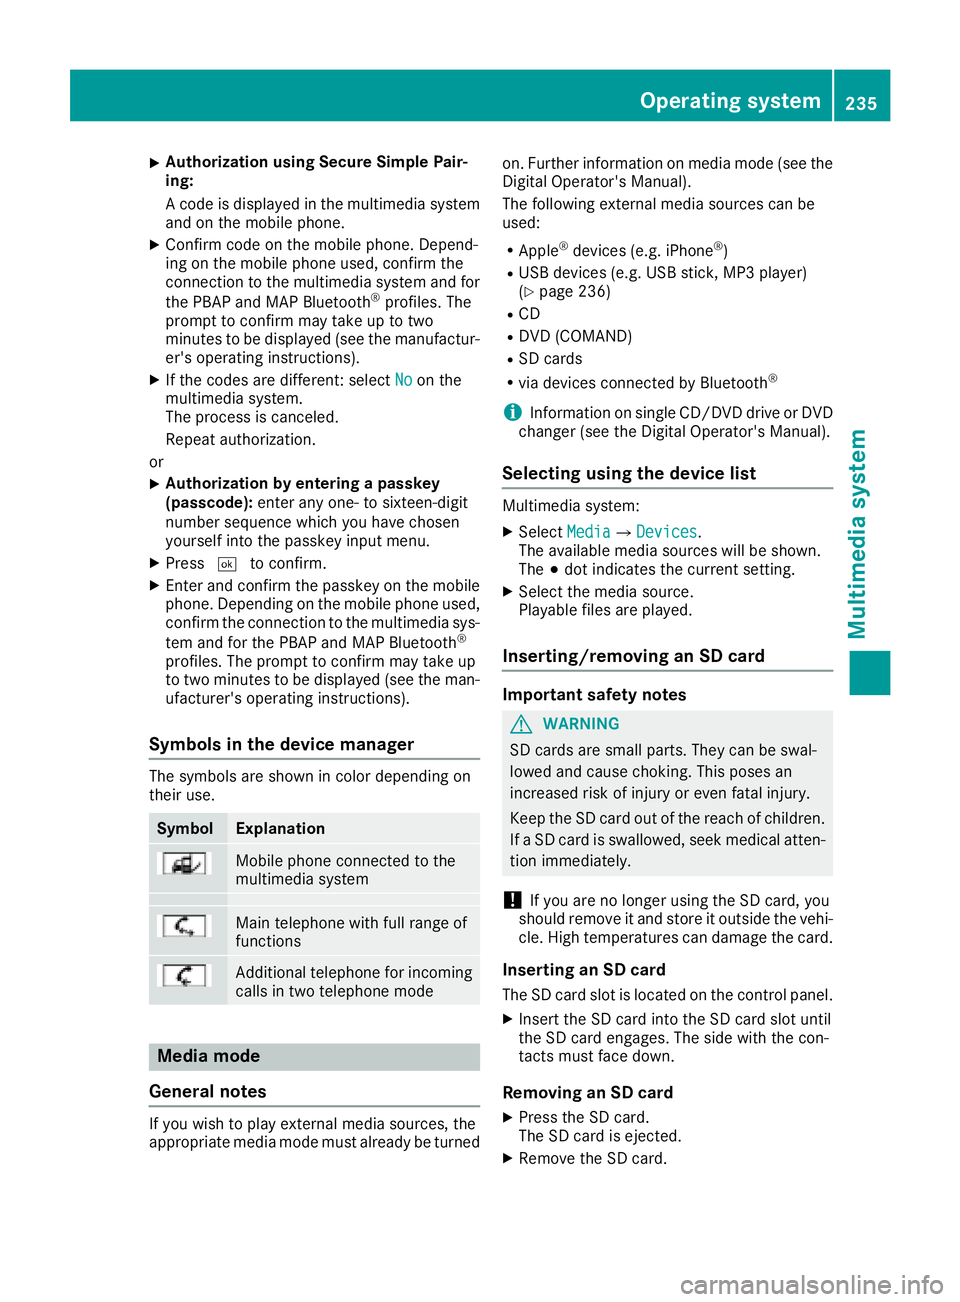
Symbols in th edevice manager
The symbols are shown in color dependingon
their use.
SymbolExplanation
Mobile phonec onnected to the
multimedia system
Main telephone withfull range of
functions
Ad ditional telephone for incoming
calls intwo telephone mode
Media mode
General notes
If you wish toplay external medi asources ,the
appropriat emediam odem ust alread ybeturned on.F
urther informatio nonmediam ode(see the
Digital Operator's Manual).
The followinge xternalmediasources can be
used:
RApple®device s(e.g. iPhone®)
RUSBd evices(e.g. USBs tick ,M P3 player)
(Ypage 236)
RCD
RDV D(COMAND)
RSD cards
Rvia device sconnected by Bluetooth®
iInformation on single CD/DV DdriveorD VD
changer (see th eDigital Operator's Manual).
Selecting usin gthe device list
Multimedia system:
XSelectMediaQDevices.
The available medi asources willbe shown.
The #dot indicates th ecurren tsetting.
XSelect th emediasource.
Playable filesare played.
Inserting/removing an SD card
Important safety notes
GWARNING
SD cardsare smal lparts. They can beswal-
lowed and caus echoking. This posesa n
increased ris kofinjury or eve nfatal injury.
Keep th eSDc ardo ut of th ereac hofc hildren.
If aS Dc ardiss wallowed, seek medical atten-
tio nimmediately.
!If you are no longer usingt heSD card,you
should remove it and store itoutside thev ehi-
cle .Hight em peratures can damag ethe card.
Insertin ganSDc ard
TheSDcardslot islocate donthecontrol panel.
XInsertt heSD cardintot he SD cardslot until
th eS Dc arde ngages.T he side withthe con-
tacts must fac edown.
Removing an SD card
XPress th eSDc ard.
The SD car disejected.
XRemo vetheS Dc ard.
Operatin gsystem235
Multimedia system
Z
Page 239 of 326
Loading guidelines
GWARNING
If objects, luggage or loads are not secured or
not secured sufficiently, they could slip, tip
over or be flun garounda nd thereb yhit vehicle
occupants. Thereisar isk of injury, particu-
larly in th eeventofs udden braking or asud-
den change in direction.
Always store object ssothatthe yc annot be
flun garound. Secure objects, luggage or
loads against slippingort ipping before the
journey.
GWARNING
Combustio nengine semit poisonous exhaust
gases such as carbon monoxide. Exhaust
gases can enter th evehicle interio rifthe
trunk lid is open when th eengine is running,
especially if th evehicle is in motion.T hereisa
risk of poisoning.
Always switch off th eengine before opening
th et runk lid. Never drivew ith thetrunk lid
open.
GWARNING
The exhaust tail pipe and tail pipe trim can
become veryh ot.Ifyou com eintoc ontact
with these partsoft hevehicle ,you could burn
yourself. Thereisar isk of injury.
Always be particularly careful aroundt he
exhaust tail pipe and th etail pipe trim. Allow
these component stocooldown before touch-
ing them.
The handlingc haracteristicsofaladen vehicle
are dependentont hedistribution of th eload
within th evehicle.
Observe th efollowing notes when loadinga nd
transporting aload:
RNever exceed th emaximum permissible
gross vehicle mass or th egross axle weight
rating for th evehicle (includingo ccupants).
The values are specified on th evehicle iden- tification plateont
heB-pillar of th edriver's
door.
RThe trunk is th epreferred place to carry
objects.
RPosition heavy loads as far forwards as pos-
sible and as low down in th etrunk as possible.
RThe load must not protrude above th eupper
edge of th eseat backrests.
RAlways place th eload against th erear or front
seat backrests .Makes ure that th eseat
backrests are securely locked int oplace.
RAlways place th eload behindu noccupied
seatsifp ossible.
RUse thecargo tie-down rings and th eparcel
net stot ransport loads and luggage.
RUse cargo tie-down rings and fastening mate-
rials appropriatef or theweight and sizeoft he
load.
RSecure th eload with sufficiently stronga nd
wear-resistant tie -downs.Pad sharpe dges for
protection.
Stowage areas
Stowage spaces
Important safety notes
GWARNING
If object sinthepassenge rcompartmenta re
stowed incorrectly, they can slide or be
thrown arounda nd hit vehicle occupants. In
addition,c upholders, open stowage spaces
and mobile phoneb racketscannot always
retain all object stheyc ontain .Thereisar isk
of injury, particularly in th eeventofs udden
braking or asudden change in direction.
RAlways stow object ssothatthe yc annot be
thrown aroundins uch situations.
RAlways makesure that objectsdonot pro-
trude fro mstowage spaces, parcel net sor
stowage nets.
RClose th elockable stowage spaces before
starting ajou rney.
RAlways stow and secure heavy, hard, poin-
ted ,sharp-edged, fragile or bulky object sin
th et runk.
Observe th eloadingg uidelines (
Ypage 237).
Stowage areas237
Stowage and features
Z
Page 242 of 326
Cargo compartment enlargement
Important safety notes
GWARNING
If th erear bench seat/rear seat and seat
backres tare no tengaged they coul dfold for-
wards ,e.g.w hen braking suddenly or in the
event of an accident.
RThe vehicle occupant would thereby be
pushedi ntot he seat belt by th erear bench
seat/rear seat or by th eseat backrest. The
seat belt can no longer offer th eintended
leve lofp rotection and coul devenc ause
injuries.
RObject sorloads in th etrunk canno tbe
restraine dbytheseat backrest.
Thereisani ncreased ris kofinjury.
Before every trip, mak esure that th eseat
backrests and th erear bench seat/rear seat
are engaged.
!Before folding th ebackres tintherear com-
partmen tforwards ,makes ure that th erear
compartmen tarmres tand th ecupholder are
folded in. They may otherwise be damaged.
Observ ethe loadingg uidelines(
Ypage 237).
The left-hand and right-handr ear seat backrests
can be folded forwards separately to increase
th et runk capacity.
Folding th erears eat backres tforwards
and back
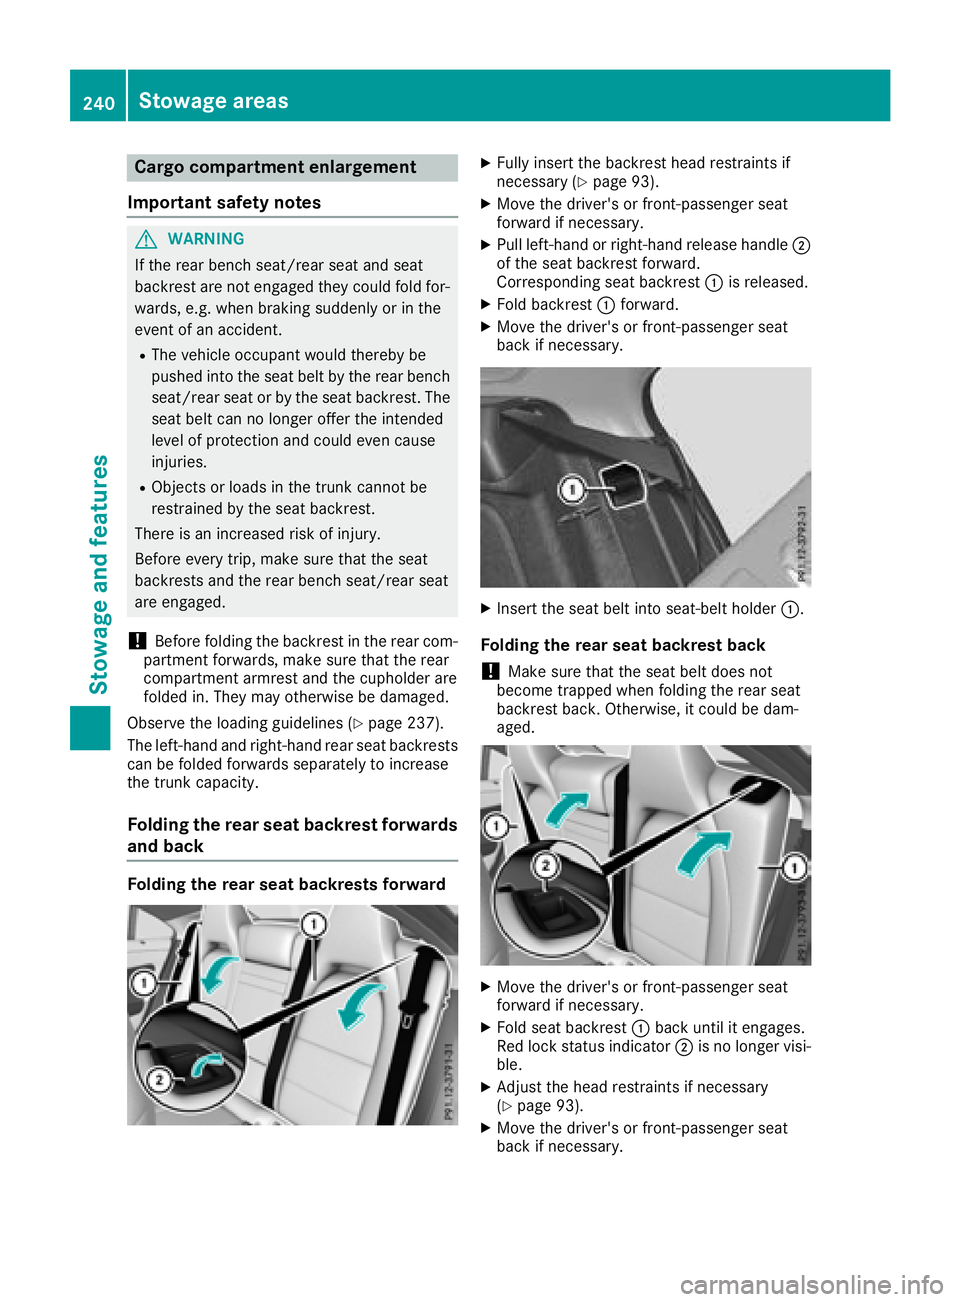
Folding th erears eat backrests forward
XFully insert th ebackres thead restraint sif
necessary (Ypage 93).
XMovet hedriver'sorf ront-passenger seat
forward if necessary.
XPull left-hand or right-handr elease handle;
of th eseat backres tforward.
Corresponding seat backrest :is released.
XFoldb ackrest :forward.
XMovet hedriver'sorf ront-passenger seat
back if necessary.
XInsertt heseat belt int oseat-belt holder :.
Folding therears eat backres tback
!Makes ure that th eseat belt does not
become trapped when folding th erear seat
backres tback .Otherwise, it coul dbedam-
aged.
XMovet hedriver'sorf ront-passenger seat
forward if necessary.
XFol dseat backrest :back until it engages.
Red locks tatus indicator ;is no longer visi-
ble.
XAdjust th ehead restraint sifnecessary
(Ypage 93).
XMovet hedriver'sorf ront-passenger seat
back if necessary.
240Stowage areas
Stowage and features
Page 243 of 326
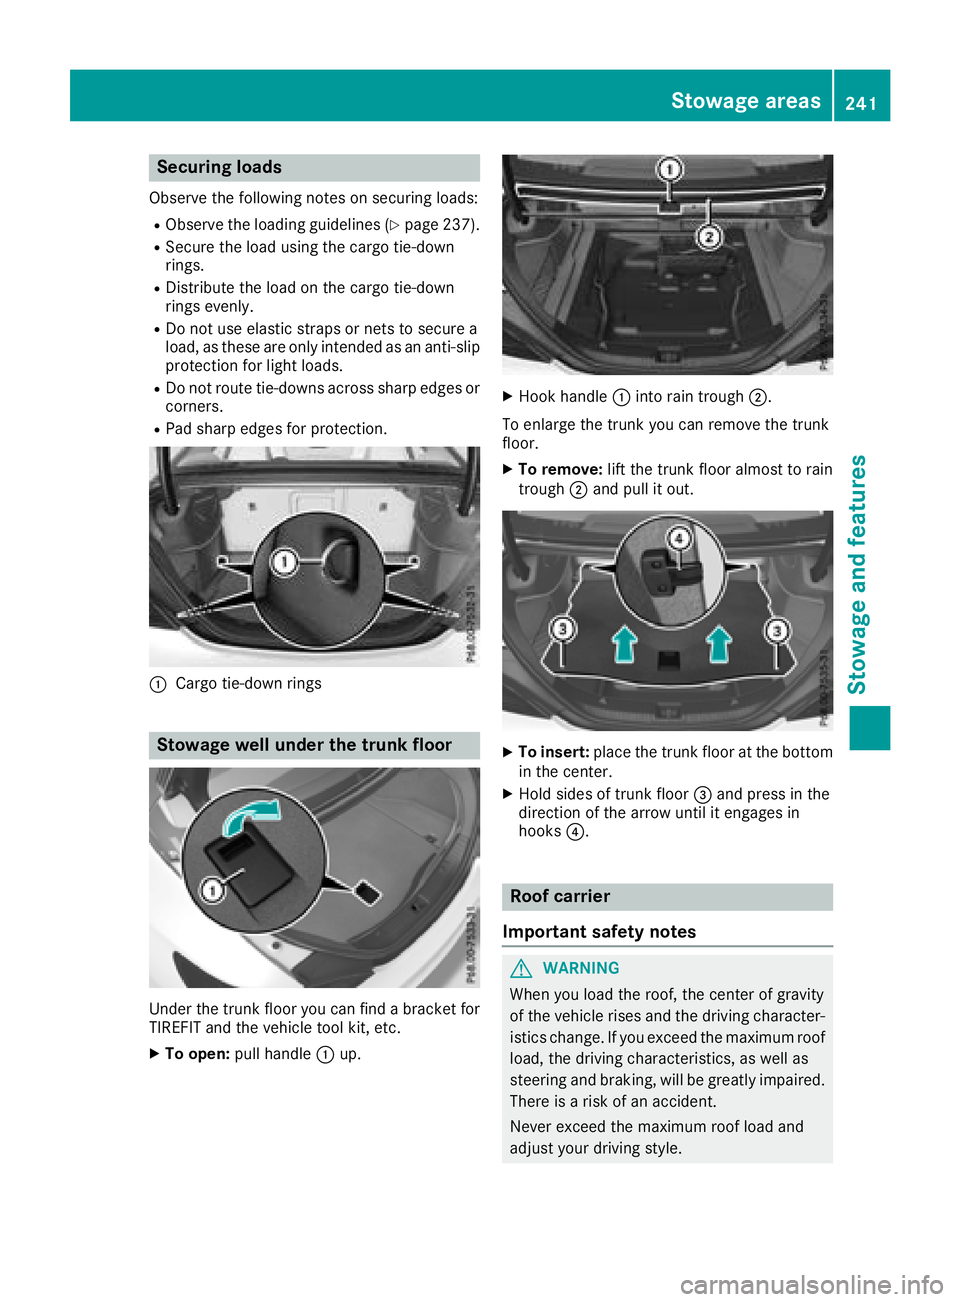
Securing loads
Observe the following notes on securing loads:
RObserve the loading guidelines (Ypage 237).
RSecure the load using the cargo tie-down
rings.
RDistribute the load on the cargo tie-down
rings evenly.
RDo not use elastic straps or nets to secure a
load, as these are only intended as an anti-slip
protection for light loads.
RDo not route tie-downs across sharp edges or
corners.
RPad sharp edges for protection.
:Cargo tie-down rings
Stowage well under the trunk floor
Under the trunk floor you can findabracket for
TIREFIT and the vehicle tool kit, etc.
XTo open: pull handle :up.
XHook handle :into rain trough ;.
To enlarge the trunk you can remove the trunk
floor.
XTo remove: lift the trunk floor almost to rain
trough ;and pull it out.
XTo insert: place the trunk floor at the bottom
in the center.
XHold sides of trunk floor =and press in the
direction of the arrow until it engages in
hooks ?.
Roof carrier
Important safety notes
GWARNING
When you load the roof, the center of gravity
of the vehicle rises and the driving character-
istics change. If you exceed the maximum roof
load, the driving characteristics, as well as
steering and braking, will be greatly impaired.
There is arisk of an accident.
Never exceed the maximum roof load and
adjust your driving style.
Stowage areas241
Stowage and features
Z