2018 MERCEDES-BENZ CLA COUPE steering
[x] Cancel search: steeringPage 94 of 326
Vehicles with the seatingcom fort pack-
age
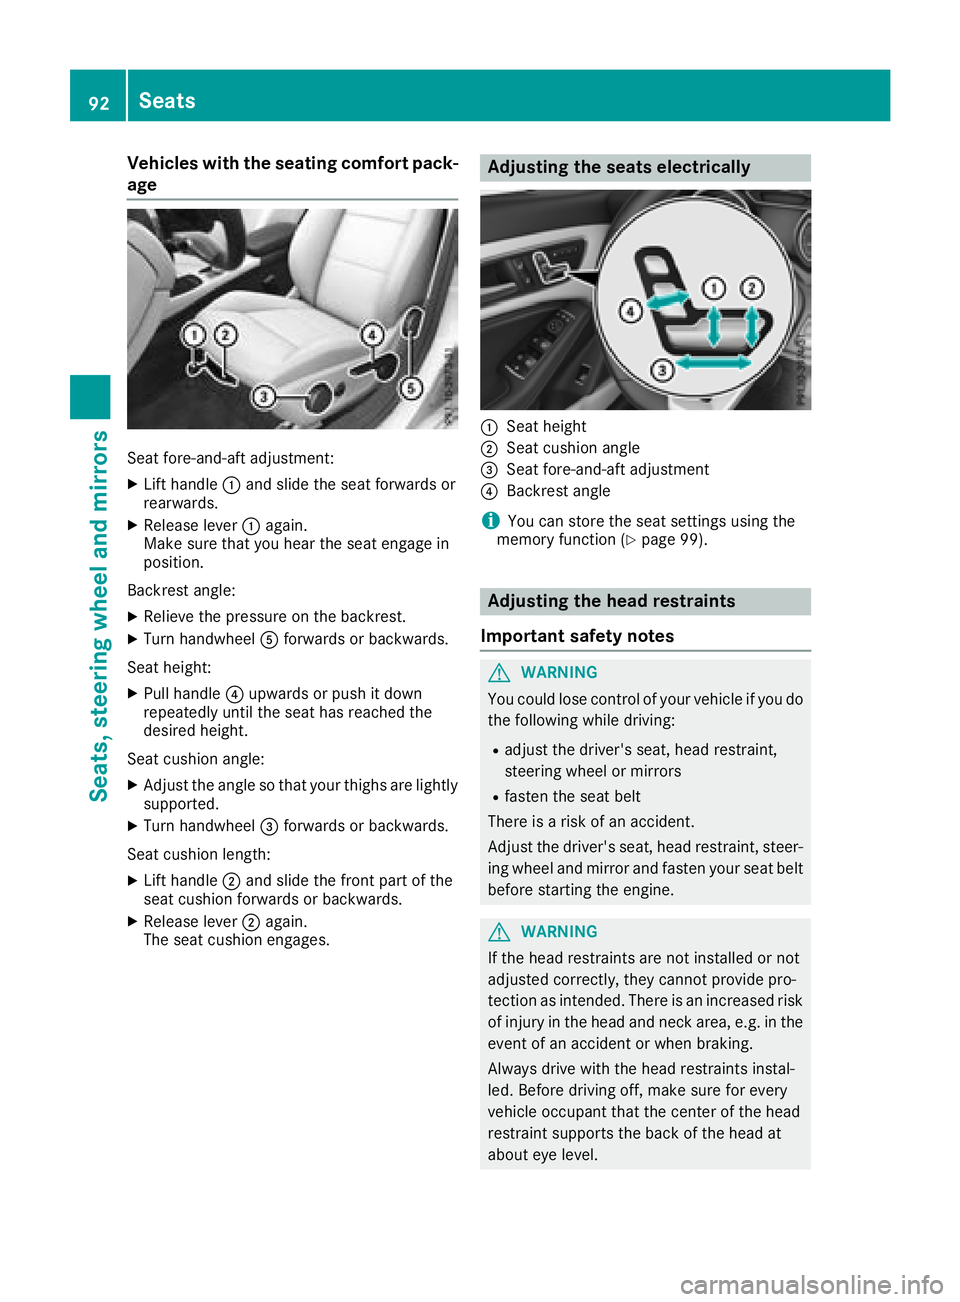
Sea tfore-and-aft adjustment:
XLif th andle :and slid ethe sea tforward sor
rearwards.
XReleas elever : again.
Make sure thaty ouhea rthe sea tengage in
position.
Backrest angle:
XRelieve the pressure on the backrest.
XTurn handwheel Aforward sorbackwards.
Sea theight:
XPull handle ?upwards or push it down
repeatedly unti lthe sea thas reachedt he
desired height.
Sea tcushion angle:
XAdjust the angle so thaty ourthighs are lightly
supported.
XTurn handwheel =forward sorbackwards.
Sea tcushion length:
XLifth andle ;and slid ethe front part of the
sea tcushion forward sorbackwards.
XReleas elever ; again.
The sea tcushion engages.
Adjustin gthe seats electrically
:Sea theight
;Sea tcushion angle
=Sea tfore-and-aft adjustment
?Backrest angle
iYo uc an storet he seatsettings using the
memory functio n(Ypage 99).
Adjustingthe hea drestraints
Important safety notes
GWARNING
Yo uc ould lose controlofy ourvehicl eifyoudo
the following whil edriving:
Radjus tthe driver'ss eat, headrestraint,
steering whee lormirrors
Rfasten the sea tbelt
There is ariskofana ccident.
Adjust the driver'ss eat, headrestraint, steer-
ing whee land mirror and fasten your sea tbelt
before starting the engine.
GWARNING
If the hea drestraints are not installe dornot
adjusted correctly, they canno tprovid epro-
tection as intended. There is an increased risk
of injury in the hea dand neck area, e.g .inthe
event of an accident or when braking.
Alway sdrive with the hea drestraints instal-
led. Before driving off, make sure for every
vehicl eoccupant thatt he centerofthe head
restraint supports the back of the hea dat
aboute yelevel.
92Seats
Seats, steering wheel andmirrors
Page 95 of 326
Using the fore-and-aft adjustment, adjust the
head restraint so that it is as close as possible to
your head.
General notes
For vehicles with sports seats you cannot adjust
the front head restraints or the outer rear head
restraints.
Adjusting the head restraints manually
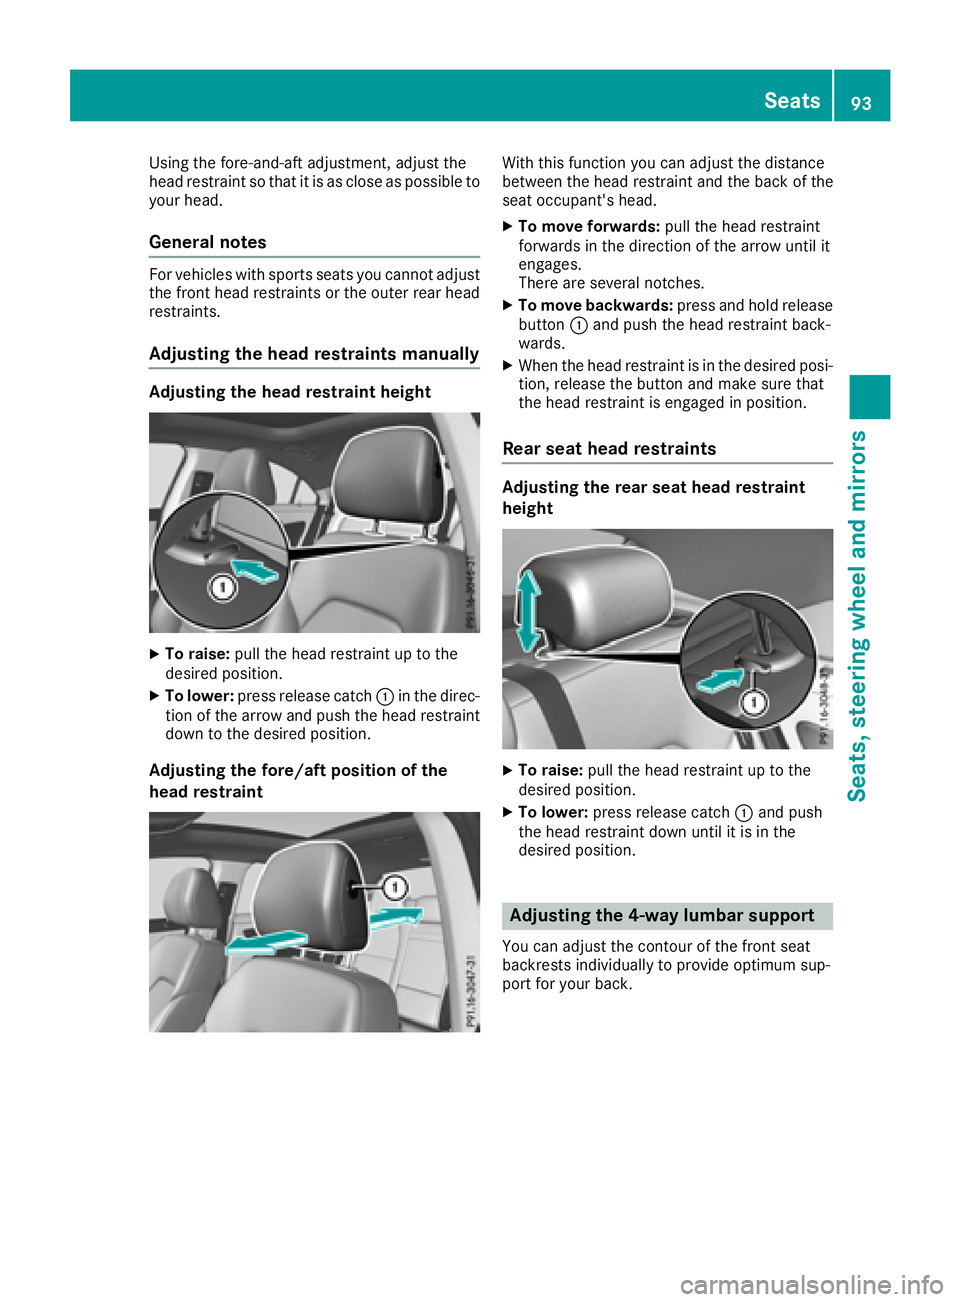
Adjusting the head restraint height
XTo raise:pull the head restraint up to the
desired position.
XTo lower: press release catch :in the direc-
tion of the arrow and push the head restraint
down to the desired position.
Adjusting the fore/aft position of the
head restraint
With this function you can adjust the distance
between the head restraint and the back of the
seat occupant's head.
XTo move forwards: pull the head restraint
forwards in the direction of the arrow until it
engages.
There are several notches.
XTo move backwards: press and hold release
button :and push the head restraint back-
wards.
XWhen the head restraint is in the desired posi-
tion, release the button and make sure that
the head restraint is engaged in position.
Rear seat head restraints
Adjusting the rear seat head restraint
height
XTo raise: pull the head restraint up to the
desired position.
XTo lower: press release catch :and push
the head restraint down until it is in the
desired position.
Adjusting the 4-way lumbar support
You can adjust the contour of the front seat
backrests individually to provide optimum sup-
port for your back.
Seats93
Seats, steering wheela nd mirrors
Z
Page 96 of 326
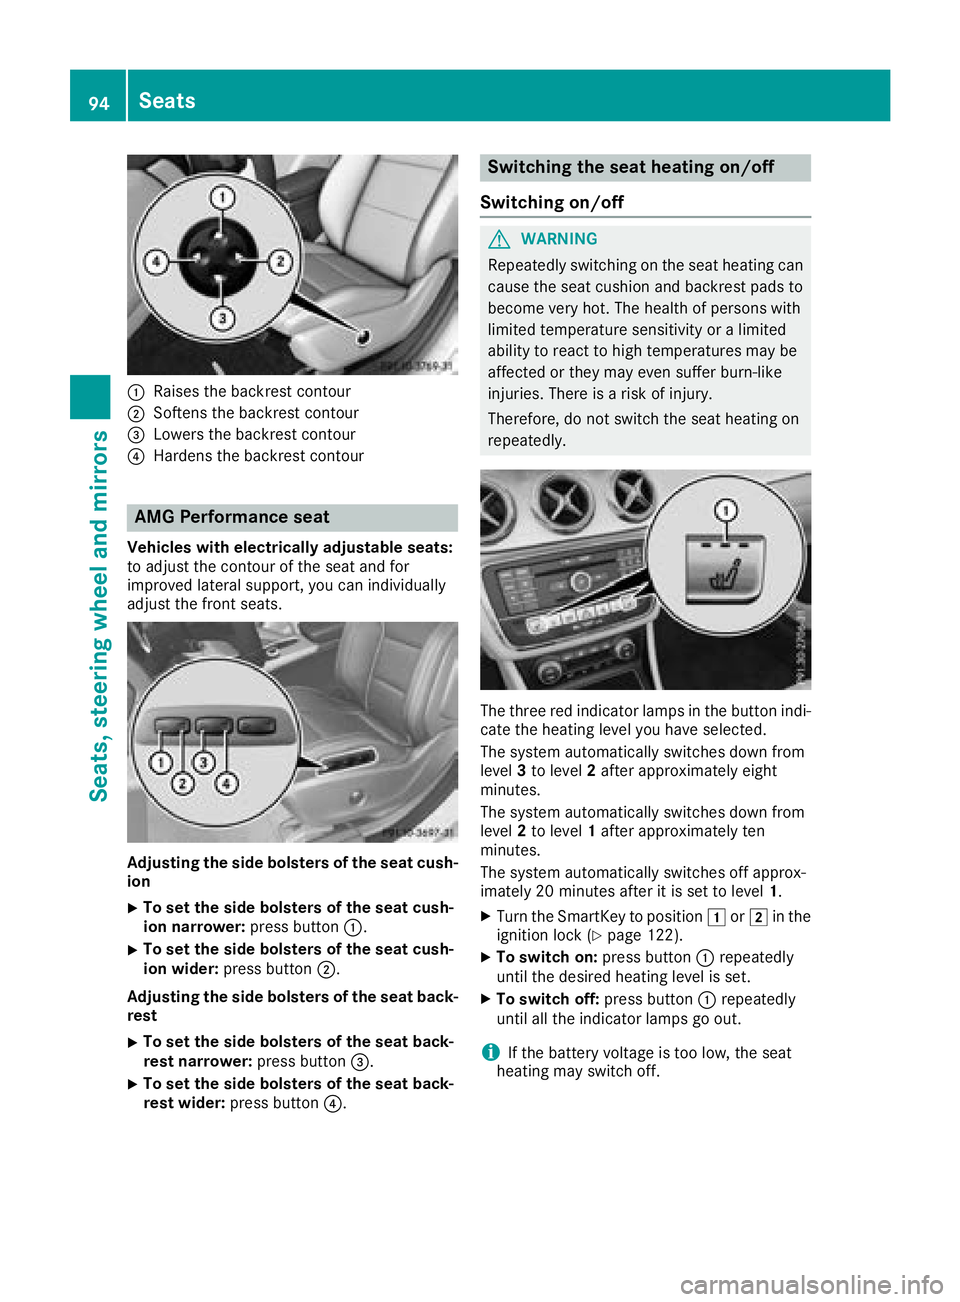
:Raises thebackrest contour
;Soften sthe backrest contour
=Lowers th ebackrest contour
?Harden sthe backrest contour
AMG Performance seat
Vehicles with electricall yadjusta bles eats :
to adjust th econtou roftheseat and for
improve dlateral support ,you can individually
adjust th efront seats.
Adjusting th esideb olsters of th eseatc ush -
ion
XTo set th esideb olsters of th eseatc ush -
ion narrower: press button:.
XTo set th esideb olsters of th eseatc ush -
ion wider: press butto n;.
Adjusting th esideb olsters of th eseatb ack -
res t
XTo set th esideb olsters of th eseatb ack -
res tnarrower: press butto n=.
XTo set th esideb olsters of th eseatb ack -
res twider: press butto n?.
Switchin gthe seath eating on/off
Switchin gon/off
GWARNIN G
Repeatedly switching on th eseat heating can
caus ethe seat cushion and backrest pads to
become ver yhot.T he healt hofpersonswith
limite dtem perature sensitivit yoralimited
abilit ytor eac ttoh igh temperatures may be
affecte dortheym ay eve nsuffer burn-like
injuries. There is ariskofi njury.
Therefore ,donotswitch th eseat heating on
repeatedly.
The three red indicator lamp sinthebutto nindi-
cat ethe heating level you hav eselected.
The system automatically switches down from
level 3to level 2after approximately eigh t
minutes.
The system automatically switches down from
level 2to level 1after approximately te n
minutes.
The system automatically switches off approx -
imately 20 minute safter it is set to level 1.
XTurn theSma rtKey to position 1or2 in th e
ignition loc k(Ypage 122).
XTo switch on: press button: repeatedly
until th edesired heating level is set .
XTo switch off:press butto n: repeatedly
until all th eindicator lamp sgoout.
iIf th ebattery voltag eistoolow, th eseat
heating may switch off .
94Seats
Seats,steering wheel and mirrors
Page 97 of 326
Problems with the seat heating
ProblemPossible causes/consequences andMSolutions
The seat heating has
switched off prematurely
or cannot be switched
on.The on-board voltage is too low because too many electrical consum-
ers are switched on.
XSwitch off electrical consumers that you do not need, such as the
rear window defroster or interior lighting.
Once the battery is sufficiently charged, the seat heating will switch
back on automatically.
Steering wheel
Important safety notes
GWARNING
You could lose control of your vehicle if you do the following while driving:
Radjust the driver's seat, head restraint,
steering wheel or mirrors
Rfasten the seat belt
There is arisk of an accident.
Adjust the driver's seat, head restraint,s teer-
ing wheel and mirror and fasten your seat belt before startin gthe engine.
GWARNING
Children could injure themselves if they
adjust the steering wheel. There is arisk of
injury.
When leaving the vehicle, always take the
SmartKey with you and lock the vehicle. Never
leave children unsupervised in the vehicle.
Adjusting the steering wheel
GWARNING
If the steering wheel is unlocked while the
vehicle is in motion, it could change position
unexpectedly. This could cause you to lose
control of the vehicle. There is arisk of an
accident.
Before startin goff, make sure the steering
wheel is locked. Never unlock the steering
wheel while the vehicle is in motion.
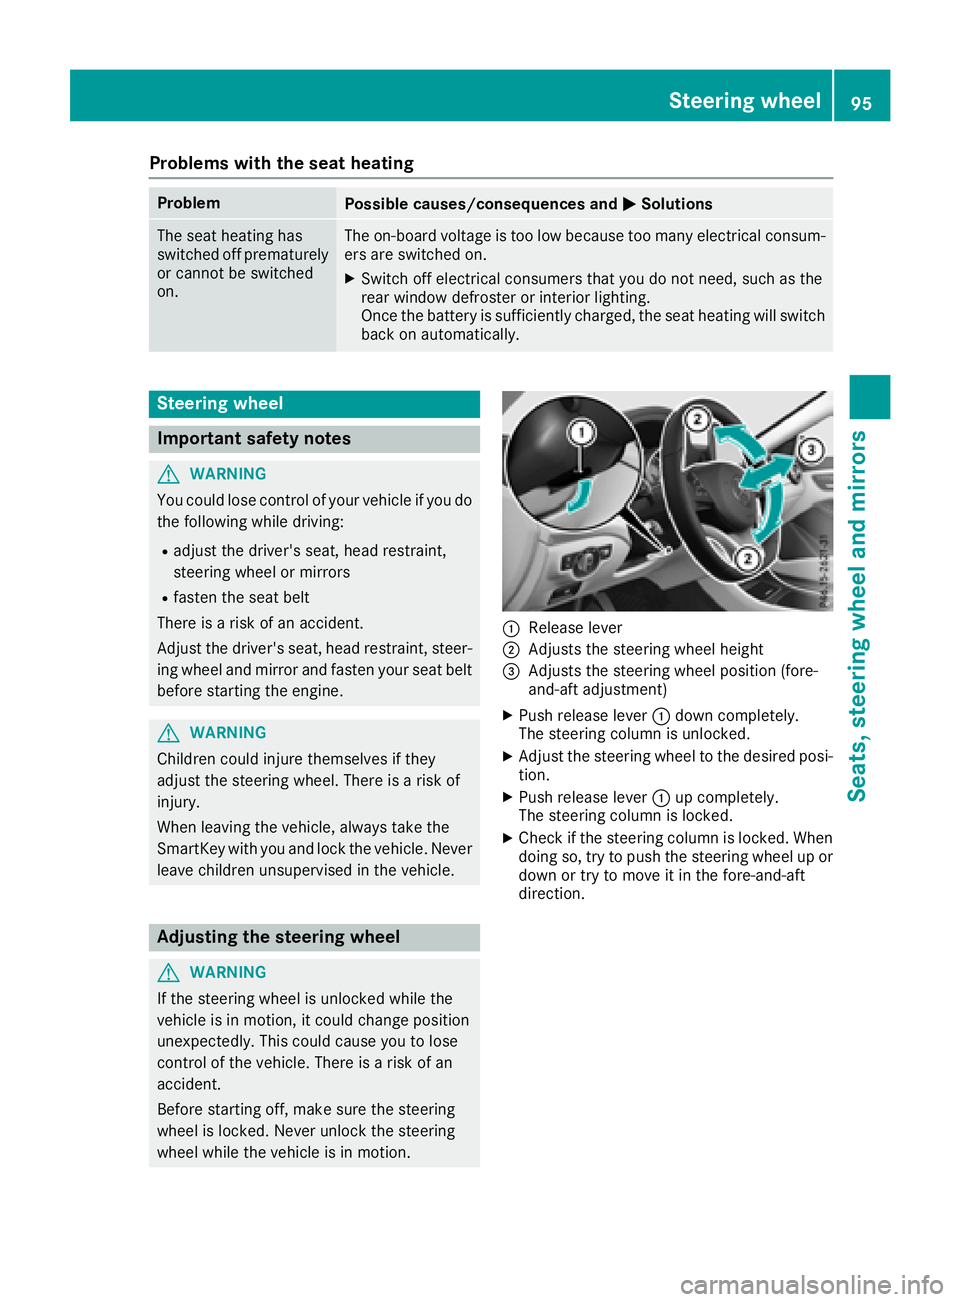
:Release lever
;Adjustst he steering wheel height
=Adjuststhe steering wheel position (fore-
and-aft adjustment)
XPush release lever :down completely.
The steering column is unlocked.
XAdjust the steering wheel to the desired posi-
tion.
XPush release lever :up completely.
The steering column is locked.
XCheck if the steering column is locked. When
doing so, try to push the steering wheel up or down or try to move it in the fore-and-aft
direction.
Steering wheel95
Seats, steering wheela nd mirrors
Z
Page 98 of 326
Mirrors
Rear-view mirror
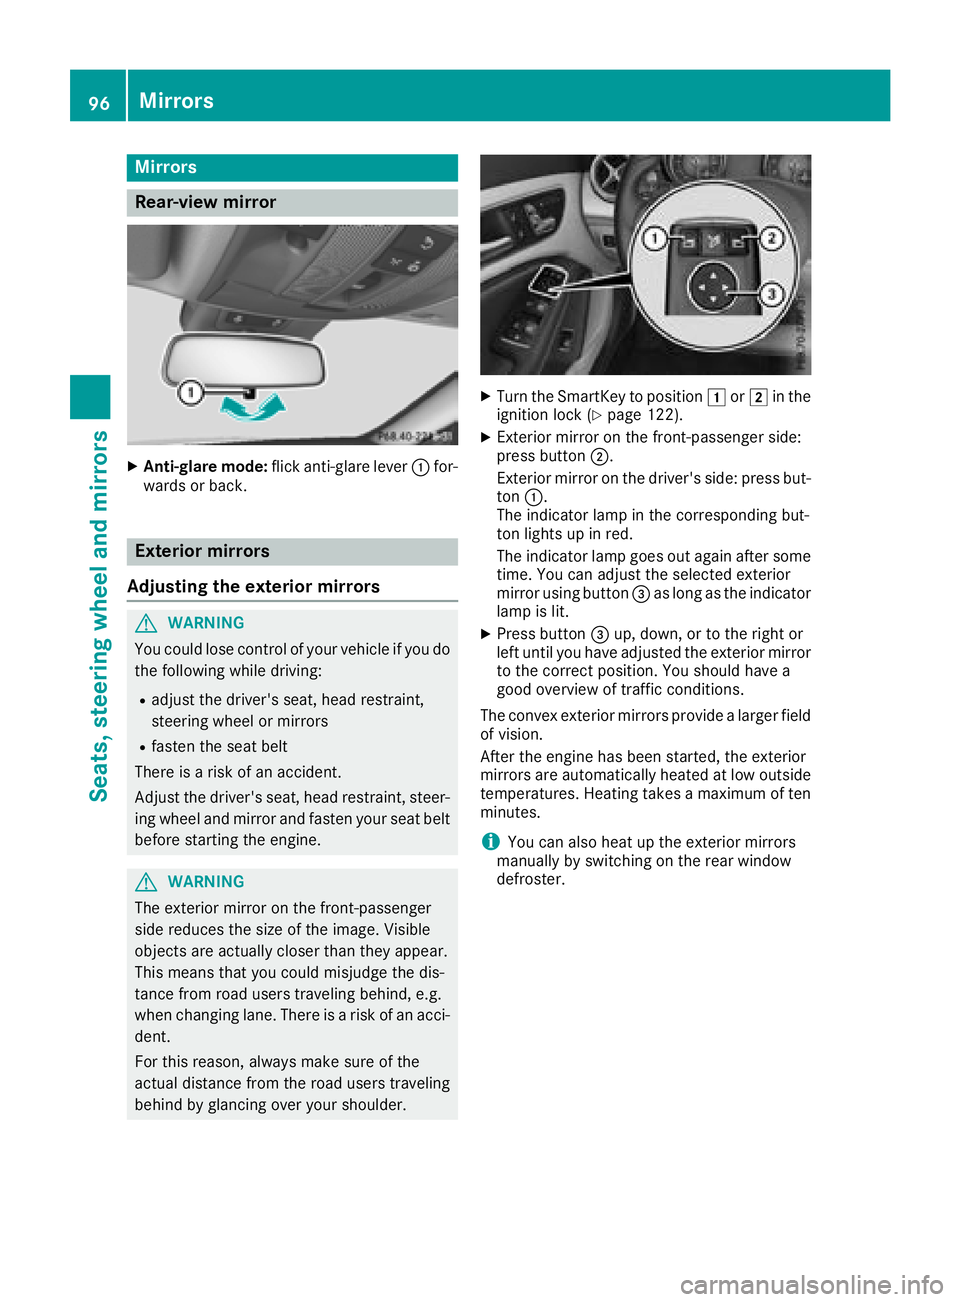
XAnti-glare mode:flick anti-glare lever :for-
wards or back.
Exterior mirrors
Adjusting the exterior mirrors
GWARNING
You coul dlose control of you rvehicleify ou do
the following while driving:
Radjust the driver's seat, headr estraint,
steering wheelorm irrors
Rfasten the seat belt
There is arisk of an accident.
Adjust the driver's seat, headr estraint, steer-
ing wheela nd mirror and fasten you rseat belt
before starting the engine.
GWARNING
The exterior mirror on the front-passenger
side reduces the size of the image. Visible
objects are actually closer than they appear.
This means that you coul dmisjudge the dis-
tance from road users traveling behind, e.g.
when changing lane .There is arisk of an acci-
dent.
For this reason, alway smake sure of the
actua ldistance from the road users traveling
behind by glancing over you rshoulder.
XTurn the SmartKey to position 1or2 in the
ignitio nlock (Ypage1 22).
XExterior mirror on the front-passenger side:
press button ;.
Exterior mirror on the driver's side:p ress but-
ton :.
The indicator lamp in the corresponding but-
ton lights up in red.
The indicator lamp goes out again after some
time. You can adjust the selected exterior
mirror using button =as long as the indicator
lamp is lit.
XPress button =up, down, or to the right or
left until you have adjusted the exterior mirror
to the correct position. You should have a
good overview of traffic conditions.
The convex exterior mirrors provide alarger field
of vision.
After the engine has been started, the exterior
mirrors are automatically heated at low outside
temperatures. Heating takes amaximu moften
minutes.
iYou can als oheatu pthe exterior mirrors
manually by switching on the rear window
defroster.
96Mirrors
Seats, steering wheel and mirrors
Page 99 of 326
Folding theexterior mirrors in or out
electrically
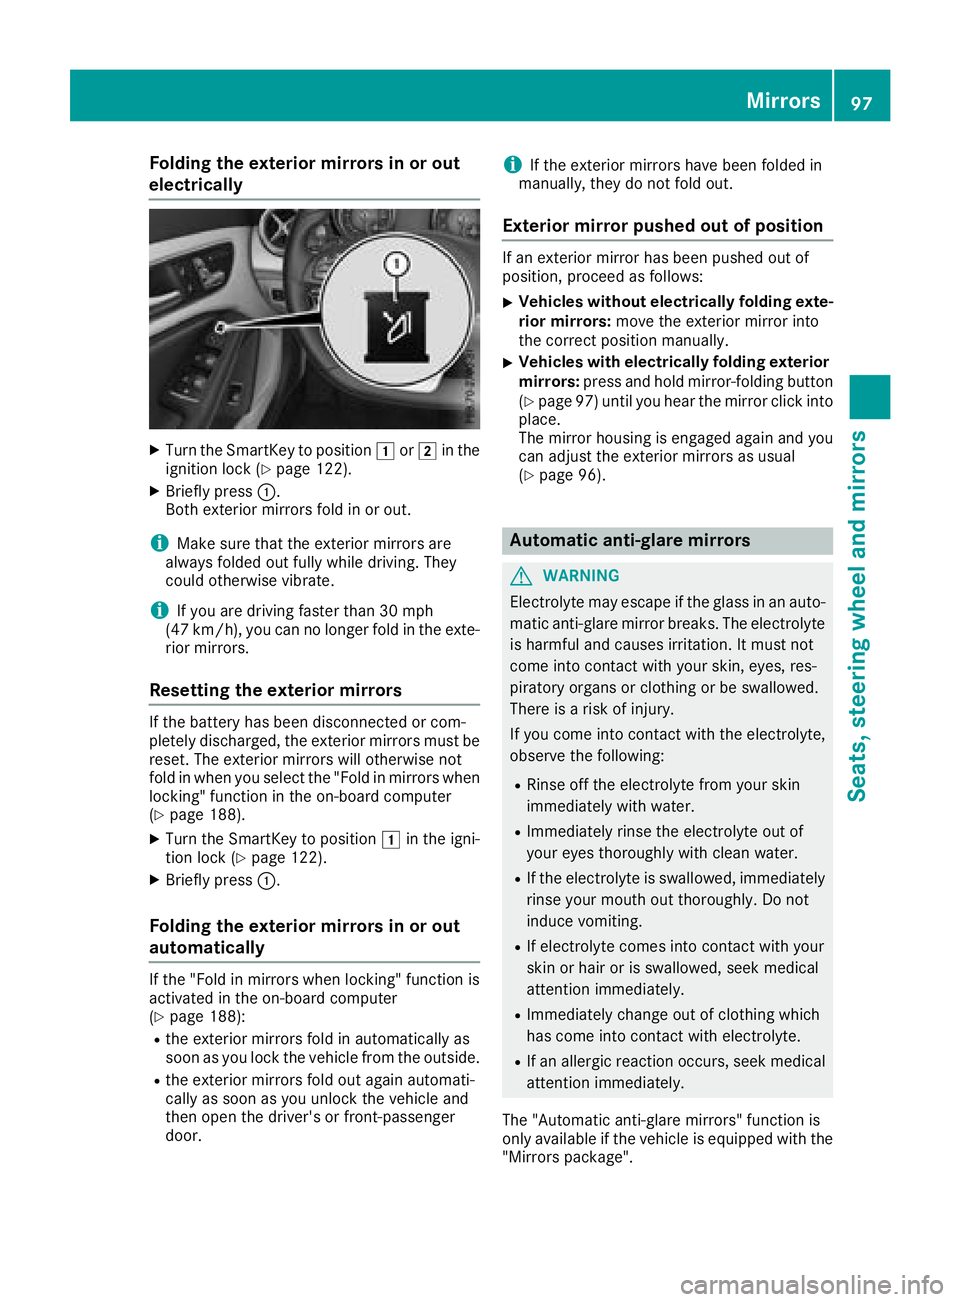
XTurn th eSma rtKey to position 1or2 in th e
ignition loc k(Ypage 122).
XBriefly press :.
Both exterio rmirror sfoldinoro ut.
iMak esure that th eexter iorm irror sare
always folded out fully while driving .They
could otherwise vibrate .
iIf you are driving fastertha n30m ph
(47 km/h), you can no longer fol dintheexte -
rio rm irrors.
Resetting th eexterior mirrors
If th ebattery has been disconnected or com-
pletely discharged, th eexter iorm irror smust be
reset .The exterio rmirror swill otherwise no t
fol dinw hen you select th e"Fold in mirror swhen
locking" function in th eon-bo ard computer
(
Ypage 188).
XTurn th eSmartKey to position 1in th eigni-
tion loc k(Ypage 122).
XBriefly press :.
Folding theexterior mirrors in or out
automatically
If th e"Fold in mirror swhen locking" function is
activated in th eon-bo ard computer
(
Ypage 188):
Rth ee xter iorm irror sfoldina utomatically as
soo nasy ou loc kthe vehicl efromt heoutside .
Rthee xter iorm irror sfoldo ut again automati-
call yass oonasy ou unlock th evehicl eand
then open th edriver' sorf ront-pa ssenger
door .
iIf theexter iorm irror shave been folded in
manually, they do no tfoldo ut.
Exterior mirror pushed out of position
If an exterio rmirror has been pushed out of
position ,procee dasfollows :
XVehicles without electricall yfolding exte-
rior mirrors :mov ethe exterio rmirror int o
th ec orre ct position manually.
XVehicles with electricall yfolding exterior
mirrors :press and hold mirror-foldin gbutto n
(
Ypage 97 )until yo uhearthe mirror click into
place.
The mirror housing is engaged agai nand you
can adjus tthe exterio rmirrors as usual
(
Ypage 96).
Automati canti-glare mirrors
GWARNING
Electrolyte maye scape if the glassinanauto-
matic anti-glare mirror breaks .The electrolyte
is harmfula nd causes irritation. It must not
come into contact with your skin, eyes, res-
piratory organs or clothing or be swallowed.
There is ariskofi njury.
If yo ucome into contact with the electrolyte,
observe the following:
RRinse off the electrolyte from your skin
immediatelyw ithw ater.
RImmediately rins ethe electrolyte outo f
your eyes thoroughl ywithc lean water.
RIf the electrolyte is swallowed, immediately
rins eyourm outh outt horoughly. Do not
induce vomiting.
RIf electrolyte comesi nto contact with your
skinorh airoriss wallowed, seekm edical
attentio nimmediately.
RImmediately change outofc lothing which
hasc ome into contact with electrolyte.
RIf an allergicr eactionoccurs, see kmedical
attentio nimmediately.
The "Automatic anti-glare mirrors"f unctionis
onlya vailable if the vehicl eisequippe dwitht he
"Mirrors package".
Mirrors97
Seats, steering wheel andmirrors
Z
Page 100 of 326
The rear-view mirror and the exterior mirror on
the driver's side automatically go into anti-glare
mode if:
Rthe ignition is switched on and
Rincident light from headlamps strikes the sen-
sor in the rear-view mirror
The mirrors do not go into anti-glare mode if
reverse gear is engaged or if the interior lighting
is switched on.
Parking position for the exterior mir-
ror on the front-passenger side
Setting and storing the parking position
You can set the front-passenger side exterior
mirror such that you can see the rear wheel on
that side as soon as you engage reverse gear.
You can store this position.
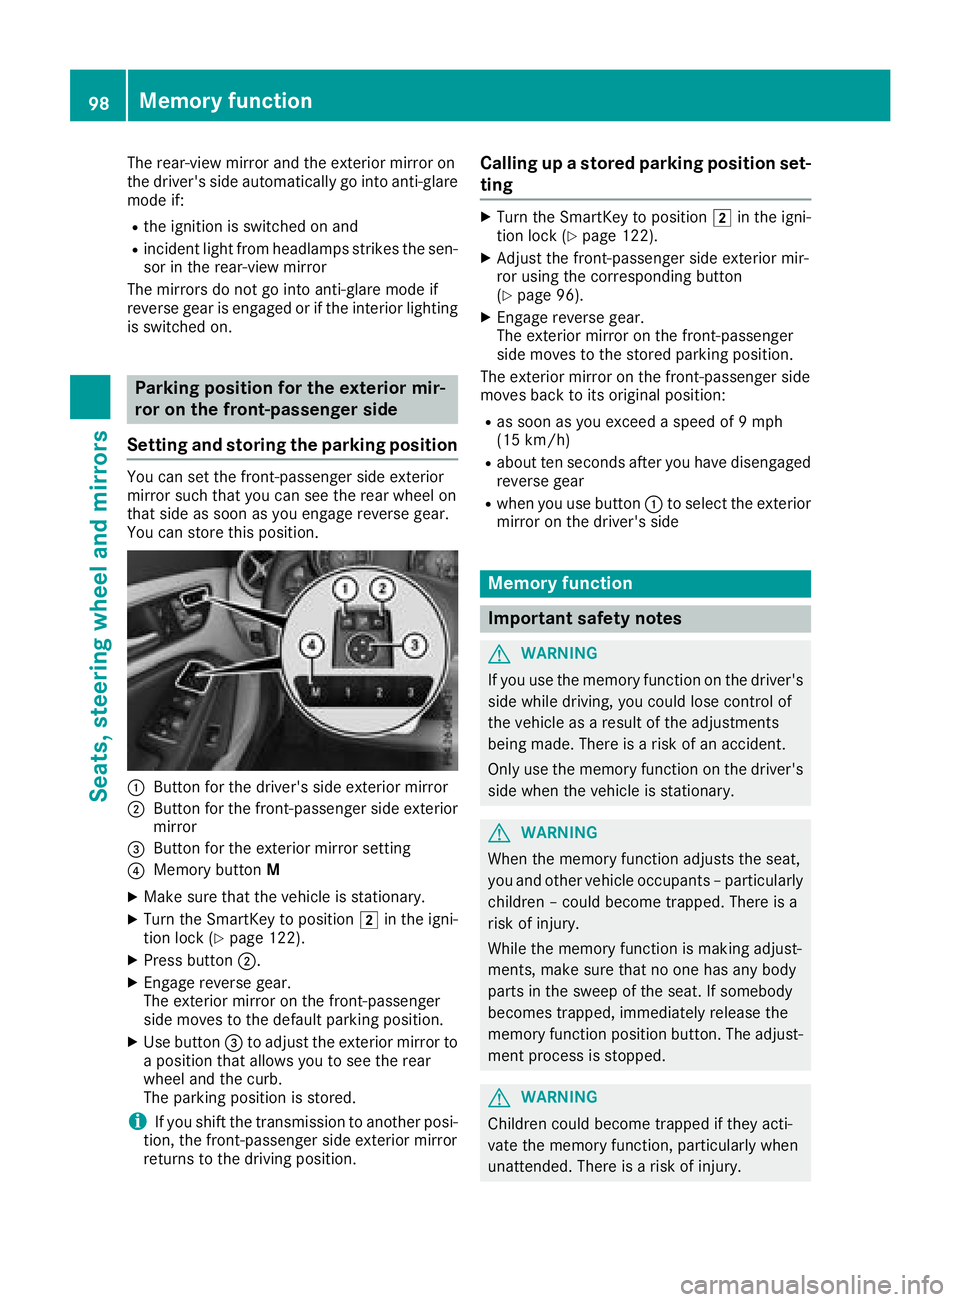
:Button for the driver's side exterior mirror
;Button for the front-passenger side exterior
mirror
=Button for the exterior mirror setting
?Memory button M
XMake sure that the vehicle is stationary.
XTurn the SmartKey to position 2in the igni-
tion lock (Ypage 122).
XPress button ;.
XEngage reverse gear.
The exterior mirror on the front-passenger
side moves to the default parking position.
XUse button=to adjust the exterior mirror to
ap osition that allows you to see the rear
wheel and the curb.
The parking position is stored.
iIf you shift the transmission to another posi-
tion, the front-passenger side exterior mirror
return stothe driving position.
Calling up astored parking position set-
ting
XTurn the SmartKey to position 2in the igni-
tion lock (Ypage 122).
XAdjust the front-passenger side exterior mir-
ror using the corresponding button
(
Ypage 96).
XEngage reverse gear.
The exterior mirror on the front-passenger
side moves to the stored parking position.
The exterior mirror on the front-passenger side
moves back to its original position:
Ras soon as you exceed aspeed of 9mph
(15 km/h)
Rabout ten seconds after you have disengaged
reverse gear
Rwhen you use button :to select the exterior
mirror on the driver's side
Memory function
Important safety notes
GWARNING
If you use the memory function on the driver's side while driving, you could lose control of
the vehicle as aresult of the adjustments
being made. There is arisk of an accident.
Only use the memory function on the driver's
side when the vehicle is stationary.
GWARNING
When the memory function adjusts the seat,
you and other vehicle occupants–p articularly
children –could become trapped. There is a
risk of injury.
While the memory function is making adjust-
ments, make sure that no one has any body
parts in the sweep of the seat. If somebody
becomes trapped, immediately release the
memory function position button .The adjust-
ment process is stopped.
GWARNING
Children could become trapped if they acti-
vate the memory function, particularly when
unattended. There is arisk of injury.
98Memory function
Seats, steering wheel and mirrors
Page 101 of 326
When leaving the vehicle, alwaystake the
SmartKey with you and lock the vehicle. Never
leave children unsupervised in the vehicle.
The memory function can be used at any time,
e.g. even when the SmartKey is not in the igni-
tion lock.
Storing settings
With the memory function, you can store up to
three differents ettings, e.g. for three different
people.
The following settings are stored as asingle
memory preset:
Rseat and backres tposition
Rdriver's side: position of the exterior mirrors
on the driver's and front-passenger sides
XAdjust the seat (Ypage 92).
XAdjust the exterior mirror on the driver's side
(Ypage 96).
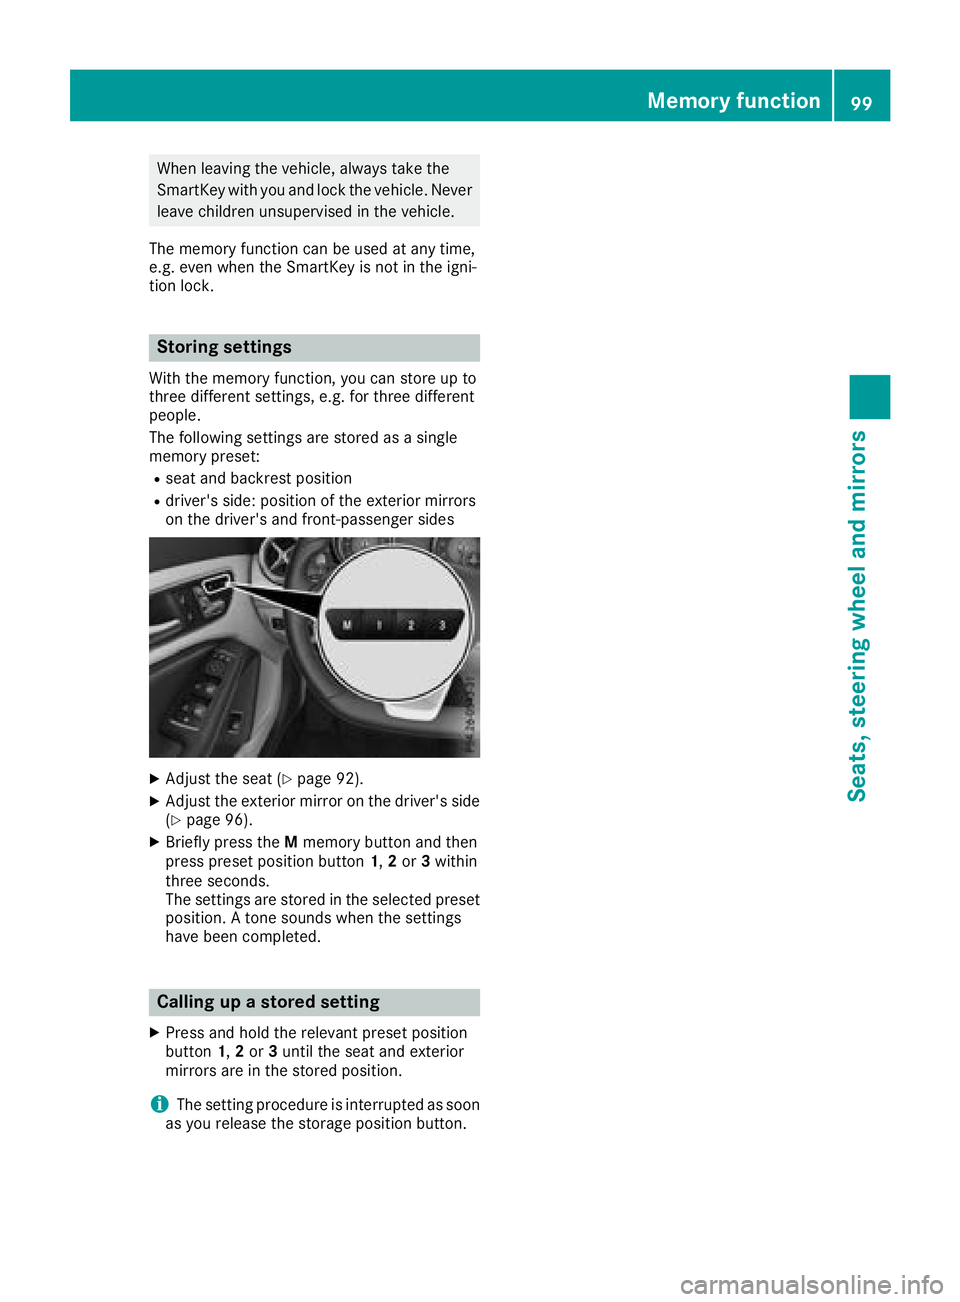
XBriefly press the Mmemory button and then
press preset position button 1,2or 3within
three seconds.
The settings are stored in the selected preset
position. Atones ounds when the settings
have been completed.
Calling up astored setting
XPress and hold the relevant preset position
button 1,2or 3until the seat and exterior
mirrors are in the stored position.
iThe setting procedure is interrupted as soon
as you release the storage position button.
Memoryf unction99
Seats, steering wheel and mirrors
Z