2018 MERCEDES-BENZ CLA COUPE lock
[x] Cancel search: lockPage 261 of 326
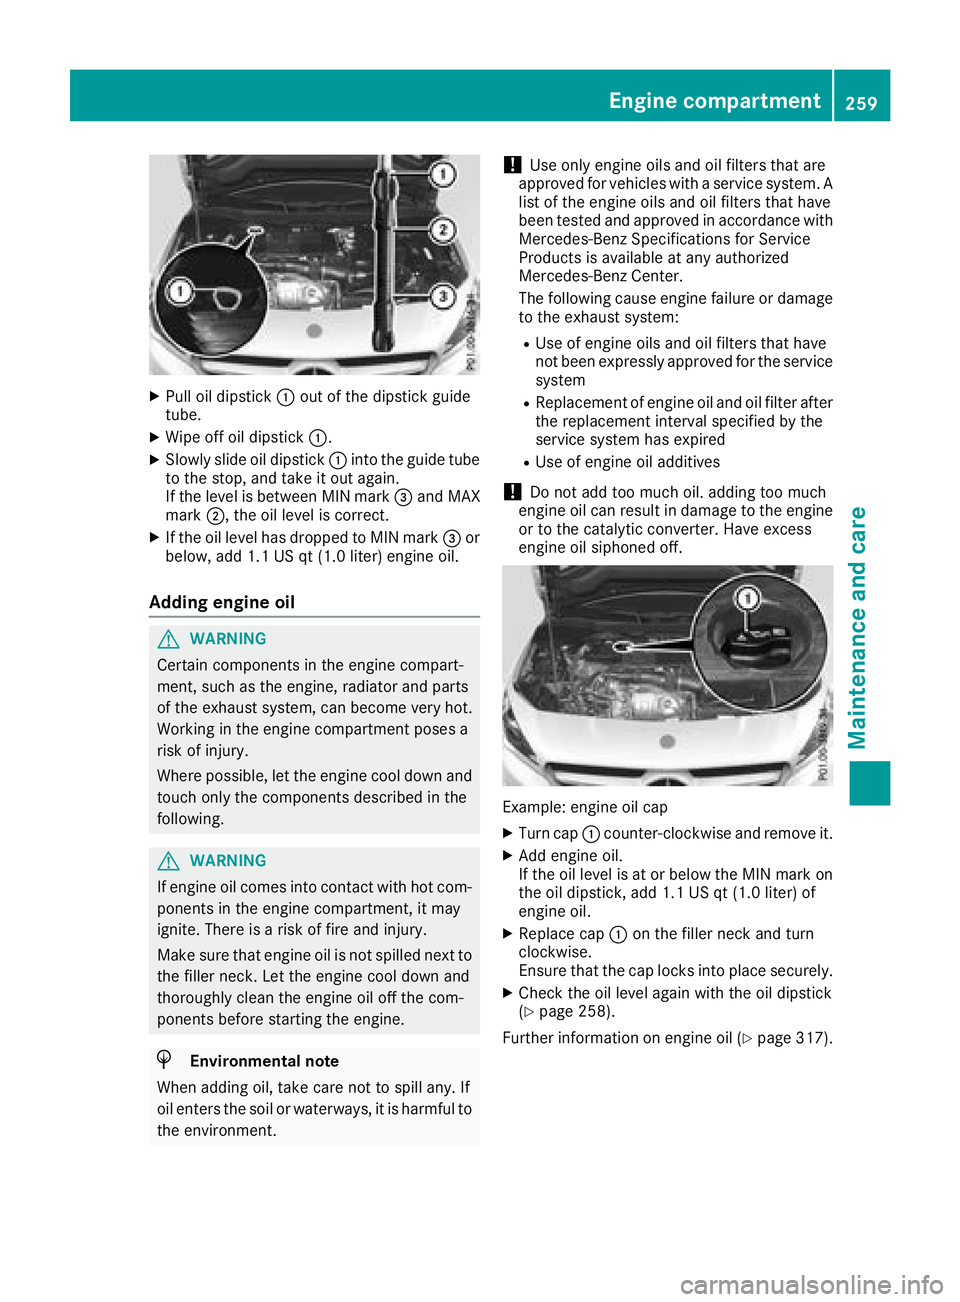
XPull oil dipstick:out of the dipstick guide
tube.
XWipe off oil dipstick :.
XSlowly slide oil dipstick :into the guide tube
to the stop, and take it out again.
If the level is between MIN mark =and MAX
mark ;,the oil level is correct.
XIf the oil level has dropped to MIN mark =or
below, add 1.1 US qt (1.0 liter) engine oil.
Adding engine oil
GWARNING
Certain components in the engine compart-
ment ,such as the engine, radiator and parts
of the exhaust system, can become very hot.
Workingint he engine compartment poses a
risk of injury.
Where possible, let the engine cool down and touch only the components described in the
following.
GWARNING
If engine oil comes into contact with hot com- ponentsint he engine compartment ,itmay
ignite. There is arisk of fire and injury.
Make sure that engine oil is not spilled next to
the filler neck.L et the engine cool down and
thoroughly clean the engine oil off the com-
ponentsb efore starting the engine.
HEnvironmenta lnote
When adding oil, take care not to spill any. If
oil enter sthe soil or waterways, it is harmful to
the environment.
!Use only engine oils and oil filters that are
approved for vehicles with aservice system. A
list of the engine oils and oil filters that have
been tested and approved in accordancew ith
Mercedes-Benz Specifications for Service
Products is availableata ny authorized
Mercedes-Benz Center.
The following cause engine failure or damage
to the exhaust system:
RUse of engine oils and oil filters that have
not been expressly approved for the service
system
RReplacement of engine oil and oil filter after
the replacement interval specified by the
service system has expired
RUse of engine oil additives
!Do not add too much oil. adding too much
engine oil can result in damage to the engine
or to the catalytic converter. Have excess
engine oil siphoned off.
Example: engine oil cap
XTurn cap :counter-clockwise and remove it.
XAdd engine oil.
If the oil level is at or below the MIN mark on
the oil dipstick ,add 1.1 US qt (1.0 liter) of
engine oil.
XReplace cap :on the filler neck and turn
clockwise.
Ensure that the cap locks into place securely.
XCheck the oil level again with the oil dipstick
(Ypage 258).
Further information on engine oil (
Ypage 317).
Engine compartment259
Maintenance and care
Z
Page 262 of 326
Checking and addingother service
products
Checking coolan tlevel
GWARNING
The coolings ystem is pressurized, particularly
when th emotor is warm .Ifyou open th ecap,
you coul dbescalded if hot coolant sprays out.
Thereisar iskofi njury.
Let th eenginec ooldown before you open the
cap. Wear gloves and eye protection.S lowly
open th ecap to relieve pressure.
!The coolant may only be checked and cor-
recte dwhen th eengineisc ool(coolantt em-
peratur ebelow 10 4‡(40 †) .Checkin gthe
coolantw hen thecoolantt emperatur eis
above1 04‡(40 †) ma yresult in damage to
th ee ngineortot heengin ecoolings ystem.
XPar kthe vehicl eonal evel surface.
Only chec kthe coolan tlevel when th evehicl e
is on alevel surfac eand th eengineh as cooled
down .
XTurn th eSmartKey to position 2in th eigni-
tion loc k(Ypage 122).
XCheckthe coolan ttem perature display in th e
instrumen tcluster.
The coolan ttem perature mus tbebelow
10 4‡ (40 †).
XTurn th eSmartKey to position g
(Ypage 122) in th eignition loc k.
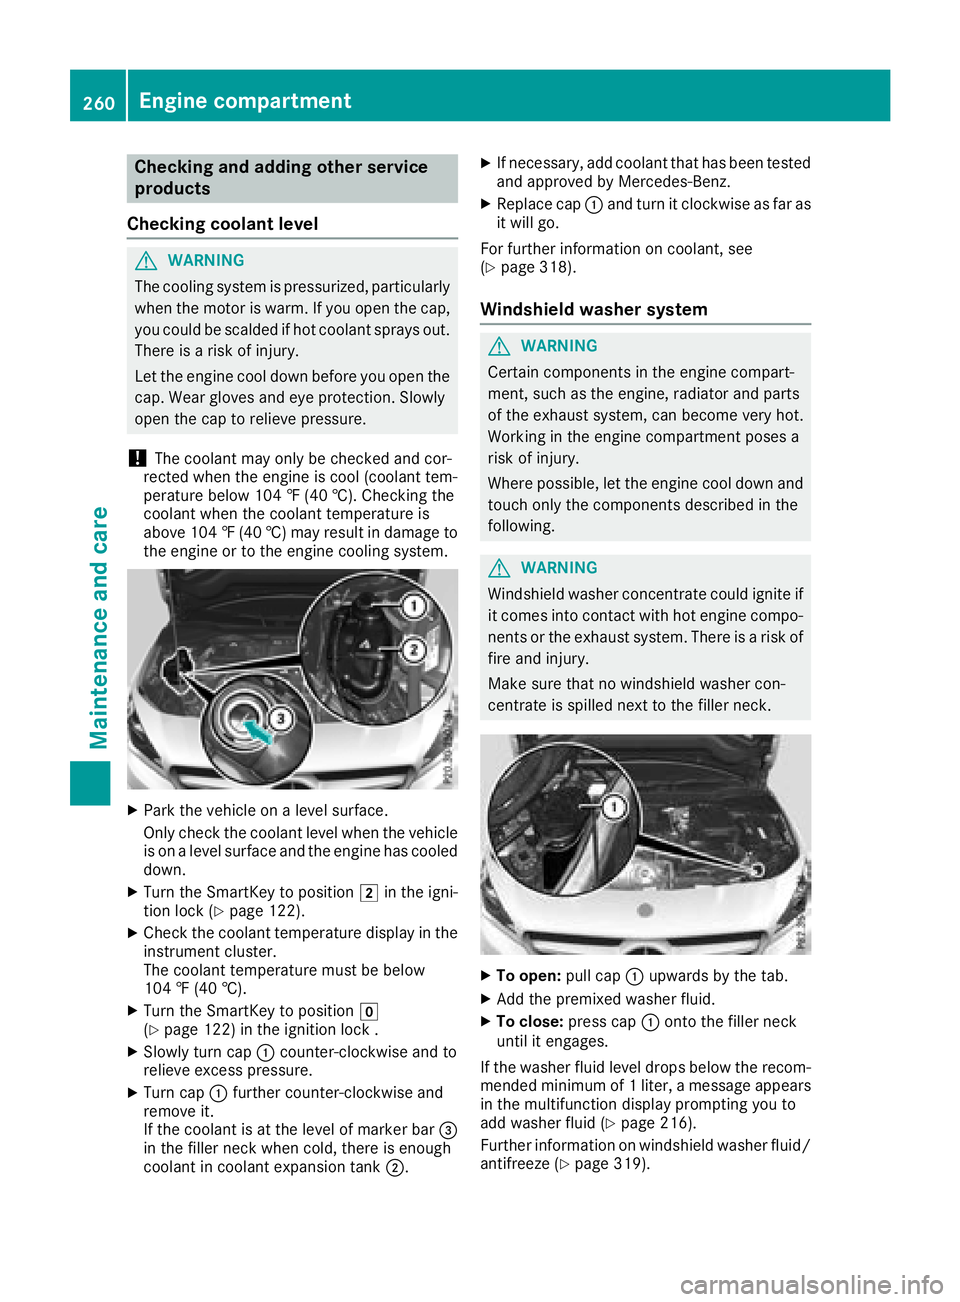
XSlowly turncap : counter-clockwise and to
reliev eexces spressure.
XTurn cap :further counter-clockwise and
remove it .
If th ecoolan tisatt helevel of marke rbar=
in th efiller neck when cold, there is enough
coolan tincoolan texpansion tan k;.
XIf necessary, add coolan ttha thas been tested
and approve dbyMercedes-Benz.
XReplacecap : and tur nitclockwise as far as
it will go.
Fo rfurther information on coolant, see
(
Ypage 318).
Windshiel dwasher system
GWARNIN G
Certain component sintheengin ecom part-
ment, suc hastheengine, radiato rand part s
of th eexhaust system, can become ver yhot.
Working in th eenginec om partmen tposes a
ris kofi njury.
Where possible, let th eenginec ooldown and
touch only th ecom ponent sdescribed in th e
following.
GWARNIN G
Windshield washer concentrate could ignit eif
it comes into contact wit hhot engin ecom po-
nent sort heexhaust system. There is arisko f
fir ea nd injury.
Mak esuret hatnow indshield washer con-
centrat eisspilled next to th efiller neck .
XTo open: pull cap:upwards by th etab.
XAd dthe premixed washer fluid.
XTo close: press cap :onto th efiller neck
until it engages.
If th ewasher flui dlevel drops belo wthe recom-
mended minimum of 1liter, amessage appears
in th emultifunction display promptin gyou to
add washer flui d(
Ypage 216).
Further information on windshield washer fluid/
antifreez e(
Ypage 319).
260Engine compartment
Maintenance and care
Page 268 of 326
XMake sure that the vehicle is atastandstill
and the SmartKey is in key position 2in the
ignition lock.
XOpen the camera cover for cleaning via the
multimedia system (see the separate operat-
ing instructions).
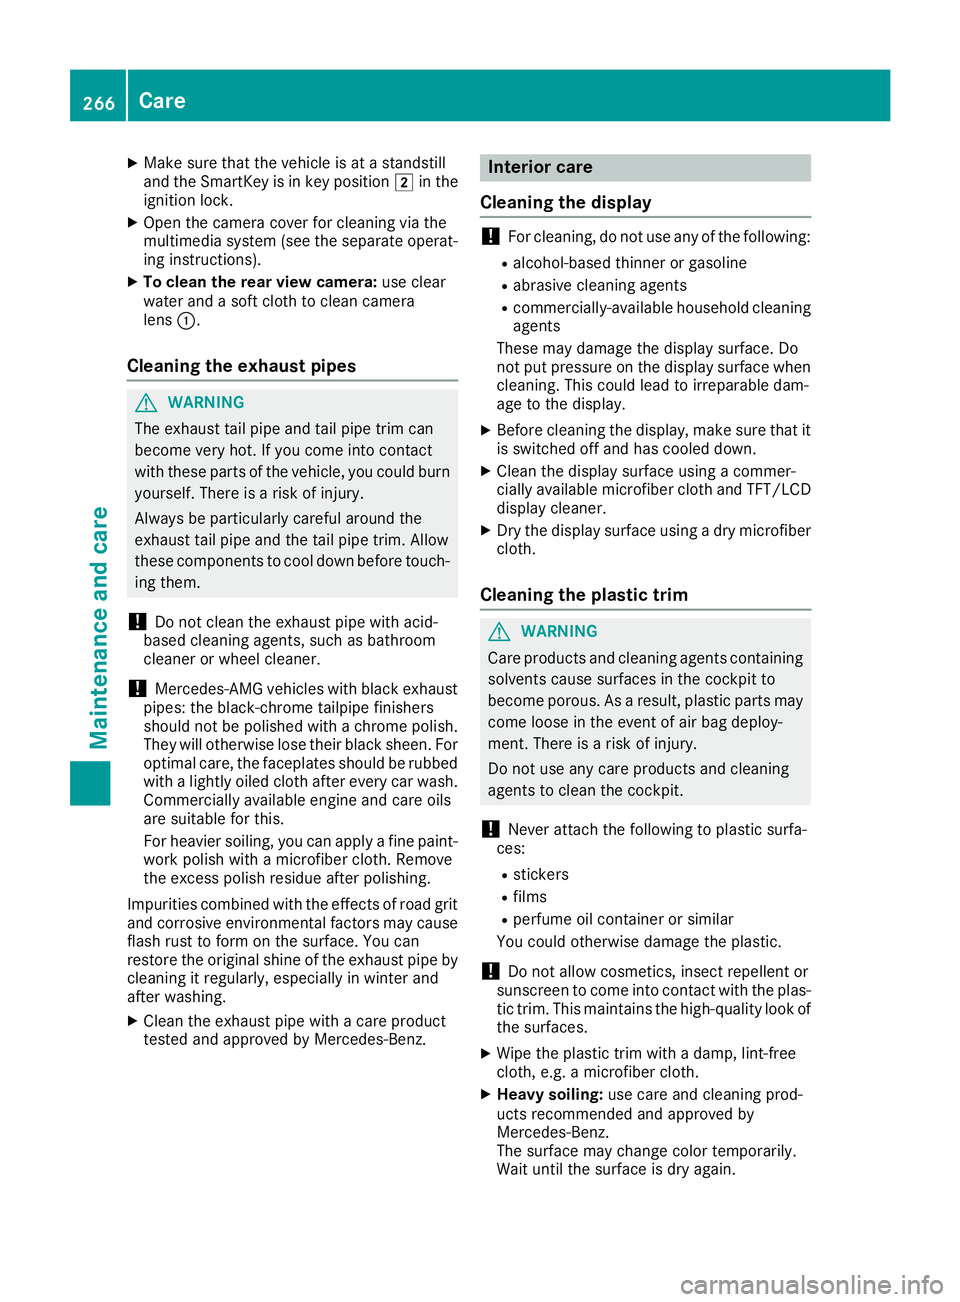
XTo clean the rear view camera: use clear
water and asoft cloth to clean camera
lens :.
Cleaningt he exhaust pipes
GWARNING
The exhaust tail pipe and tail pipe trim can
become very hot. If you come into contact
with these parts of the vehicle, you could burn
yourself. There is arisk of injury.
Always be particularly careful around the
exhaust tail pipe and the tail pipe trim. Allow
these components to cool down before touch-
ing them.
!Do not clean the exhaust pipe with acid-
based cleaning agents, such as bathroom
cleaner or wheel cleaner.
!Mercedes-AMG vehicles with black exhaust
pipes: the black-chrome tailpipe finishers
should not be polished with achrome polish.
They will otherwise lose their black sheen. For
optimal care, the faceplates should be rubbed with alightly oiled cloth after every car wash.
Commercially available engine and care oils
are suitable for this.
For heavier soiling, you can apply afine paint-
work polish with amicrofiber cloth. Remove
the excess polish residue after polishing.
Impurities combined with the effectsofr oad grit
and corrosive environmental factors may cause
flash rust to form on the surface. You can
restore the original shine of the exhaust pipe by
cleaning it regularly,e specially in winter and
after washing.
XClean the exhaust pipe with acare product
tested and approved by Mercedes-Benz.
Interior care
Cleaningt he display
!For cleaning, do not use any of the following:
Ralcohol-based thinner or gasoline
Rabrasive cleaning agents
Rcommercially-availableh ousehold cleaning
agents
These may damage the display surface. Do
not put pressure on the display surface when cleaning. This could lead to irreparable dam-
age to the display.
XBefore cleaning the display,m ake sure that it
is switched off and has cooled down.
XClean the display surface using acommer-
cially available microfiber cloth and TFT/LCD
display cleaner.
XDry the display surface using adry microfiber
cloth.
Cleaningt he plastic trim
GWARNING
Care products and cleaning agents containing solvents cause surfaces in the cockpit to
become porous. As aresult, plastic parts may
come loose in the event of air bag deploy-
ment. There is arisk of injury.
Do not use any care products and cleaning
agents to clean the cockpit.
!Never attach the following to plastic surfa-
ces:
Rstickers
Rfilms
Rperfume oil container or similar
You could otherwise damage the plastic.
!Do not allow cosmetics, insect repellent or
sunscreen to come into contact with the plas-
tic trim. This maintains the high-quality look of
the surfaces.
XWipe the plastic trim with adamp, lint-free
cloth, e.g. amicrofiber cloth.
XHeavy soiling: use care and cleaning prod-
ucts recommended and approved by
Mercedes-Benz.
The surface may change color temporarily.
Wait until the surface is dry again.
266Care
Maintenance and care
Page 272 of 326
Warning triangle
Removing/replacing the warning trian-
gle
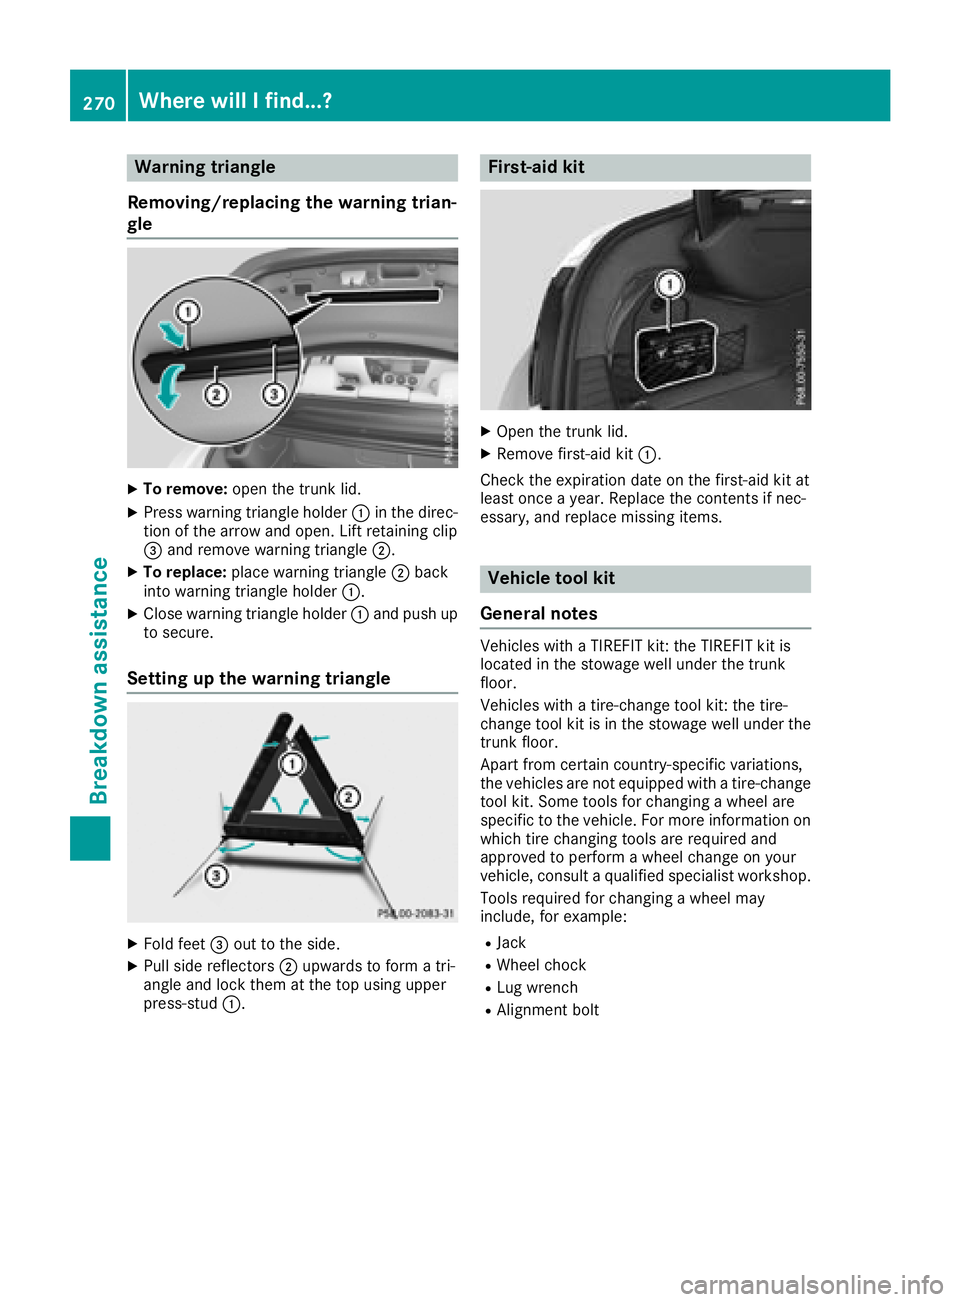
XTo remove: open the trunk lid.
XPress warning triangl eholder :in the direc-
tion of the arrow and open. Lift retaining clip
= and remove warning triangle ;.
XTo replace:place warning triangle ;back
into warning triangl eholder :.
XClose warning triangl eholder :and pus hup
to secure.
Setting up the warning triangle
XFold feet =out to the side.
XPullside reflectors ;upwards to form atri-
angl eand lock them at the top using upper
press-stud :.
First-aid kit
XOpen the trunk lid.
XRemove first-ai dkit:.
Check the expiration date on the first-ai dkit at
least once ayear. Replace the contents if nec-
essary, and replace missing items.
Vehicle tool kit
General notes
Vehicles with aTIREFIT kit: the TIREFIT kit is
located in the stowage wellu nder the trunk
floor.
Vehicles with atire-change tool kit: the tire-
change tool kit is in the stowage wellu nder the
trunk floor.
Apart from certain country-specificv ariations,
the vehicles are not equipped with atire-change
tool kit. Some tools for changing awheel are
specific to the vehicle. For more information on which tire changing tools are required and
approved to perform awheel change on your
vehicle, consul taqualified specialist workshop.
Toolsr equired for changing awheel may
include, for example:
RJack
RWheelc hock
RLug wrench
RAlignment bolt
270Where will Ifind...?
Breakdown assistance
Page 273 of 326
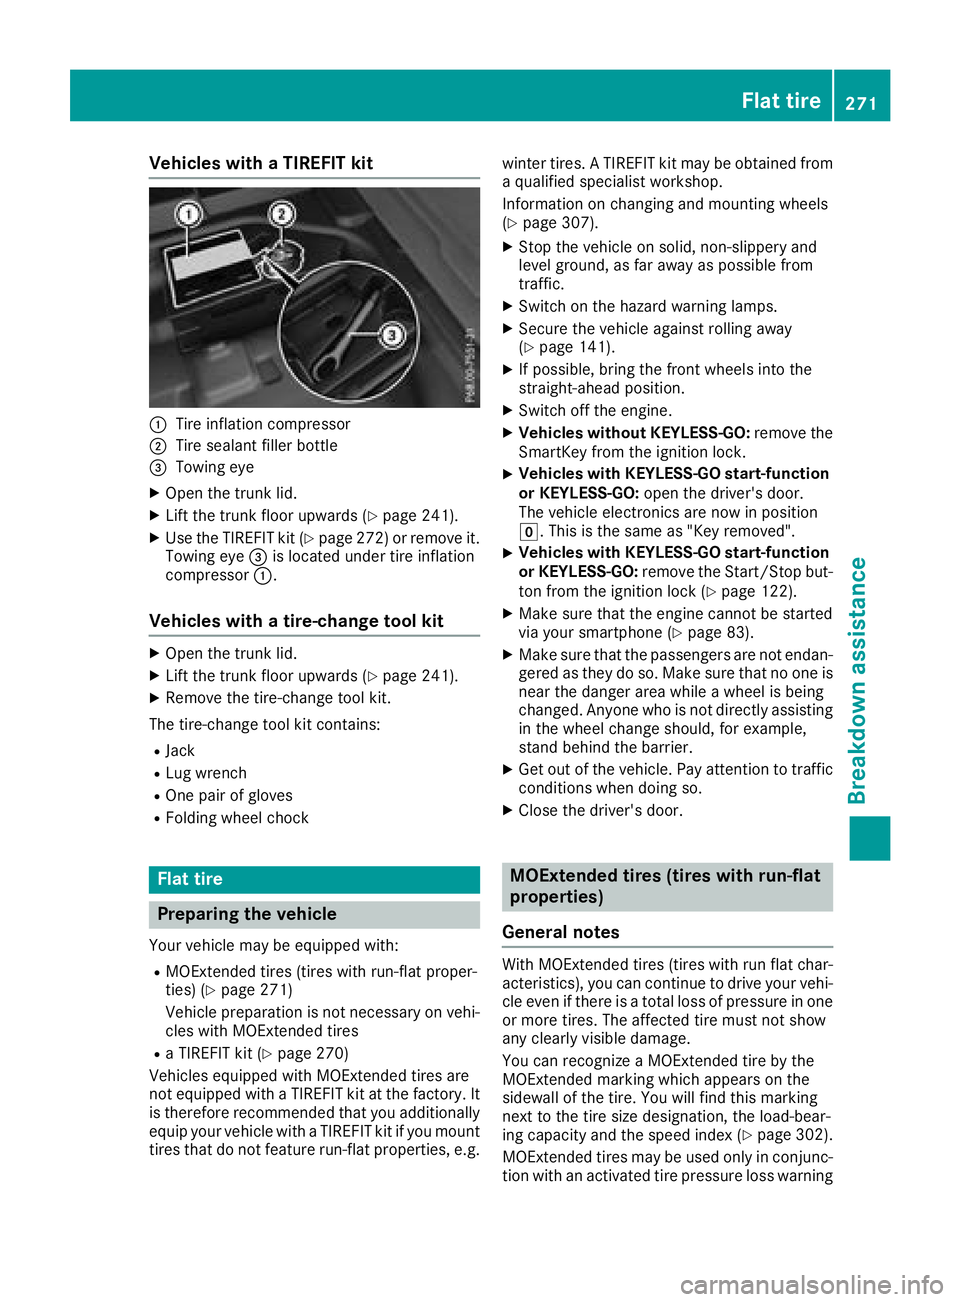
Vehicles withaTIREFI Tkit
:Tire inflation compressor
;Tire sealant fille rbottle
=Towing eye
XOpe nthe trunk lid.
XLiftthe trunk floor upwards (Ypage 241).
XUse the TIREFIT kit (Ypage 272 )orremove it.
Towing eye =is located under tire inflation
compressor :.
Vehicles with atire-chang etool kit
XOpen the trunk lid.
XLift the trunk floor upwards (Ypag e241).
XRemove the tire-change tool kit.
The tire-change tool kit contains:
RJack
RLug wrench
ROne pai rofgloves
RFolding wheelc hock
Flat tire
Preparing the vehicle
Yourvehiclem ay be equipped with:
RMOExtended tires (tires with run-flat proper-
ties) (Ypage271)
Vehiclep reparation is not necessary on vehi-
cles with MOExtended tires
RaT IREFIT kit (Ypag e270)
Vehicles equipped with MOExtended tires are
not equipped with aTIREFIT kit at the factory. It
is therefore recommended that you additionally
equip you rvehiclew ithaTIREFIT kit if you mount
tires that do not feature run-flat properties, e.g. winter tires.
ATIREFIT kit may be obtained from
aq ualified specialist workshop.
Information on changing and mounting wheels
(
Ypag e307).
XStop the vehicleons olid, non-slippery and
level ground ,asfar awa yaspossible from
traffic.
XSwitch on the hazard warning lamps.
XSecure the vehiclea gainst rolling away
(Ypag e141).
XIf possible, bring the front wheels into the
straight-ahead position.
XSwitch off the engine.
XVehicles without KEYLESS-GO: remove the
SmartKey from the ignitio nlock.
XVehicles with KEYLESS-GO start-function
or KEYLESS-GO: open the driver'sd oor.
The vehiclee lectronics are now in position
g.T his is the same as "Key removed".
XVehicles with KEYLESS-GO start-function
or KEYLESS-GO: remove the Start/Stop but-
ton from the ignitio nlock (
Ypag e122).
XMake sure that the engine cannot be started
via you rsmartphone (Ypag e83).
XMake sure that the passengers are not endan-
gered as they do so. Make sure that no one is
near the dange rarea while awhee lisb eing
changed .Anyone who is not directly assisting
in the wheelc hange should, for example,
stand behind the barrier.
XGet out of the vehicle. Pay attention to traffic
conditions when doing so.
XClose the driver'sd oor.
MOExtended tires (tires with run-flat
properties)
General notes
With MOExtended tires (tires with run flat char-
acteristics) ,you can continue to drive you rvehi-
cle even if there is atotal loss of pressure in one
or more tires. The affected tire must not show
any clearly visible damage.
You can recognize aMOExtended tire by the
MOExtended marking which appears on the
sidewal lofthe tire. You wil lfind this marking
next to the tire size designation, the load-bear-
ing capacity and the speedi ndex (
Ypage302).
MOExtended tires may be used only in conjunc-
tion with an activated tire pressure loss warning
Flat tire271
Breakdown assistance
Page 277 of 326
Ifat ire pressure of 200 kPa (2.0 bar/29 psi) has
been attained after ten minutes:
XSwitch off the tire inflation compressor.
XUnscrew the fillerh ose from the valve of the
faulty tire.
Note that tire sealant may escape when you
unscrew the fillerh ose.
XUSA only:Stow the tire sealant bottle and the
tire inflation compressor.
XPull away immediately.
XStop after driving for approximately ten
minutes and check the tire pressure with the
tire inflation compressor.
The tire pressure must now be at least
130 kPa (1.3 bar/19 psi).
GWARNING
If the required tire pressure is not reached
after driving for ashort period,t he tire is too
badlyd amaged. The tire sealant cannot repair
the tire in this instance. Damaged tires and a
tire pressure that is too low can significantly
impair the vehicle's braking and driving char-
acteristics. There is arisk of accident.
Do not continue driving. Contact aqualified
specialist workshop.
iUSA only: In cases such as the one men-
tioned above,c ontact an authorized
Mercedes-Benz Center. Or call
1-800-FOR-MERCedes (in the USA) or
1-800-387-0100 (in Canada).
XUSA only: Correct the tire pressure if it is still
at least 130 kPa (1.3 bar/19 psi). See the Tire
and Loading Information placard on the driv-
er's side B-pillarort he tire pressure table in
the fuel fillerf lap for values.
XTo increase the tire pressure: switch on the
tire inflation compressor.
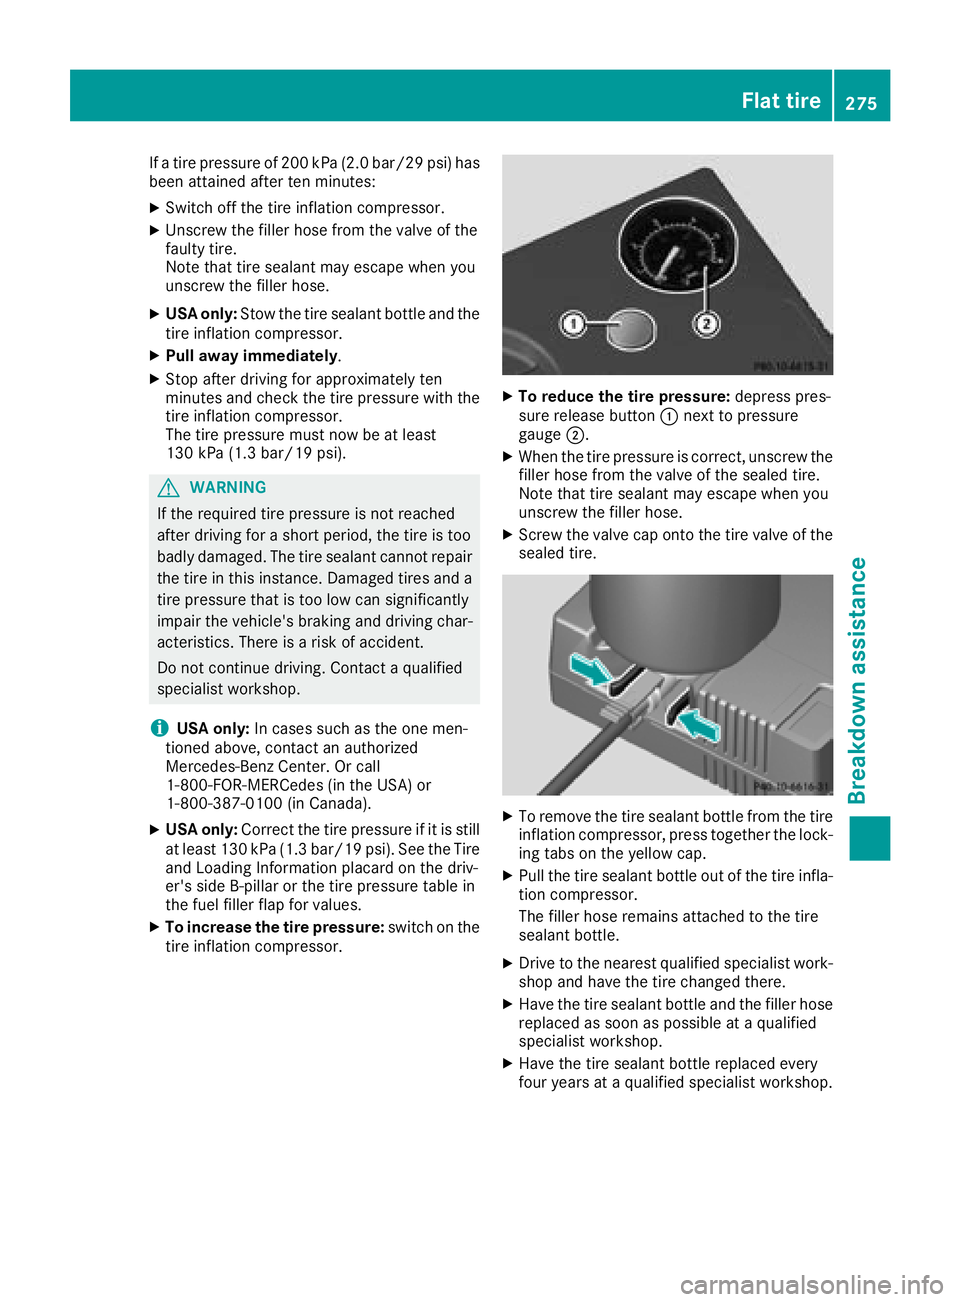
XTo reduce the tire pressure: depresspres-
sure release button :next to pressure
gauge ;.
XWhen the tire pressure is correct, unscrew the
fillerhose from the valve of the sealed tire.
Note that tire sealant may escape when you
unscrew the fillerh ose.
XScrew the valve cap onto the tire valve of the
sealed tire.
XTo remove the tire sealant bottle from the tire
inflation compressor, press together the lock-
ing tabs on the yellow cap.
XPullthe tire sealant bottle out of the tire infla-
tion compressor.
The fillerh ose remains attached to the tire
sealant bottle.
XDrive to the nearest qualifieds pecialist work-
shop and have the tire changed there.
XHave the tire sealant bottle and the fillerh ose
replaced as soon as possible at aqualified
specialist workshop.
XHave the tire sealant bottle replaced every
four years at aqualifieds pecialist workshop.
Flat tire275
Breakdowna ssistance
Z
Page 278 of 326
Battery (vehicle)
Important safety notes
Specialtool sand expert knowledg eare required
when working on the battery ,e.g.r emovala nd
installation. Yo ushoul dtherefore have al lwork
involving the battery carrie doutataq uali fied
specialist workshop.
GWARNING
Wor kcarrie doutincorrectly on the battery
can lead ,for example, to ashort circui tand
thusd amagethe vehicl eelectronics .Thisc an
lead to functio nrestrictions applying to
safety-relevant systems, e.g the lighting sys-
tem, the ABS (anti-lock braking system )orthe
ESP
®(Electronic Stability Program). The oper-
ating safety of your vehicl emaybe restricted.
Yo uc ould lose controloft he vehicle, for
example:
Rwhen braking
Rin the event of abrupt steering maneuvers
and/or when the vehicle's speed is not
adapted to the roadc onditions
There is ariskofana ccident.
In the event of ashort circui torasimilar inci-
dent, contact aquali fied specialist workshop
immediately. Do not drive any further .You
shoul dhavea llwork involving the battery car-
rie do utataq uali fied specialist workshop.
For further informatio nabout ABS and ESP
®,
see (Ypage 61 )and (Ypage 64).
GWARNING
Electrostati cbuild -upc an lead to the creation
of sparks, which could ignite the highl yexplo-
sive gases of abattery.T here is ariskofa n
explosion.
Before handling the battery ,touch the vehicle
body to remove any existing electrostatic
build-up.
The highl yflammabl egasmixture form swhen
charging the battery as well as when jump-start-
ing. Alway
smakes uret hatn either yo unor the bat-
tery is electrostaticall ycharged. Abuild -upo f
electrostatic charge can be caused ,for exam-
ple:
Rby wearing clothing made from synthetic
fibers
Rdu etof rictionbetween clothing and seats
Rif yo upushorp ullt he battery across the car-
pe toro thersyntheti cmaterials
Rif yo urub the battery with acloth
GWARNING
During the charging process ,abattery produ-
ces hydrogen gas. If ashort circui toccurs or
sparks are created,t he hydrogen gascan
ignite .There is ariskofane xplosion.
RMake sure thatt he positive terminal of a
connected battery does not come into con- tact with vehicl eparts.
RNever place meta lobjects or tool sonabat-
tery.
RIt is important thaty ouobserve the descri-
be do rder of the battery terminal swhen
connecting and disconnecting abattery.
RWhe njump-starting ,makes uret hatt he
battery pole swithi de ntical polarity are
connected.
RIt is particularly important to observe the
describe dorder when connecting and dis-
connecting the jumper cables.
RNever connect or disconnect the battery
terminal swhile the engine is running.
GWARNING
Battery aci discaustic .There is ariskofi njury.
Avoidc ontact with skin, eyes or clothing. Do
not inhal eany battery gases .Donot lean over
the battery .Keepc hildren away from batter-
ies. Wash away battery aci dimmediatelyw ith
plenty of clean water and see kmedica latten-
tion.
HEnvironmental note
Batterie scontain dangerous
substances. It is against the
la wtod ispose of them with
276Battery (vehicle)
Breakdo wn assis tance
Page 279 of 326
the householdrubbish .They
must be collected separately and recycle dtoprotect the
environment.
Dispose of batteries in an
environmentall yfriendly
manner. Take discharged
batteries to aquali fied spe-
cialist workshop or aspecial
collectio npoint for used bat-
teries.
!Hav ethe battery checked regularly at a
qualified specialis tworkshop.
Observe the service intervals in the Mainte-
nanc eBookle torcontact aquali fied specialist
workshop for mor einformation.
!Yo us houl dhavea llwork involvin gthe bat-
tery carrie doutataq uali fied specialis twork-
shop. In the exceptiona lcas et hatiti sneces-
sary for yo utodisconnect the battery your-
self, make sure that:
Ryo us witch off the engine and remove the
key .Onv ehicles with KEYLESS-GO, ensure
thatt he ignition is switched off .Check that
al lt he indicator lamps in the instrument
clustera reoff .O therwise, electronic com-
ponents ,suc hast he alternator, mayb e
damaged.
Ryo uf irst remove the negative terminal
clamp and thent he positive terminal
clamp. Never swap the termina lclamps.
Otherwise, the vehicle' selectronic system
maybed amaged.
Rin vehicles with automatic transmission,
the transmission is locked in position P
after disconnecting the battery .The vehicle
is secur ed a
gainst rolling away
.You can
thennol ongerm ovet he vehicle.
The battery and the cove rofthe positive ter-
minal clamp must be installe dsecurel yduring
operation.
Compl ywiths afety precautions and take pro-
tective measures when handling batteries.
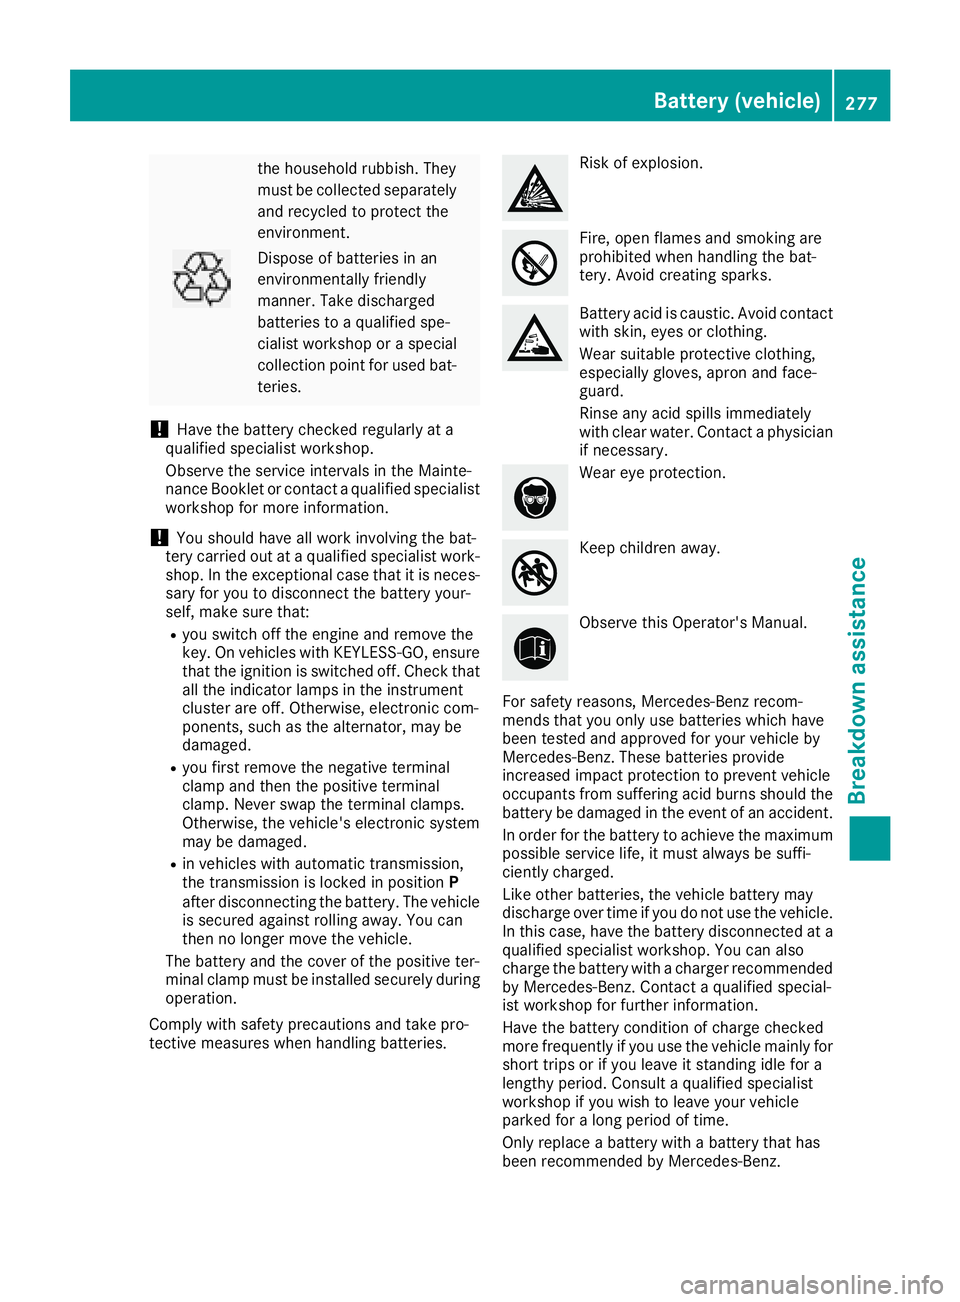
Risk of explosion.
Fire, open flames and smoking are
prohibited when handling the bat-
tery .Avoi dc reating sparks.
Battery aci discaustic. Avoidc ontact
with skin, eyes or clothing.
Wear suitabl eprotective clothing,
especiall ygloves, apron and face-
guard.
Rinse any aci dspills immediately
with clear water. Contact aphysician
if necessary.
Wear ey eprotection.
Kee pchildren away.
Observe thisO perator' sManual.
For safety reasons, Mercedes-Benz recom-
mend sthaty ouonlyusebatteries which have
been tested and approved for your vehicl eby
Mercedes-Benz. Thes ebatteries provide
increasedi mpactprotection to prevent vehicle
occupants froms ufferin gacidb urns shoul dthe
battery be damage dinthe event of an accident.
In order for the battery to achieve the maximum
possibl eservice life, it must always be suffi-
ciently charged.
Like othe rbatteries ,the vehicl ebattery may
discharge ove rtim eify oudo not us ethe vehicle.
In thisc ase, have the battery disconnecte data
qualified specialis tworkshop .You can also
charge the battery with acharge rrecommended
by Mercedes-Benz. Contact aquali fied special-
is tw orkshop for furtheri nformation.
Hav ethe battery condition of charge checked
mor efrequentl yifyouuset he vehicl emainl yf or
short trip sorifyouleav eits tanding idle for a
lengthyp eriod. Consult aquali fied specialist
workshop if yo uwishtol eave your vehicle
parked for alon gp eriodoft ime.
Onlyr eplace abattery with abattery thath as
been recommended by Mercedes-Benz.
Battery (vehicle)277
Breakdow nassistance
Z