2018 MERCEDES-BENZ CLA COUPE lock
[x] Cancel search: lockPage 280 of 326
Remove theSmartKey if you park th evehicl e
and do no trequire any electrical consumers.
The vehicl ewill then use ver ylittl ee nergy, thus
conserving battery power .
If th epower suppl yhas been interrupted, e.g. if
you reconnect th ebattery, you will hav eto:
Rset th eclock usin gthe multimedia system;
see th eseparat eoperating instruction s
Rreset thefunction for foldin gthe exterio rmir-
ror sin/out automatically, by foldin gthe mir -
ror so ut once (
Ypage 97)
Charging th ebattery
GWARNIN G
During charging and jump-starting ,explosive
gase scan escape from th ebattery. There is a
ris kofane xplosion .
Particularly avoi dfire, open flames, creating
sparks and smoking. Ensur ethe re is sufficien t
ventilation while charging and jump-starting .
Do no tlean ove rabattery.
GWARNIN G
Battery acid is caustic. There is ariskofi njury.
Avoid contact wit hskin, eyes or clothing .Do
no tinhale any battery gases. Do no tlean ove r
th eb attery. Kee pchildren away from batter-
ies. Wash away battery acid immediately wit h
plenty of clean water and seek medical atten -
tion .
GWARNIN G
Ad ischarged battery can freez eattempera-
tures belo wfreezing point. When jump-start -
ing thevehicl eorc harging th ebattery, gase s
can escape from th ebattery. There is arisko f
an explosion .
Allow th efroze nbattery to thaw out before
charging it or jump-starting .
!Only use battery chargers wit hamaximum
charging voltag eof14.8V .
!Only charge th ebattery usin gthe jump-
starting connection point.
The jump-starting connection poin tisinthe
engin ecom partmen t(
Ypage 278).
XOpen thehood.
XConnect th ebattery charge rtothepositive
termina land ground poin tinthesam eorder
as when connecting th edonor battery in th e
jump-starting procedure (
Ypage 278).
If th eindicator/warning lamp sdonotligh tupi n
th ei nstrumen tcluste ratlow temperatures ,itis
ver ylikely that th edischarged battery has fro-
zen. In this cas eyou may neither jump-start th e
vehicl enorcharge th ebattery. The servic elife of
at hawed-out battery may be shorter. The start -
ing characteristics can be impaired, particularly
at low temperatures .Havet he thawed-out bat -
tery checke dataqualified specialist workshop.
Only charge th einstalled battery wit habattery
charge rwhic hh as been tested and approve dby
Mercedes-Benz .Abattery charge runi
ts p
ecially
adapted for Mercedes-Benz vehicles and tested
and approve dbyMercedes-Benz is available as
an accessory. It permit sthe charging of th ebat-
tery in it sinstalled position .Contac tana uthor-
ized Mercedes-Benz Cente rfor further informa-
tion and availability. Read th ebattery charger's
operating instruction sbefore charging th ebat-
tery.
Jump-starting
Fo rthe jump-starting procedure ,use only th ejump-starting connection point, consisting of apos-
itive termina land aground point, in th eenginec om partment.
GWARNIN G
Battery acid is caustic. There is ariskofi njury.
Avoid contact wit hskin, eyes or clothing .Donotinhale any battery gases. Do no tlean ove rthe
battery. Kee pchildren away from batteries. Wash away battery acid immediately wit hplenty of
clean water and seek medical attention .
278Jump-starting
Breakdown assistance
Page 282 of 326
Make sure that:
RThe jumper cables are not damaged.
RNon-insulated parts of the terminal clamps do not come into contact with other metal parts while
the jumper cables are connected to the battery.
RThe jumper cables cannot come into contact with parts that can move when the engine is running,
such as the V-belt pulleyorthe fan.
XSecure the vehicle by applying the electric parking brake.
XShift the transmission to position j.
XTurn the SmartKey to positiongin the ignition lock and remove it.
XSwitch off all electrical consumers, e.g. rear window defroster, lighting, etc.
XOpen the hood.
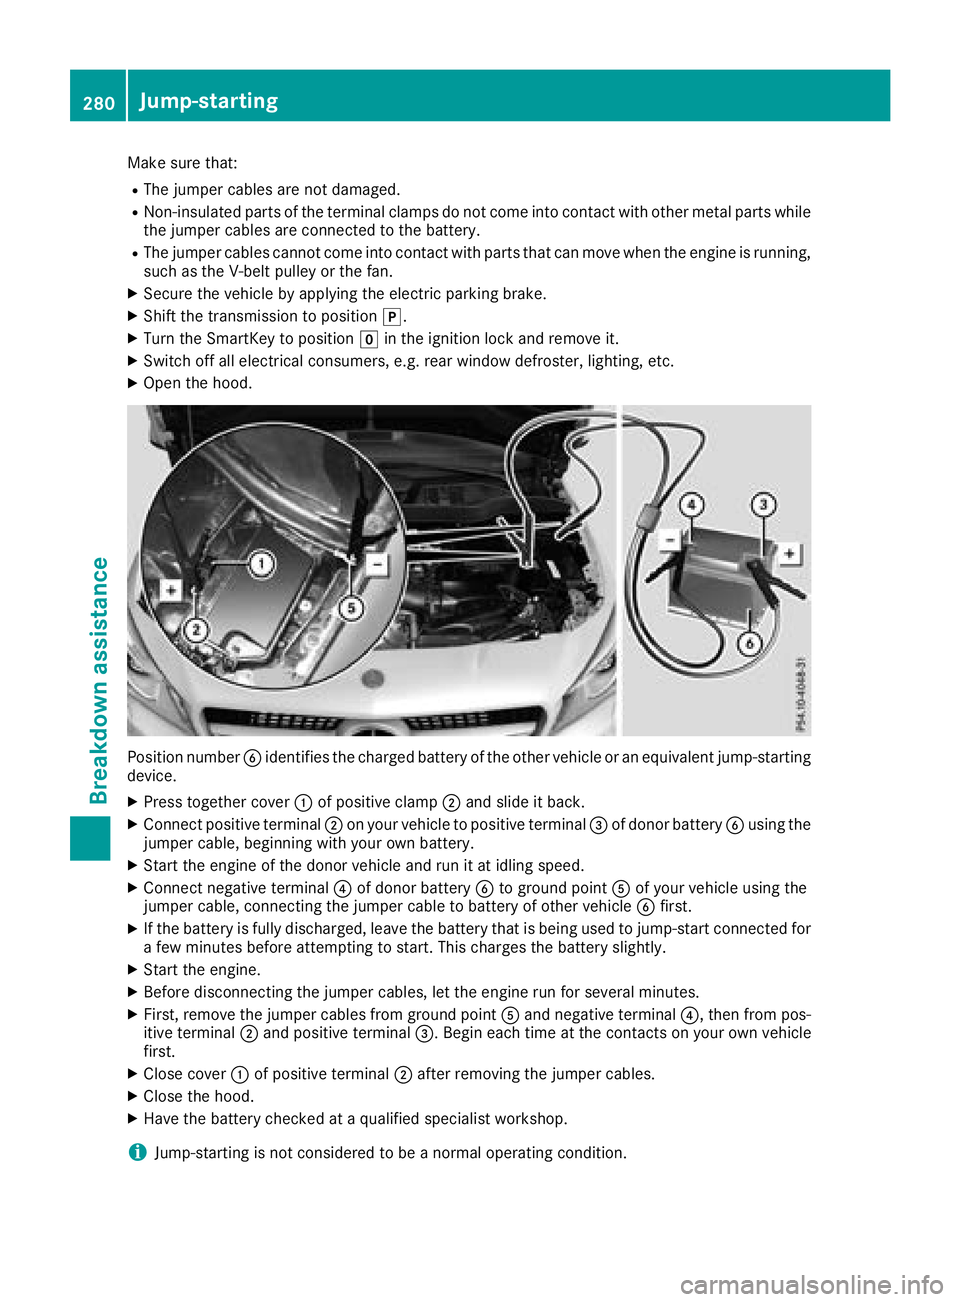
Position number Bidentifies the charged battery of the other vehicle or an equivalent jump-starting
device.
XPress together cover :of positive clamp ;and slide it back.
XConnect positive terminal ;on your vehicle to positive terminal =of donor battery Busing the
jumper cable, beginning with your own battery.
XStart the engine of the donor vehicle and run it at idling speed.
XConnect negative terminal ?of donor battery Bto ground point Aof your vehicle using the
jumper cable, connecting the jumper cable to battery of other vehicle Bfirst.
XIf the battery is fully discharged, leave the battery that is being used to jump-start connected for
afew minutes before attempting to start. This charges the battery slightly.
XStart the engine.
XBefore disconnecting the jumper cables, let the engine run for several minutes.
XFirst, remove the jumper cables from ground point Aand negative terminal ?,then from pos-
itive terminal ;and positive terminal =.Begin each time at the contacts on your own vehicle
first.
XClose cover :of positive terminal ;after removing the jumper cables.
XClose the hood.
XHave the battery checked at aqualified specialist workshop.
iJump-starting is not considered to be anormal operating condition.
280Jump-starting
Breakdown assistance
Page 283 of 326
iJumper cablesand further informatio nregardingj ump-startin gcan be obtaine datany qualified
specialist workshop.
Towing and tow-starting
Important safety notes
GWARNING
Functionsr elevanttos afety are restricted or
no longer available if:
Rth ee ngine is no trunning.
Rtheb rakes ystem or th epower steering is
malfunctioning.
Rthere is amalfunctio ninthevoltage supply
or th evehicle's electrical system.
If your vehicle is beingt owed, muchm ore
force may be necessaryt osteer or brake.
Thereisar isk of an accident.
In such cases, use atow bar. Before towing,
makes ure that th esteering moves freely.
GWARNING
You can no longer steer th evehicle if the
steering wheel lockh as been engaged. There
is ar isk of an accident.
Always switch off th eignitio nwhen towing the
vehicle with atow cable or atow bar.
GWARNING
When towing or tow-startin ganother vehicle
and its weight is greater than th epermissible
gross weight of your vehicle ,the :
Rthet ow ing eye could detach itself
Rthev ehicle/trailer combinatio ncould roll-
over.
Thereisar isk of an accident.
When towing or tow-startin ganother vehicle,
its weight shouldn otbe greater than th eper-
missible gross weight of your vehicle.
Details on th epermissible gross vehicle weight
of your vehicle can be foun donthevehicle iden-
tification plate(
Ypage 314).
!When Activ eBrake Assist,D istance Pilot
DISTRONIC or th eHOLDfunction is activated, th
ev ehicle brakes automatically in certain
situations.
To avoid damage to th evehicle ,deactivate
these systems in th efollowing or similar sit-
uations:
Rwhen towing th evehicle
Rin th ecar wash
!Makes ure that th eelectric parking brak eis
released. If th eelectric parking brakeisf aulty,
visitaq ualifiedspecialist workshop.
!Only secure th etow rope or to wbar at the
towing eyes. Otherwise, th evehicle coul dbe
damaged.
!Do no tuse th etow ing eyes for recoveryp ur-
posesast hisc oul dd amage th evehicle .Ifin
doubt,r ecover th evehicle with acrane.
!When towing ,pull away slowly and
smoothly. If th etractive power is to ohigh,t he
vehicle scoul dbed amaged.
!The vehicle can be towed amaximum of
30 miles (50km ). The towing speed of 30 mph
(50km/h) must no tbeexceeded.
If th evehicle has to be towed moret han
30 miles (50km), th efront axle must be raised
or th eentire vehicle raiseda nd transported.
!Do nottow with sling-type equipment .This
coul ddamage th evehicle.
!When towing vehicle swith KEYLESS-GO,
use th ekey instead of th eStart/Sto pbutton.
Otherwise, th eautomatic transmission may
shifttop ositionPwhen th edriver' sorf ront-
passenger door are opened, whichc ouldlead
to damage to th etransmission.
!Vehicles with automatic transmission must
no tbes tarted by tow-starting. This coul doth-
erwis edamage th etransmission.
It is bette rtohave th evehicle transported than
to have it towed away.
If th evehicle can no longer be driven because of
an accidentorb reakdown,you have thefollow-
ing options:
RTransportin gthe vehicle.
Towing and tow-starting281
Breakdown assistance
Z
Page 284 of 326
Asarule, yous houl dhavet he vehicl etrans-
ported.
RTowing the vehicl ewithat ow ropeort ow bar.
Onlyt ow the vehicl einexceptionalc ases.
The battery must be connected and charged.
Otherwise, you:
Rcanno tturn the SmartKeytop osition2in
the ignition lock.
Rcanno trelease the electri cparking brake.
Rcanno tshift the transmission to position i.
The functio nofthe electri cparking brake and
the parking lock is dependent on the on-board
voltage.
If the on-board voltag eislowor if ther eisasys-
tem malfunction:
Rthe electri cparking brake mayn ot be applied
in certain circumstances ,or
Rit maynol ongerbep ossibl etos hift the trans-
mission to position j
Switch off non-essentia lconsumers, e.g .the
radio.
Disar mthe automatic locking feature before the
vehicl eistowed (
Ypage 187). Yo ucould other-
wise be locked outw henp ushing or towing the
vehicle.
Installing/removin gthe towin geye
Installing the towin geye
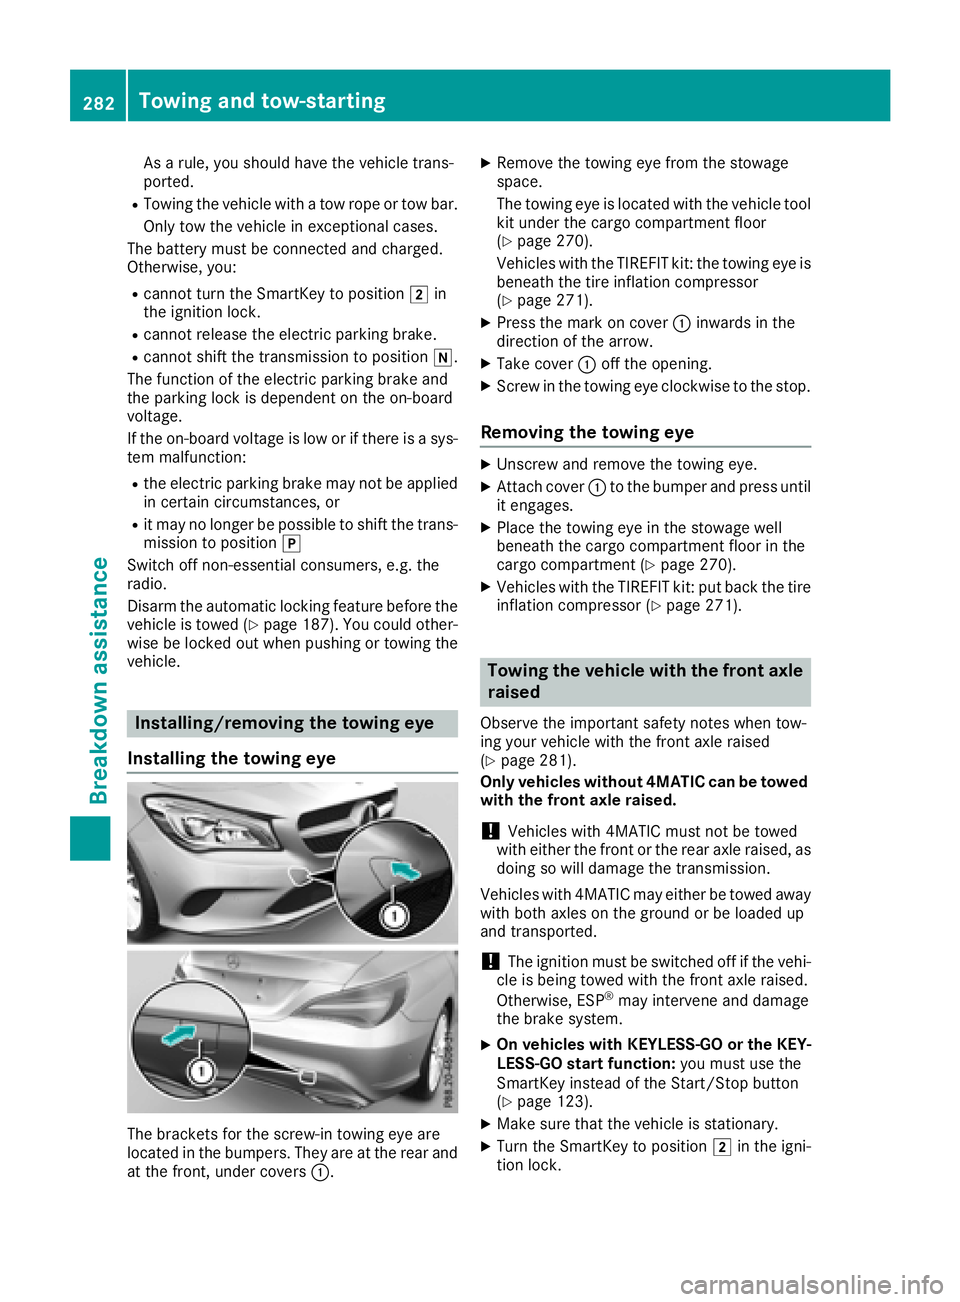
The brackets for the screw-i ntowing ey eare
locate dinthe bumpers. The yareat the rea rand
at the front, under covers :.
XRemove the towing eyefrom the stowage
space.
The towing ey eislocate dw itht he vehicl etool
kit under the cargo compartment floor
(
Ypage 270).
Vehicles with the TIREFIT kit: the towing ey eis
beneath the tire inflation compressor
(
Ypage 271).
XPress the mark on cover :inwards in the
direction of the arrow.
XTake cover :off the opening.
XScrew in the towing ey eclockwise to the stop.
Removing the towin geye
XUnscrew and remove the towing eye.
XAttach cover :to the bumpe rand press until
it engages.
XPlace the towing ey einthe stowag ewell
beneath the cargo compartment floor in the
cargo compartment (
Ypage 270).
XVehicles with the TIREFIT kit: pu tbackt he tire
inflation compressor (Ypage 271).
Towin gthe vehicle with the fron taxle
raised
Observ ethe important safety notes when tow-
ing your vehicl ewitht he front axl eraised
(
Ypage 281).
Only vehicle swithou t4MATIC can be towed
with the fron taxler aised.
!Vehicles with 4MATIC must not be towed
with either the front or the rea raxler aised, as
doing so will damage the transmission.
Vehicles with 4MATIC maye ither be towed away
with both axles on the ground or be loaded up
and transported.
!The ignition must be switched off if the vehi-
cle is being towed with the front axl eraised.
Otherwise, ESP
®mayi ntervene and damage
the brake system.
XOn vehicle swithK EYLESS -GO or the KEY-
LESS-GO start function: youm ustu se the
SmartKeyi nsteadofthe Start/Stop button
(
Ypage 123).
XMake sure thatt he vehicleisstationary.
XTurn the SmartKeytop osition 2in the igni-
tio nlock.
282Towin gand tow-starting
Breakdo wn assis tance
Page 285 of 326
XWhen the vehicle is stationary, depress the
brake pedal and keep it depressed.
XShift the automatic transmission to position
j.
XRelease the brake pedal.
XRelease the electric parking brake.
XSwitchoff the automatic locking
(Ypage 187).
XSwitc hont he hazard warning lamps
(Ypage 102).
XTurn the SmartKey in the ignition lock to posi-
tion gand leave the SmartKey in the ignition
lock.
Towing avehicle with both axles on
the ground
It is importan tthat you observe the safety
instruction swhen towing away your vehicle
(
Ypage 281).
XOn vehicles with KEYLESS-GO or the KEY-
LESS-GO star tfunction: you must use the
SmartKey instead of the Start/Stop button
(
Ypage 123).
The automatic transmission automatically shifts
to position jwhen you open the driver's or
front-passenger door or when you remove the
SmartKey from the ignition lock. In order to
ensure that the automatic transmission stays in
position iwhen towing away the vehicle, you
must observe the following points:
XMake sure that the vehicle is stationary.
XTurn the SmartKey to position 2in the igni-
tion lock.
XDepress and hold the brake pedal.
XShift the automatic transmission to position
i.
XLeave the SmartKey in position 2in the igni-
tion lock.
XRelease the brake pedal.
XRelease the electric parking brake.
XSwitc hont he hazard warning lamps
(Ypage 102).
iIn order to signal achange of direction when
towing the vehicle with the hazard warning
lamps switched on, use the combination
switch as usual. In this case, only the indicator
lamps for the direction of travel flash. After resetting the combination switch, the hazard
warning lamp start
sflashing again.
Transporting the vehicle
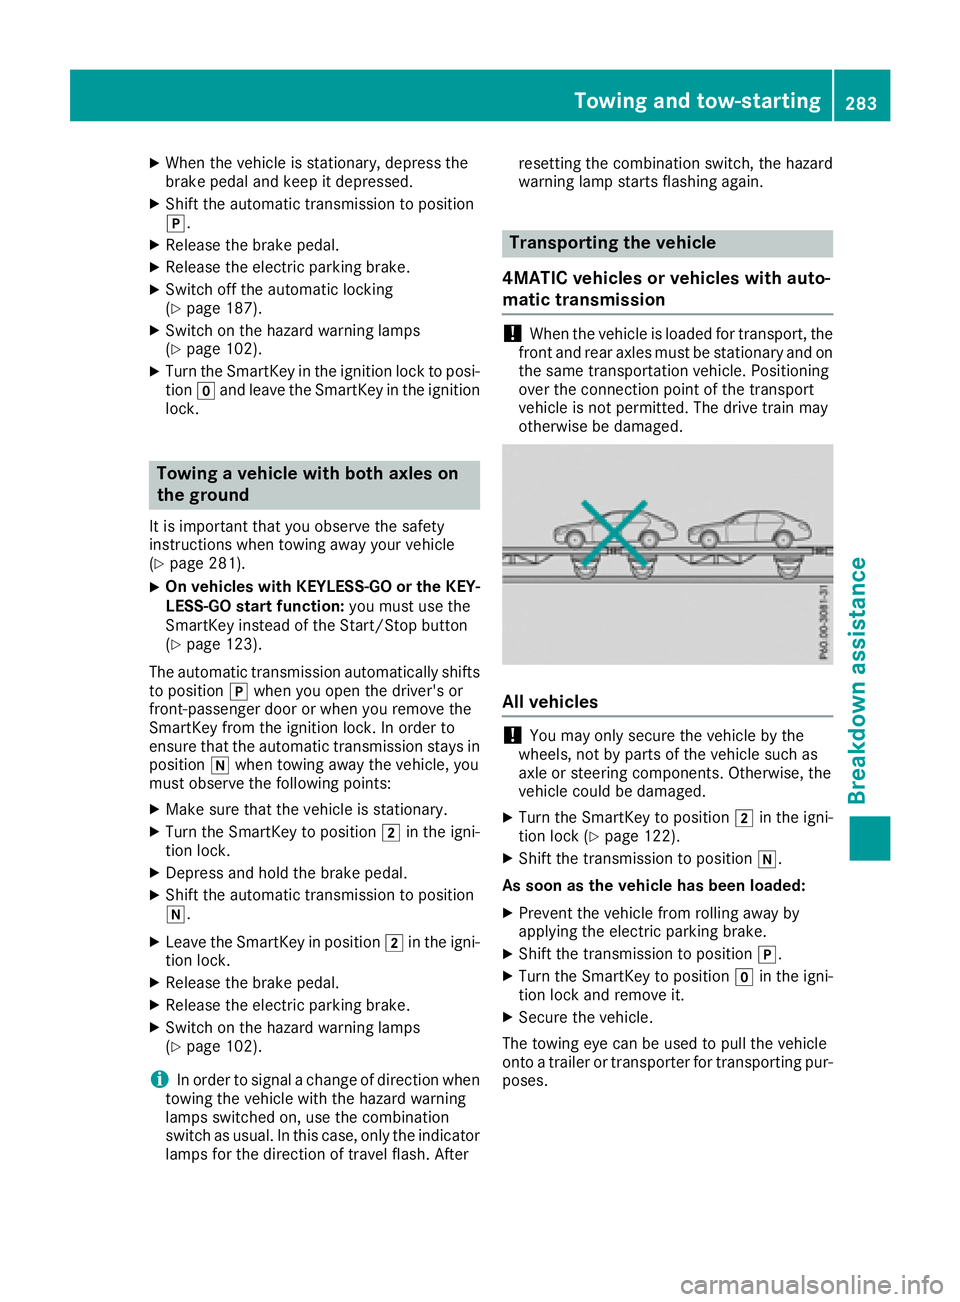
4MATIC vehicles or vehicles with auto-
matic transmission
!When the vehicle is loaded for transport, the
fronta nd rear axles must be stationary and on
the same transportation vehicle. Positioning
over the connection point of the transport
vehicle is not permitted. The drive train may
otherwise be damaged.
All vehicles
!You may only secure the vehicle by the
wheels, not by parts of the vehicle such as
axle or steerin gcomponents. Otherwise, the
vehicle could be damaged.
XTurn the SmartKey to position 2in the igni-
tion lock (Ypage 122).
XShift the transmission to position i.
As soon as the vehicle has been loaded:
XPreventt he vehicle from rolling away by
applying the electric parking brake.
XShift the transmission to position j.
XTurn the SmartKey to positiongin the igni-
tion lock and remove it.
XSecure the vehicle.
The towing eye can be used to pull the vehicle
ont oat railer or transporter for transportin gpur-
poses.
Towing and tow-starting283
Breakdown assistance
Z
Page 286 of 326
Noteson4 MATIC vehicles
!
Vehicle swith4 MATIC must not be towed
with eithe rthe front or the rea raxler aised, as
doing so will damage the transmission.
Vehicle swith4 MATIC mayo nlye ithe rbet owed
away with both axles on the ground or be loaded
up and transported.
If the vehicle' stransmission, front, or rea raxlei s
damaged, have the vehicl etransporte dona
truck or trailer.
In the even tofdamagetot he electrical sys-
tem:
If the battery is defective, the automatic trans-
mission will be locked in position j.Tos hift the
automatic transmission to position i,you
must provide powe rtothe vehicle' son-board
electrica lsys temint he same wa yaswhenjump-
starting (
Ypage 278).
Have the vehicl etransporte donatransporte ror
trailer.
Tow-startin g(em ergency engine
starting)
!
Vehicle switha utomatic transmission must
not be tow-started .You could otherwis edam -
ag et he automatic transmission.
iYouc an find information on "Jump-starting"
under (Ypage 278).
Fuses
Important safety notes
GWARNING
If yo umanipulate or bridg eafaulty fuse or if
yo ur eplace it with afusew ithah igheramper -
age, the electric cable scould be overloaded.
This could resul tinafire. There is ariskofa n
accident and injury.
Alway sreplace faulty fusesw itht he specified
new fusesh avingthe correc tamperage.
!Onlyu sefusest hath aveb eena pproved for
Mercedes-Benz vehicles and which have the
correc tfus er ating for the systemc oncerned.
Onlyu sefusesm arked with an "S" .Other- wise,c
omponents or systems could be dam-
aged.
!Make sure tha tnomoisture can ente rthe
fuse bo xwhent he cover is open.
!When closing the cover, make sure tha titis
lying correctly on the fuse box. Moistur eseep-
ing in or dirt could otherwis eimpair the oper-
ation of the fuses.
Th ef uses in your vehicl eserve to close down
faulty circuits .Ifafuse blows, al lthe compo-
nents on the circuit and their functions stop
operating.
Blown fusesm ustber eplaced with fusesoft he
same rating ,which yo ucan recognize by the
color and value. Th efuser ating sarelistedint he
fuse allocation chart.
Th efusea lloc atio
nc h
art is in the fuse bo xinthe
front-passenge rfootwell (Ypage 285).
If an ewly inserte dfusea lsob lows ,havet he
cause traced and rectifie dataqualified special-
is tw orkshop ,e.g.ana uthorized Mercedes-Benz
Center.
Before changin gafuse
XSecure the vehicl eagain st rolling away
(Ypage 141).
XSwitch off al lelectrica lconsumers.
XVehicle swithout KEYLESS-GO: remove the
SmartKeyf romthe ignition lock.
XVehicle swithK EYLESS -GOs tart-function
or KEYLESS-GO: open the driver's door.
Th ev ehicl eelectronics ar enow in position
g .Thisc orresponds to the SmartKeyb eing
remove dfromt he ignition.
Th ef uses arel oc ated in variou sfuseb oxes:
RFuse bo xinthe engine compartment on the
left-hand side of the vehicle, when viewed in
the directio noftravel
RFuse bo xinthe front-passenge rfootwell
Th efus ea lloc atio nchart is on the fuse bo xinthe
front-passenge rfootwell (
Ypage 285).
284Fuses
Breakdow nassistance
Page 288 of 326
XRemove cover=forwards .
Fus eallocation chart ?is locate donthe
lower right-hand side of cover =.
XTo close:insert cover =on th eleft-han dside
of th efuseb ox int othe retainer.
Cove r= engage sintheretainers .
XFold down cover =until clamps ;lockaudi-
bly.
XFold bac kperforate dfloor covering :.
XInstall thefloormats .
286Fuses
Breakdown assistance
Page 290 of 326
Checkwheelsand tires for damag eatleast once
am onth .Checkw heelsa nd tires after driving
off-road or on roug hroads. Damaged wheels
can caus ealoss of tir epressure. Pay particular
attentio ntodamagesucha s:
RCutsinthet ires
RPunctures inthet ires
RTearsint hetires
RBulges on tires
RDeformation or severe corrosiononw heels
Regularly check thetiret read dept hand the
conditio nofthetread across th ewhole widthof
th et ire(
Ypage 288). Ifnecessary, tur nthe
frontw heelstof ull lockino rder to inspectt he
inner sideof thetires urface.
All wheelsm ust haveavalvec ap to protect the
valv eagainst dirtand moisture. Do no tmount
anythingo ntot he valv eother than th estandard
valv ecap or other valv ecaps approved by
Mercedes-Ben zfor your veh icle.Don otuse any
other valv ecaps or systems ,e.g.t irep ressure
monitorin gsystems.
Regularly check thepressureofa llth et ires par-
ticularly priortol ongt rips. Adjus tthe tirep res-
sure as necessary (
Ypage 290).
Observ ethe note sont heemergenc yspare
wheel (
Ypage 312).
The servic elife of tires depends, amon gother
things, on th efollowin gfactors:
RDrivin gstyle
RTire pressure
RDistance covered
Notes on tir etread
GWAR NING
In suff icient tir etread will reduce tir etraction.
The tir eisnol ongerabletodissipat ewater.
This mean stha tonw et road surfaces ,the risk
of hydroplaning increases, inparticular where
speedisn otadapted to suit th edriving con-
dit ions. Thereisar iskofa cciden t.
If th et irep ressureist oohigh or to olow, tires
may exhibit diff erent levelsof wear at differ-
entl ocations on th etiret read. Thus,y ou
should regularly check th etread dept hand
th ec onditio noft hetread across th eentire
widt hofa lltires.
Minimum tir etread depthf or:
RSummer tires: âin(3 mm)
RM+S tires: ãin(4 mm)
For safety reasons, replace th etires before
th el egally prescribe dlimit for th eminimum
tir et read depthisr eached.
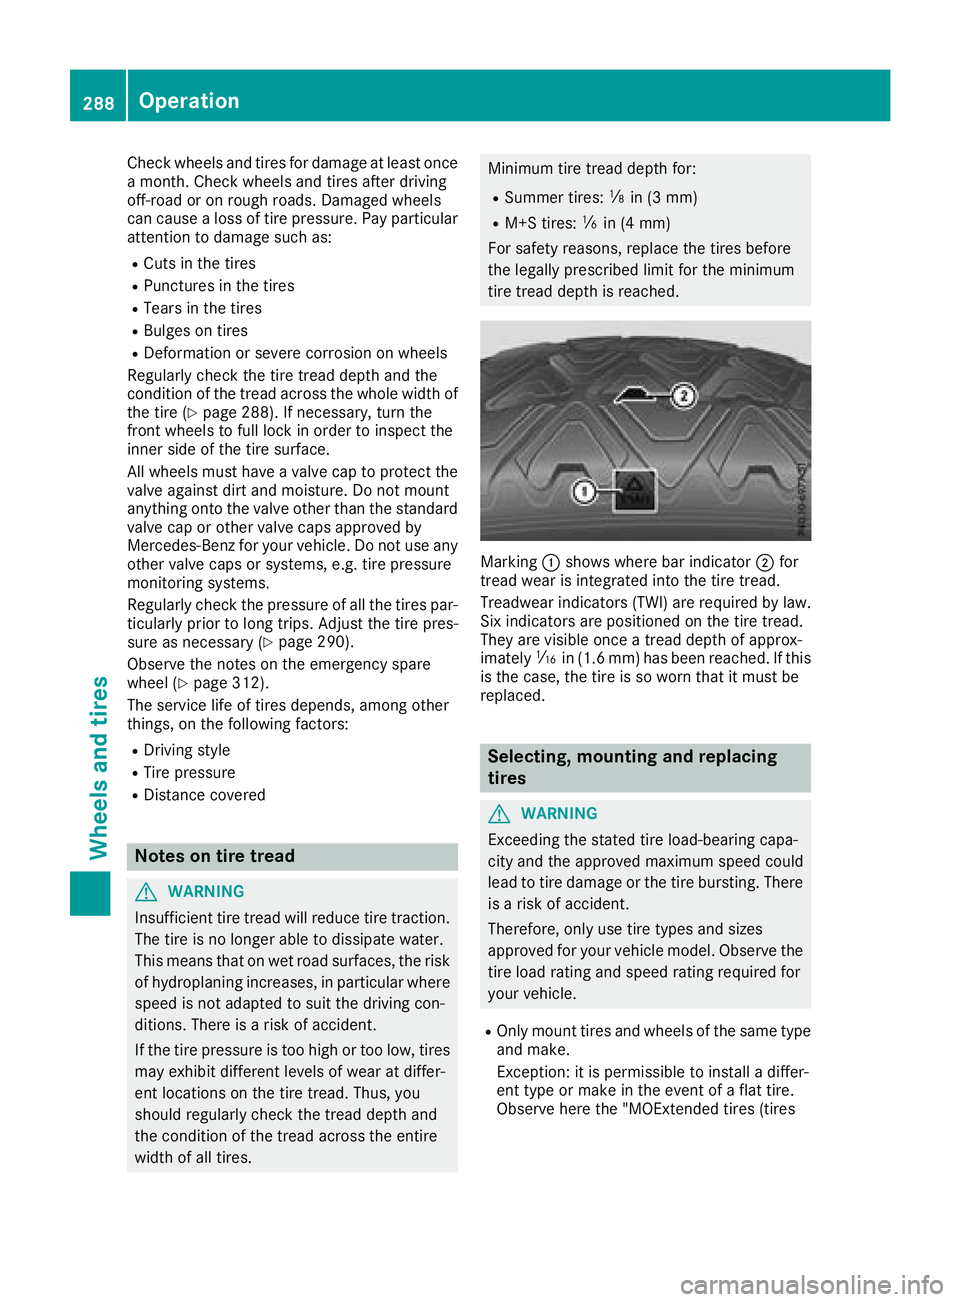
Marking:shows whereb ar indicator ;for
tread wear is integrate dintot he tiret read.
Treadwear indicators (TWI)a re requiredbylaw.
Six indicators are positione donthetiret read.
They are vis ibleonce atread depthofa pprox-
imately áin(1. 6m m) has been reached. Ifthis
is thec ase, th etireissow orn that it must be
replace d.
Selecting, mounting and replacing
tires
GWARNING
Exceedingt hestate dtirel oad-bearing capa-
cit ya nd th eapprove dmaximum speedc ould
lead to tir edamag eorthetireb ursting. There
is ar iskofa ccident.
Therefore, only use tiretype sand sizes
approve dfor your vehicle model. Observ ethe
tir el oad rating and speedr ating required for
your vehicle.
ROnly moun ttires and wheelsoft hesame type
and make.
Exception: itis permissible to install adiffer-
entt ype or mak eintheevent of aflat tire.
Observ eheret he"MOExtended tires (tires
288Operation
Wheels and tires