Page 105 of 248
Communications and multimedia
Communications and multi-
medi a
St eerin
g wheel controls*
General information The steering wheel includes a multifunction
modul
e fr
om where it is possible to control
the audio, telephone and radio/navigation
functions without needing to distract the
driver.
There are two versions of the multifunction
module:
● Audio, telephone and navigation with voice
contr o
l version : for controlling the audio
functions available (radio, audio CD, MP3,
iPod ®1)
, USB 1)
, SD 1)
) and Bluetooth system
from the steering wheel.
● Audio, telephone and navigation without
voice c
ontrol version : for controlling the au-
dio functions available (radio, audio CD,
MP3, iPod ®1)
, USB 1)
, SD 1)
) and Bluetooth sys-
tem from the steering wheel. 1)
Depending on the vehicle equipment.
103
Technical data
Advice
Operation
Emergencies
Safety
Page 106 of 248

Operation
Operating the audio, telephone and navigation system with voice control Fig. 115
Controls on the steering wheel.ButtonRadioMedia (except AUX)AUXTelephone a)Navigation a)
ATurn
Turn volume up/down. You do
not need to be in audio mode
(radio).Turn volume up/down. You do
not need to be in audio mode
(media).Turn volume up/down. You do
not need to be in audio mode
(media).Turn volume up/down. You do
not need to be in telephone
mode.
Turn announcement volume
up/down. You do not need to
be in navigation mode but
there has to be an announce-
ment active when you adjust
the volume.
APressMute volume.Mute volume.Mute volume.Mute incoming call.Mute the current navigation an-
nouncement.
Ba)Activate/deactivate voice control.
This function can be used from any mode (audio, media, navigation, assistants, vehicle status, travel data). When the system is in telephone mode this button’s function
is deactivated during the ongoing call, and without Radio/Media functionality (except AUX).
C /
DSearch for the previous/next
station b)
.
Short press: Switch to the pre-
vious/next song.
Hold down: Fast rewind/for-
ward c)
.
No function
– There is no active call: Ra-
dio/Media functionality (ex-
cept AUX)
– Active call: no functionNo function for the other
modes (navigation, assistants,
vehicle status, travel data).
E / Fa)Change instrument panel menu.
This function can be used from any mode (audio, media, navigation, assistants, vehicle status, travel data).104
Page 107 of 248

Communications and multimediaButtonRadioMedia (except AUX)AUXTelephone
a)Navigation a)
GColoured instrument panel:
switch to the previous menu.
Monochrome instrument panel: switch to the previous function.
HTurn
Coloured instrument panel: List
of stations available (only if
the instrument panel is in au-
dio menu).Coloured instrument panel:
next track (only if the instru-
ment panel is in audio menu).No function
– There is no active call: List of
latest calls.
– Active call: access the call
options list (call on hold, hang
up, mute microphone, private
number, etc.).– Active route: access the view
to halt guidance to destination.
– No active route: list of recent
destinations.
HPressActs on the instrument panel or confirms the instrument panel menu option depending on the menu option.
a) According to the vehicle's equipment package.
b) This action can be performed when you are listening to the radio; there is no need to be in audio-radio mode.
c) These actions can be performed when you are listening to media; there is no need to be in audio-radio mode. 105
Technical data
Advice
Operation
Emergencies
Safety
Page 108 of 248

Operation
Operating the audio, telephone and navigation system with voice control Fig. 116
Controls on the steering wheel.ButtonRadioMedia (except AUX)AUXTelephone a)Navigation a)
ATurn
Turn volume up/down. You do
not need to be in audio mode
(radio).Turn volume up/down. You do
not need to be in audio mode
(media).Turn volume up/down. You do
not need to be in audio mode
(media).Turn volume up/down. You do
not need to be in telephone
mode.
Turn announcement volume
up/down. You do not need to
be in navigation mode but
there has to be an announce-
ment active when you adjust
the volume.
APressMute volume.Mute volume.Mute volume.Mute incoming call.Mute the current navigation an-
nouncement.
Ba)– Incoming call: pick up (short press), reject (hold down).
– Active call: hang up active call (short press).
– No active/incoming call: open telephone menu (short press), redial the last active call (hold down).
These functions can be used from any mode (audio, media, navigation, assistants, vehicle status, travel data).
C /
DSearch for the previous/next
station b)
.
Short press: Switch to the pre-
vious/next song.
Hold down: Fast rewind/for-
ward c)
.
No function
– There is no active call: Ra-
dio/Media functionality (ex-
cept AUX)
– Active call: no functionNo function for the other
modes (navigation, assistants,
vehicle status, travel data).
E / Fa)Change instrument panel menu.
This function can be used from any mode (audio, media, navigation, assistants, vehicle status, travel data).106
Page 109 of 248

Communications and multimediaButtonRadioMedia (except AUX)AUXTelephone
a)Navigation a)
GCycles through the audio source: FM/AM – CD – SD - USB - AUX - BT Audio (only those that are available).
This function can be used from any mode (audio, media, navigation, assistants, vehicle status, travel data).
HTurn
Coloured instrument panel:
List
of stations available (only if
the instrument panel is in au-
dio menu).Coloured instrument panel:
next track (only if the instru-
ment panel is in audio menu).No function
– There is no active call: List of
latest calls.
– Active call: access the call
options list (call on hold, hang
up, mute microphone, private
number, etc.).– Active route: access the view
to halt guidance to destination.
– No active route: list of recent
destinations.
HPressActs on the instrument panel or confirms the instrument panel menu option depending on the menu option.
a) According to the vehicle's equipment package.
b) This action can be performed when you are listening to the radio; there is no need to be in audio-radio mode.
c) These actions can be performed when you are listening to media; there is no need to be in audio-radio mode. 107
Technical data
Advice
Operation
Emergencies
Safety
Page 110 of 248

Operation
Multimedia USB/A UX
-IN inp
utFig. 117
USB/AUX-IN input. Depending on the features and the country,
the
v
ehic
le may have a USB/AUX-IN connec-
tion.
The USB/AUX-IN input is located above the
storage compartment in the front centre con-
sole ››› Fig. 117.
The operating description is located in the re-
spective Instruction Manuals of the audio
system or the navigation system. Opening and closing
R emot
e c
ontrol
General notes Read the additional information carefully
›› ›
page 9
The remote control key can
● Lock and unlock the vehicle
● Unlock or open the rear lid.
The remot e c
ontrol transmitter and the bat-
teries are integrated in the key. The receiver
is inside the vehicle. The remote control key
has a maximum range of 30 metres. The
range is reduced as the batteries start to lose
power.
The key includes a foldaway part that can be
used to manually lock or unlock the vehicle
and to start the engine.
If a lost key is replaced or the receiver is re-
paired or changed, the remote control key
must be adapted by an authorised SEAT deal-
er. Only then can the remote control key be
used again. Note
● The remot e c
ontrol is automatically deacti-
vated when the ignition is switched on. ●
The remot e c
ontrol function may be tempo-
rarily limited by interference from other
transmitters near the vehicle that operate on
the same frequency (e.g. mobile phone, tele-
vision transmitter).
● If the central locking system or the anti-
theft a
larm only responds to the remote con-
trol at a distance of less than 3 metres, then
the battery must be replaced ››› page 110.
● If the driver door is open, the vehicle can-
not be lock
ed using the remote control. Unlocking and locking the vehicle
Fig. 118
Remote control key Unlocking the vehicle
– Press button 1 .
L oc
k
ing the vehicle
– Press button 2 .
108
Page 111 of 248

Opening and closing
Deactivating the Safe lock – Press button 2 twice in 2 seconds. Further
inf orm
ation ›
›› page 111.
Unlocking the rear lid
– Press button 3 . Further information
› ›
›
page 118.
Unfolding the key shaft
– Press button 4 .
F o
l
ding the key shaft
– Press button 4 and fold the key shaft back
t o its
origin
al position.
The turn signals will flash twice when the ve-
hicle is unlocked. If the vehicle is unlocked
using button 1 and none of the doors or the
r e
ar lid i
s opened in the following 30 sec-
onds, the vehicle will automatically relock
and the Safe lock or the anti-theft alarm will
be activated. This function prevents the vehi-
cle from being unlocked by mistake.
Locking indication
The turn signals will flash if the vehicle has
been correctly locked.
Should any of the doors or the rear lid remain
open when the vehicle is locked, the turn sig-
nals will only flash when they are closed. WARNING
Do not leave people or animals in vehicles
lock ed fr
om outside with the Safe lock activa-
ted: the doors and windows cannot then be
opened from the inside. Doors locked in this
manner could delay assistance in an emer-
gency. Risk of death! Note
● Only u
se the remote control when the
doors and the rear lid are locked and the ve-
hicle is within sight.
● Do not press the lock button on the re-
mote c
ontrol before inserting the key in the
ignition, otherwise the vehicle could be
locked by mistake. Should this occur, press
the unlock button on the remote control. Remote control synchronisation
f the vehicle cannot be locked or unlocked
u
s
in
g the remote control, the key code may
not match that of the control unit. This can
occur when the remote control buttons are
frequently pressed outside the range of the
system or if the remote control battery has
been replaced.
In this case, it must be synchronised as fol-
lows:
● Press any key on the remote control key. ●
Open the door usin
g the key within the
next minute.
Keys General
notes Fig. 119
Key with remote control/Key without
r emot
e c
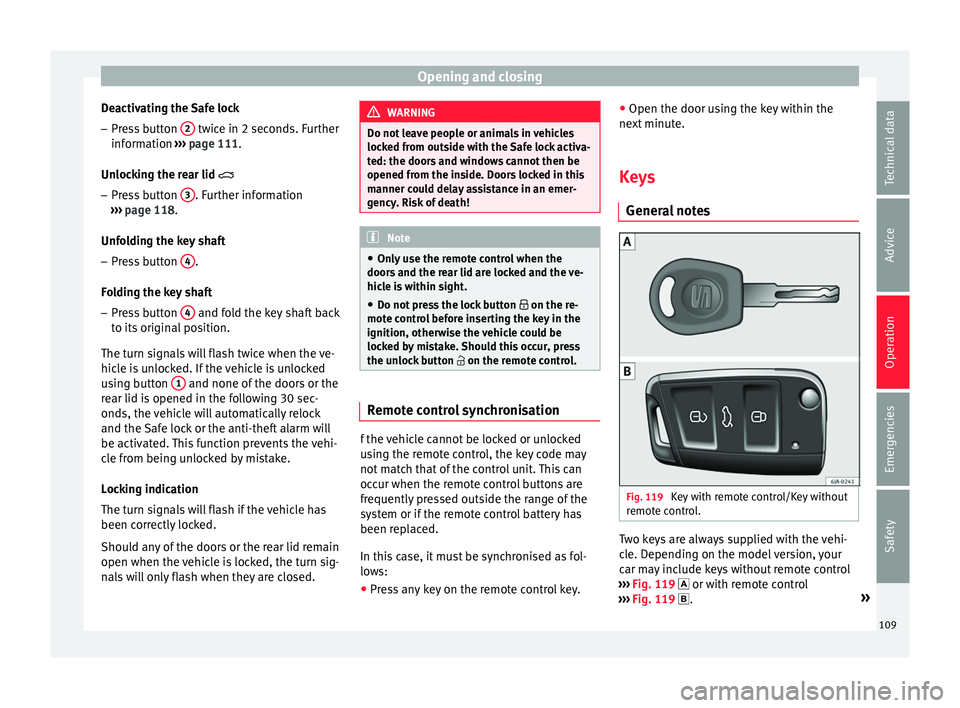
ontrol. Two keys are always supplied with the vehi-
c
l
e. D
epending on the model version, your
car may include keys without remote control
››› Fig. 119 or with remote control
››› Fig. 119 . »
109
Technical data
Advice
Operation
Emergencies
Safety
Page 112 of 248

Operation
WARNING
● Never l e
ave the key inside whenever you
leave the vehicle - even if only for a moment.
This is particularly important if children are
to remain in the vehicle. Children might start
the engine or some other electrical compo-
nent, e.g. electric windows. Risk of injury!
● Wait until the vehicle has completely stop-
ped before t
aking the key out of the ignition.
Otherwise the steering wheel may lock sud-
denly. Risk of accident! CAUTION
● Eac h k
ey contains electronic components
and must, therefore, be protected from damp-
ness and strong vibrations.
● Keep the grooves in the key shaft clean.
Any dir
t (fibre from clothing, dust, etc.) has a
negative impact on locks, ignition, etc. Note
Should a key be lost, request a duplicate key
from an Authori sed S
EAT dealer. Replacing the battery in the remote
c
ontr
o
l key Fig. 120
Vehicle key: opening the battery
c omp
ar
tment. Fig. 121
Vehicle key: removing the battery. SEAT recommends you ask a specialised
w
ork
shop t
o replace the battery.
The battery is located to the rear of the vehi-
cle key, under a cover. Changing the battery
● Unfold the vehicle key shaft.
● Remove the cover from the back of the ve-
hicle k
ey ››› Fig. 120 in the direction of the ar-
row ››› .
● Extract the battery from the compartment
u s
in
g a suitable thin object ››› Fig. 121.
● Place the new battery in the compartment
as sho
wn ››› Fig. 121, pressing in the oppo-
site direction to that shown by the arrow
››› .
● Fit the cover as shown ››
›
Fig. 120 , pressing
it onto the vehicle key casing in the opposite
direction to that shown by the arrow until it
clicks into place. CAUTION
● If the b att
ery is not changed correctly, the
vehicle key may be damaged.
● Use of unsuitable batteries may damage
the vehic
le key. For this reason, always re-
place the dead battery with another of the
same voltage, size and specifications.
● When fitting the battery, check that the po-
larity i
s correct. For the sake of the environment
Please dispose of your used batteries correct-
ly and w ith r
espect for the environment.110