Page 33 of 248

The essentials
Service intervals Fig. 39
Instrument panel The service interval indication appears on the
in
s
trument
panel display ››› Fig. 39 1 .
S EA
T di
stinguishes between services with en-
gine oil change (e.g. Oil change service) and
services without engine oil change (e.g. In-
spection).
In vehicles with Services established by time
or mileage, the service intervals are already
pre-defined.
In vehicles with LongLife Service , the inter-
vals are determined individually. Thanks to
technological progress, maintenance work
has been greatly reduced. Because of the
technology used by SEAT, with this service
you only need to change the oil when the ve- hicle so requires. To calculate this change
(max. 2 y
ears), the vehicle's conditions of
use and individual driving styles are consid-
ered. The advance warning first appears 20
days before the date established for the cor-
responding service. The kilometres (miles)
remaining until the next service are always
rounded up to the nearest 100 km (miles)
and the time is given in complete days. The
current service message cannot be viewed
until 500 km after the last service. Prior to
this, only lines are visible on the display.
Inspection reminder
When the Service date is approaching, when
the ignition is switched on a Service remind-
er is displayed.
Vehicles without text messages : a span-
ner will be displayed on the instrument
panel plus an indication in km.
The kilometres indicated are the maximum
number of kilometres that can be travelled
until the next service. After a few seconds,
the display mode changes. A clock symbol
appears and the number of days until the
next service is due.
Vehicles with text messages : Service in
--- km or --- days will be shown on the
instrument panel display. Service due
When the servic
e date is due, an audible
warning is given when the ignition is switch-
ed on and the spanner displayed on the
screen flashes for a few seconds .
Vehicles with text messages : Service now
will be shown on the instrument panel dis-
play.
Reading a service notification
With the ignition switched on, the engine off
and the vehicle at a standstill, the current
service notification can be read:
Press and hold the button 0.0/SET for more
th an 5 sec
ond
s to consult the service mes-
sage ››› Fig. 39 2 .
When the ser v
ic
e date has passed , a minus
sign is displayed in front of the number of kil-
ometres or days.
Vehicles with text messages : Service
since --- km or --- days ago will be
shown on the display.
Resetting service interval display
If the service was not carried out by a SEAT
dealership, the display can be reset as fol-
lows:
● Switch off the ignition, press and hold the
button 0.0/S
ET
› ›
› Fig. 39 2 .
● Switch ignition back on. » 31
Page 34 of 248

The essentials
● Rel
e
ase the button 0.0/SET and press it
ag ain f
or the ne
xt 20 seconds. Note
● The serv ic
e message disappears after a few
seconds, when the engine is started or when OK/RESET is pressed on the windscreen wiper
lev er
, or OK on the multifunction steering
wheel.
● In v
ehicles with the LongLife system in
which the batt
ery has been disconnected for
a long period of time, it is not possible to cal-
culate the date of the next service. Therefore
the service interval display may not be cor- rect. In this case, bear in mind the maximum
service intervals permitted in the ››› Booklet
Maintenance Programme. Cruise control
Oper atin
g the c
ruise control system
(CCS)* Fig. 40
On the left of the steering column:
sw it
c
hes and controls for operating the CCS ●
Switching on the CCS: Move switch
› ›
›
Fig. 40 1 to .
The system is on. If no
s peed h
as been programmed, the system will
not control it.
● Activating the CCS: Press button ›››
Fig. 40
2 in the ar
e
a. The current speed is
memorised and controlled. ●
Temporari
ly switching off the CCS: Move
switch ››› Fig. 40 1 to
or push the
br ak
e. The cruise control system is switched
off temporarily.
● Reactivating the CCS: Press button
›››
Fig. 40 2 in
. The memorised speed
i s
saved and controlled again.
● Increasing stored speed during CCS regula-
tion: pres
s button 2 in
. The vehicle ac-
c el
erates until the new stored speed.
● Reducing stored speed during CCS regula-
tion: pres
s button 2 in t
o lower the
s peed b
y 1 km/h (1 mph). Speed is reduced
until reaching the new stored speed.
● Switching off the CCS: Move switch
›››
Fig. 40 1 to .
The system is disconnec-
t ed and the memori
sed speed is deleted.
››› in Introduction on page 178
››› page 178 32
Page 35 of 248
The essentials
Warning lamps On the in s
trument
panelFig. 41
Instrument panel, on dash panel. Red warning lamps
Central warning lamp: additional
information on the instrument
panel display–
Parking brake on.›››
page
158
Do not continue driving!
The brake fluid level is too low or
there is a fault in the brake sys-
tem.››› page
157
Lit up or flashing: Do not continue driving!
Fault in the steering.››› page
153
Driver or passenger has not fas-
tened seat belt.›››
page
62
Use the foot brake!»
33
Page 36 of 248

The essentials
Yellow warning lamps Central warning lamp: additional
information on the instrument
panel display–
Front brake pads worn.›››
page
157
it lights up:
Fault in the ESC, or
disconnection caused by the sys-
tem.
››› page
158
flashes: ESC or ASR activated.
ASR manually deactivated.›››
page
158
ABS faulty or does not work.
Rear fog light switched on.›››
page 18
lights up or flashes:
fault in the
emission control system.››› page
167
it lights up:
pre-heating of diesel
engine.
››› page
169
flashes: fault in the diesel engine
management.
fault in the petrol engine man-
agement.›››
page
169
lights up or flashes:
fault in the
steering system.››› page
153
Tyre pressure too low, or fault in
the tyre pressure monitoring sys-
tem.›››
page
221
Fuel tank almost empty.›››
page
100
Fault in airbag system and seat
belt tensioners.›››
page
67 Other warning lamps
Left or right turn signal.›››
page 19
Hazard warning lights on.››› page
125
Trailer turn signals›››
page
186
it lights up:
Press the foot brake!
flashes: the selector lever locking
button has not engaged.››› page
163
it lights up:
cruise control activa-
ted or speed limiter switched on
and active.
››› page 32
flashes: the speed set by the
speed limiter has been exceeded.
Main beam on or flasher on.›››
page 19
››› in Control and warning lamps on
page 101
››› page 100 On the instrument panel display
Fig. 42
On the instrument panel display: door
open.
Do not continue driving!
With the corresponding indi-
cation: door(s), rear lid or
bonnet open or not properly
closed.
››› page 28
Ignition: Do not carry on
driving! Engine coolant level
too low, coolant temperature
too high
››› page 210
Flashing: Fault in the engine
coolant system.
Do not continue driving!
Engine oil pressure too low.››› page 207 34
Page 37 of 248

The essentials
Fault in the battery.›››
page 214
Driving light totally or partially
faulty.›››
page 84
Fault in the cornering light
system.››› page 120
Diesel particulate filter
blocked›››
page 168
Level of windscreen washer
fluid too low.›››
page 212
Flashing: Fault in the oil level
detection. Control manually.
›››
page 207Ignition: Insufficient engine
oil.
Fault in the gearbox.›››
page 164
Immobiliser active.›››
page 154
Service interval display›››
page 31
Mobile telephone is connec-
ted via Bluetooth to the origi-
nal telephone device.
›››
Booklet
Radio or
››› Booklet
Navigation
system
Mobile telephone battery
charge meter. Available only
for devices pre-installed in
factory.
Freezing warning. The outside
temperature is lower than
+4°C (+39°F).›››
page 29
Start-Stop system activated.
›››
page 183 Start-Stop system unavaila-
ble.
Low consumption driving sta-
tus›››
page 97
›››
page 97 On the instrument panel
Front passenger front airbag is
disabled (
).
››› page
67
››› in Front passenger front airbag
switch on page 73
››› page 14 Gearbox lever
M anua
l
gearbox Fig. 43
Gear shift pattern of a 5 or 6-speed
m anual
g
earbox. The position of the gears is indicated on the
g
e
arbo
x lever ››› Fig. 43.
● Press the clutch pedal and keep your foot
right down.
● Mo
ve the gearbox lever to the required po-
sition.
● Rel
ease the clutch.
Selecting r
everse gear
● Press the clutch pedal and keep your foot
right down.
● W
ith the gearbox lever in neutral, push it
downw
ards, move it to the left as far as it will
go and then forwards to select reverse
››› Fig. 43 R .
» 35
Page 38 of 248

The essentials
● Rel
e
ase the clutch.
››› in Changing gears on page 160
››› page 160 Automatic gearbox*
Fig. 44
Automatic gearbox: selector lever po-
s ition
s. Parking lock
R
ev
er
se gear
P
R Neutral (idling)
Drive (for
ward)
Sport programme: drive (forward)
Tiptronic mode: pull the lever forwards
(+) to go up a gear or backwards ( –) to
go down a gear.
››› in Basic information on page 161
››› page 160
››› page 36 Manual release of selector lever
Fig. 45
Manual release of the selector lever. N
D
S
+/–
If there is a fault in the power system to the
el
ectr
onic
selector lever lock system (flat bat-
tery, blown fuse) or the system itself is faulty,
the selector lever cannot be moved from po-
sition P in the normal manner, which pre-
vents the vehicle from being moved. The se-
lector lever must be unlocked using the man-
ual release.
● Apply the handbrake.
● Pull gently on both sides at the front of the
selector l
ever cover.
● Also loosen the cover at the rear.
● Press the yellow plastic part with your fin-
ger in the direction indic
ated by the arrow
››› Fig. 45.
● Press the interlock button on the selector
lever kno
b at the same time and move the se-
lector lever to position N (if the selector lever
is moved back to position P, it will lock
again). 36
Page 39 of 248
The essentials
Air conditioning Ho w doe
s
Climatronic* work? Fig. 46
In the centre console: Climatronic con-
tro l
s Buttons/controls
Interior t
emper
ature setting
Display Selected interior temperature
Degrees Centigrade or Fahrenheit
Automatic air conditioning mode
Defrost or demist windscreen
Air flow direction
Air recirculation
1 2
3
4
5
6
7 Cooling on/off
Sel
ect
ed b
lower speed
Buttons/controls Set blower speed
Interior temperature sensor
Defrost or demist windscreen
Automatic mode
Air distribution to windows
Air distribution to upper body
8 9
10
11
12
13
14
15 Air distribution to footwells
Air r
ec
ir
culation
Cooling on/off
››› in General notes on page 146
››› page 150 16
17
18
37
Page 40 of 248

The essentials
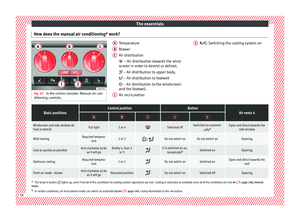
How does the manual air conditioning* work? Fig. 47
In the centre console: Manual air con-
ditioning c ontr
ols. Temperature
Blow
er
Air di
stribution
– Air distribution towards the wind-
screen in order to demist or defrost.
– Air distribution to upper body.
– Air distribution to footwell
– Air distribution to the windscreen
and the footwell.
Air recirculation
A B
C
1 A/C
: Switching the cooling system on
2
Basic positionsControl positionButtonAir vents 4ABC12
Windscreen and side window de-
frost or demistFull right3 or 4 Switched offSwitched on automati-
callya)Open and direct towards the
side window
Mild heatingRequired tempera-ture2 or 3 / Do not switch onDo not switch onOpening
Cool as quickly as possibleAnti-clockwise as far
as it will goBriefly 4, then 2 or 3 It is switched on au-
tomatically b)Switched onOpening
Optimum coolingRequired tempera-
ture1 or 2 Do not switch onSwitched onOpen and direct towards the
roof
Fresh air mode - blowerAnti-clockwise as faras it will goRequired position Do not switch onSwitched offOpening
a)
The lamp in button 2 lights up, even if not all of the conditions for cooling system operations are met. Cooling is indicated as available once all of the conditions are met
››› page 148, General
notes.
b) In certain conditions, air recirculation mode can switch on automatically ›››
page 149, a lamp illuminates in the button.38