Page 217 of 248
 of the battery is
connected in r
everse order.")
Checking and refilling levels
– Open the b att
er
y cover in the direction indi-
cated by the arrow ››› Fig. 210.
– The positive terminal (+) of the battery is
connected in r
everse order.
Checking the battery electrolyte level Fig. 211
Battery: Electrolyte level indicator. We recommend you have the acid level regu-
l
arly
c
hecked at an official technical service,
particularly in the following cases.
● At high outside temperatures.
● On long daily trips.
● Whenever the vehicle is loaded
›››
page 215, Charging the battery.
In vehicles equipped with a battery with col-
our indicator, the so-called magic eye
››› Fig. 211 changes colour to indicate the
acid level. Air bubbles can influence the colour of the in-
dicator
. Therefore, carefully knock the indica-
tor before checking the acid level.
● Black – the acid level is correct.
● Colourless or light yellow – acid level too
low, b
attery must be changed. Note
● The batt er
y acid level is also regularly
checked during servicing at authorised SEAT
dealers.
● The electrolyte level on “AGM” batteries
cannot be c
hecked for technical reasons.
● Vehicles equipped with the “Start-Stop”
syst
em include a battery control unit to con-
trol the battery level for repeated engine
starting. Winter service
At low temperatures the battery provides only
a fr
action of
the s
tarting power it has at nor-
mal temperatures.
A flat battery can also freeze at temperatures
slightly below 0°C (+32°F).
We therefore recommend you have the bat-
tery checked and, if necessary, charged at an
official SEAT technical service before the start
of winter. Charging the battery A fully-charged battery is essential for relia-
bl
e s
tarting.
– Switch off the ignition and all electrical
equipment.
– For “f
ast-charging” only: disconnect both
batter
y connection cables (first the “nega-
tive” terminal and then the “positive”).
– Connect the charger cables to the battery
terminal
s (red = “positive”, black = “nega-
tive”).
– Plug in the battery charger and switch on.
– After charging the battery: Switch off the
batt er
y charger and disconnect the cable.
– Remove the charger cables.
– If necessary, reconnect both battery cables
to the batt
ery (first the “positive” cable,
then the “negative” cable).
When charging with a low current (e.g. with a
small battery charger ), the battery does not
normally have to be disconnected. The in-
structions of the battery charger manufactur-
er must be followed.
Use a current equivalent to or lower than
10% of the battery capacity to fully charge
the battery.
Before “fast-charging” the battery however,
both battery cables must be disconnected. »
215
Technical data
Advice
Operation
Emergencies
Safety
Page 218 of 248

Advice
“Fast-charging” a battery is dan
g erous and
requires a battery charger and special knowl-
edge. Fast charges should be performed by
an official technical service.
The battery caps should not be opened while
the battery is being charged. CAUTION
In vehicles fitted with the “Start-Stop” sys-
tem, the c h
arger cable cannot be directly con-
nected to the negative terminal of the vehicle
battery but must be attached to the engine
ground point ›››
page 53. Disconnecting and connecting the
b
att
er
y The following functions will either be inoper-
ativ
e or w
i
ll not work properly after discon-
necting and reconnecting the battery:
FunctionInstallation
Setting the clock››› page 97
The multifunction display data
is deleted››› page 99 Note
We recommend having the vehicle checked by
an authorised S EA
T dealer to guarantee the
correct working order of all electrical sys-
tems. Changing the battery
A replacement battery must have the same
cap
ac
ity, voltage, current rating and size as
the original. The appropriate types of battery
can be acquired from authorised SEAT deal-
ers.
We recommend having the battery changed
by an authorised SEAT dealer, where the new
battery will be correctly installed and the
original disposed of in line with regulations.
Automatic disconnection of electrical
equipment When heavily-charging a battery, the pro-
gr
amme sel
ect
ed by the electrical system
control unit prevents the battery from auto-
matically discharging. This may result in the
following:
● Increase in idling speed so that the alterna-
tor can s
upply more current to the electrical
system.
● The performance of certain electrical com-
ponents cou
ld be limited or some may switch
off temporarily, e.g. the heated seats, the
heated rear window, the 12 V power socket. Note
Despite any measures taken by the control
unit, the b att
ery could drain. e.g. with the en- gine is switched off, the key is turned in the
ignition for a lon
g period or the s
ide lights or
parking lights are switched on. The switching
off of certain electrical components does not
impair driving comfort and often the driver
will not even notice. 216
Page 219 of 248

Wheels and tyres
Wheels and tyres
T y
r
es
Introduction WARNING
● Durin g the fir
st 500 km, new tyres do not
give maximum grip, therefore you should
drive carefully. Risk of accident!
● Never drive with damaged tyres. Risk of ac-
cident!
● Only
use wheels and tyres that been au-
thorised by
SEAT or your vehicle model. Fail-
ure to do so could impair road safety. Risk of
accident!
● Never exceed the maximum speed permit-
ted for
your tyres. Risk of accident due to tyre
damage and loss of vehicle control!
● Under-inflated tyres are submitted to great-
er rol
ling resistance. This means that they
can overheat at high speeds. This can cause
tread separation and even tyre blow-out.
● For driving safety, tyres should be replaced
at le
ast in pairs according to the axle and not
individually. The tyres with the deepest tread
should always be used on the front wheels.
● Never fit used tyres of an unknown age or
prior use.
● Ty
res must be immediately changed at the
very
latest when they have worn down to the
tread wear indicators. ●
Worn ty r
es reduce the necessary grip at
high speeds on damp surfaces. This could
lead to “aquaplaning” (uncontrolled vehicle
movement –“skidding” on damp surfaces).
● Damaged wheels and tyres must be re-
plac
ed immediately.
● Do not use summer or winter tyres that are
more than 6 or 4
years old respectively.
● Wheel bolts should be clean and screw
eas
ily. However, they must never be treated
with grease or oil.
● If the tightening torque of the wheel bolts
is t
oo low, they could loosen while the vehi-
cle is moving. Risk of accident! If the tighten-
ing torque of the wheel bolts is too high, the
bolts and threads could be damaged, leading
to the permanent deforming of the rim sup-
port surfaces.
● Incorrectly handled wheel bolts could lead
to a wheel c
oming loose while the vehicle is
moving. Risk of accident!
● Observe the national legal requirements re-
gardin
g the use of snow tyres and chains. CAUTION
● Where a s p
are wheel that is not compatible
with the wheels fitted is used, follow the in-
structions ››› page 220.
● The prescribed tightening torque for wheel
bolts
on steel and alloy wheels is 120 Nm.
● Protect your tyres from coming into contact
with oil, gr
ease and fuel.
● Replace any lost valve caps immediately. For the sake of the environment
Under-inflated tyres increases fuel consump-
tion. Note
● We r ec
ommend having all work on tyres
and wheels carried out by an authorised SEAT
dealer.
● We recommend using wheels, tyres, hub
caps
and snow chains from the SEAT Original
Accessories programme. 217
Technical data
Advice
Operation
Emergencies
Safety
Page 220 of 248

Advice
Service life of tyres Fig. 212
Side view of tyres with tread wear in-
dic at
or
s. Fig. 213
Location of the tyre pressure sticker. Tread wear indicator
The b
ase of
the side of the original tyres on
your vehicle show 1.6 mm high tread wear in-
dicators ››› Fig. 212. The position of these in-
dicators is given on the tyre sidewalls by the
letters “TWI”, triangular symbols or other
symbols.
The useful life of the tyres depends primarily
on the following factors:
Tyre pressure values
Under-inflation or over-inflation will consider-
ably reduce the useful life of the tyres and
impair the vehicle's handling. Therefore,
check the tyre pressure, including the spare
wheel, at least once a month and before any
long journey.
Inflation pressures for summer tyres are lis-
ted on a sticker inside the fuel tank flap
››› Fig. 213. The pressures for winter tyres are
0.2 bar (2.9 psi/20 kPa) above the summer
values.
Always check the pressure when the tyre is
cold. Do not reduce over-pressure in warm
tyres. The tyre pressures must be altered to
suit notable changes in the load being car-
ried.
Depending on the vehicle, tyre pressure can
be adjusted to medium load to improve driv-
ing comfort (“comfort” tyre pressure). When driving with comfort tyre pressure fuel con-
sumption ma
y increase slightly.
Driving style
Fast cornering, heavy acceleration and hard
braking all increase tyre wear.
Wheel balancing
The wheels on new vehicles are balanced.
Various factors encountered when driving
can cause them to become unbalanced,
which results in vibration of the steering
wheel.
The wheel must be rebalanced if a new tyre is
fitted or if a tyre is repaired.
Incorrect wheel alignment
Incorrect front or rear wheel alignment cau-
ses excessive tyre wear, frequently on one
side, and also impairs vehicle safety. If tyre
wear is very irregular, contact an Official
Service.
Tyre damage
To avoid damage to tyres and wheels, only
drive over kerbs or similar obstacles slowly
and at a right angle if possible.
Check tyres and wheels regularly for damage
(punctures, cracks, blisters, deformities,
etc.). Remove any foreign objects embedded
in outside of the treads.
218
Page 221 of 248

Wheels and tyres
Unusual vibration or the car pulling to one
s ide m
a
y indicate that one of the tyres is
damaged. Reduce speed immediately and
stop if you suspect that a wheel may have
been damaged! Check the tyres for damage
(blisters, cracks, etc.). If no external damage
is visible, drive slowly and carefully to the
nearest Official Service and have the vehicle
inspected.
Interchanging tyres Fig. 214
Interchanging tyres. Changing wheels around
If
the w
e
ar is visibly greater on the front tyres,
they should be exchanged for the rear tyres
as shown in the diagram ››› Fig. 214. All the
tyres will then last for about the same time.
To ensure that the wear is equal on all tyres
and maintain their optimum useful life, they
should be changed around every 10 000 km. Storing tyres
When you r
emove the tyres, mark them in or-
der to maintain the same direction of rotation
when they are installed again.
When removed, the wheels and/or tyres
should be stored in a cool, dry and preferably
dark location. Store tyres in a vertical posi-
tion, if they are not fitted on wheel rims.
New tyres or wheels All four wheels must be fitted only with tyres
of
the s
ame type, s
ize and the same tread
pattern.
The correct tyre/wheel combinations speci-
fied for your vehicle are listed in its docu-
mentation.
Understanding the tyre designations makes
it easier to choose the correct tyres. The tyre
designation is marked on the sidewall. For
example.
195/55 R 15 85 H
This contains the following information:
195Tyre width in mm
55Height/width ratio in %
Ridentifying tyre construction letter –
Radial
15Rim diameter in inches
85Load rating code
HSpeed rating code letter The tyres are subject to the following
maxi-
mum s
peed limits:
Speed rating codeletterMaximum speed limit
Q160 km/h (99 mph)
R170 km/h (106 mph)
S180 km/h (112 mph)
T190 km/h (118 mph)
U200 km/h (124 mph)
H210 km/h (130 mph)
V240 km/h (149 mph)
W270 km/h (168 mph) The m
anufacturing date is also indicated on
the ty r
e sidewall (possibly only on the outer
side of the wheel).
DOT … 27 16… »
219
Technical data
Advice
Operation
Emergencies
Safety
Page 222 of 248

Advice
means, for example, that the tyre was pro-
duc ed in the 27th w
eek
of 2016.
Follow the instructions ››› page 220 if you
only have a temporary spare wheel. Note
A SEAT Service Centre should be consulted to
find out whether wheel s
or tyres of different
sizes to those originally fitted by SEAT can be
fitted, and to find out about the combinations
allowed between the front axle (axle 1) and
the rear axle (axle 2). Tyres with directional tread pattern
The direction of rotation is indicated by the
arr
o
w
s on the tyre sidewall . The direction of
rotation indicated must be respected. This
guarantees optimum grip and helps avoid ex-
cessive noise, wear and aquaplaning.
In the event of a flat tyre, a spare wheel with
an undetermined tread pattern or an oppo-
site tread pattern must be used and you must
drive carefully, as in these cases the tyres no
longer offer maximum performance. Spare wheel
Spar
e wheel location* Fig. 215
Luggage compartment: spare wheel. The spare wheel is housed in a well under
the floor p
anel
in the lug
gage compartment
and is secured by a special bolt ››› Fig. 215.
Take out the tool box before removing the
spare wheel.
The tyre pressure of the spare wheel must be
checked (preferably whenever the tyre pres-
sure is checked – see sticker on fuel tank flap
››› page 218) to ensure the spare wheel re-
mains ready for use.
If the spare wheel is not the same size or de-
sign as the tyres that are mounted on the car
(for example if the car has winter tyres or
tyres with direction tread), only use the spare
tyre for a short period of time in the event of breakdown and drive with the corresponding
care
›
›› .
It mu
s
t be replaced as soon as possible for a
wheel with a normal size and finish.
Temporary spare wheel
If the vehicle is equipped with a temporary
spare wheel, there will be a warning sign on
the rim of the wheel.
Follow the instructions below when driving
with this wheel fitted.
● After fitting the wheel, the warning sign
must
not be covered.
● Do not drive faster than 80 km/h (50 mph)
with the sp
are wheel and take great care
while driving. Avoid heavy acceleration, hard
braking and fast cornering.
● The tyre pressure is the same as that of the
stand
ard tyres.
● Only use this spare wheel to reach the
neare
st Official Service, as it is not designed
for permanent use. WARNING
● Under no cir c
umstances must damaged
spare wheels be used.
● If the spare wheel is different in size or de-
sign to the ty
res currently fitted, never drive
faster than 80 km/h (50 mph). Avoid heavy
acceleration, hard braking and fast cornering. 220
Page 223 of 248

Wheels and tyres
CAUTION
Follow the instructions given on the tempora-
ry s
pare wheel label. Note
The tyre pressure of the spare wheel must al-
wa y
s correspond to the highest pressure pre-
scribed for the model of vehicle in question. Tyre monitoring systems
Ty r
e pressure* The tyre pressure monitoring system uses
ABS
sen
sor
s to compare the revolutions and
the circumference of each wheel. Should the
circumference of any wheel change, the
warning lamp on the general instrument
panel will light up and an audible warning
will be heard.
Tyre circumference may change if:
● Tyre pressure is too low
● Tyre structure is damaged
● Vehicle load not evenly distributed
● wheels on one axle are subjected to greater
load, (e.
g. driving with trailer, uphill, down-
hill);
● Snow chains are fitted
● The temporary spare wheel is fitted ●
One wheel on the axl
e has been changed
Basic system settings
Should the tyre pressure change or if one or
more wheels are changed or the position of
the wheel on the vehicle is changed, e.g.
changing round the front and rear wheels, or
where a warning lamp lights up when driv-
ing, the system must be adjusted as follows: ● Inflate all tyres to the prescribed pressures
›››
page 218.
● Switch the ignition on.
● Store the new tyre pressure in the Easy
Connect sy
stem with the button and the
S ET
TINGS function button
››
›
page 21.
● In vehicles without radio : pres
s and hold
down the button with the ignition on,
until an acoustic signal is heard.
The warning lamp lights up
If the pressure on at least one tyre is signifi-
cantly lower than the pressure set by the driv-
er, the warning lamp will light up ››› .
The w arnin
g l
amp flashes
If the warning lamp flashes, there is a fault in
the system. Contact a specialised service to
have it fixed. WARNING
● If the w arnin
g lamp lights up, slow down
immediately and avoid any severe braking or
steering manoeuvres. Stop and check the
tyres and their pressure as soon as possible.
● Under certain conditions (e.g. sporty driv-
ing styl
e, driving on loose surfaces or in win-
ter) the warning lamp may take a while to
light up or may remain switched off.
● Despite the tyre pressure monitoring sys-
tem, the driver r
emains responsible for main-
taining the correct tyre pressure. You must
therefore check the tyre pressure often. Note
● The tyr e pr
essure monitoring system is not
a replacement for regularly checking the tyre
pressure, as it is unable to recognise an even
drop in pressure.
● The tyre pressure monitoring system is un-
able t
o warn of a sudden drop in tyre pres-
sure, e.g. a puncture. In this case, try to stop
the vehicle carefully with no severe braking
or steering manoeuvres.
● To ensure the tyre pressure monitoring sys-
tem work
s correctly, the basic setting must
be performed every 10 000 km (6000 miles)
or once a year.
● If the battery is disconnected the warning
lamp lights
up when the ignition is switch-
ed on. This warning lamp must switch off af-
ter covering a short distance. 221
Technical data
Advice
Operation
Emergencies
Safety
Page 224 of 248
")
Advice
Winter service W int
er ty
resWinter tyres will significantly improve han-
dling of
the
vehicle in winter road conditions.
The design of summer tyres (width, rubber
compound, tread pattern) gives less grip at
temperatures below +7°C (+45°F), on ice and
snow. This applies particularly to vehicles
equipped with wide section tyres or high
speed tyres (code letters H or V on the side-
wall).
In order to preserve the performance of the
vehicle as much as possible, winter tyres
must be fitted on all four wheels, the mini-
mum depth of the tread must be 4 mm and
the maximum age must be 4 years.
You can use winter tyres of a lower speed rat-
ing if the maximum speed limit of these tyres
will not be exceeded, even if the maximum
speed limit for the vehicle is higher. For the sake of the environment
Summer tyres should be fitted again in time,
as they
give better handling on roads free of
snow and ice and at temperatures over +7°C
(+45°F). Summer tyres have a shorter braking
distance, produce less rolling noise and do
not wear as quickly. They also reduce fuel
consumption. 222
 1
1 2
2 3
3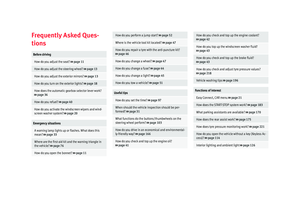 4
4 5
5 6
6 7
7 8
8 9
9 10
10 11
11 12
12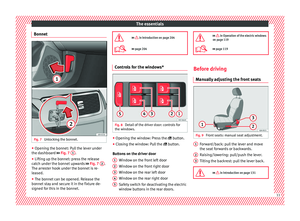 13
13 14
14 15
15 16
16 17
17 18
18 19
19 20
20 21
21 22
22 23
23 24
24 25
25 26
26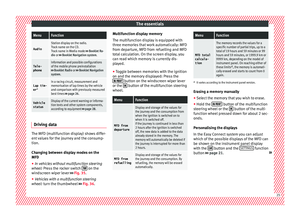 27
27 28
28 29
29 30
30 31
31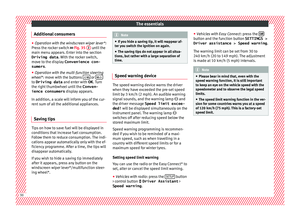 32
32 33
33 34
34 35
35 36
36 37
37 38
38 39
39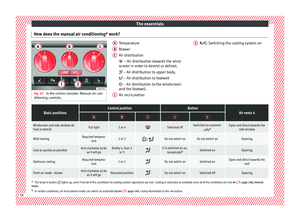 40
40 41
41 42
42 43
43 44
44 45
45 46
46 47
47 48
48 49
49 50
50 51
51 52
52 53
53 54
54 55
55 56
56 57
57 58
58 59
59 60
60 61
61 62
62 63
63 64
64 65
65 66
66 67
67 68
68 69
69 70
70 71
71 72
72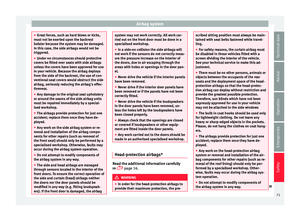 73
73 74
74 75
75 76
76 77
77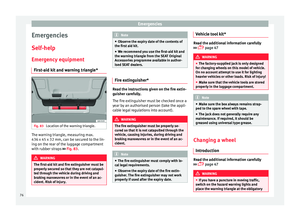 78
78 79
79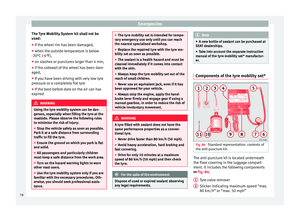 80
80 81
81 82
82 83
83 84
84 85
85 86
86 87
87 88
88 89
89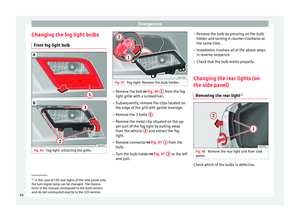 90
90 91
91 92
92 93
93 94
94 95
95 96
96 97
97 98
98 99
99 100
100 101
101 102
102 103
103 104
104 105
105 106
106 107
107 108
108 109
109 110
110 111
111 112
112 113
113 114
114 115
115 116
116 117
117 118
118 119
119 120
120 121
121 122
122 123
123 124
124 125
125 126
126 127
127 128
128 129
129 130
130 131
131 132
132 133
133 134
134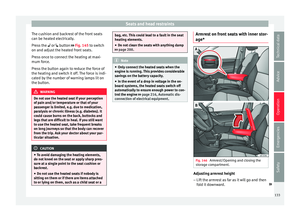 135
135 136
136 137
137 138
138 139
139 140
140 141
141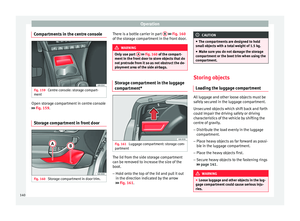 142
142 143
143 144
144 145
145 146
146 147
147 148
148 149
149 150
150 151
151 152
152 153
153 154
154 155
155 156
156 157
157 158
158 159
159 160
160 161
161 162
162 163
163 164
164 165
165 166
166 167
167 168
168 169
169 170
170 171
171 172
172 173
173 174
174 175
175 176
176 177
177 178
178 179
179 180
180 181
181 182
182 183
183 184
184 185
185 186
186 187
187 188
188 189
189 190
190 191
191 192
192 193
193 194
194 195
195 196
196 197
197 198
198 199
199 200
200 201
201 202
202 203
203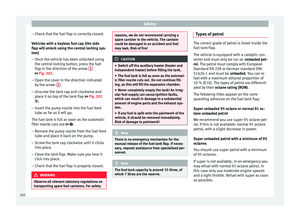 204
204 205
205 206
206 207
207 208
208 209
209 210
210 211
211 212
212 213
213 214
214 215
215 216
216 217
217 218
218 219
219 220
220 221
221 222
222 223
223 224
224 225
225 226
226 227
227 228
228 229
229 230
230 231
231 232
232 233
233 234
234 235
235 236
236 237
237 238
238 239
239 240
240 241
241 242
242 243
243 244
244 245
245 246
246 247
247