Page 193 of 248

Towing bracket device
Assembly of the ball-headed bar Fig. 197
Placing the ball-headed bar/locking
and r emo
v
ing the key. Fig. 198
Placing the key slot cover. –
Remove the cap from the clamping bush 4 ›››
Fig. 194 by p
ulling downwards.
– Place the ball-headed bar in the service po-
sition ››
› page 190.
– Hold the ball-headed bar from underneath
›››
Fig. 197 and push it into the clamping
bush as far as possible until you hear it
click into place ››› .
The m anual
r
egulator A aut
omatically turns
in the op po
site direction, adjusting to the
ball-headed bar ››› .
– Switch off the manual regulator lock with
key
B by turning the key fully to the right
in the dir ection of
arr
ow 1 – the arrow in
the k ey
di
splays the “locked” symbol.
– Remove the key in the direction of arrow
2 .
– Place cover C over the manual regulator
loc k
in the dir
ection of arrow 3
› ›
› Fig. 198 .–
Verify
the correct placement of the ball-
headed bar ››› page 192. WARNING
● Do not ho l
d the manual regulator with your
hand when fitting the ball-headed bar since
you could sustain injuries to your fingers.
● When mounting the ball-headed bar, al-
way
s lock it with a key and remove the key
from the slot.
● The ball-headed bar must not be in the
servic
e position with the key in the key slot.
● If the ball-headed bar is not placed in the
servic
e position you will not be able to place
it in the clamping bush. CAUTION
When removing the key, always place the
co v
er over the key slot of the manual regula-
tor to prevent dirt from entering. Note
Once removed, place the clamping bush cap
in an appr opri
ate location in the boot. 191
Technical data
Advice
Operation
Emergencies
Safety
Page 194 of 248

Operation
Verification of correct placement Fig. 199
Correct placement of the ball-head-
ed b ar
. Before using the ball-headed bar, ensure it is
c
orr
ectly
fitted.
Ensure that:
● The ball-headed bar does not come out of
the clampin
g bush in a “jerky” manner.
● The red mark A
› ›
› Fig. 199
on the manual
regulator signals toward the white mark on
the ball-headed bar.
● The manual regulator is adjusted to the
ball-he
aded bar, leaving no space between
them.
● The regulator is locked and the key has
been remov
ed.
● Cover B has been placed over the manual
r e gu
lator lock. WARNING
Only use the towing bracket device when the
ba l
l-headed bar is properly fitted! Disassembly of the ball-headed bar
Fig. 200
Remove the key slot cover/unlock
w ith the k
ey
. Fig. 201
Unblock the ball-headed bar. –
Remove cover A from over the regulator
k ey
s
lot in the direction of arrow 1 ›››
Fig. 200.
– Insert key B in the key slot.
– Open the manual regulator lock by turning
key
B fully to the left in the direction of ar-
r o
w 2 . The arrow on the key points to the
“u n
loc
ked” symbol.
– Hold the ball-headed bar from underneath
›››
Fig. 201 and remove manual regulator
C with your other hand in the direction of
arr o
w 3 .
– Turn the removed regulator fully in the di-
rection of
arr
ow 4 and hold it firmly in this
po s
ition.
– R
emove the ball-headed bar from the
clampin
g bush, pulling downward in the di-
rection of arrow 5 .
192
Page 195 of 248

Towing bracket device
The ball-headed bar should be placed in the
ser v
ic
e position so that it is ready to be inser-
ted into the clamping bush ››› .
– Place the cover over the clamping bush 4›››
Fig. 194. WARNING
● Never leave the ball-headed bar unsecured
in the boot. It c
ould be damaged in the event
of sudden braking, putting the safety of pas-
sengers at risk!
● Never disassemble the ball-headed bar
with the trai
ler still hitched. CAUTION
● If y
ou do not turn the manual regulator
fully, it will return to its original position
when the ball-headed bar is removed. The
manual regulator will be stuck to the ball-
headed bar and you will not be able to put it
in the service position. Therefore, before you
assemble it again, you must place the ball-
headed bar in this position.
● After disassembly, place the cap on the
clampin
g bush’s orifice. This way you will
prevent dirt from entering the clamping bush. Note
● Bef or
e disassembling the ball-headed bar,
we recommend placing the cover on the ball
head. ●
Cle
an the ball-headed bar thoroughly be-
fore returning it to the on-board toolbox. Use and maintenance
Cover the clamping bush with the cap to pre-
vent
dir
t from entering.
Before hooking on the trailer, check the ball
head and, if necessary, lubricate it with ade-
quate lubricant.
Place the protective cover over the ball head
when storing the bar. This way, you will avoid
getting the boot dirty.
If it gets dirty, clean and dry the clamping
bush thoroughly with an appropriate prod-
uct. CAUTION
The top part of the clamping bush opening is
lubricat ed. B
e careful not to remove this lu-
brication. 193
Technical data
Advice
Operation
Emergencies
Safety
Page 196 of 248

Advice
Advice
C ar
e and m
aintenance
Accessories and modifications to the vehicle
Accessories, replacement parts and
repair work If you wish to retrofit accessories in the vehi-
c
l
e, or if
a part of the vehicle has been re-
placed by a new part or technical modifica-
tions are required, the following instructions
must be taken into account:
● Before purchasing accessories or spare
par
ts and before making technical modifica-
tions, always request advice from an Author-
ised SEAT dealer ››› .
● In the event that technical modifications
ar e c
arried out
on the vehicle, the instruc-
tions and regulations specified by the com-
pany, SEAT, must be observed.
No damage will be caused to the vehicle if
the established procedures are respected,
which guarantees safe driving and operation.
After the modifications are carried out, the
vehicle will comply with the restrictions and
regulations of the highway code. More infor-
mation can be obtained at an Authorised SEAT dealer, where all jobs required can be
carried out ap
propriately.
Vehicle improvements and modifications
The owner must keep the technical documen-
tation regarding the modifications carried out
on the vehicle so it can be handed over to
those responsible for processing end-of-life
vehicles. This ensures end-of-life processing
of the vehicle, while protecting the environ-
ment.
Work done on the electrical components and
software can cause disruption in operations.
Due to the interconnection of electronic com-
ponents, their malfunction can also impair
systems that are not directly affected. This
can adversely affect reliability of the vehicle,
and can produce excessive wear of the parts.
Damage caused by technical modifications
that are not made with the consent of SEAT
will be excluded from the warranty – see war-
ranty certificate. WARNING
● Job s
or modifications unduly carried out on
your vehicle can cause disruption to opera-
tions - Risk of accident!
● We recommend that you use only expressly
authorised SEA
T Accessories and SEAT Origi-
nal Spare Parts for your vehicle. The reliabili-
ty, safety and compatibility with your vehicle of SEAT original spare parts and accessories
ha
s
been verified.
● Despite the continuous observation of the
market, w
e cannot judge nor guarantee the
suitability of other products for your vehicle,
be they authorised products or products ap-
proved by a state testing facility. Note
SEAT original spare parts and accessories can
be p urc
hased at authorised SEAT dealers
where the purchased parts can also be fitted. Modifications and effects of the air-
b
ag sy
s
tem In the adjustment and modification, respect
the S
EA
T dir
ective.
Modifications and corrections of the front
bumper, doors, front seats, roof or bodywork
must be carried out at authorised SEAT work-
shops. Components of the airbag system can
be found in these parts of the vehicle. WARNING
● Airbag modu l
es must never be repaired.
They must be replaced.
● Never fit components of the airbag system
remov
ed from old vehicles or those originat-
ing from a recycling process in the vehicle. 194
Page 197 of 248

Care and maintenance
●
The modification of the s
uspension of the
vehicle wheels, including the use of non-per-
mitted combinations of tyres and rims can al-
ter the operation of the airbag system and in-
crease the risk of serious or fatal injuries in
an accident.
● During all jobs on the airbag system, in ad-
dition to the remo
val and fitting of parts of
the system in the course of other repair jobs,
parts of the airbag system can be damaged.
Therefore in the event of an accident, this
may cause the airbags to activate incorrectly
or not activate at all. Radio and aerial reception
In vehicles factory-fitted with an audio or
n
av
ig
ation system, the aerial may be instal-
led in different places:
● inside the rear window next to the heating
elements,
● on the roof
of the vehicle.
Care and cleaning Introduction Regular and suitable care helps to
m
aint ain
the u
seful life of your vehicle. This may also
be one of the requirements for upholding any warranty claims in the event of corrosion or
paint def
ects.
We recommend you use cleaning products
from the SEAT Original Accessories pro-
gramme available in SEAT dealers. Please fol-
low the instructions for use on the packag-
ing. WARNING
● Cle
aning products and other materials used
for car care can damage the health if mis-
used.
● Always keep car care materials in a safe
plac
e out of the reach of children. Risk of poi-
soning!
● When washing the car during the winter
season: Moi
sture and ice on the brakes may
affect braking efficiency. Risk of accident!
● The ignition must always be switched off
when the car is
washed. Risk of accident!
● Do not clean the underside of the car or in-
side the wheel ar
ches without protecting your
hands and arms. You may cut yourself on
sharp metal parts!
● Perfumes and air fresheners inside the ve-
hicle m
ay be harmful to health at high tem-
peratures in the interior. CAUTION
● Check the c
olour-fastness of your clothing
to avoid damaging or visibly staining the fab-
ric (leather), upholstery and fabric trim. ●
Cle
aning products containing solvents may
damage the material being cleaned.
● Do not wash the vehicle in direct sunlight.
Risk of
damage to paintwork.
● If washing the vehicle with a hose in win-
ter, do not
direct the jet of water directly at
the locks or at the door seals or bonnet. Risk
of freezing.
● Do not use sponges for removing insects or
abras
ive household sponges, etc. on painted
surfaces. Risk of damage to the painted sur-
face!
● Do not put stickers on the inner side of the
rear w
indow in areas where heating elements
or the aerial are located. This could cause
damage and, in the case of the aerial, radio
and navigation system reception faults.
● Do not clean the inside of the window with
sharp ob
jects or corrosive or acidic cleaning
products. Risk of damaging the heating ele-
ments or the aerial.
● Do not attach any fragrance or air freshener
to the da
sh panel. Risk of damage to the
dash panel!
● To avoid damaging the parking aid system
sensors, s
pray them only briefly at a mini-
mum distance of 10 cm when cleaning the ve-
hicle with a high-pressure or steam cleaner.
● Do not clean the roof panel with a brush.
Risk of
damage to the panel surface! » 195
Technical data
Advice
Operation
Emergencies
Safety
Page 198 of 248

Advice
For the sake of the environment
● The pac k
aging of the product used to care
for your vehicle is hazardous waste. It must
be disposed of according to current local law.
● Only wash the car in special wash bays. Note
● Remo v
e stains from fresh ball-pen and oth-
er inks, lipstick, shoe cream and similar
stains on the fabric (leather), upholstery and
fabric trim as soon as possible.
● We recommend that you visit an authorised
SEAT de
aler to clean and care for the interior
of your vehicle, due to the problems that may
arise when cleaning and caring for the interi-
or of your vehicle and to the utensils and
knowledge required. Washing the vehicle
The best protection of the vehicle from the
h
armf
u
l influences of the environment in-
volves frequent washing and waxing. The fre-
quency with which the vehicle is washed de-
pends on many different factors, such as:
● Frequency of use
● Type of parking (garage, underneath trees,
etc.)
● Time of
year
● Weather conditions ●
Envir
onmental conditions
The longer substances such as insects, bird
droppings, resinous tree sap, road dirt, in-
dustrial deposits, tar, soot or road salt and
other aggressive materials remain on the
paintwork, the more damage they do. High
temperatures (for instance in strong sunlight)
further intensify the corrosive effect.
After the winter season, it is important to
have the underside of the vehicle washed
thoroughly.
Car washes Your vehicle can be washed in an automatic
c
ar w
a
sh.
Before going through an automatic car wash,
be sure to take the usual precautions (close
the windows and fold in the rear-view mir-
rors).
If the vehicle has special accessories such as
spoilers or a roof rack or two-way radio aerial,
etc., it is advisable to consult the car wash
operator beforehand.
The windscreen wiper rubbers must be de-
greased after going after the car wash and
waxing. Washing by hand When washing the car by hand, use plenty of
wat
er t
o soften the dirt first and rinse off as
well as possible.
Then clean the vehicle with a sponge, glove
or brush. Start on the roof and work down.
Use only slight pressure when cleaning the
painted surfaces of the vehicle. A car sham-
poo should only be used for very persistent
dirt.
Rinse the sponge or glove thoroughly and of-
ten.
Wheels, sills and underside should be
cleaned last. Use a second sponge for this.
After washing, rinse the vehicle thoroughly
and then dry with a chamois.
Washing with high-pressure cleaners When cleaning the vehicle with a high-pres-
s
ur
e c
leaner, always follow the operating in-
structions for the equipment. This particular-
ly applies to the operating pressure and the
distance of the spray from the surface of the
vehicle. Do not hold the spray nozzle too
close to the parking aid system sensors and
soft materials, such as rubber hoses or insu-
lating material.
196
Page 199 of 248
.
Risk of
d")
Care and maintenance
WARNING
Do no use a nozzle that sprays the water out
in a direct s
tream or one that has a “rotating
jet”! CAUTION
Do not use water hotter than +60°C (+140°F).
Risk of
damage to the vehicle! Factory-fitted adhesive sheets
The following indications should be taken in-
t
o ac
c
ount to avoid damaging adhesive
sheets:
● Do not use high pressure cleaners.
● Do not use scrapers to remove ice or snow
from the sheets.
● Do not po
lish the adhesive sheets.
● Do not use dirty cloths or sponges.
● It is preferable to wash them with a soft
spong
e and gentle neutral soap.
Camera sensors and lenses ●
Use a small brush to remove snow and a
de-ic er s
pr
ay to remove ice.
● Clean the sensors with a solvent-free prod-
uct and a soft, dr
y cloth. ●
Moist
en the camera lens using a standard
alcohol-based glass cleaning agent and
clean the lens with a dry cloth. CAUTION
● When y ou c
lean the vehicle with a pressure
washer:
–Stay a suitable distance from the sensors
on the front and rear bumpers.
– Do not clean the camera lenses or sur-
rounding area with the pressure washer.
● Never use warm or hot water to remove
snow and ic
e from the reverse camera lens,
as it could crack the lens.
● Never use abrasive cleaning agents on the
lens. Waxing and polishing the vehicle's
p
aintw
ork Care
T
o a gr
e
at extent, good waxing protects the
vehicle surface from the harmful effects of
the environment.
The vehicle must be treated with a high qual-
ity, hard wax when water no longer forms
droplets on clean paintwork.
A new coat of high quality, hard wax can be
applied to the clean, painted surface only
when it has fully dried. Even if a wax solution
is used regularly in the car wash, it is advisa- ble to protect the paint with a coat of wax at
lea
st twice a year.
Polishing
Polishing is only necessary if the paint has
lost its shine, and the gloss cannot be
brought back by applying wax.
The vehicle must be waxed after polishing if
the polish used does not contain wax com-
pounds to seal the paint. CAUTION
● Never w ax
the windows.
● Do not use polishes and hard wax on pain-
ted par
ts with a matt finish or on plastic
parts.
● Do not polish your vehicle in a sandy or
dusty
environment. Cleaning of chromed parts
Clean the chrome first with a clean cloth and
then b
uff
up w
ith a soft, dry cloth. If this does
not clean the chrome properly, use a special
chrome cleaner. CAUTION
Do not polish the chrome in a dusty environ-
ment or it c
ould be scratched. 197
Technical data
Advice
Operation
Emergencies
Safety
Page 200 of 248

Advice
Paint damage Minor damage to the paint, such as scratches
or st
one c
hips, should be touched up without
delay using paint.
Suitable touch-up brushes or sprays for the
colour of your vehicle can be purchased from
authorised SEAT dealers. Note
We recommend you leave paint damage re-
pair s
to a SEAT Authorised Service. Plastic parts
Exterior plastic parts will come clean using a
d
amp c
loth. If
this is not sufficient, plastic
parts can also be treated with special sol-
vent-free plastic cleaning detergents .
Do not use paint cleaners, polishes or wax on
plastic parts.
Windows and mirrors Remove snow and ice from windows and rear
v
i
s
ion mirrors with a plastic scraper only. To
avoid damaging the surface of the glass, the
scraper should only be pushed in one direc-
tion and not moved to and fro. The windows should also be cleaned on the
inside at
regular intervals.
Use a separate cloth or chamois to dry the
windows and rear vision mirrors.
Do not use the chamois used to polish the
bodywork to dry the windows. Waxing and
polishing residues could cause smears on
the glass and hinder visibility. CAUTION
● Never u se hot
or boiling water to remove
snow and ice from the windows. Risk of crack-
ing glass!
● Make sure you do not damage the paint-
work on the
vehicle on removing snow and
ice from the windows and rear vision mirrors.
● Do not remove the snow or ice dirty with
thick p
articles, e.g. gravel, sand or road salt,
from windows and mirrors. Risk of damage to
the glass and mirror surfaces. Headlights
Use soap and clean, hot water to clean the
fr
ont
he
adlights. CAUTION
● Never rub the he a
dlights to dry them and
do not use sharp objects to clean the plastic
glass material. These could damage the pro- tective paint and cause the headlights to
cr
ac
k.
● Do not use aggressive cleaning products or
chemica
l solvents to clean the glass. This
could damage the headlights. Caring for rubber seals
The weatherstrips on doors and windows will
rem
ain p
liable and last longer if they are oc-
casionally treated with a suitable rubber care
product. This will prevent premature ageing
and leaks. If they are properly cared for, the
seals will be less likely to freeze up in the
winter.
Door lock cylinder Special products must be used to defrost
loc
k
cylinder
s. Note
● Mak e s
ure, when washing the vehicle, that
the least amount of water possible enters the
lock cylinders.
● We recommend the use of products from
the selection of
SEAT Original Accessories to
care for the door lock cylinder. 198
 1
1 2
2 3
3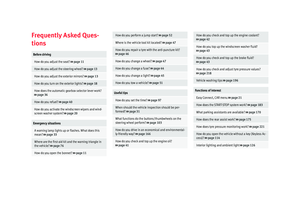 4
4 5
5 6
6 7
7 8
8 9
9 10
10 11
11 12
12 13
13 14
14 15
15 16
16 17
17 18
18 19
19 20
20 21
21 22
22 23
23 24
24 25
25 26
26 27
27 28
28 29
29 30
30 31
31 32
32 33
33 34
34 35
35 36
36 37
37 38
38 39
39 40
40 41
41 42
42 43
43 44
44 45
45 46
46 47
47 48
48 49
49 50
50 51
51 52
52 53
53 54
54 55
55 56
56 57
57 58
58 59
59 60
60 61
61 62
62 63
63 64
64 65
65 66
66 67
67 68
68 69
69 70
70 71
71 72
72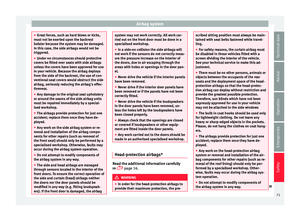 73
73 74
74 75
75 76
76 77
77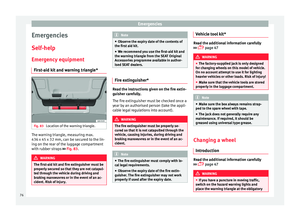 78
78 79
79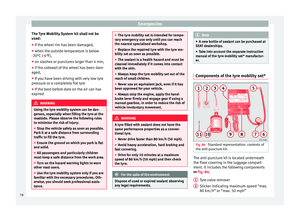 80
80 81
81 82
82 83
83 84
84 85
85 86
86 87
87 88
88 89
89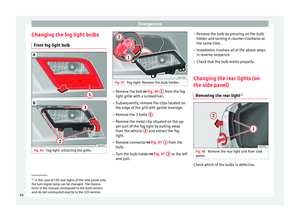 90
90 91
91 92
92 93
93 94
94 95
95 96
96 97
97 98
98 99
99 100
100 101
101 102
102 103
103 104
104 105
105 106
106 107
107 108
108 109
109 110
110 111
111 112
112 113
113 114
114 115
115 116
116 117
117 118
118 119
119 120
120 121
121 122
122 123
123 124
124 125
125 126
126 127
127 128
128 129
129 130
130 131
131 132
132 133
133 134
134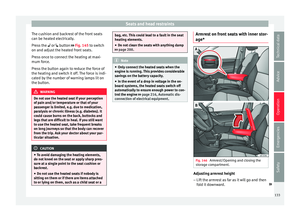 135
135 136
136 137
137 138
138 139
139 140
140 141
141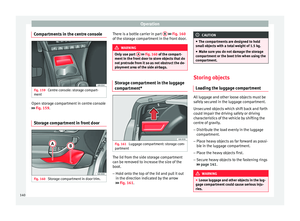 142
142 143
143 144
144 145
145 146
146 147
147 148
148 149
149 150
150 151
151 152
152 153
153 154
154 155
155 156
156 157
157 158
158 159
159 160
160 161
161 162
162 163
163 164
164 165
165 166
166 167
167 168
168 169
169 170
170 171
171 172
172 173
173 174
174 175
175 176
176 177
177 178
178 179
179 180
180 181
181 182
182 183
183 184
184 185
185 186
186 187
187 188
188 189
189 190
190 191
191 192
192 193
193 194
194 195
195 196
196 197
197 198
198 199
199 200
200 201
201 202
202 203
203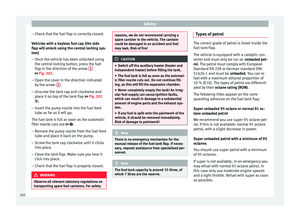 204
204 205
205 206
206 207
207 208
208 209
209 210
210 211
211 212
212 213
213 214
214 215
215 216
216 217
217 218
218 219
219 220
220 221
221 222
222 223
223 224
224 225
225 226
226 227
227 228
228 229
229 230
230 231
231 232
232 233
233 234
234 235
235 236
236 237
237 238
238 239
239 240
240 241
241 242
242 243
243 244
244 245
245 246
246 247
247