Page 113 of 248

Opening and closing
Note
If it is not possible to unlock or lock the vehi-
cl e w
ith the remote control key once the bat-
tery has been replaced, it will need to be re-
synchronised ››› page 109. Central locking system
Genera l
notesAll of
the doors, the rear lid and the fuel cap
fl ap 1)
w
ill unlock at the same time when the
central locking system is used.
Warning lamp on the driver door
Once the doors are locked, the warning lamp
will flash quickly for 2 seconds and then at a
slower rate.
If the vehicle is locked with Safe lock engag-
ed ›››
page 112, the warning lamp on the
driver door will flash quickly for 2 seconds
before switching off for 30 seconds and then
flashing at a slower rate.
If the warning lamp flashes quickly for 2 sec-
onds and then remains switched on before
flashing at a slower rate after 30 seconds,
there is a fault in the interior monitor and tow-away protection system
›››
page 117. Go
to a technical service.
Individualised settings Unlocking single doors
This
option
al function unlocks the driver door
only. The other doors remain locked and are
only unlocked when the next command is giv-
en (unlock).
Automatic unlock and lock
The doors and the rear lid are locked auto-
matically when the vehicle reaches a speed
of about 15 km/h (9 mph).
The doors unlock automatically when the key
is removed from the ignition. Additionally,
the driver or front passenger can unlock the
doors by pressing the ›››
page 113 central
lock button or by pulling the front door han-
dle. WARNING
Locking the doors prevents intruders from
gettin g int
o the car, e.g. while waiting at in-
tersections. However, it can also delay assis-
tance in the event of an accident. Risk of
death! Note
● Activ ation of
the single door setting can be
requested at your SEAT dealer.
● In the event of an accident in which the air-
bags
deploy, the doors will be automatically
unlocked for easier access and assistance.
● If the central locking system should fail to
work at
any time, only the driver door can be
locked or unlocked using the key
››› page 112. All other doors and the rear lid
can be operated manually.
–Manual release ›››
page 10.
– Manual release mechanism for the rear
lid ›››
page 10. 1)
Valid for vehicles with a keyless fuel tank cap.
111
Technical data
Advice
Operation
Emergencies
Safety
Page 114 of 248

Operation
Unlocking with key Fig. 122
Key positions during vehicle locking
and u n
loc
king. –
Turn the key in the driver door in the for-
war
d driv
ing direction to its unlock position
A
› ›
›
Fig. 122.
– Pull the handle and open the door.
● All doors (driver door only on vehicles with
anti-theft al
arm) are unlocked.
● The rear lid is unlocked.
● The fuel tank flap is unlocked 1)
.
● The courtesy lights switch on.
● The Safe lock is deactivated.
● The driver door warning lamp stops flash-
ing (on v
ehicles not equipped with an anti-
theft system) ›››
page 116. Note
If the vehicle is equipped with an anti-theft
al arm sy
stem, you have 15 seconds from the
time the door is opened to insert the key in
the ignition and start the vehicle. If, during
these 15 seconds, the vehicle is not started,
the alarm is triggered. Locking with key
–
Turn the key in the driver door lock cylinder
in the rev er
se direction to its lock position
B
› ›
›
Fig. 122.
● The doors, the rear lid and the fuel tank
flap 1)
wi
ll be locked.
● The courtesy lights switch off.
● The Safe lock is immediately activated.
● Warning lamp on the driver door starts to
flash. Note
The vehicle doors cannot be locked if the
driver door i s
open. Safe Lock
The central locking system is equipped with a
Safe loc
k
. If the vehicle is closed from out-
side, the door locks will automatically lock.
The warning lamp on the driver door will
flash quickly for about 2 seconds and then at
a slower rate. It is not possible to open any of
the doors from the inside or outside using
the handle. This limits the possibility of in-
truders getting into the vehicle.
The Safe lock can be deactivated by pressing
the lock button twice in less than 2 seconds.
If Safe lock is out of service, the control lamp
on the driver door will flash quickly for about
2 seconds before switching off for 30 sec-
onds and then flashing at a slower rate.
The Safe lock is re-activated on unlocking
and locking the vehicle again.
If the vehicle is locked and the Safe lock is
deactivated, the vehicle can be opened from
inside by pulling on the door handle. WARNING
Do not leave people or animals in locked ve-
hicl e
s with Safe lock activated: the doors and
windows cannot then be opened from the in-
side. Doors locked in this manner could delay
assistance in an emergency. Risk of death! 1)
Valid for vehicles with a keyless fuel tank cap.
112
Page 115 of 248

Opening and closing
Note
● The anti-theft a
larm switches on automati-
cally when the vehicle is locked, even if the
Safe lock is deactivated. The Vehicle interior
monitoring, however, is not activated.
● Given that the Safe function will be activa-
ted on lock
ing the vehicle, CHECK DEADLOCK
will be shown on the general instrument pan-
el display. On vehicles equipped with an in-
formative display, Caution SAFE! On- board documentation! Central locking button
Fig. 123
Central lock button. If the vehicle has not been locked from out-
s
ide, it
i
s possible to lock and unlock the
doors from inside by pressing the ›››
Fig. 123
button, even without the key in the ignition. Locking of all doors, the boot lid and the fuel
tank fl
ap1)
– Press the button ›››
Fig. 123. The warning
lamp on the button will light up.
Unlocking of all doors, the boot lid and the
fuel tank cap 1)
– Press the button ›››
Fig. 123. The warning
lamp on the button will switch off.
If the vehicle has been locked using the cen-
tral lock button.
● The rear lid cannot be unlocked from the
outside (security
measure, e.g. when stop-
ped at an intersection).
● The doors can be unlocked individually by
pul
ling the handle.
● The vehicle doors cannot be locked if any
of the doors
are open.
● In the event of an accident in which the air-
bags
activate, doors locked from the inside
will be automatically unlocked for easier ac-
cess and assistance. WARNING
The central locking system remains operative
when the ignition is sw
itched off. Never leave
children unattended in the vehicle, as doors
locked from the inside delay assistance in an
emergency. Risk of sustaining fatal injuries! Note
The handles and the central lock buttons will
not w ork
if the Safe lock ››› page 112 is acti-
vated. 1)
Valid for vehicles with a keyless fuel tank cap.
113
Technical data
Advice
Operation
Emergencies
Safety
Page 116 of 248

Operation
Unlocking and locking the vehicle
w ith K
eyl
ess Access Fig. 124
Keyless Access locking and ignition
sy s
t
em: in the proximity of the car. Fig. 125
Keyless Access locking and ignition
sy s
t
em: sensor surface A for unlocking in-
s ide the door h
andl
e and sensor surface Bfor locking on the exterior of the handle.
Keyless Access is a key-free locking and igni-
tion sy
s
t
em to unlock and lock the vehicle
without actively using its key. For this, all that is required is to have a valid vehicle key near
›››
Fig. 124 the vehicle and one of the sensor
surfaces on the door handles to be touched
››› Fig. 125.
General information
If a valid key is in the proximity of the car
››› Fig. 124, the Keyless Access locking and
starting system gives the key entry as soon
as one of the sensor surfaces on the door
handles is touched or the push button on the
boot hatch is operated. The following fea-
tures are then available without having to
use the vehicle key actively:
● Keyless-Entry: unlocking of the vehicle with
the handle
s on the four doors or the button
on the boot hatch.
● Keyless-Go: engine ignition and driving. For
this t
o occur, there has to be a valid key in-
side the vehicle and the ››› page 155. igni-
tion push button needs to be pressed.
● Keyless-Exit: locking of the vehicle with one
of the four door h
andles.
The central locking and locking systems oper-
ate in the same way as a normal locking and
unlocking system. Only the controls change.
Unlocking the vehicle is confirmed with a
double flash of the indicator lights; locking
by a single flash. The vehicle will lock again after a few sec-
onds if
you unlock the vehicle but fail to open
any door or boot hatch.
Unlocking and opening the doors (Keyless-
Entry)
● Grip the door handle. In doing this, the
sensor sur
face ››› Fig. 125 A (arrow) on the
h andl
e i
s touched and the vehicle unlocks.
● Open the door.
On vehic
les without a “Safe” security sys-
tem: closing and locking the doors (Keyless-
Exit)
● Switch the ignition off.
● Close the driver's door.
● Touch (once) the sensor surface B (arrow)
on the door h andl
e.
The door that is used
must be closed.
On vehicles with a “Safe” security system:
shutting and locking doors (Keyless-Exit)
● Switch the ignition off.
● Close the driver's door.
● Touch (once) the sensor surface B (arrow)
on the door h andl
e.
The vehicle locks with
the “Safe” ››› page 112 system. The door that
is used must be closed.
● Touch (twice) the sensor surface B (arrow)
on the door h andl
e t
o lock the vehicle with-
out the Safe security system ››› page 112.
114
Page 117 of 248

Opening and closing
Unlocking and locking the boot hatch
When the v
ehic
le is locked, the hatch auto-
matically unlocks on opening if ››› Fig. 124
there is a valid vehicle key in the proximity.
Open or close the hatch normally
››› page 118.
After closing, the hatch locks automatically.
In the following instances, the rear lid does
not lock automatically after closing:
● If the entire vehicle is unlocked.
● If the key used last is inside the vehicle. All
vehicl
e indicator lights flash four times. The
vehicle will lock again after a few seconds if
no door or boot hatch are opened.
Locking the vehicle with a second key
If there is a vehicle key inside the vehicle and
it is locked from the outside with a second
vehicle key, the key inside the vehicle is
blocked for engine ignition ››› page 152. In
order to enable engine ignition, the button
on the key inside the vehicle needs to be
pressed ››› page 108.
Automatically disabling sensors
If the vehicle is not locked or unlocked for a
long period of time, the proximity sensor on
the passenger door is automatically disa-
bled.
If one of the sensor surfaces on the door han-
dles is often activated in an unusual manner with the vehicle locked (e.g. by the branches
of a bu
sh rubbing against it), all proximity
sensors are disabled for a time. If this only
happens with the exterior sensor on the driv-
er's door, only this sensor is disabled.
Sensors will again be enabled:
● After a time.
● OR: if the vehicle is unlocked with the but-
ton
on the key.
● OR: if the boot is opened.
Keyl
ess Access temporary disconnection
function*
You can deactivate the vehicle's Keyless Ac-
cess unlocking for a locking and unlocking
cycle.
● Move the gear lever to position P (if the v
e-
hicle has automatic gearbox), since other-
wise the vehicle cannot be locked.
● Close the door.
● Push the central locking button on the
remote c
ontrol and touch the locking sensor
surface ››› Fig. 125 B on the driver door han-
dl e onc
e w
ithin the following 5 seconds. Do
not grip the door handle, otherwise the vehi-
cle will not lock. Deactivation is also possible
if the vehicle is locked through the driver’s
door lock.
● To check that the function has been deacti-
vated, w
ait at least 10 seconds, grip and pull on the door handle. The door should not
open.
The next time the door c
an only be unlocked
via the remote control or the lock cylinder.
The next time the door is locked/unlocked,
Keyless Access will be active again.
Convenience functions
To close all electric windows, the sliding roof
and electric tilting panoramic roof with the
convenience feature, keep your finger on the
lock sensor surface B located on the exteri-
or p ar
t
of the driver or passenger door handle
for a few seconds until the windows and roof
close.
The doors opened by touching the sensor
surface of the door handle depend on the
settings that have been activated in the Easy
Connect system with the button and the
S ET
TINGS and
Openin
g and c
lo
sing function but-
t on
s. CAUTION
The sensor surfaces on the door handles
cou l
d engage if hit with a water jet or high
pressure steam if there is a valid vehicle key
in the proximity. If at least one of the win-
dows is open and the sensor surface B on
one of the h andl
es is activated continuously,
all windows will close. If the water jet or
steam is briefly moved away from the sensor
surface A on one of the handles and then
» 115
Technical data
Advice
Operation
Emergencies
Safety
Page 118 of 248

Operation
pointed at it again, all the windows will
pro
b
ably open ››› page 115, Convenience
functions. Note
● If the v
ehicle battery has little or no charge,
or the vehicle key battery is almost or entire-
ly out of charge, it is likely that the vehicle
will not be able to be lock or unlocked with
the Keyless Access system. The vehicle can
be unlocked or locked manually
››› page 9.
● If there is no valid key inside the vehicle or
the syst
em fails to detect one, a warning will
display on the dash panel screen. This could
happen if any other radio frequency signal in-
terferes with the key signal (e.g. from a mo-
bile device accessory) or if the key is covered
by another object (e.g. an aluminium case).
● If the sensors are very dirty, e.g. have a lay-
er of sa
lt, the correct functioning of the sen-
sors on the door handles may be affected. If
this is the case, wash the vehicle
››› page 195.
● If the vehicle is equipped with an automatic
gearbo
x, it may only be locked in the gear
stick is in position P. Child-proof locking
Fig. 126
Activating the childproof lock. The childproof lock prevents the rear doors
fr
om bein
g opened fr
om the inside. Doors
can only be opened from the outside.
The childproof lock is activated and deactiva-
ted using the ignition key.
Activating the childproof lock
– Turn the slot in the direction of the arrow
›››
Fig. 126 (in the other direction on the
right-hand door).
Deactivating the childproof lock – Turn the slot in the opposite direction of
the arrow (in the other dir
ection on the
right-hand door). Anti-theft alarm*
General
notes The anti-theft alarm system increases vehicle
prot
ection fr
om intruders. The system will ini-
tiate acoustic and optical warning signals
when your vehicle is tried to be forced.
Activating the alarm system
The anti-theft alarm switches on automatical-
ly when the vehicle is locked using the re-
mote control key or inserting the key in the
driver door. The alarm is activated around 30
seconds after the vehicle is locked.
Deactivating the alarm system
The anti-theft alarm system is deactivated
when the remote control unlock button is
pressed. If the vehicle is not opened within
30 seconds after emitting the radio frequen-
cy signal, the system will be reactivated.
If the vehicle is unlocked using by inserting
the key in the driver door, the ignition must
be switched on within 15 seconds. This deac-
tivates the alarm system. If, during these 15
seconds, the vehicle is not started , the alarm
is triggered .
116
Page 119 of 248

Opening and closing
When does the system trigger an alarm?
The f o
l
lowing areas of the vehicle are moni-
tored:
● Bonnet
● rear lid;
● Doors
● Ignition
● Tilt angle ››› pag
e 117, Vehicle interior
monitoring and anti-tow system
● The interior ››› pag
e 117, Vehicle interior
monitoring and anti-tow system
● Drop in voltage in the car systems
● The factory-fitted towing bracket
The alarm is
triggered immediately if one of
the battery cables is disconnected while the
alarm system is active.
How to turn OFF the alarm
To deactivate the alarm, press the unlock but-
ton on the remote control key or switch on
the ignition. Note
● The al arm horn po
wer supply has a 5-year
useful life. Contact an Official Service for
more detailed information.
● To make sure that the anti-theft alarm is
ful
ly operative when leaving the vehicle,
check that all the doors and windows are
closed. ●
Remot e c
ontrol and receiver unit coding
means that the remote control cannot be
used on other vehicles. Vehicle interior monitoring and anti-
to
w sy
stem Fig. 127
Button for vehicle interior monitor-
in g and the t
o
w-away protection system. The Vehicle interior monitoring system is acti-
v
at
ed if
movements are detected in the interi-
or of the vehicle.
Deactivating Vehicle interior monitoring and
the tow-away protection system
– Switch the ignition off.
– Open the driver door.
– Press the ››› Fig. 127
button on the cen-
tre column. The red backlit symbol on
the button turns orange. –
Lock
the vehicle within the next 30 sec-
onds.
The Vehicle interior monitoring system and
the tow-away protection system are reactiva-
ted when the vehicle is unlocked again. Note
● The v ehic
le interior monitoring system and
the tow-away protection system must be de-
activated if there is a danger of the alarm be-
ing triggered due to movements by children
or animals in the interior when being trans-
ported (e.g. by boat or by train) or towed.
● The effectiveness of the Vehicle interior
monitoring sy
stem is reduced if the spectacle
case is left open. Always close the storage
compartment before locking the vehicle to
ensure that this monitoring system operates
correctly. 117
Technical data
Advice
Operation
Emergencies
Safety
Page 120 of 248

Operation
Rear lid Openin g and c
lo
singFig. 128
Rear lid: opening from the outside. Fig. 129
Close-up of the inside trim of the
r e
ar lid: h
and grip Read the additional information carefully
› ›
›
page 10 The rear lid opening system operates electri-
cally
. It is activated by using the handle on
the boot lid.
This system may or may not be operative, de-
pending on the situation of the vehicle.
If the rear lid is locked then it cannot be
opened, however if it is unlocked then the
opening system is operative and the rear lid
may be opened.
To lock/unlock, press the button or the
button on the remote control key.
A warning appears on the instrument panel
display if the boot lid is open or not properly
closed.* An audible warning is also given if
the boot lid is opened while the vehicle is
moving faster than 6 km/h (4 mph)*. WARNING
● Alw a
ys close the rear lid properly. Risk of
accident or injury.
● Do not close the rear lid by pushing it down
with y
our hand on the rear window. The glass
could smash. Risk of injury!
● Ensure the rear lid is locked after closing it.
If not, it m
ay open unexpectedly while driv-
ing.
● Never allow children to play in or around
the vehic
le. A locked vehicle can be subjected
to extremely high and low temperatures, de-
pending on the time of year, thus causing se-
rious injuries/illness. It could even have fatal
consequences. Close and lock both the rear lid and all the other doors when you are not
us
in
g the vehicle.
● Closing the rear lid without observing and
ensurin
g it is clear could cause serious injury
to you and to third parties. Make sure that no
one is in the path of the rear lid.
● Never drive with the rear lid open or half-
closed, e
xhaust gases may penetrate into the
interior of the vehicle. Danger of poisoning!
● If you only open the rear lid, do not leave
the key in
side. The vehicle will not be opened
if the key is left inside. Note
● Once the r e
ar lid is closed, its lock is en-
gaged and the alarm system is activated. On-
ly valid if the vehicle has been locked before
the rear lid is closed.
● The release catch located at the top of the
regi
stration plate recess is deactivated on ac-
celerating or at speeds of over 5 km/h (3
mph). The catch is reactivated when the vehi-
cle comes to a standstill and a door is
opened. Rear lid automatic locking
Where the vehicle has been locked by press-
in
g the b
utt
on on the remote control with
the rear lid open, the rear lid will lock auto-
matically when closed.
118
 1
1 2
2 3
3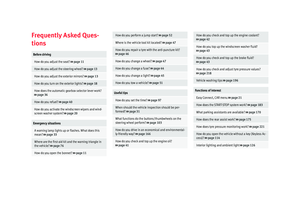 4
4 5
5 6
6 7
7 8
8 9
9 10
10 11
11 12
12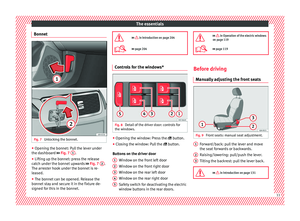 13
13 14
14 15
15 16
16 17
17 18
18 19
19 20
20 21
21 22
22 23
23 24
24 25
25 26
26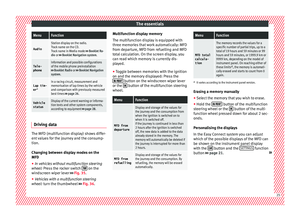 27
27 28
28 29
29 30
30 31
31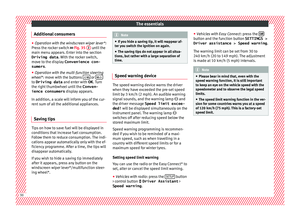 32
32 33
33 34
34 35
35 36
36 37
37 38
38 39
39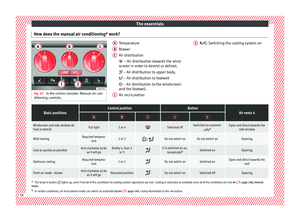 40
40 41
41 42
42 43
43 44
44 45
45 46
46 47
47 48
48 49
49 50
50 51
51 52
52 53
53 54
54 55
55 56
56 57
57 58
58 59
59 60
60 61
61 62
62 63
63 64
64 65
65 66
66 67
67 68
68 69
69 70
70 71
71 72
72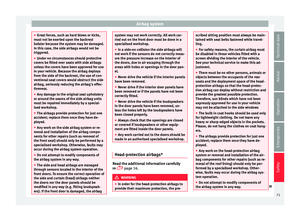 73
73 74
74 75
75 76
76 77
77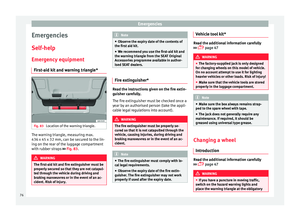 78
78 79
79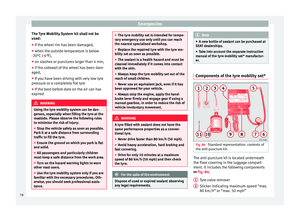 80
80 81
81 82
82 83
83 84
84 85
85 86
86 87
87 88
88 89
89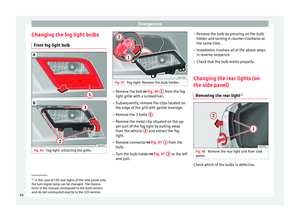 90
90 91
91 92
92 93
93 94
94 95
95 96
96 97
97 98
98 99
99 100
100 101
101 102
102 103
103 104
104 105
105 106
106 107
107 108
108 109
109 110
110 111
111 112
112 113
113 114
114 115
115 116
116 117
117 118
118 119
119 120
120 121
121 122
122 123
123 124
124 125
125 126
126 127
127 128
128 129
129 130
130 131
131 132
132 133
133 134
134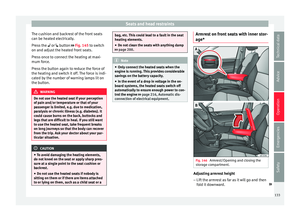 135
135 136
136 137
137 138
138 139
139 140
140 141
141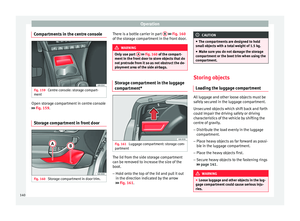 142
142 143
143 144
144 145
145 146
146 147
147 148
148 149
149 150
150 151
151 152
152 153
153 154
154 155
155 156
156 157
157 158
158 159
159 160
160 161
161 162
162 163
163 164
164 165
165 166
166 167
167 168
168 169
169 170
170 171
171 172
172 173
173 174
174 175
175 176
176 177
177 178
178 179
179 180
180 181
181 182
182 183
183 184
184 185
185 186
186 187
187 188
188 189
189 190
190 191
191 192
192 193
193 194
194 195
195 196
196 197
197 198
198 199
199 200
200 201
201 202
202 203
203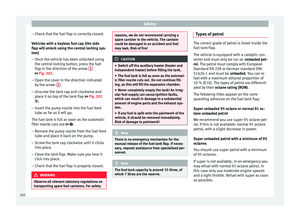 204
204 205
205 206
206 207
207 208
208 209
209 210
210 211
211 212
212 213
213 214
214 215
215 216
216 217
217 218
218 219
219 220
220 221
221 222
222 223
223 224
224 225
225 226
226 227
227 228
228 229
229 230
230 231
231 232
232 233
233 234
234 235
235 236
236 237
237 238
238 239
239 240
240 241
241 242
242 243
243 244
244 245
245 246
246 247
247