Page 73 of 232

Self-help
Location Fig. 77
In the luggage compartment: Raised
c arpet
. The vehicle tool kit, spare wheel, temporary
s
p
ar
e wheel and the tyre mobility set are
stored in the luggage compartment under the
carpeted floor panel ›››
Fig. 77.
● If necessary, remove the boot variable floor
›››
page 123.
● Raise the carpet at the recess (arrow)
›››
Fig. 77. Note
After use, return the jack to its initial position
us in
g the handle in order to securely store it
in the vehicle. Accessing the vehicle tool kit and tyre
mo
b
i
lity system in vehicles fitted with
the SEAT SOUND 7 speaker system
(with subwoofer)* ●
Open the boot hatch and lift the shelf.
● If necessary, remove the boot variable floor
›› ›
page 125.
● Lift up the carpet from the recess and re-
move it
from the luggage compartment.
● Disconnect the subwoofer’s speaker cable.
● Completely remove the hand-controlled
wheel fr om the c
entre of the subwoofer
speaker by turning it anti-clockwise.
● Take out the subwoofer, which is on top of
the tool
s and tyre mobility system.
● When finished, place the tools and system
back
in the same way and place as before to
ensure the speaker sits properly in its hous-
ing.
● Place the subwoofer in the direction of the
arrow and w
ith the word “FRONT” facing for-
ward.
● Reconnect the speaker cable and firmly ro-
tate the sec
uring wheel clockwise so that the
subwoofer is firmly in place. Components
Fig. 78
Components of the vehicle tool kit The vehicle tool kit depends on the vehicle
equipment
.
The f
ollowing is a description for
a vehicle with all options.
The individual elements of the vehicle tool
kit ››› Fig. 78
Screwdriver with hexagon socket in the
handle for screwing and unscrewing the
wheel bolts. The screwdriver bit is inter-
changeable. The screwdriver may be
found underneath the wheel spanner.
Adapter for anti-theft bolt. SEAT recom-
mend you carry the wheel bolt adapter in
the vehicle tool kit at all times. The code
number of the anti-theft wheel bolt is
stamped on the front of the adapter. In »
1 2
71
Technical data
Advice
Operation
Emergencies
Safety
Page 74 of 232

Emergencies
case it is lost, another adapter can be or-
der ed u
s
ing this number. Note the anti-
theft bolt code for the wheels and keep it
in a place other than the vehicle.
Towline anchorage, removable.
Wire hook for pulling off the wheel cover,
integral hubcaps and the wheel bolt
caps.
Jack. Before storing the jack in the tool
kit, fold its hook. The crank must then be
folded tight against the side of the jack in
order for it to be safely stored.
Wheel spanner.
Wheel bolt cap clips. Note
The jack does not generally require any main-
ten anc
e. If required, it should be greased us-
ing universal type grease. Changing a wheel
Intr oduction Read the additional information carefully
› ›
›
page 36
Some vehicle versions and models do not
have a factory-fitted jack or box spanner. In
this case, we recommend consulting a Speci-
alised workshop to change the wheel. 3 4
5
6
7 You should only change the wheels yourself if
the
v
ehic
le is parked in a safe place, you are
familiar with the procedure and safety stand-
ards and you have all the necessary tools!
Otherwise, you should seek professional as-
sistance. WARNING
Changing a wheel can be dangerous, espe-
ci a
lly on the hard shoulder. Please observe
the following rules to minimise the risk of in-
jury:
● Stop the vehicle safely as soon as possible.
Park at
a safe distance from surrounding traf-
fic to change a wheel.
● When changing a wheel, keep all passen-
gers, and p
articularly children, a safe dis-
tance away from the work area.
● Turn on the hazard warning lights to warn
other roa
d users.
● Ensure the ground on which you park is flat
and solid. If nec
essary, support the jack on a
wide solid base.
● If you are changing a wheel yourself, you
should be f
amiliar with the required proce-
dure. Otherwise, you should seek professio-
nal assistance.
● Only use suitable tools that are not dam-
aged when ch
anging a wheel.
● Always stop the engine, apply the hand-
brake l
ever firmly and place the selector lever
in position N, or engage a gear for a manual gearbox to reduce the risk of the vehicle mov-
ing ac
c
identally.
● Have the tightening torque of the wheel
bolts
checked as soon as possible with a reli-
able torque wrench. WARNING
If the wheel trims are not appropriate or not
fitt ed c orr
ectly, they could cause major acci-
dents or damage.
● Incorrectly mounted wheel trims may come
off whil
e driving and endanger other road
users.
● Damaged trims must never be mounted on
the wheels.
● Alw
ays ensure that the brake ventilation
and coolin
g is not cut off or blocked. This is
also valid if hubcaps are fitted later. If there
is not enough air, you may require signifi-
cantly longer braking distances. CAUTION
Remove and remount wheel trims taking care
to av oid d
amage to the vehicle. Tyre repair
TM S (T
yre Mobility System)* Read the additional information carefully
› ›
›
page 35
72
Page 75 of 232

w i
l
l reliably seal punctures caused by the
penetration of a foreign body of up to about
4 mm in diameter. Do not remove foreign ob-
jects, e.")
Self-help
The Anti-puncture kit* (Tyre Mobility System)
w i
l
l reliably seal punctures caused by the
penetration of a foreign body of up to about
4 mm in diameter. Do not remove foreign ob-
jects, e.g. screws or nails, from the tyre.
After inserting the sealant residue in the tyre,
you must again check the tyre pressure about
10 minutes after starting the engine.
You should only use the tyre mobility set if
the vehicle is parked in a safe place, you are
familiar with the procedure and you have the
necessary tyre mobility set! Otherwise, you
should seek professional assistance.
Do not use the tyre sealant in the following
cases:
● If the wheel rim has been damaged.
● In outside temperatures below -20°C (-4°F).
● In the event of cuts or perforations in the
tyre gr
eater than 4 mm.
● If you have been driving with very low pres-
sure or a c
ompletely flat tyre.
● If the sealant bottle has passed its use by
date. WARNING
Using the tyre mobility system can be dan-
ger ou
s, especially when filling the tyre at the
roadside. Please observe the following rules
to minimise the risk of injury: ●
Stop the v
ehicle safely as soon as possible.
Park it at a safe distance from surrounding
traffic to fill the tyre.
● Ensure the ground on which you park is flat
and solid.
● Al
l passengers and particularly children
must
keep a safe distance from the work area.
● Turn on the hazard warning lights to warn
other roa
d users.
● Use the tyre mobility system only if you are
famili
ar with the necessary procedures. Oth-
erwise, you should seek professional assis-
tance.
● The tyre mobility set is intended for tempo-
rary
emergency use only until you can reach
the nearest specialised workshop.
● Replace the repaired tyre with the tyre mo-
bility
set as soon as possible.
● The sealant is a health hazard and must be
cle
aned immediately if it comes into contact
with the skin.
● Always keep the tyre mobility set out of the
reac
h of small children.
● Never use an equivalent jack, even if it has
been appro
ved for your vehicle.
● Always stop the engine, apply the hand-
brake l
ever firmly and engage gear if using a
manual gearbox, in order to reduce the risk of
vehicle involuntary movement. WARNING
A tyre filled with sealant does not have the
same per f
ormance properties as a conven-
tional tyre.
● Never drive faster than 80 km/h (50 mph).
● Avoid heavy acceleration, hard braking and
fas
t cornering.
● Drive for only 10 minutes at a maximum
speed of 80
km/h (50 mph) and then check
the tyre. For the sake of the environment
Dispose of used or expired sealant observing
any l
egal requirements. Note
● A new bottle of se
alant can be purchased at
SEAT dealerships.
● Take into account the separate instruction
manual
of the tyre mobility set* manufactur-
er. 73
Technical data
Advice
Operation
Emergencies
Safety
Page 76 of 232

Emergencies
Contents of the tyre mobility system* Fig. 79
Standard representation: contents of
the anti-p u
nct
ure kit. The anti-puncture kit is located underneath
the floor c
o
v
ering in the luggage compart-
ment. It includes the following components
››› Fig. 79:
Tyre valve remover
Sticker indicating maximum speed “max.
80 km/h” or “max. 50 mph”
Filler tube with cap
Air compressor
Tube for inflating tyres
1 2
3
4
5 Warning provided by tyre pressure moni-
t
orin
g sy
stem1)
Air bleed screw 2)
ON/OFF switch
12 volt connector
Bottle of sealant
Spare tyre valve
The valve insert remover 1 has a gap at the
lo w
er end f
or a valve insert. The valve insert
can only be screwed or unscrewed in this
way. This also applies to its replacement part 11 .
WARNING
When inflating the wheel, the air compressor
and the inflat or t
ube may become hot.
● Protect hands and skin from hot parts.
● Do not place the hot flexible inflator tube or
hot air compr
essor on flammable material.
● Allow them to cool before storing the de-
vice.
● If
it is not possible to inflate the tyre to at
lea
st 2.0 bars (29 psi / 200 kPa), the tyre is
too badly damaged. The sealant is not in a
good condition to seal the tyre. Do not con-
tinue driving. Seek specialist assistance. 6
7
8
9
10
11 CAUTION
Switch off the air compressor after a maxi-
mum of 8 oper ation
al minutes to avoid over-
heating! Before switching on the air compres-
sor again, let it cool for several minutes. Check after 10 minutes of driving
Screw in the inflator tube
›››
Fig. 79 5 again
and chec k
the pressure on the gauge 6 .
1.3 bar (19 p s
i / 130 kPa) and lower:
● Stop the vehicle! The tyre c
annot be sealed
sufficiently with the tyre mobility set.
● You should obtain professional assistance
›››
.
1.4 b ar (20 p
s
i / 140 kPa) and higher:
● Set the tyre pressure to the correct value
again ››
› page 200.
● Carefully resume your journey until you
reac
h the nearest specialised workshop with-
out exceeding 80 km/h (50 mph).
● Have the damaged tyre replaced. 1)
It can also be integrated in the compressor.
2) In its place, the compressor may have a button.
74
Page 77 of 232
 and lower.
�")
Self-help
WARNING
Driving with an unsealed tyre is dangerous
and can c au
se accidents and serious injury.
● Do not continue driving if the tyre pressure
is 1.3
bar (19 psi / 130 kPa) and lower.
● Seek specialist assistance. Changing the windscreen wiper
bl
a
des
Changing the windscreen and rear
window wiper blades Read the additional information carefully
› ›
›
page 46.
The windscreen wiper blades are supplied as
standard with a layer of graphite. This layer is
responsible for ensuring that the wipe is si-
lent. If the graphite layer is damaged, the
noise of the water as it is wiped across the
windscreen will be louder.
Check the condition of the wiper blades regu-
larly. If the wipers scrape across the glass
they should be changed if they are damaged,
or cleaned if they are dirty ››› .
Dam ag
ed w
iper blades should be replaced
immediately. These are available from quali-
fied workshops. WARNING
Worn or dirty windscreen wiper blades reduce
vi s
ibility and increase the risk of accident
and serious injury.
● Always replace damaged or worn wind-
scr
een wiper blades or blades that no longer
clean the windscreen properly. CAUTION
● Damag ed or dir
ty windscreen wipers could
scratch the glass.
● If products containing solvents, rough
spong
es or sharp objects are used to clean
the blades, the graphite layer will be dam-
aged.
● Never use fuel, nail varnish remover, paint
thinner or simil
ar products to clean the win-
dows. CAUTION
● To pr ev
ent damage to the bonnet and the
wiper arms, only leave them in the service
position.
● Before driving, always lower the wiper
arms. Note
If wax deposits, other cleaning products from
the autom atic
car wash, or other care prod-
ucts, are left on the windscreen and the rear
window, the blades can scratch the glass. Re- move wax deposits with a special product or
cl
e
aning cloths. Tow-starting and towing
Ins truction
s for tow-starting Read the additional information carefully
›› ›
page 42.
When towing or tow starting, respect the le-
gal requirements.
For technical reasons, it is not possible to
tow a vehicle if the battery is flat.
In general, the vehicle should not be started
by towing. Jump-starting is much more pref-
erable ›››
page 43.
For technical reasons, the following vehicles
can not be tow started:
● Vehicles with an automatic gearbox.
● If the vehicle battery is flat, it is possible
that the en
gine control unit does not operate
correctly.
However, if your vehicle must absolutely be
tow-started (manual gearbox):
● Put it into second or third gear.
● Keep the clutch pressed down. »
75
Technical data
Advice
Operation
Emergencies
Safety
Page 78 of 232

Emergencies
● Sw it
c
h on the ignition and the hazard warn-
ing lights.
● Release the clutch when both vehicles are
movin
g.
● As soon as the engine starts, press the
clutc
h and move the gear lever into neutral.
This helps to prevent a collision with the tow-
ing vehicle. WARNING
A vehicle with a flat battery should never be
to w
ed.
● Never remove the key from the ignition
lock. Otherw
ise, the steering wheel lock
could suddenly lock. The vehicle would not
be controlled and a serious accident could
ensue. WARNING
When towing the vehicle, the handling and
brak in
g efficiency change considerably.
Please observe the following instructions to
minimise the risk of serious accidents and in-
jury:
● As the driver of the vehicle being towed:
– The brake mu
st be depressed must hard-
er as the brake servo does not operate.
Always remain aware to avoid collision
with the towing vehicle.
– More strength is required at the steering
wheel as the power steering does not op-
erate when the engine is switched off. ●
As the driv er of
the towing vehicle:
– Accelerate gently and carefully.
– Avoid sudden braking and manoeuvres.
– Brake well in advance than usual and
brake gently. CAUTION
● When t ow-
starting, fuel could enter the cat-
alytic converter and damage it.
● Carefully fit and remove the towline anchor-
age and its
cover to avoid damage to the ve-
hicle (e.g. paintwork).
● When towing, fuel could enter the catalytic
conv
erter and cause damage! Note
Fitting a towline anchorage to the rear bump-
er is not
possible. The vehicle is not suitable
for towing other vehicles. Advice for towing the vehicle
Towing vehicles with an automatic gearbox
Not
e the f
o
llowing for a towed vehicle:
● Make sure the gear selector lever is in the N
position.
● Do not
drive faster than 50 km/h (30 mph)
when tow
ing a vehicle.
● Do not tow further than 50 km (30 miles). ●
If a bre
akdown truck is used, the vehicle
must be towed with the front wheels raised.
Situations in which a vehicle should not be
towed
In the following cases, the vehicle should not
be towed but transported on a trailer or spe-
cial vehicle:
● If the vehicle gearbox does not contain lu-
bricant due t
o a fault.
● If the battery is flat and the steering cannot
be unloc
ked as a result, the electronic steer-
ing lock and electronic parking brake cannot
be disengaged.
● If the vehicle to be towed has an automatic
gearbo
x and the distance to be covered is
greater than 50 km (30 miles). Note
The vehicle can only be towed if the steering
lock el
ectronic gearbox lock is deactivated. If
the vehicle has no power supply or there is
an electric system fault, the engine must be
started using jump leads to deactivate the
steering column electronic gearbox lock. 76
Page 79 of 232

Self-help
Fitting the front towline anchorage Fig. 80
On the right-hand side of the front
b umper: R
emo
ve the cover. Fig. 81
On the right-hand side of the front
b umper: Sc
rew in the towline anchorage. The location for the removable tow ring is on
the right
-h
and s
ide of the front bumper be-
hind a cover ››› Fig. 80.
The towline anchorage should always be kept
in the vehicle. Note the instructions for towing
›››
page 76.
Fitting the towline anchorage
● Take the towline anchorage from the vehi-
cle t
ool kit in the luggage compartment
››› page 70.
● Press the upper part of the cover ›››
Fig. 80
(arrow) to disengage and release the cover.
● Remove the cover and leave it hanging
from the v
ehicle.
● Screw in the tow ring into its housing anti-
clock
wise as far as it will go ››› Fig. 81 ››› .
U se a s
uit
able tool to firmly tighten the tow-
line anchorage in its location.
● After towing, remove the tow ring by turn-
ing it c
lockwise.
● Place the cover's upper tab on the opening
of the bumper and c
arefully guide the lower
tab on the edge of the opening. If necessary,
press the lower tab from below.
● Press the lower area of the cover until the
lower t
ab engages in the bumper. CAUTION
The towline anchorage must always be com-
pl et
ely and firmly tightened. Otherwise, it
could be released while towing and tow-start-
ing. Emergency locking and unlock-
in
g
Intr oduction The doors and rear lid can be locked manual-
ly and p
ar
tially opened, for example if the key
or the central locking is damaged. WARNING
Opening and closing doors carelessly can
cau se seriou
s injury.
● If the vehicle is locked from outside, the
doors and w
indows cannot be opened from
the inside.
● Never leave children or disabled people
alone in the car
. They could be trapped in the
car in an emergency and will not be able to
get themselves to safety.
● Depending on the time of the year, temper-
ature
s inside a locked and closed vehicle can
be extremely high or extremely low resulting
in serious injuries and illness or even death,
particularly for young children. WARNING
Getting in the way of the doors and the rear
lid is d
angerous and can lead to serious in-
jury.
● Open and close the doors and the rear lid
only when ther
e is nobody in the way. » 77
Technical data
Advice
Operation
Emergencies
Safety
Page 80 of 232

Emergencies
CAUTION
When opening and closing in an emergency,
car ef
ully disassemble components and then
reassemble them carefully to avoid damage
to the vehicle. Fuses and bulbs
F u
se
s
Introduction Due to the constant updating of vehicles,
fu
se a
ssignments based on equipment and
the use of the same fuse for various electrical
components, it is not possible to provide an
up-to-date summary of the fuse positions for
the electrical components at the time of
printing this manual. For detailed information
about the fuse positions, please consult a
technical service.
In general, a fuse can be assigned to various
electrical components. Likewise, an electrical
component can be protected by several
fuses.
Only replace fuses when the cause of the
problem has been solved. If a newly inserted
fuse blows after a short time, you must have
the electrical system checked by a special-
ised workshop as soon as possible. WARNING
The high voltages in the electrical system can
give seriou s
electrical shocks, causing burns
and even death!
● Never touch the electrical wiring of the igni-
tion syst
em. ●
Tak e c
are not to cause short circuits in the
electrical system. WARNING
Using unsuitable fuses, repairing fuses or
bridgin g a curr
ent circuit without fuses can
cause a fire and serious injury.
● Never use a fuse with a higher value. Only
repl
ace fuses with a fuse of the same amper-
age (same colour and markings) and size.
● Never repair a fuse.
● Never replace a fuse by a metal strip, staple
or simil
ar. CAUTION
● To pr ev
ent damage to the vehicle's electric
system, before replacing a fuse always turn
off the ignition, the lights and all electrical
elements and remove the key from the igni-
tion.
● If you replace a fuse with higher-rating
fuse,
you could cause damage to another part
of the electrical system.
● Protect the fuse boxes when open to pre-
vent the entr
y of dust or humidity as they can
damage the electrical system. Note
● One component m
ay have more than one
fuse. 78
 1
1 2
2 3
3 4
4 5
5 6
6 7
7 8
8 9
9 10
10 11
11 12
12 13
13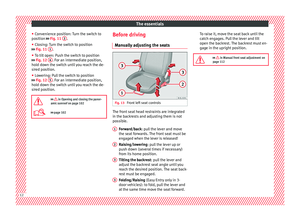 14
14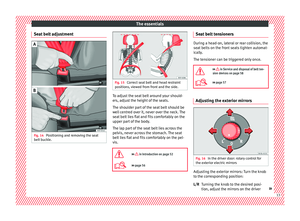 15
15 16
16 17
17 18
18 19
19 20
20 21
21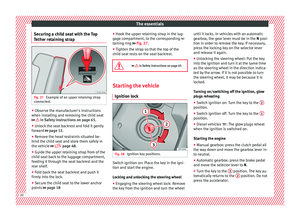 22
22 23
23 24
24 25
25 26
26 27
27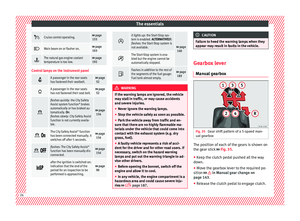 28
28 29
29 30
30 31
31 32
32 33
33 34
34 35
35 36
36 37
37 38
38 39
39 40
40 41
41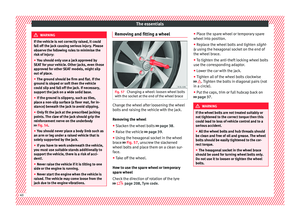 42
42 43
43 44
44 45
45 46
46 47
47 48
48 49
49 50
50 51
51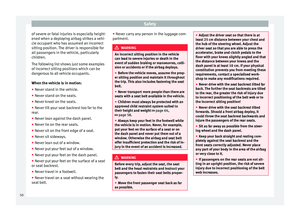 52
52 53
53 54
54 55
55 56
56 57
57 58
58 59
59 60
60 61
61 62
62 63
63 64
64 65
65 66
66 67
67 68
68 69
69 70
70 71
71 72
72 73
73 74
74 75
75 76
76 77
77 78
78 79
79 80
80 81
81 82
82 83
83 84
84 85
85 86
86 87
87 88
88 89
89 90
90 91
91 92
92 93
93 94
94 95
95 96
96 97
97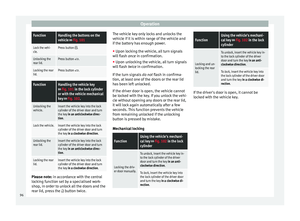 98
98 99
99 100
100 101
101 102
102 103
103 104
104 105
105 106
106 107
107 108
108 109
109 110
110 111
111 112
112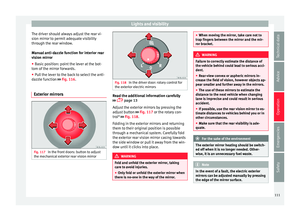 113
113 114
114 115
115 116
116 117
117 118
118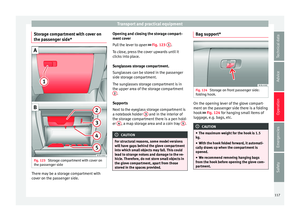 119
119 120
120 121
121 122
122 123
123 124
124 125
125 126
126 127
127 128
128 129
129 130
130 131
131 132
132 133
133 134
134 135
135 136
136 137
137 138
138 139
139 140
140 141
141 142
142 143
143 144
144 145
145 146
146 147
147 148
148 149
149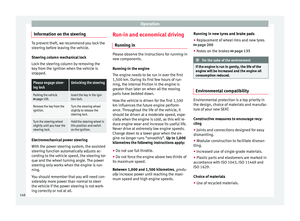 150
150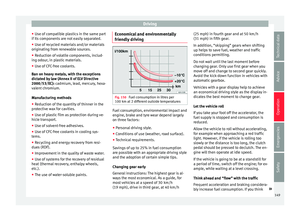 151
151 152
152 153
153 154
154 155
155 156
156 157
157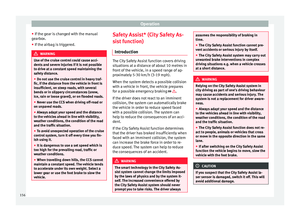 158
158 159
159 160
160 161
161 162
162 163
163 164
164 165
165 166
166 167
167 168
168 169
169 170
170 171
171 172
172 173
173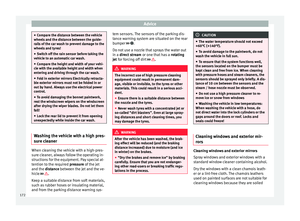 174
174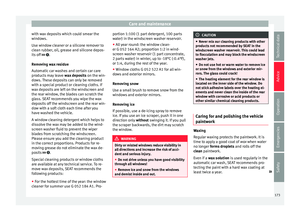 175
175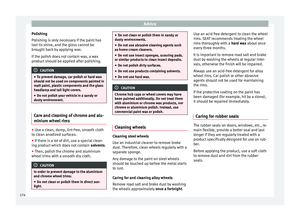 176
176 177
177 178
178 179
179 180
180 181
181 182
182 183
183 184
184 185
185 186
186 187
187 188
188 189
189 190
190 191
191 192
192 193
193 194
194 195
195 196
196 197
197 198
198 199
199 200
200 201
201 202
202 203
203 204
204 205
205 206
206 207
207 208
208 209
209 210
210 211
211 212
212 213
213 214
214 215
215 216
216 217
217 218
218 219
219 220
220 221
221 222
222 223
223 224
224 225
225 226
226 227
227 228
228 229
229 230
230 231
231