Page 169 of 232

Care and maintenance
The optimal reach of the equipment is only
ac hiev
ed w
ith an external aerial.
Check first with a specialised workshop that
understands the technical possibilities of in-
stallation if you wish to use a two-way radio
with a transmitting power of over 10 watts.
SEAT recommends taking your car in for tech-
nical service.
All legal requirements, together with the in-
structions for the use of two-way radios must
be observed. WARNING
If the two-way radio is not securely fastened
in pos ition, it
could be sent flying around the
vehicle in the event of sharp braking, sudden
manoeuvres or accident, causing injury.
● While driving, two-way radios must be se-
curely
fastened in position, outside the air-
bags deployment zones, or safely stowed
away. WARNING
When using a two-way radio without a con-
nection to an e xt
erior aerial, the maximum
permitted levels of electromagnetic radiation
may be exceeded. This is also the case if the
aerial has not been correctly installed.
● You should only use a two-way radio inside
the vehic
le if it has first been correctly con-
nected to an exterior aerial. Information stored by the control
u
nit
s Your vehicle is fitted at the factory with a ser-
ies
of
electronic control units responsible for
the engine and gearbox management. In ad-
dition, the control units supervise the per-
formance of the exhaust gas system and the
airbag systems.
Therefore, while the vehicle is being driven,
these electronic control units are continuous-
ly analysing the vehicle data. In the event of
faults or deviations from the theoretical val-
ues, only this data is stored. Normally, the
warning lamps on the instrument panel light
up in the event of faults.
This data can only be read and analysed us-
ing special equipment.
The storing of the data allows specialised
workshops to detect and repair faults. Stored
data may include:
● Data relating to the engine or the gearbox
● Speed
● Direction of travel
● Braking force
● Detection of seat belt
The v ehic
le control units never record conver-
sations held by passengers in the vehicle.
In vehicles equipped with an emergency call
function via the mobile phone or other appli- ances connected in the vehicle, it is possible
to send the v
ehicle position. If the control
unit records an accident with airbag activa-
tion, the system may automatically send a
signal. This will depend on the network oper-
ator. Normally, transmission is only possible
in areas with good coverage.
Event Data Recorder
The vehicle is not fitted with an event data re-
corder.
An event data recorder temporarily stores the
vehicle information. Therefore, in the event of
an accident, it is possible to obtain detailed
information about how the accident occur-
red. Vehicles with airbag systems can store
data relating to impact speed, seat belt sta-
tus, seat positions and airbag activation
times may be stored, etc. The volume of data
depends on the manufacturer.
Event data recorders can only be mounted
with authorisation from the vehicle owner
and, in some countries, they are governed by
local legislation.
Reprogramming control units
On the whole, all the data required for the
component management is stored in the con-
trol units. The programming of certain con-
venience functions, such as the turn signals,
individual door opening and instructions on
the display can be modified using special »
167
Technical data
Advice
Operation
Emergencies
Safety
Page 170 of 232

Advice
equipment at the workshop. If the comfort
f u
nction
s are reprogrammed, the information
and Instruction Manual descriptions will not
coincide with the modified functions. There-
fore, SEAT recommends that any modifica-
tions be recorded in the section “Other work-
shop notes” in the Maintenance Programme.
The SEAT Official Service must have a record
of any modification to the programming.
Reading the vehicle fault memory
There is a diagnostics connector in the vehi-
cle interior for reading the vehicle fault mem-
ory. The fault memory documents errors and
deviations from the theoretical values of the
electronic control units.
The diagnostics connector is in the driver
side footwell area, next to the lever for open-
ing the bonnet, below a cover.
The fault memory should only be read and re-
set by a specialised workshop.
Using a mobile telephone in a vehicle
without c
onnection to an exterior aer-
ial Mobile telephones transmit and receive radio
w
av
e
s also called high-frequency energy,
both when in use and when on stand-by. Sci-
entific studies state that radio waves exceed-
ing certain values may be harmful to the hu- man body. International committees and au-
thorities h
ave established limits and direc-
tives in order to ensure electromagnetic radi-
ation from mobile phones remains within cer-
tain limits that do not endanger health. Nev-
ertheless, there is no conclusive scientific
evidence that wireless telephones are totally
safe.
That is why some experts recommend moder-
ate use of the mobile telephone, and the ap-
pliance of measures to reduce radiation on
the human body.
When a mobile phone not connected to an
exterior aerial is used inside the vehicle, the
electromagnetic radiation may be greater
than if the mobile phone were connected to a
built-in aerial or to another exterior aerial.
If the vehicle is fitted with a suitable hands-
free device that allows the employment of
numerous additional mobile telephone func-
tions with compatible Bluetooth technolo-
gy ®
, it will comply with the legislation in
many countries which only permits the use of
mobile phones inside vehicles using a
hands-free device.
Mobile telephones must be placed in a suita-
ble telephone support or stored safely in the
vehicle. If a support is used for the tele-
phone, it must be securely fastened to the
base plate. The mobile will be secure on the
instrument panel and always within reach of
the driver only by following these procedures. Mobile telephone connection with an exter-
nal aeri
al is carried out subject to the hands-
free device, via the telephone support or by
the Bluetooth ®
connections present in the
mobile telephone and the vehicle.
If the mobile phone is connected to an aerial
incorporated into the vehicle or an exterior
aerial connected to the vehicle, it will help re-
duce the electromagnetic radiation transmit-
ted and the risk to human health. It will also
improve the quality of the connection.
If the phone is used inside the vehicle with-
out the hands-free system, it will not be se-
curely fastened and will not be connected to
the exterior aerial of the vehicle telephone.
Nor will the telephone charge if it is not on
the support. In addition, some calls may
break off and the quality of the connection
will be affected.
Mobile telephones should only be used in-
side the vehicle if they are connected to a
hands-free system. SEAT recommends using
an external aerial should you wish to use a
mobile telephone inside the vehicle.
Bluetooth ®
is a registered trademark of Blue-
tooth ®
SIG, Inc. WARNING
If the mobile phone is not securely fastened
in pos ition, it
could be sent flying around the
vehicle in the event of sharp braking, sudden
manoeuvres or accident, causing injury. 168
Page 171 of 232

Care and maintenance
●
Whil e driv
ing, the mobile telephone, other
equipment including telephone accessories
such as telephone supports, notepads and
navigators must be correctly secured, away
from the airbags deployment zones, or stored
in a safe place. WARNING
When using a mobile telephone or two-way
r a dio w
ithout connecting an external aerial,
the maximum permitted levels of electromag-
netic radiation in the vehicle may be excee-
ded, thus putting the driver and the rest of
the vehicle occupants in danger. This is also
the case if the aerial has not been correctly
installed.
● A minimum of 20 centimetres should be
kept betw
een mobile phone aerials and artifi-
cial pacemakers, as mobile telephones may
affect the working of pacemakers.
● Do not keep mobile phones in breast pock-
ets dir
ectly above pacemakers.
● Immediately switch off the mobile tele-
phone if y
ou suspect any interference with
pacemakers or other types of medical equip-
ment. Support points for raising the vehicle
Fig. 159
Front jacking points for raising vehi-
c l
e w
ith lifting platform or jack Fig. 160
Rear jacking points for raising vehi-
c l
e w
ith lifting platform or jack Always use the jacking points indicated in
the figur
e
s
››› Fig. 159 and ››› Fig. 160 when
raising the vehicle. If the vehicle is not lifted
at these points, it could be seriously dam-
aged ››› or lead to serious injury
›
››
.The vehicle should not be lifted using lifting
p
latf
orms with lift pads containing fluid.
When raising a vehicle using a platform or
jack, a series of precautionary measures are
required. Do not raise the vehicle with a lift-
ing platform or jack unless you have received
training in how to do so and know how to do
so safely.
Notes on raising the vehicle with a jack
››› page 72. WARNING
The improper use of the lifting platform or
the jac k
when raising the vehicle may result
in accidents or serious injury.
● Before raising the vehicle, please observe
the manufact
urer's instructions for the plat-
form or jack, and the legal requirements,
where applicable.
● There should not be anyone inside the ve-
hicle when it
is being raised or once it is in
the air.
● Only use the jacking points indicated in the
figures
››› Fig. 159 and ››› Fig. 160 when rais-
ing the vehicle. If the vehicle is not lifted at
the indicated points, it may fall from the plat-
form while the engine or gearbox is being
dismounted, for example.
● The jacking points should be centrally
aligned and firmly
positioned on the platform
support plates. » 169
Technical data
Advice
Operation
Emergencies
Safety
Page 172 of 232

Advice
●
Never s t
art the engine when the vehicle is
raised! The vehicle may fall from the platform
due to the engine vibrations.
● If it is necessary to work underneath the ve-
hicle whi
le it is raised, you should check that
the supporting stands have an adequate load
capacity.
● Never climb onto the lifting platform.
● Always make sure that the weight of the ve-
hicle doe
s not exceed the lifting platform
load capacity. CAUTION
● Never r ai
se the vehicle at the engine oil
sump, the gearbox or the rear or front axles.
● Always use an intermediate rubber support
to prev
ent damage to the vehicle underbody.
Check that the arms of the lifting platform are
able to move with obstruction.
● The arms should not come into contact with
the side runnin
g boards or other parts of the
vehicle. Caring for and cleaning the ve-
hic
le e
xterior
Introduction Regular maintenance and washing help to
m
aint
ain the
value of the vehicle. This may
also be one of the requirements for acknowl- edging warranty claims in the event of body-
work c
orrosion or paint defects.
Products suitable for the care of your vehicle
are available at any technical service. WARNING
Car-care products may be toxic and hazard-
ous. If c
ar care products are not suitable or
are used inappropriately, this could result in
accident, serious injury, burns or intoxica-
tion.
● Car care products must always be stored in
the original
container which should be kept
closed.
● Observe information provided by the manu-
factur
er.
● To prevent confusion, never store car care
products
in empty food cans, bottles or other
containers.
● Keep all care products out of reach of chil-
dren.
● Harmfu
l vapours may be produced when us-
ing car c
are products. Therefore, care prod-
ucts should only be used in well-ventilated
spaces or in the open air.
● Never use fuel, turpentine, engine oil, ace-
tone or any
other volatile liquid to wash,
clean or care for the vehicle. These are toxic
and highly flammable. WARNING
Inappropriate care and cleaning of vehicle
component s
may effect the vehicle safety
equipment, increasing the risk of severe in-
jury.
● Vehicle components should only be
cle
aned and maintained in accordance with
the manufacturer's instructions.
● Only use approved or recommended care
products. CAUTION
Cleaning products which contain solvents will
dam ag
e the material. For the sake of the environment
Only wash the vehicle in areas allocated for
this p
urpose, to prevent dirty water which
may be contaminated by oil, grease or fuel,
from entering the drains. In some places,
even washing it outside the planned areas is
banned. For the sake of the environment
Where possible, always use products which
re s
pect the environment. For the sake of the environment
The remains of car care products should not
be dis po
sed of with ordinary household170
Page 173 of 232

Care and maintenance
waste. Observe information provided by the
manuf
act
urer. Washing the vehicle
The longer substances such as insects, bird
drop
pin
gs, resinous tree sap, road dirt, in-
dustrial deposits, tar, soot or road salt and
other aggressive materials remain on the ve-
hicle, the more damage they do to the paint-
work. High temperatures (for instance due to
strong sunlight) further intensify the corro-
sive effect. The vehicle undercarriage should
also be thoroughly washed at regular inter-
vals.
Automatic car washes
Always observe the instructions provided at
the automatic car wash. The standard pre-
cautionary measures prior to entering the car
wash should be taken to avoid damage to
the vehicle (close all windows and the roof,
fold in exterior mirrors). If the vehicle is fitted
with additional components (spoiler, roof-
rack, aerial, etc.), check with the car wash su-
pervisor whether these can enter the car
wash ››› .
The v
ehic
le paintwork is so durable that the
vehicle can normally be washed without
problems in an automatic car wash tunnel.
However, wear and damage to the paintwork
will depend on the type of car wash used. SEAT recommends the use of car washes
without bru
shes.
To remove traces of wax on windows and to
prevent wiper blades from scratching, please
observe the following ››› page 172, Cleaning
windows and exterior mirrors .
Washing the car by hand
When washing the car by hand, use plenty of
water to soften the dirt first, and rinse off as
well as possible.
Then clean the vehicle with a soft sponge,
glove or brush using only slight pressure.
Start at the roof and work downwards. Spe-
cial car shampoo should only be used for
very persistent dirt.
Rinse the sponge or glove thoroughly and of-
ten.
Wheels, sills and similar should be cleaned
last. Use a second sponge for this. WARNING
Sharp components on the vehicle may cause
injury .
● Pr
otect arms and hands from sharp edges
when cle
aning the vehicle undercarriage or
the interior of the wheel hubs. WARNING
After the vehicle has been washed, the brak-
ing eff ect
will be reduced (and the braking
distance increased) due to moisture (and ice
in winter) on the brakes.
● “Dry the brakes and remove ice” by braking
caref
ully. Ensure that you are not endanger-
ing other road-users or breaking traffic regu-
lations in the process. CAUTION
● The wat er t
emperature should not exceed
+60°C (+140°F).
● To avoid damage to the paintwork, do not
wash the
vehicle in full sun.
● Do not use rough sponges or similar which
coul
d damage the surface to clean away the
traces of insects.
● Never wipe the headlights with a dry cloth
or spong
e, always moisten first. It is best to
use soapy water.
● Washing the vehicle in low temperatures:
When washin
g the vehicle with a hose, do
not direct water into the lock cylinders or the
gaps around the doors or roof. Locks and
seals could freeze! CAUTION
To avoid any risk of damage to the vehicle,
pl e
ase check the following points before us-
ing an automatic car wash: » 171
Technical data
Advice
Operation
Emergencies
Safety
Page 174 of 232

Advice
●
Comp ar
e the distance between the vehicle
wheels and the distance between the guide-
rails of the car wash to prevent damage to the
wheels and tyres!
● Switch off the rain sensor before taking the
vehicl
e to an automatic car wash.
● Compare the height and width of your vehi-
cle w
ith the available height and width when
entering and driving through the car wash.
● Fold in exterior mirrors Electrically retracta-
ble e
xterior mirrors must not be folded in or
out by hand. Always use the electrical power
control.
● To avoid damaging the bonnet paintwork,
res
t the windscreen wipers on the windscreen
after drying the wiper blades. Do not let them
fall!
● Lock the rear lid to prevent it from opening
unexpect
edly while inside the car wash. Washing the vehicle with a high pres-
s
ur
e c
leaner When cleaning the vehicle with a high-pres-
s
ur
e c
leaner, always follow the operating in-
structions for the equipment. Pay special at-
tention to the required pressure of the jet
and the distance between the jet and the ve-
hicle ››› .
K eep a s uit
able distance from soft materials,
such as rubber hoses or insulating material,
and from the parking distance warning sys- tem sensors. The sensors of the parking dis-
tance w
arning system are situated on the rear
bumper ››› .
Do not u
se a no
zzle that sprays the water out
in a direct stream or one that has a rotating
jet for forcing off dirt ››› .
WARNING
The incorrect use of high pressure cleaning
equipment c ou
ld result in permanent dam-
age, visible or invisible, to the tyres or other
materials. This could result in a serious acci-
dent.
● Ensure there is a suitable distance between
the nozzl
e and the tyres.
● Never wash tyres with a concentrated jet or
so-cal
led “dirt blasters”. Even at large spray-
ing distances and short cleaning times, you
may damage the tyres. WARNING
After the vehicle has been washed, the brak-
ing eff ect
will be reduced (and the braking
distance increased) due to moisture (and ice
in winter) on the brakes.
● “Dry the brakes and remove ice” by braking
caref
ully. Ensure that you are not endanger-
ing other road-users or breaking traffic regu-
lations in the process. CAUTION
● The wat er t
emperature should not exceed
+60°C (+140°F).
● To avoid damage to the paintwork, do not
wash the
vehicle in full sun.
● To ensure that the system functions well,
the sensors
located on the bumper must be
kept clean and free from ice. When cleaning
with pressure hoses and steam cleaners, the
sensors should be sprayed only briefly. A dis-
tance of 10 cm between the sensors and the
steam / hose nozzle must be observed.
● Do not use a high pressure cleaner to re-
move ic
e or snow from windows
● Washing the vehicle in low temperatures:
When washin
g the vehicle with a hose, do
not direct water into the lock cylinders or the
gaps around the doors or roof. Locks and
seals could freeze! Cleaning windows and exterior mir-
r
or
s Cleaning windows and exterior mirrors
S
pr
a
y windows and exterior windows with a
standard window cleaner containing alcohol.
Dry the windows with a clean chamois leath-
er or a lint-free cloth. The chamois leathers
used on painted surfaces are not suitable for
cleaning windows because they are soiled
172
Page 175 of 232

Care and maintenance
with wax deposits which could smear the
w indo
w
s.
Use window cleaner or a silicone remover to
clean rubber, oil, grease and silicone depos-
its off ››› .
R emo
v
ing wax residue
Automatic car washes and certain car care
products may leave wax deposits on the win-
dows. These deposits can only be removed
with a special product or cleaning cloths. If
wax deposits are left on the windscreen and
the rear window, the blades can scratch the
glass. SEAT recommends you wipe the wax
deposits off the windscreen and the rear win-
dow with a soft cloth each time after you
have washed the vehicle.
A window cleaning detergent which helps to
dissolve the wax may be added to the wind-
screen washer fluid to prevent the wiper
blades from scratching the windscreen.
Please ensure you add the cleaning product
in the correct proportions. Products for re-
moving grease do not eliminate the wax de-
posits ››› .
S pec
i
al cleaning products or window cloths
are available at any technical service. To re-
move wax deposits, SEAT recommends the
following products:
● For the hottest time of the year: the window
cle
aner for summer use G 052 184 A1. Pro- portion 1:100 (1 part detergent, 100 parts
water) in the w
indscreen washer reservoir.
● All year round: the window clean-
er G 052 164 A2; proportion 1:2 in w
ind-
screen washer reservoir (1 part concentrate,
2 parts water) in winter, up to -18°C (-0.4°F),
or 1:4, during the rest of the year.
● Window cloths G 052 522 A1 for all win-
dows
and exterior mirrors.
Removing snow
Use a small brush to remove snow from the
windows and exterior mirrors.
Removing ice
If possible, use a de-icing spray to remove
ice. If you use an ice scraper, push it in one
direction only without swinging it. If you pull
the scraper backwards, the dirt may scratch
the window. WARNING
Dirty or misted windows reduce visibility in
al l
directions and increase the risk of acci-
dent and serious injury.
● Do not drive unless you have good visibility
through al
l windows!
● Remove ice and snow from the windows
and demist
inside and out. CAUTION
● Never mi x
our cleaning products with other
products not recommended by SEAT in the
windscreen washer reservoir. This could lead
to flocculation and may block the windscreen
washer jets.
● Do not use hot or warm water to remove ice
or snow fr
om the windows and exterior mir-
rors. The glass could crack!
● The heating element for the rear window is
located on the inner s
ide of the window. Do
not stick adhesive labels over the heating el-
ements and never clean the inside of the rear
window with corrosive or acid products or
other similar chemical cleaning products. Caring for and polishing the vehicle
p
aintw
ork Waxing
R
e
gu
lar waxing protects the paintwork. It is
time to apply a good coat of wax when water
no longer forms droplets and rolls off the
clean paintwork.
Even if a wax solution is used regularly in the
automatic car wash, SEAT recommends pro-
tecting the paint with a hard wax coating at
least twice a year. »
173
Technical data
Advice
Operation
Emergencies
Safety
Page 176 of 232

Advice
Polishing
P o
li
shing is only necessary if the paint has
lost its shine, and the gloss cannot be
brought back by applying wax.
If the polish does not contain wax, a wax
product should be applied after polishing. CAUTION
● To pr ev
ent damage, car polish or hard wax
should not be used on components painted in
matt paint, plastic components and the glass
headlamp and tail light covers.
● Do not polish your vehicle in a sandy or
dusty
environment. Care and cleaning of chrome and alu-
minium wheel
rims●
Use a clean, damp, lint-free, smooth cloth
t o c
l
ean anodized surfaces.
● If there is a lot of dirt, use a special clean-
ing product
which does not contain solvents.
● Then, polish the chrome and aluminium
wheel trims w
ith a smooth dry cloth. CAUTION
In order to prevent damage to the aluminium
and chr ome wheel
trims:
● Do not clean or polish them in direct sun-
light. ●
Do not c l
ean or polish them in sandy or
dusty environments.
● Do not use abrasive cleaning agents such
as home c
ream cleaners.
● Do not use insect sponges, scouring pads,
or simil
ar products to clean insect deposits.
● Do not polish dirty surfaces.
● Do not use products containing solvents.
● Do not use hard wax. CAUTION
Chrome hub caps or wheel covers may have
been p ainted a
dditionally. Do not treat them
with aluminium or chrome wax products, nor
chrome or aluminium polish. Instead, use
commercial paint wax or polish. Cleaning wheels
Cleaning steel wheels
U
se an indu
s
trial cleaner to remove brake
dust. Therefore, clean wheels regularly with a
separate sponge.
Any damage to the paint on steel wheels
should be touched up before the metal starts
to rust.
Caring for and cleaning alloy wheels
Remove road salt and brake dust by washing
the wheels approximately once a fortnight.Use an acid free detergent to clean the wheel
rims. SEA
T recommends treating the wheel
rims thoroughly with a hard wax about once
every three months.
It is important to remove road salt and brake
dust by washing the wheels at regular inter-
vals, otherwise the finish will be impaired.
Always use an acid-free detergent for alloy
wheel rims. Car polish or other abrasive
agents should not be used for maintaining
the rims.
If the protective coating on the paint has
been damaged (for example, hit by a stone),
it should be repaired immediately.
Caring for rubber seals The rubber seals on doors, windows, etc., re-
m
ain fl
e
xible, provide a better seal and last
longer if they are regularly treated with a
product specifically designed for use on rub-
ber.
Before applying the product, use a soft cloth
to remove dust and dirt from the rubber
seals.
174
 1
1 2
2 3
3 4
4 5
5 6
6 7
7 8
8 9
9 10
10 11
11 12
12 13
13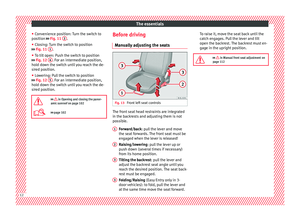 14
14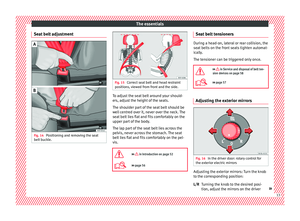 15
15 16
16 17
17 18
18 19
19 20
20 21
21 22
22 23
23 24
24 25
25 26
26 27
27 28
28 29
29 30
30 31
31 32
32 33
33 34
34 35
35 36
36 37
37 38
38 39
39 40
40 41
41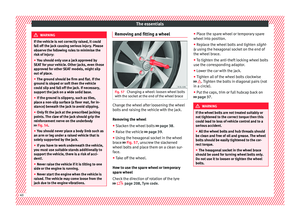 42
42 43
43 44
44 45
45 46
46 47
47 48
48 49
49 50
50 51
51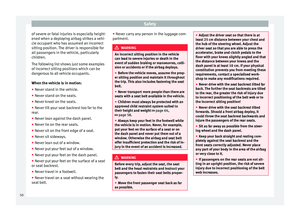 52
52 53
53 54
54 55
55 56
56 57
57 58
58 59
59 60
60 61
61 62
62 63
63 64
64 65
65 66
66 67
67 68
68 69
69 70
70 71
71 72
72 73
73 74
74 75
75 76
76 77
77 78
78 79
79 80
80 81
81 82
82 83
83 84
84 85
85 86
86 87
87 88
88 89
89 90
90 91
91 92
92 93
93 94
94 95
95 96
96 97
97 98
98 99
99 100
100 101
101 102
102 103
103 104
104 105
105 106
106 107
107 108
108 109
109 110
110 111
111 112
112 113
113 114
114 115
115 116
116 117
117 118
118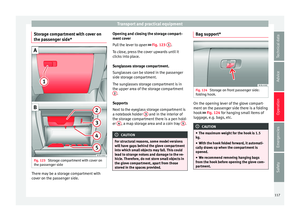 119
119 120
120 121
121 122
122 123
123 124
124 125
125 126
126 127
127 128
128 129
129 130
130 131
131 132
132 133
133 134
134 135
135 136
136 137
137 138
138 139
139 140
140 141
141 142
142 143
143 144
144 145
145 146
146 147
147 148
148 149
149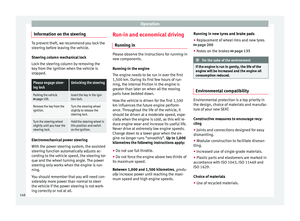 150
150 151
151 152
152 153
153 154
154 155
155 156
156 157
157 158
158 159
159 160
160 161
161 162
162 163
163 164
164 165
165 166
166 167
167 168
168 169
169 170
170 171
171 172
172 173
173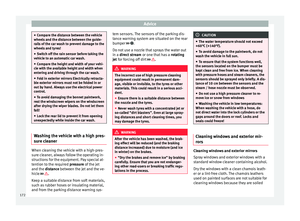 174
174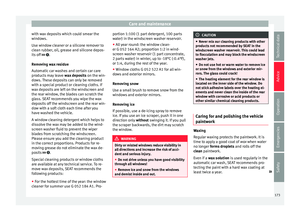 175
175 176
176 177
177 178
178 179
179 180
180 181
181 182
182 183
183 184
184 185
185 186
186 187
187 188
188 189
189 190
190 191
191 192
192 193
193 194
194 195
195 196
196 197
197 198
198 199
199 200
200 201
201 202
202 203
203 204
204 205
205 206
206 207
207 208
208 209
209 210
210 211
211 212
212 213
213 214
214 215
215 216
216 217
217 218
218 219
219 220
220 221
221 222
222 223
223 224
224 225
225 226
226 227
227 228
228 229
229 230
230 231
231