Page 121 of 232

Transport and practical equipment
● In fr ont
of
the rear seats ››› Fig. 127.
● Rear shelf for light items of clothing*.
● Bag hook in the luggage compartment
›››
page 123.
● In the upper part of the centre console, in-
ste
ad of the radio ››› Fig. 94 11 .
WARNING
Clothing hung on the coat hooks could re-
strict the driv
er's view and lead to serious ac-
cidents.
● Hang the clothes from the hooks so that
driver's
view is not restricted.
● The coat hook is suitable for light items of
clothing. Nev
er place heavy, hard or sharp
objects in the bags. Drink holders
The drink holders are in the open storage
c
omp
ar
tments in the driver and passenger
doors. WARNING
Improper use of the drink holders can cause
injury .
● Do not
place containers with hot drinks in a
drink hol
der. During sudden braking or driv-
ing manoeuvres, the hot drink could be spil-
led and lead to scalding. ●
Ens ur
e that no bottles or other object are
dropped in the driver footwell, as they could
get under the pedals and obstruct their work-
ing.
● Never place heavy containers, food or other
heavy o
bjects in the drink holder. In the
event of an accident, these heavy objects
could be “thrown around” the vehicle interior
and cause serious injuries. WARNING
Closed bottles inside the vehicle could ex-
p lode or c r
ack due to the heat or the cold.
● Never leave a closed bottle in the vehicle if
the inside t
emperature is too high or too low. CAUTION
Do not leave open drinks containers in the
drink ho l
ders when the vehicle is in motion.
They could spill during braking, for example,
and cause damage to the vehicle and the
electrical system. Centre console drink holders
Fig. 129
In the front part of the centre con-
so l
e: drink
holder Fig. 130
In the back part of the centre con-
so l
e: drink
holder There are drink holders in the front and rear
p
ar
ts
of the centre console. »
119
Technical data
Advice
Operation
Emergencies
Safety
Page 122 of 232

Operation
Securing the drink container in the front
drink ho
l
der
Fold the drink holder ››› Fig. 129 forward.
Place the drink container in the drink holder
so that it is securely surrounded.
Ashtray* Fig. 131
In the front part of the centre con-
so l
e: openin
g the ashtray. Opening and closing the ashtray
T
o
open
, lift the lid of the ashtray in the direc-
tion of the arrow ››› Fig. 131.
To close, push the ashtray lid down.
Emptying the ashtray ● Remove the ashtray from the storage com-
partment
lifting it up. ●
After empty
ing the ashtray, insert it into the
drink holder from above. WARNING
Incorrect use of the ashtray may cause a fire
or burn s
and other serious injuries.
● Never put paper or other flammable objects
in the ashtra
y. Cigarette lighter*
Fig. 132
In the front part of the centre con-
so l
e: light
er ●
Push the button on the cigarette lighter in-
w ar d w
ith the ignition on ››› Fig. 132.
● Wait for the lighter to pop out slightly.
● Pull out the cigarette lighter and light the
cigar
ette on the glowing coil ››› .
● Replace the cigarette lighter in its insert. WARNING
Undue use of the cigarette lighter may cause
a fire or b urn
s and other serious injuries.
● The cigarette lighter must only be used to
light cig
arettes or similar.
● Never leave children unsupervised in the
vehicl
e. The cigarette lighter can be used
when the ignition is switched on. Note
The cigarette lighter can also be used with
the 12 V o
lt socket. Power socket*
Fig. 133
Front centre console: 12 Volt socket
in the s t
or
age compartment Electrical equipment can be connected to the
soc
k
et
in the vehicle.
120
Page 123 of 232

Transport and practical equipment
All connected appliances should be in per-
f ect
w
orking order without any faults.
Maximum power consumption
Power sock-
etMaximum power consumption
12 Volts120 Watts The maximum capacity of the socket must
not be e
x
ceeded. The power consumption is
indicated on the rating plate of each appli-
ance.
Where 2 or more appliances are connected at
the same time, the total rating of all the con-
nected devices must never exceed 190 Watts
››› .
12 v o
lt
power socket
The 12 volt socket is found in the storage
compartment at the front of the centre con-
sole ›››
Fig. 133 and only functions when the
ignition is switched on.
Using electrical appliances with the engine
stopped and the ignition switched on will
drain the battery. Therefore, electrical devi-
ces connected to the power socket can only
be used when the engine is running.
To prevent voltage variations from causing
damage, switch off the electrical device con-
nected to the 12 Volt power socket before switching the ignition on or off and before
star
ting the engine. WARNING
Improper use of the socket or electrical devi-
ce s
could lead to a fire and cause serious in-
juries.
● Never leave children unsupervised in the
vehicl
e. The socket and equipment connected
to it can be used when the ignition is switch-
ed on.
● Should a connected electrical device over-
heat, swit
ch it off and unplug it immediately. CAUTION
● Alw a
ys follow the operating instructions for
the appliances to be connected!
● Never exceed the maximum power rating as
this c
ould damage the vehicle's general elec-
trical system.
● 12 volt power socket:
– Only u
se accessories with approved elec-
tromagnetic compatibility according to
current regulations.
– Never power the socket. CAUTION
● To av oid d
amage to the vehicle's electrical
system, never connect equipment that gener-
ates electrical current, such as solar panels
or battery chargers, to the 12 volt power sockets in order to charge the vehicle's bat-
ter
y
.
● Only use accessories with approved elec-
tromagnetic
compatibility according to cur-
rent regulations.
● To avoid damage due to voltage variations,
switc
h off all devices connected to the 12 V
socket before switching the ignition on or off
and before starting the engine.
● Never connect an appliance to the 12 volt
power soc
ket that consumes more than the
power indicated in watts. Exceeding the max-
imum power absorption could damage the ve-
hicle's electrical system. For the sake of the environment
Do not leave the engine running when the ve-
hicl e i
s at a standstill. Note
● Us in
g devices with the engine stopped and
the ignition switched on will drain the bat-
tery.
● Unshielded equipment can cause interfer-
ence on the ra
dio equipment and the vehi-
cle's electrical system.
● Interference can occur on the radio's AM
wave
band if electrical appliances are used
near the aerial. 121
Technical data
Advice
Operation
Emergencies
Safety
Page 124 of 232

Operation
Portable smartphone holder Fig. 134
Assembling the universal support
and the ho l
din
g arm. Fig. 135
In the centre console: close the com-
p ar
tment
where the infotainment system is
housed. Removing the smartphone
● Grip the smartphone firmly with one hand. ●
Pr e
s
s the release button ››› Fig. 135 5 un-
ti l
the t
op arm of the universal holder disen-
gages.
● Remove the smart phone and, as the case
may
be, unplug any cables.
Inserting a smart phone
● If necessary, install the smartphone hous-
ing ››
› .
● Connect the smartphone.
● Place the smartphone on the bottom
mou ntin
g
s. To adjust the bottom mountings,
press button ››› Fig. 135 4 .
● Press the top arm of the universal holder
u nti
l
the smartphone is securely held in
place.
Disassembling the housing
● If necessary, remove the smartphone.
● Grip the universal holder ›››
Fig. 134 3 and
pr e
s
s the release button ››› Fig. 134 4 .
● Push the universal holder to the right (anti-
c loc
k
wise) and remove it.
● Grip the holder arm and ›››
Fig. 135 1 and
pr e
s
s the release button ››› Fig. 135 4 in the
dir ection of
the arr
ow.
● Remove the holder from the dash panel up-
ward
s. Install the housing
●
Insert the universal holder ›››
Fig. 134 3 into the slots
2 on the holder
1 .
● Move the universal holder to the side in the
loc k
in
g direction 4 until it engages audi-
b ly
›
›
› .
● Place the holder arm ››
›
Fig. 135 1 in the
anc horin
g p
late ››› Fig. 135 3 from above
and pr e
s
s down on it until you hear it en-
gage ››› .
WARNING
If a smartphone is not secured or is incorrect-
ly sec ur
ed in the vehicle, it could be flung
though the interior during a sudden driving
or braking manoeuvre or in the event of an
accident, and could cause injuries.
● The infotainment system holder must be
properly sec
ured in the corresponding gap in
the dash panel.
● The infotainment system must always be
properly sec
ured in its holder or stored safely
in the vehicle. CAUTION
If tilt and angle of visibility are not properly
adju s
ted the smart phone could be damaged.
● When adjusting the smartphone, move it
with car
e and never beyond its limits.122
Page 125 of 232

Transport and practical equipment
CAUTION
At very high or very low temperatures the
smar tphone might
not operate properly, or
the actual device could get damaged.
● Take your smart phone with you when you
get out
of the vehicle to protect it from very
high or very low temperatures, and from in-
tense solar radiation. CAUTION
Humidity can damage the electrical contacts
for the sm ar
tphone on the instrument panel.
● Do not wet the smartphone’s housing when
cle
aning it. Use only a dry cloth. Note
SEAT recommends that you always take your
smar t
phone with you when you get out of
the vehicle to avoid possible thefts. Luggage compartment
Intr oduction Always transport heavy loads in the luggage
c
omp
ar
tment and place the seat backs in a
vertical position. Never overload the vehicle.
Both the carrying capacity as well as the dis-
tribution of the load in the vehicle have ef- fects on the driving behaviour and braking
ability
››› .
WARNING
When the vehicle is not in use or being
wat c
hed, always lock the doors and the rear
lid to reduce the risk of serious injury or
death.
● Do not leave children unwatched, especial-
ly when the boot i
s open. Children could
climb into the luggage compartment, close
the rear lid from inside and be unable to es-
cape themselves. This could lead to serious
injury or death.
● Never allow children to play in or around
the vehic
le.
● Never transport people in the luggage com-
partment
. WARNING
Unsecured or incorrectly secured objects can
cau se seriou
s injury in case of a sudden ma-
noeuvring or breaking or in case of an acci-
dent. This is especially true when objects are
struck by a detonating airbag and fired
through the vehicle interior. To reduce the
risks, please note the following:
● Secure all objects in the vehicle. Always
plac
e equipment and heavy objects in the
boot.
● Always secure objects to the fastening
rings
with suitable rope or straps to prevent
them from being thrown around the interior and moving to the airbag deployment area in
the event
of
sudden movements or accidents.
● While driving, always keep object compart-
ments c
losed.
● Do not place hard, heavy or sharp objects
inside the
vehicle interior, in open storage
compartments, the rear shelf or on the dash
panel.
● Remove hard, heavy and sharp objects from
clothes
and pockets inside the vehicle and
store securely. WARNING
The transport of heavy object changes vehi-
cl e h
andling and increases braking distance.
Heavy loads that have not been stored or se-
cured correctly could cause loss of control
and result in serious injury.
● Vehicle handling changes when transport-
ing heavy
objects due to a change in the cen-
tre of gravity.
● Distribute the load as uniformly and as low
down on the v
ehicle as possible.
● Store heavy objects in the luggage com-
partment
as far from the rear axle as possi-
ble. CAUTION
Hard objects on the rear shelf could chafe
again s
t the wires of the heating element in
the heated rear window and cause damage. » 123
Technical data
Advice
Operation
Emergencies
Safety
Page 126 of 232

Operation
Note
The ventilating slits between the heated rear
windo w and the r
ear shelf must not be cov-
ered so that used air can escape from the ve-
hicle. Folding and lifting up the rear seat
bench b
ac
krestFig. 136
Rear seat: unlock button A ; red
m ark
in
g B The rear seat backrest can be folded forward
t
o e
xt
end the luggage compartment.
Folding the rear seat backrest forwards
● Push the head restraint down as far as it
wil
l go or remove it if necessary ››› page 48
and store it in a safe place. ●
Pul
l the unlock switch ››› Fig. 136 A for-
w ar
d
s whilst simultaneously lifting the rear
seat backrest.
● The rear seat backrest is not engaged when
the red mark
ing of the button B is visible.
● If the rear seat backrest is folded, people
(inc ludin
g c
hildren) are not permitted to trav-
el in the rear folded seats.
Folding up the rear seat backrest
● Lift back the backrest of the rear seat and
push it
firmly into the lock until it clicks se-
curely into place ››› .
● The red marking on the unlock button B must not be seen.
●
Make sure that the backrest of the rear seat
i s
sec
urely locked in position so that the seat
belts can provide proper protection in the
rear seats.
● If necessary, reinstall and readjust the head
res
traints ››› page 112. WARNING
Folding and lifting the backrests of the rear
seat s
carelessly without paying attention
could cause serious injury.
● Never fold or lift the seats while driving.
● Do no trap or damage seat belts when rais-
ing the seat
backrest. ●
Keep h and
s, fingers, feet and other limbs
away from the range of the rear seat backr-
ests when folding and lifting them.
● All seat backrests must engage correctly for
the seat belt
s on the rear seats to work prop-
erly. When the backrest of an occupied seat is
not correctly locked in place, the passenger
can be thrust forward with the rear seat back-
rest in case of sudden braking, sudden ma-
noeuvres or an accident.
● A red signal on the button B warns that
the bac k
rest is not engaged. Always check to
make sure that the red mark is not visible
when the backrest of the rear seat is in the
upright position.
● No seat must be occupied if the backrest of
the rear se
at is folded or not correctly engag-
ed. CAUTION
Before folding the rear seat backrest, adjust
the front se
ats so that neither the head re-
straint or backrest hit them when folded. If
necessary, remove the head restraints
››› page 112 and store them safely.124
Page 127 of 232

Transport and practical equipment
Luggage compartment shelf* Fig. 137
In the luggage compartment: remov-
in g and in
s
talling the rear shelf You may put light items of clothing on the
r
e
ar shelf
. Check that the rear view is not limi-
ted.
Removing the shelf
● Unhook the loops ›››
Fig. 137 B from
hou s
in
gs A .
● Extract the shelf from its housing C up-
w ar
d
s and then pull it out. WARNING
Unsecured or incorrectly secured objects or
anima l
s on the rear shelf could cause serious
injuries in case of a sudden manoeuvre, sud-
den braking or an accident.
● Do not leave hard, heavy or sharp objects
(loose or in bag
s) on the rear shelf. ●
Never tr an
sport animals on the rear shelf.
● Never drive with the rear shelf raised. Al-
way
s lower it or remove it before the journey. CAUTION
To prevent the rear shelf from being dam-
ag ed:
● Alw
ays check that the side supports are
firmly en
gaged.
● Regulate the height of the load in the lug-
gage c
ompartment to ensure the rear shelf
does not press down on the load with the rear
lid closed. Luggage compartment variable floor
Fig. 138
A: open the boot variable floor. B:
r ai
sed boot
variable floor. » 125
Technical data
Advice
Operation
Emergencies
Safety
Page 128 of 232

Operation
Fig. 139
C: extend the boot downward. D: ex-
t end the boot
f
orward. Raise and lower the boot floor
● To r aise the floor, raise handle
› ›
› Fig. 138 1 in the direction of the arrow
and p u
l
l from the floor all the way up
››› Fig. 138 B.
● To lower it , guide the floor down
ward.
Extend the boot downward
● Raise the boot floor and push it downward
in the rail
›››
Fig. 139 C (arrows)
● Place the variable floor over the floor lining.
● If necessary, fold the backrest of the rear
seat f
orward ›››
page 124. Extending the luggage compartment forward
● Disassemble the luggage compartment tray
›››
page 125.
● Disassemble the rear headrests ›››
page 48.
● Fold the backrest of the rear seat forward
›››
page 124.
● If necessary, expand the boot downward. CAUTION
Do not let the luggage compartment floor fall
when clo s
ing it. Always carefully guide it
downward in a controlled manner. Otherwise,
the lining and the floor of the boot could be
damaged. Class N1 (commercial) vehicles
For safe vehicle operation, the electrical sys-
t
em mu
s
t work perfectly. Special attention
should be paid so it is not damaged during
adjustment, loading and unloading of trans-
ported objects.
Fastening rings* In the front part of the luggage compartment,
ther
e m
a
y be fastening rings to secure the
luggage.
In order to use the fastening rings, they must
be lifted beforehand. WARNING
If unsuitable or damaged belts or retaining
str ap
s are used, they may break in the event
of braking or an accident. Objects could then
be launched across the passenger compart-
ment and cause serious or fatal injuries.
● It is important to always use belts or retain-
ing str
aps that are suitable and in a good
condition.
● Belts and retaining straps should be se-
curely
fastened to the fastening rings.
● Objects in the luggage compartment that
are un
secured could move suddenly and mod-
ify the handling of the vehicle.
● Small light objects should also be fixed in
plac
e.
● A child seat should never be secured with
the fas
tening rings. Note
● The max imum t
ensile load that the fasten-
ing rings can support is 3.5 kN.
● Belts and securing systems for the appro-
priate lo
ad can be obtained from specialised
dealerships. SEAT recommends visiting a
SEAT dealership for this. 126
 1
1 2
2 3
3 4
4 5
5 6
6 7
7 8
8 9
9 10
10 11
11 12
12 13
13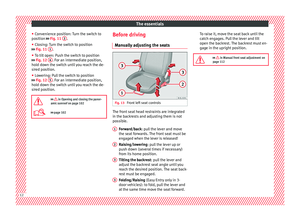 14
14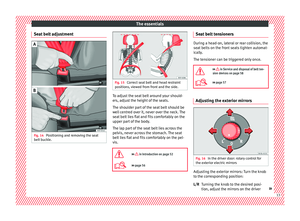 15
15 16
16 17
17 18
18 19
19 20
20 21
21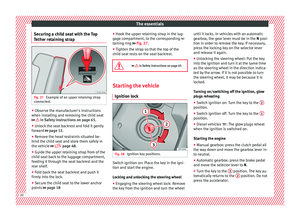 22
22 23
23 24
24 25
25 26
26 27
27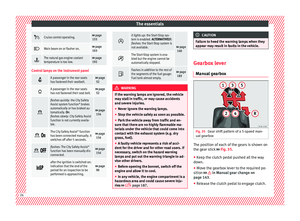 28
28 29
29 30
30 31
31 32
32 33
33 34
34 35
35 36
36 37
37 38
38 39
39 40
40 41
41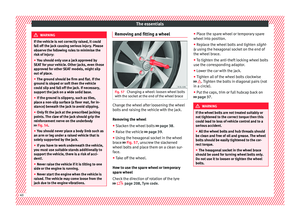 42
42 43
43 44
44 45
45 46
46 47
47 48
48 49
49 50
50 51
51 52
52 53
53 54
54 55
55 56
56 57
57 58
58 59
59 60
60 61
61 62
62 63
63 64
64 65
65 66
66 67
67 68
68 69
69 70
70 71
71 72
72 73
73 74
74 75
75 76
76 77
77 78
78 79
79 80
80 81
81 82
82 83
83 84
84 85
85 86
86 87
87 88
88 89
89 90
90 91
91 92
92 93
93 94
94 95
95 96
96 97
97 98
98 99
99 100
100 101
101 102
102 103
103 104
104 105
105 106
106 107
107 108
108 109
109 110
110 111
111 112
112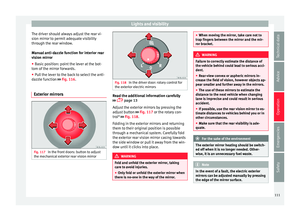 113
113 114
114 115
115 116
116 117
117 118
118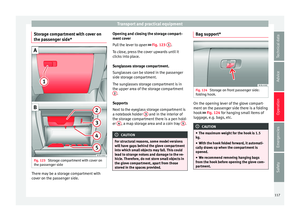 119
119 120
120 121
121 122
122 123
123 124
124 125
125 126
126 127
127 128
128 129
129 130
130 131
131 132
132 133
133 134
134 135
135 136
136 137
137 138
138 139
139 140
140 141
141 142
142 143
143 144
144 145
145 146
146 147
147 148
148 149
149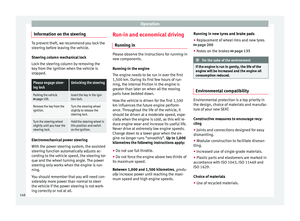 150
150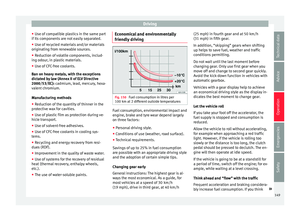 151
151 152
152 153
153 154
154 155
155 156
156 157
157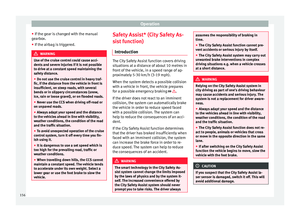 158
158 159
159 160
160 161
161 162
162 163
163 164
164 165
165 166
166 167
167 168
168 169
169 170
170 171
171 172
172 173
173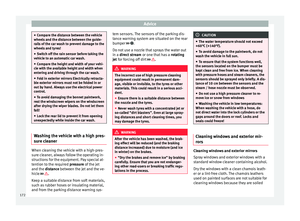 174
174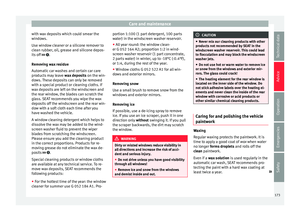 175
175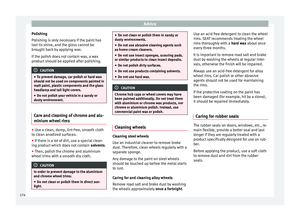 176
176 177
177 178
178 179
179 180
180 181
181 182
182 183
183 184
184 185
185 186
186 187
187 188
188 189
189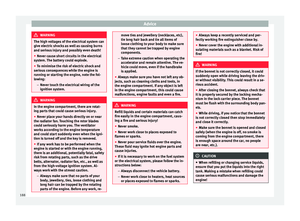 190
190 191
191 192
192 193
193 194
194 195
195 196
196 197
197 198
198 199
199 200
200 201
201 202
202 203
203 204
204 205
205 206
206 207
207 208
208 209
209 210
210 211
211 212
212 213
213 214
214 215
215 216
216 217
217 218
218 219
219 220
220 221
221 222
222 223
223 224
224 225
225 226
226 227
227 228
228 229
229 230
230 231
231