Page 41 of 178

XSelectActivate.
XPress the controller.
Switch the connection on Oor off ª,
depending on the previous setting.
Connecting the device
General notes
The exact Wi-Fi connection procedure may vary
depending on the device to be connected. Fol-
low the instructions that are shown in the dis-
play. Further information; see the manufactur-
er's operating instructions.
Connecting a device via WPS PIN
Requirement: for this type of connection, the
device to be connected must support "Connect
using WPS PIN".
XTo select Vehiclefrom the main function bar:
turn and press the controller.
XTo switch to the menu bar: slide 6the con-
troller.
XSelect System Settings.
XSelectWiFi.
The Wi-Fi menu appears.
XSelect Connect via WPS PIN.
XSelect the vehicle from the device to be con-
nected and "Connect using WPS PIN". The
vehicle is displayed with the SSID MB WLAN
XXXXX.
The device to be connected generates a PIN.
XAlso enter this PIN into the multimedia sys-
tem.
Connecting the device by pressing a
button (push button)
Requirement: for this type of connection, the
device to be connected must support "Connect
via push button".
XTo select Vehiclefrom the main function bar:
turn and press the controller.
XTo switch to the menu bar: slide 6the con-
troller.
XSelect System Settings.
XSelectWiFi.
The Wi-Fi menu appears.
XSelect Connect via WPS PBC.
XSelect the vehicle from the device to be con-
nected and ConnectviaWPSPBC. The vehi-
cle is displayed with the SSID MB WLAN
XXXXX.
XSelectContinuein the multimedia system.
Connecting the device via the security
key
XTo select Vehiclefrom the main function bar:
turn and press the controller.
XTo switch to the menu bar: slide 6the con-
troller.
XSelect System Settings.
XSelectWiFi.
The Wi-Fi menu appears.
XSelect Connect Using Security Key.
XSelect the vehicle from the device to be con-
nected. The vehicle is displayed with the SSID
MB WLAN XXXXX
.
XEnter the security key that appears on the
multimedia system display into the device to
be connected.
XConfirm the entry.
Generating a new security key
XTo select Vehiclefrom the main function bar:
turn and press the controller.
XTo switch to the menu bar: slide 6the con-
troller.
XSelect System Settings.
XSelectWiFi.
The Wi-Fi menu appears.
XSelect Generate Security Key.
XSelectRegenerate.
A new security key is generated.
XTo save the security key: turn the controller
and select Save.
The Wi-Fi menu appears. The new security key
will now be displayed and verified when a Wi-
Fi connection is established. The connection
must be re-established with the newly cre-
ated security key.
iDevice connections established using the
previous security key will no longer work after
the security key is changed. You have to
reconnect these devices (
Ypage 39).
Wi-Fi39
System settings
Z
Page 42 of 178

Changing the name of the SSID
XTo selectVehiclefrom the main function bar:
turn and press the controller.
XTo switch to the menu bar: slide 6the con-
troller.
XSelect System Settings.
XSelect WiFi.
The Wi-Fi menu appears.
XSelect Change SSID.
A dialog for entering the SSID appears.
XEnter the new SSID.
XSelect ¬.
XPress the controller.
From now on, when establishing a connec-
tion, the vehicle will be shown with the new
SSID both on the device to be connected and
in the Connect
UsingSecurityKeymenu.
iDevice connections established using the
previous SSID will no longer work after the
SSID is changed. You have to reconnect these
devices (
Ypage 39).
Bluetooth®settings
General information about Blue-
tooth®
Bluetooth®-capable devices, e. g. mobile
phones, need to comply with a certain profile in
order to be connected to the multimedia sys-
tem. Every Bluetooth
®device has its own spe-
cific Bluetooth®name.
Bluetooth®technology is a standard for short
range wireless data transmissions up to approx-
imately 10 m. You can use Bluetooth
®to connect your mobile
phone to the multimedia system, for example:
Ruse the hands-free system
Restablish an Internet connection
Rlisten to music using Bluetooth®Audio
Rexchange vCards
Bluetooth®is a registered trademark of Blue-
tooth Special Interest Group (SIG) Inc.
Activating/deactivating Bluetooth®
X
Press the Øbutton.
or
XPress Vehiclein the main function bar.
The vehicle menu is displayed.
XTo switch to the menu bar: slide 6the con-
troller.
XTo select System Settings: turn and press
the controller.
A menu appears.
XTo select Activate Bluetooth: turn and
press the controller.
This switches Bluetooth
®on O or off ª.
Automatic volume adjustment
General information
With the AutomaticVolumeAdjustmentfunc-
tion, the volumes of different audio sources are
adjusted for each other, to compensate for rel-
ative differences in volume.
For example: changing from a relatively quiet to
a relatively loud radio station. The volume for
both stations sounds the same. Manual read-
justment of the volume is not required.
The Automatic Volume Adjustment
function
is deactivated ªwhen the vehicle leaves the
factory. Using this function, the dynamic range
of the music is slightly reduced. To make the
most of the audiophile sound quality, it is rec-
ommended to leave it off.
40Automatic volume adjustment
System settings
Page 43 of 178

Switching the automatic volume
adjustment on/off
XPress theØbutton.
or
XPress Vehiclein the main function bar.
The vehicle menu is displayed.
XTo switch to the menu bar: slide 6the con-
troller.
XTo select System Settings: turn and press
the controller.
A menu appears.
XTo select Automatic Volume Adjustment:
turn and press the controller.
Switch the Automatic Volume Adjustment
function on Oor off ª.
Setting the system language
General information
This function allows you to determine the lan-
guage for the menu displays and the navigation
messages. The selected language affects the
characters available for entry.
iThe navigation announcements are not
available in all languages. If a language is not
available, the navigation announcements will
be in English.
iWhen you set the system language, the lan-
guage of the Voice Control System will
change accordingly. If it is not supported by
the Voice Control System, English will be
selected.
Setting the system language
XPress the Øbutton.
or
XPress Vehiclein the main function bar.
The vehicle menu is displayed.
XTo switch to the menu bar: slide 6the con-
troller.
XTo select System Settings: turn and press
the controller.
A menu appears.
XTo select Language: turn and press the con-
troller.
The list of languages appears. The #dot indi-
cates the current setting.
XSelect the desired language.
The multimedia system loads the selected
language and sets it.
Calling up and editing the Favorites
function
The Favorites function can, depending on the
vehicle equipment, be called up as follows:
Rvia the System Settingsmenu
Rvia the Favorites button on the controller
(Ypage 21)
Rvia the Favorites button on the touchpad
(Ypage 23)
Calling up the Favorites function via the sys-
tem menu
XPress the Øbutton.
or
XPress Vehiclein the main function bar.
The vehicle menu is displayed.
XTo switch to the menu bar: slide 6the con-
troller.
XTo select System Settings: turn and press
the controller.
A menu appears.
XTo select Favorite Functions: press the
controller.
The favorites are displayed.
XTo select the desired function, e.g. Phone‐book: turn and press the controller.
Calling up the Favorites function via the
controller or touchpad
XPress the Favorites button on the controller or touchpad.
The favorites are displayed.
XTo select the desired function, e.g. Phone‐book: turn and press the controller.
Exiting the Favorites function
XPress the Favorites button again.
or
XPress the %button.
Further information on favorites (
Ypage 33).
Calling up and editing the Favorites function41
System settings
Z
Page 44 of 178

Importing/exporting data
General notes
!
Never remove th estick or car dwhen writing
dat ato th eUS Bstick or th ememory card. You
may otherwise lose data.
Usin gthis function you can do th efollowin gwit h
your personal data:
Rtransfer your dat afrom on emultimedia sys-
te m to another multimedia system
The transfer may be limite dor no tpossible ,
depending on th evehicle's equipment.
Rmak e abackup copy of your personal dat a
(expor tdata) and load it again (import data)
Rprotect your dat afrom unwante dexpor tby
activating apin prompt (presetting :deactiva-
te dª)
You can either use an SD car dor aUS Bstorag e
device (e.g. aUS Bstick )as temporar ystorage.
You can obtain further information on dat a
import and expor tfrom an authorize d
Mercedes-Ben zCenter.
Activating/deactivating PIN protec-
tion
XPress th eØ button.
or
XPress Vehicl ein themain function bar.
The vehicl emen uis displayed.
XTo switch to th emen ubar: slide 6thecon-
troller .
XTo select System Settings:tur nand press
th econtroller.
A men uappears.
XTo select DataImport/Expor t:tur nand
press th econtroller.
XSelec tActivate PIN Protectio n.
Activat eO or deactivat eª PIN protection .
When activating PIN protection ,you will be
prompted to ente r aPIN .
XTo ente rth e4-digit PIN and select ¬:turn
and press th econtroller .
You will be prompted to ente rth ePIN again .
XEnterth ePIN again and select ¬.
The PIN prompt no wprotect syour personal
dat afrom unwante dexport.
iIf you deactivat eyour PIN protection ,you
will first be prompted to ente ryour PIN .If you
hav eforgotte nyour PIN ,an authorize d
Mercedes-Ben zCente rcan deactivat eyour
PIN protection for you. Alternatively, you can
deactivat ePIN protection by resetting your
personal dat a (
Ypage 43).
Importing/exporting data
The followin gdat acan be exported:
Raddress dat a
Rsystem setting sthat you hav emade
Rbookmarks
Rradi ostation list s
Personal musi cfile sin th eMedi aRegiste rcan -
no tbe saved or transferred usin gthis function .
Mercedes-Ben zis no tliable for any loss of data.
Connecting aUSB storage device
XInser tth eSD memory car d (Ypage 145).
or
XConnect aUS Bdevice (e.g. aUS Bmemory
stick ) (Ypage 145).
Importing or exporting data
iIf you import dat asuc has address data, th e
existing dat ain th emultimedia system is
overwritten. You will see amessage to this
42Importing/exporting data
System settings
Page 45 of 178

effect. The multimedia system is restarted
after the data import.
XPress theØbutton.
or
XPress Vehiclein the main function bar.
The vehicle menu is displayed.
XTo switch to the menu bar: slide 6the con-
troller.
XTo select System Settings: turn and press
the controller.
A menu appears.
XTo select Data Import/Export: turn and
press the controller.
XSelect Import DataorExport Data.
If PIN protection is activated, a PIN prompt
appears when you select Export Data
.
XTo enter the 4-digit PIN and select ¬: turn
and press the controller.
PIN protection is deactivated.
XTo select MemoryCard,USB 1or USB 2: turn
and press the controller.
This function exports all the data to the selec-
ted disc.
Reset function
General information
You can reset the multimedia system to the fac-
tory settings. Resetting is recommended before handing over or selling the vehicle, for example.
This includes the deletion of all of your personal
data on the multimedia system. These include,
for example:
RStation presets
REntries in the destination memory
REntries in the list of previous destinations in
the navigation system
REntries in the address book
RAuthorized telephone
Data on the internal hard drive, e.g. music files in
the Media Register, will be deleted during a
reset.
In addition, an activated PIN protection, which
you have used to protect your data against
unwanted export, will be deactivated during a
reset.
Mercedes-Benz is not liable for any loss of data.
Resetting the multimedia system
XPress the Øbutton.
or
XPress Vehiclein the main function bar.
The vehicle menu is displayed.
XTo switch to the menu bar: slide 6the con-
troller.
XTo select System Settings: turn and press
the controller.
A menu appears.
XTo select Reset: turn and press the controller.
A prompt appears asking whether you wish to
reset.
XSelect Yes.
A prompt appears again asking whether you
really wish to reset.
XSelect Yes.
A message appears. The multimedia system
is reset to the factory settings and restarted.
Reset function43
System settings
Z
Page 46 of 178

Your multimediasyste mequipment
These operatin ginstruction sdescribe all th e
standar dan doptional equipment of your multi-
media system, as available at th etime of going
to press. Country-specifi cdifference sare pos -
sible. Bear in min dthat your vehicle may no t
feature all function sdescribed here. Thi salso
applies to safety-relevan tsystems an dfunc-
tions.
Read th einformation on qualifie dspecialis t
workshop sin th evehicle Operator's Manual.
Important safet ynotes
GWARNING
If you operat emobile communication equip-
men twhil edriving, you will be distracted from
traffic conditions. You could also los econtro l
of th evehicle. There is aris kof an accident.
Only operat ethis equipment when th evehicle
is stationary.
You mus tobserv eth elegal requirements fo rth e
country in whic hyou are currentl ydrivin gwhen
operatin gmobile communication sequipment in
th evehicle.
Vehicl esettings
Calling up vehicle settings
XPress th eØ button.
or
XPress Vehicl ein themain function bar .
The vehicle men uis displayed.
XTo selec tVehicle Settings:press th econ-
troller.
The Vehicl eSettings
men uis active .
XTo selectth edesire dvehicle setting :turn an d
press th econtroller .
The main are awit hth esetting elemen tis
active .
Selecting adifferent vehicle setting:
XTo activat eth emen ufo rselecting th evehicle
setting :slid e5 thecontroller . Exiting th
evehicle settings :
XTo select& :slid e6 andpress th econ-
troller.
Ambien tlighting
General notes
You can set th efollowin gfo rth eambien tlight-
ing:
RBrightness
Thi ssetting makes an additional change to
th ebrightness of th eambien tlighting .
RColor
Thi ssetting changes th ecolor of th eambien t
lighting .
Setting th ebrightness
XCall up VehicleSettings(Ypage 44).
XTo selec tAmbien tLigh tBrightness:turn
an dpress th econtroller .
The setting elemen tis active .The brightness
valu eis displayed.
XTo change th ebrightness value: turn th econ-
troller.
You can fin dfurther information on th einterio r
lighting in th evehicle Operator's Manual.
Setting th ecolor
XCall up VehicleSettings(Ypage 44).
XTo selec tAmbien tLigh tColo r:turn an d
press th econtroller .
The setting elemen tis active .
XTo selec t acolor :turn an dpress th econtrol-
ler .
You can fin dfurther information on th einterio r
lighting in th evehicle Operator's Manual.
Setting th eeas yentry an dexit feature
Thi sfunction makes getting in an dout of your
vehicle easier.
XCall up VehicleSettings(Ypage 44).
XTo selec tEasy Entry/Exit:turn an dpress
th econtroller .
The setting elemen tis active .
XTo change th esetting :press th econtroller .
44Vehicle settings
Vehicle functions
Page 47 of 178

You can find further information on the easy
entry and exit feature in the vehicle Operator's
Manual.
Activating/deactivating the acoustic
locking verification signal
You can also set an audible signal to confirm
that the vehicle has been locked.
XCall upVehicle Settings(Ypage 44).
XTo select Acoustic Lock Feedback: turn
and press the controller.
The function switches on or off, depending on
the previous setting.
You can find further information on the locking
feature in the vehicle Operator's Manual.
Switching the seat belt adjustment
on/off
The BeltAdjustmentfunction adjusts the driv-
er's and front-passenger seat belt to the upper
body of the occupants.
XCall up Vehicle Settings(Ypage 44).
XTo select Belt Adjustment: turn and press
the controller.
The function switches on or off, depending on
the previous setting.
You can find further information on seat belt
adjustment in the vehicle Operator's Manual.
Switching the automatic mirror fold-
ing function on/off
When the Automatic Mirror Foldingfunc-
tion is activated, the outside mirrors fold in auto-
matically as soon as you lock the vehicle from
the outside. The outside mirrors fold out auto-
matically again as soon as you unlock the vehi-
cle.
XCall up Vehicle Settings(Ypage 44).
XTo select Automatic Mirror Folding: turn
and press the controller.
The function switches on or off, depending on
the previous setting.
You can find further information on the auto-
matic folding mirror function in the vehicle Oper-
ator's Manual.
Switching locator lighting on/off
If you switch on the Locator Lightingfunc-
tion, the exterior lighting is switched on for a
short time when it is dark. The light switch must
be set to Ã; see the vehicle Operator's Man-
ual.
The exterior lighting remains on for 40 seconds
after the vehicle is unlocked. When you start the
engine, the locator lighting is switched off and
the automatic driving lights are activated.
XCall up Vehicle Settings(Ypage 44).
XTo select LocatorLighting: turn and press
the controller.
XPress the controller.
The function is switched on or off, depending
on the previous status.
You can find further information on the locator
lighting in the vehicle Operator's Manual.
Activating/deactivating the auto-
matic door locking mechanism
The vehicle is locked automatically when the
ignition is switched on and the vehicle is travel-
ing faster than walking pace.
XCall up Vehicle Settings(Ypage 44).
XTo select Automatic Locking: turn and
press the controller.
The function switches on or off, depending on
the previous setting.
You can find further information on the locking
feature in the vehicle Operator's Manual.
Setting the switch-off delay time
Interior lighting switch-off delay time
The interior lighting is activated for the duration
of the switch-off delay time when the SmartKey
is removed from the ignition lock.
XCall up Vehicle Settings(Ypage 44).
XTo select Interior Lighting DelayedSwitch-off: turn and press the controller.
The setting element is active.
XTo change the delayed switch-off time: turn
and press the controller.
You can find further information on the interior
lighting in the vehicle Operator's Manual.
Vehicle settings45
Vehicle functions
Z
Page 48 of 178

Exterior lighting switch-off delay time
If you switch on theExterior LightingDelayed Switch-offfunction, the exterior
lighting is switched on for a short time after the
engine is switched off. The light switch must be
set to Ã; see the vehicle Operator's Manual.
The exterior lighting remains on for 60 seconds
after the engine is switched off. If you close all
the doors and the tailgate, the exterior lighting
switches off after the set time.
XCall up Vehicle Settings(Ypage 44).
XTo select Exterior Lighting DelayedSwitch-off: turn and press the controller.
The setting element is active.
XTo change the delayed switch-off time: turn
and press the controller.
360° camera
General notes
The 360° camera covers the immediate sur-
roundings of the vehicle and assists you, for
instance when parking or at exits with reduced
visibility.
The 360° camera is only an aid. It is not a
replacement for your attention to your immedi-
ate surroundings. You are always responsible
for safe maneuvering and parking. Make sure
that no persons or animals are in the maneu-
vering range.
For more information on the 360° camera see
the vehicle Operator's Manual.
Displaying the 360° camera image
The 360° camera image can be displayed if:
Ryour vehicle is equipped with a 360° camera
Rthe 360°Camerafunction is switched on (see
the vehicle Operator's Manual)
XPress the Øbutton.
or
XPress Vehiclein the main function bar.
The vehicle menu is displayed.
XTo select 360° Camera: turn and press the
controller.
The 360° camera image appears in split
screen mode. You will see the previous view on the display if,
when the function is switched on:
Ryou turn the SmartKey to position
1in the
ignition lock
Ryou select transmission position P
Rwhen you are driving at moderate speeds
Switching the display off manually
XTo select &: slide 6and press the con-
troller.
Switching the display on automatically
XYou can automatically switch the 360° Cam-
era display using reverse gear (Ypage 46).
Switching automatic mode of the
360° camera on/off
This function activates the 360° camera when
reverse gear is engaged.
XPress the Øbutton.
or
XPress Vehiclein the main function bar.
The vehicle menu is displayed.
XTo switch to the menu bar: slide6the
controller.
XTo select System Settings: turn and press
the controller.
XTo select 360° Camera: turn and press the
controller.
The menu 360° Camera
appears.
XSelectActivation by R gear.
The function is switched on Oor off ª,
depending on the previous status.
Opening the camera cover for clean-
ing
XTo select Open Camera Coverin the 360°
camera menu: turn the controller and press to
confirm.
The Please Wait...
message appears for
approximately three seconds.
The camera cover opens.
The camera cover closes automatically if:
Rthe ignition is switched off
Rthe vehicle exceeds a moderate speed
46360° camera
Vehicle functions
 1
1 2
2 3
3 4
4 5
5 6
6 7
7 8
8 9
9 10
10 11
11 12
12 13
13 14
14 15
15 16
16 17
17 18
18 19
19 20
20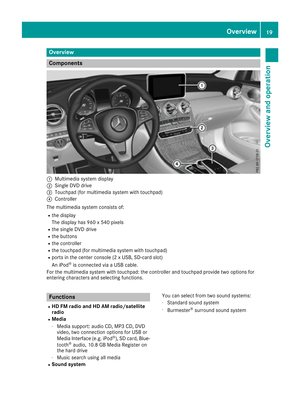 21
21 22
22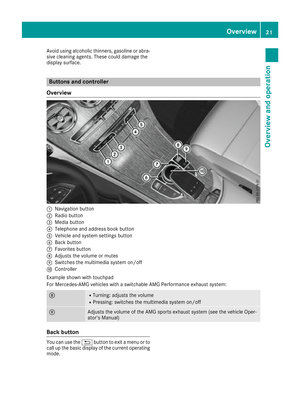 23
23 24
24 25
25 26
26 27
27 28
28 29
29 30
30 31
31 32
32 33
33 34
34 35
35 36
36 37
37 38
38 39
39 40
40 41
41 42
42 43
43 44
44 45
45 46
46 47
47 48
48 49
49 50
50 51
51 52
52 53
53 54
54 55
55 56
56 57
57 58
58 59
59 60
60 61
61 62
62 63
63 64
64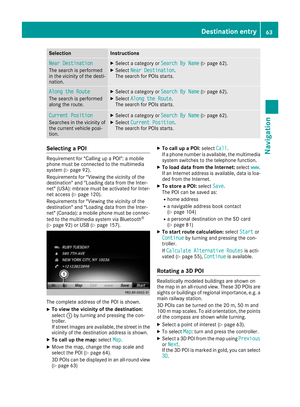 65
65 66
66 67
67 68
68 69
69 70
70 71
71 72
72 73
73 74
74 75
75 76
76 77
77 78
78 79
79 80
80 81
81 82
82 83
83 84
84 85
85 86
86 87
87 88
88 89
89 90
90 91
91 92
92 93
93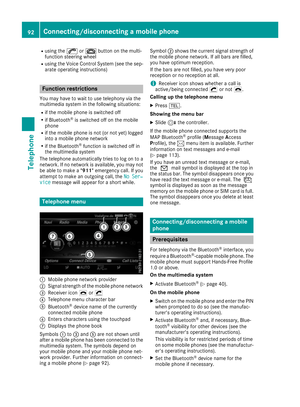 94
94 95
95 96
96 97
97 98
98 99
99 100
100 101
101 102
102 103
103 104
104 105
105 106
106 107
107 108
108 109
109 110
110 111
111 112
112 113
113 114
114 115
115 116
116 117
117 118
118 119
119 120
120 121
121 122
122 123
123 124
124 125
125 126
126 127
127 128
128 129
129 130
130 131
131 132
132 133
133 134
134 135
135 136
136 137
137 138
138 139
139 140
140 141
141 142
142 143
143 144
144 145
145 146
146 147
147 148
148 149
149 150
150 151
151 152
152 153
153 154
154 155
155 156
156 157
157 158
158 159
159 160
160 161
161 162
162 163
163 164
164 165
165 166
166 167
167 168
168 169
169 170
170 171
171 172
172 173
173 174
174 175
175 176
176 177
177