Page 105 of 178
 or the touchpad (Ypage 26).
XTo finish and save an")
XTo selectContinue: turn and press the con-
troller.
The input menu with input lines is displayed.
XEnter characters using the controller
(Ypage 30) or the touchpad (Ypage 26).
XTo finish and save an entry: select ¬.
The contact is created in the phone book and
in the address book.
Adding information to a contact
You can add a telephone number to an existing
contact.
XTo highlight a contact in the phone book: turn
the controller.
XTo select G: slide 9the controller.
XTo select AddPhoneNo.: turn and press the
controller.
XTo select a category for the number, e.g.
Home: turn the controller and press to confirm.
XTo select a telephone category, e.g. MobilePhone: turn the controller and press to con-
firm.
If you have marked a number as favored, it
appears at the top of the list and is highligh-
ted.
XTo select Continue: turn and press the con-
troller.
An input line appears.
XEnter the telephone number.
XSelect ¬.
A maximum of five entries can be saved for one
category.
If five numbers are already stored for the entry
you are searching for, a prompt will appear ask-
ing whether you wish to overwrite one of the
existing numbers.
Overwriting an entry
XTo select Yes: turn and press the controller.
A list of the existing five phone numbers is
displayed.
XTo select the number to be overwritten from
the list: turn the controller and press to con-
firm.
The entry field for the new phone number is
displayed.
XEnter characters using the controller
(Ypage 30) or the touchpad (Ypage 26). Canceling the overwriting of an entry
XTo select
No: turn and press the controller.
The process is canceled.
Saving a contact
Saved contacts are indicated in the phone book
by different symbols (Ypage 101).
XSearch for a contact on the mobile phone d
(Ypage 101).
XTo select G: slide 9the controller.
XTo select Save: turn and press the controller.
The contact has now been saved. The contact
is identified by the ¥symbol in the phone
book.
iSaved contacts are also displayed in the
address book.
Saving or editing the contact data in the mul-
timedia system does not change the contacts
on the mobile phone. If automatic calling-up
of phone contacts is activated, the multime-
dia system displays the copy ¥with the
changed data.
To add additional data, such as additional
phone numbers or e-mail addresses, select
this contact. In this way, you avoid creating
additional copies of the mobile phone entry.
Deleting a name
You can delete contacts that have been added,
supplemented, saved or imported in the multi-
media system.
If there are only phone numbers saved under the
contact, the contact is deleted from the phone
book and the address book.
If there are additional entries under the contact,
such as a navigable destination, only the phone
numbers are deleted. The contact is retained in
the address book with the remaining entries.
XTo highlight a contact in the phone book: turn
the controller.
XTo select G: slide 9the controller.
XTo select Delete Entry: turn and press the
controller.
A prompt appears asking whether the contact
should be deleted.
XTo select Yes: turn and press the controller.
The phone number is deleted.
Phone book103
Telephone
Z
Page 106 of 178

Closing the phone book
XTo select&from the character bar: turn the
controller and press to confirm.
or
XPress the %button.
Address book
Introduction
Always pay attention to traffic conditions.
Familiarize yourself with the address book func-
tions before beginning your journey.
You can use the multimedia system when the
road and traffic conditions permit. You could
otherwise become involved in an accident in
which you or others could be injured.
The address book displays all the contacts from
the various sources (mobile phone, memory
card, USB device, the phone book of the multi-
media system, navigation).
You can use the contacts to make telephone
calls, navigate and to write messages.
If a mobile phone is connected to the multimedia
system and automatic calling up is activated
(
Ypage 108), the mobile phone's contacts are
displayed in the address book. If you disconnect
the mobile phone from the multimedia system,
these contacts are no longer displayed in the
address book.
When you import, save, edit or add contacts,
they will be saved in the multimedia system.
These contacts will remain available even when
you connect the multimedia system to a differ-
ent mobile phone. You can view these contacts
even without a mobile phone.
iThe address book can store a total of 5,000
contacts:
R2000 entries are reserved for permanently
saved contacts.
R3000 entries are reserved for contacts that
you can load from the mobile phone.
iBefore selling your vehicle, delete the con-
tacts saved in the multimedia system using
the reset function (
Ypage 43).
Calling up the address book
XTo call up the telephone menu: press the
% button.
XTo display the main function bar: slide 5the
controller.
XTo select Phone: turn and press the controller.
XTo select Address Book: turn and press the
controller.
XTo browse in the address book: turn the con- troller.
An address book entry can also include a pic-
ture. This is shown to the left of the address
data. Address book entries with pictures can
only be created by importing vCards (vcf
files). Further information on importing
vCards (
Ypage 109). The quality of the pic-
ture depends on the picture's resolution.
Searching for a contact
Using the character bar
XCall up the address book (Ypage 104).
XTo switch to the menu bar: slide 6the con-
troller.
XTo select Search: turn and press the control-
ler.
XTo select characters: turn the controller and
press to confirm.
The first contact with the selected first char-
acter is highlighted in the phone book. If there
are similar contacts, the next different char-
acter is shown. For example, with contacts
such as Jana
andJohn, the beginnings of the
names are identical. The next different char-
acter A
andOare offered for selection.
104Address book
Telephone
Page 107 of 178

XSelect the characters of the contact you are
searching for one by one, pressing and con-
firming with the controller each time.
XTo complete the search: slide5the con-
troller repeatedly until the character bar dis-
appears.
or
XTo select ¬: turn and press the controller.
The contacts in the address book are dis-
played.
XTo select a contact: turn and press the con-
troller.
Information about character entry (
Ypage 30).
Using the touchpad
XCall up the address book (Ypage 104).
XTo switch to the menu bar: glide down.
XSelect Search.
XDraw the letter on the touchpad surface.
The first contact with the selected first char-
acter is highlighted in the address book.
Further information on handwriting recogni-
tion on the touchpad (
Ypage 26).
XDraw additional letters on the touchpad sur-
face one after another.
XTo complete the search and return to the
phone book: press the touchpad.
XTo select and call the contact: glide up or
down and press.
Adding a new contact
You can enter address data directly into the
address book. If you store telephone numbers in
the phone book of the multimedia system, these
are also saved in the address book. If you store
a navigation destination, the multimedia system
creates an address book entry that includes the
complete navigable address data.
XCall up the address book (Ypage 104).
XTo switch to the menu bar: slide 6the con-
troller.
XTo select New: turn and press the controller.
The surname and first name input lines are
displayed.
XEnter characters using the controller
(Ypage 30) or the touchpad (Ypage 26).
XTo save the surname and first name: select
¬.
The details for the contact are displayed.
XTo add a desired entry (e.g. Add E-MailAddress): turn and press the controller.
Depending on the type of entry, the corre-
sponding input menu appears.
XEnter characters using the controller
(Ypage 30) or the touchpad (Ypage 26).
XTo finish and save an entry: select ¬.
Displaying contact details
XCall up the address book (Ypage 104).
XTo select a contact: turn and press the con-
troller.
The details for the contact are displayed.
The entries can be categorized as follows:
\ Business details
6 Home details
iAn address book entry can contain the fol-
lowing information:
Rname
Rfirst name
Rcompany
Rup to five telephone numbers
Rtwo email addresses
RInternet address
Rtwo addresses
Rtwo navigation addresses (transferred from
navigation(Ypage 58))
Rgeo-coordinates
Address book105
Telephone
Z
Page 108 of 178
.
XTo selectacontact :tur nand press th econ-
troller .
The details for th econtact are displayed.
XTo add adesired entr y(e.g. Add")
Adding information to a contact
XCall up theaddress book (Ypage 104).
XTo selectacontact :tur nand press th econ-
troller .
The details for th econtact are displayed.
XTo add adesired entr y(e.g. Add E-MailAddres s): turnand press th econtroller .
Dependin gon th etyp eof entry, th ecorre-
sponding input men uappears.
XEnte rcharacters usin gth econtroller
(Ypage 30) or th etouchpad (Ypage 26).
XTo finish and sav ean entry: select ¬.
A maximum of fiv etelephon enumber scan be
saved for on econtact .
Starting route guidance to an address
or geo-coor dinates
If an address wit h aZIP code is saved, th e
address can be used for rout eguidance .If th e
ZIP code canno tbe assigned to an exact
address ,you can adjust th edestination subse-
quentl yusin gth econtroller .
XCall up theaddress book (Ypage 104).
XTo selectacontact :tur nand press th econ-
troller .
The details for th econtact are displayed.
XTo select an address :tur nand press th econ-
troller .
or
XTo select an entr ywit hgeo-coordinates: tur n
and press th econtroller .
The navigation men uis displayed.
XTo select StartRouteGuidance:slid e6
and press th econtroller .
The rout eto th edestination address is calcu-
lated and rout eguidance starts.
Making a call
XCall up th eaddress book (Ypage 104).
XTo selectacontact :tur nand press th econ-
troller .
The details for th econtact are displayed.
XTo select atelephon enumber :tur nand press
th econtroller .
The number is dialed .Further information
about th efunction sduring acall (
Ypage 98).
Sending text messages
XCall up th eaddress book (Ypage 104).
XTo selectacontact :tur nand press th econ-
troller .
The details for th econtact are displayed.
XTo highligh tth etelephon enumber :tur nth e
controller .
XTo select G:slide9 thecontroller .
XTo select SendTex tMessag e:tur nand
press th econtroller .
The entr yfields for atext message are dis-
played (
Ypage 116).
Observ eth erequirements for th emessage func-
tion (
Ypage 113).
Sending an e-mail
XCall up th eaddress book (Ypage 104).
XSelectan entry: tur nand press th econtroller .
The details for th econtact are displayed.
XTo select an e-mail address :tur nand press
th econtroller .
The entr yfields for an e-mail are displayed
(
Ypage 117).
Observ eth erequirements for th emessage func-
tion (
Ypage 113).
Displaying sub-entry inform ation
XCall up theaddress book (Ypage 104).
XSelectan entry: tur nand press th econtroller .
The details for th econtact are displayed.
XTo highligh tth edesired entry: tur nth econ-
troller .
XTo select G:slide9 thecontroller .
XTo select Details:tur nand press th econ-
troller .
The display is shown in full.
106Address book
Telephone
Page 109 of 178
.
XTo select a contact: turn and press the con-
troller.
The details for the contact are displayed.
XTo highlight the desired entry: turn the con")
Editing a contact
XCall up the address book (Ypage 104).
XTo select a contact: turn and press the con-
troller.
The details for the contact are displayed.
XTo highlight the desired entry: turn the con-
troller.
XTo selectG: slide 9the controller.
XTo select Edit: turn and press the controller.
The entry field for the selected entry is dis-
played.
Information about character entry (
Ypage 30).
Changing the category of an entry
XCall up the address book (Ypage 104).
XSelect an entry: turn and press the controller.
The details for the contact are displayed.
XTo highlight the desired entry: turn the con-
troller.
XTo select G: slide 9the controller.
XTo select Change Category: turn and press
the controller.
XTo select a category: turn the controller and
press to confirm.
Storing the phone number as a speed
dial number
XCall up the address book (Ypage 104).
XSelect an entry: turn and press the controller.
The details for the contact are displayed.
XTo highlight the desired telephone number:
turn the controller.
XTo select G: slide 9the controller.
XTo select Speed Dial: turn and press the
controller.
XTo select AssignSpeedDialPreset: turn
and press the controller.
XTo select a memory position for the speed
dial: turn and press the controller.
The phone number has been saved as a speed
dial.
Voice tags
Introduction
You can enter voice tags via the Voice Control
System (see the separate operating instruc-
tions). Once you have assigned a voice tag to an
address book entry, you can call up this entry
with a voice command and dial a phone number,
for example. You can add one voice tag per
address book entry.
Adding a voice tag
XCall up the address book (Ypage 104).
XSearch for an address book entry with or with-
out a voice tag ¦(Ypage 104).
XTo select G: slide 9the controller.
XTo select VoiceTag: turn and press the con-
troller.
XTo select Add: turn and press the controller.
Subsequent operation is voice-controlled.
The Voice Control System guides you through
the dialogs.
Deleting a voice tag
XCall up the address book (Ypage 104).
XSearch for an address book entry with a voice
tag (Ypage 104).
XTo select G: slide 9the controller.
XTo select VoiceTag: turn and press the con-
troller.
XTo select Delete: turn and press the control-
ler.
XTo select Yes: turn and press the controller.
The voice tag is deleted.
Listening to a voice tag
XSearch for an address book entry with a voice
tag (Ypage 104).
XTo select G: slide 9the controller.
Address book107
Telephone
Z
Page 110 of 178

XTo selectVoiceTag: turn and press the con-
troller.
XTo select Listen: turn and press the control-
ler.
You hear the voice tag.
Changing the display and sorting cri-
teria for contacts
XCall up the address book (Ypage 104).
XTo show the menu bar: slide 6the control-
ler.
XTo select Options: turn and press the con-
troller.
XTo select Display and Sorting: turn and
press the controller.
You have the following options:
RLast Name, First Name(default setting)
The contacts are sorted by surname and dis-
played with a comma.
RLast Name First Name
The contacts are sorted by surname and dis-
played without a comma.
RFirst Name Last Name
The contacts are sorted by first name and dis-
played without a comma.
XTo select the required option: turn and press
the controller.
The contacts are sorted and displayed
according to the selection.
Automatically importing contacts
from the phone
Depending on the mobile phone used, you can
set whether the contacts should be called up
automatically after the mobile phone is connec-
ted to the multimedia system.
XConnect a mobile phone (Ypage 92).
XCall up the address book (Ypage 104).
XTo show the menu bar: slide 6the control-
ler.
XTo select Options: turn and press the con-
troller.
XTo select Automatically Import Con‐tacts from Phone: turn and press the con-
troller.
You can allow Oor deactivate ªthe auto-
matic download.
Saving a contact
Saved contacts are indicated in the phone book
by different symbols (Ypage 101).
XCall up the address book (Ypage 104).
XTo select a contact: turn and press the con-
troller.
The details for the contact are displayed.
XTo select G: slide 9the controller.
XTo select Save: turn and press the controller.
The contact has now been saved.
iIf the saved address book entry contains a
phone number, the entry is also displayed in
the phone book.
Saving or editing the contact data in the mul-
timedia system does not change the contacts
on the mobile phone. If automatic download-
ing of phone contacts is activated, the multi-
media system displays the copy ¥with the
changed data. To add additional data, such as additional phone numbers or e-mail
addresses, select this contact. In this way,
you avoid creating additional copies of the
mobile phone entry.
Deleting a name
XCall up the address book (Ypage 104).
XSearch for a contact (Ypage 104).
XTo select G: slide 9the controller.
XTo select Delete Entry: turn and press the
controller.
XTo select Yes: turn and press the controller.
The contact is deleted.
108Address book
Telephone
Page 111 of 178
. A
vCar dis an electronic business card. Amemory
card, US Bdevice or aBluetoot h
®connection
can be used")
Importing contacts
Information and requirements
Contacts can be imported as vCards (vc ffiles). A
vCar dis an electronic business card. Amemory
card, US Bdevice or aBluetoot h
®connection
can be used for importing .
iUp to 2000 entries can be imported int oth e
address book . Amessage notifie syou when
th emaximum number is reached. In order to
be able to then import ne wcontacts, you have
to delet eexisting contact s (
Ypage 108).
SourceRequirements
Memory cardThe SD cardis inserted. It
contain simportable contact
details.
US BdeviceThe US Bdevice is inserted
int oth eUS Bport. It contain s
importable contact details.
Bluetoot h®
connection
If thesendin gof vCards is
supported via Bluetoot h®,
vCards can be received on
mobile phones or netbooks,
for example.
Bluetoot h
®must be activa-
te din th emultimedia system
and on th erespective device ;
see th emanufacturer' soper -
ating instructions.
iIf automatic calling up of th econtact sis
deactivated (Ypage 108), th eImportfro mPhoneoption is available.
Importing from the memory card or USB
device
Contacts imported from th ememory car dor
from aUS Bdevice are identifie dby th e¯
symbol.
The followin gcondition smust be fulfilled in
order to import vCards:
RvCards (vc ffiles) may be locate din th emain
directory or in folders. The multimedia system
allows for atargeted selection of th ecorre-
sponding directories.
RvCards must have th efile extension "vcf".
iThe multimedia system support svCards in
version s2. 1and 3.0.
XTo switch to th emen ubar in th etelephon e
men uor th eaddress book :slide 6thecon-
troller .
XTo select Options:tur nand press th econ-
troller .
XTo select Download Contacts:tur nand
press th econtroller .
XTo select FromMemory Car dorFro mUSBdevice:tur nand press th econtroller .
Receiving vCards via Bluetooth®
Multimedi asystem
XTo switch to th emen ubar in th etelephon e
men uor th eaddress book :slide 6thecon-
troller .
XTo select Options:tur nand press th econ-
troller .
XTo select Download Contacts:tur nand
press th econtroller .
XTo selectFromBluetoothDevice:tur nand
press th econtroller .
If th emultimedia system is connecte dto a
mobile phone, th econnection is terminated.
vCards can no wbe received by adevice (PC,
mobile phone) via Bluetoot h
®.
External device
XStart th edat atransfer ;see th emanufactur -
er' soperating instructions.
The number of vCards received is displayed in th emultimedia system.
Multimedi asystem
XTo cance lth etransfer :press th econtroller .
If amobile phon ewas connected, th econ-
nection to th emobile phon eis established
again .
Address book109
Telephone
Z
Page 112 of 178

Received vCards are identifiedby th e®
symbol in th eaddress book .
iIf you switch to another main function ,e.g.
navigation ,while receiving vCards, th erecep-
tion of vCards will be terminated.
Deleting imported contacts
XTo chang eto th emen ubar when in th e
address book or th etelephon emenu: slid e
6 thecontroller .
XTo select Options:tur nand press th econ-
troller .
XTo select Delete Contacts:tur nand press
th econtroller .
XSelecton eof th efollowin goptions:
RInternal Contacts
RImported fro mStorag eDevice
RImported fro mBluetooth Device s
RDownloadedfro mPhone
Turn and press th econtroller .
XTo select Yes:tur nand press th econtroller .
The contact sare deleted.
Closing the address book
XPress th e% buttonon eor mor etimes .
Call lists
Introduction
If your mobile phon esupport sth ePBAP Blue -
toot h®profile ,th ecall list sfrom th emobile
phon eare displayed in th emultimedia system.
When connecting th emobile phone, you may
hav eto confirm th econnection for th ePBAP
Bluetoot h
®profile.
If your mobile phon edoes no tsupport th ePBAP
Bluetoot h
®profile,th emultimedia system gen -
erates it sown call lists. These are no tth esam e
as th ecall list sin your mobile phone.
The call list soption is no tavailable unless a
mobile phon eis connecte dto th emultimedia
system.
If th econtact for an incoming call is no tsaved in
th eaddress book ,you can use th ecall list to
sav eth etelephon enumber .You can sav ethis telephon
enumber as ane wcontact in th e
address book or add it to an existing contact
(
Ypage 111).
iIf you connec t adifferen tmobile phon eto
th emultimedia system, th ecall list sfrom th e
ne wmobile phon eare displayed.
Opening the call list and selecting an
entry
Example: list of selected phone number s
:
Dat eand time (if available)
;Telephon enumber of th ehighlighte dentr y
and symbols (if assigned)
XTo call up th etelephon emenu: press th e
% button.
XTo switch to th emen ubar: slid e6 thecon-
troller .
XTo select CallLists:tur nand press th e
controller .
XTo selectCallsReceivedorCallsDialed:
tur nand press th econtroller .
The relevan tlist is displayed.
XTo select an entr yand mak e acall:tur nand
press th econtroller .
Closin gth ecall list
XTo select &to th elef tof th elist :slid e8
th econtroller and press to confirm .
or
XPress th e% button.
The list is closed.
Displaying details from a list entry
Abbreviated list entries can also be shown in full.
110Call lists
Telephone
 1
1 2
2 3
3 4
4 5
5 6
6 7
7 8
8 9
9 10
10 11
11 12
12 13
13 14
14 15
15 16
16 17
17 18
18 19
19 20
20 21
21 22
22 23
23 24
24 25
25 26
26 27
27 28
28 29
29 30
30 31
31 32
32 33
33 34
34 35
35 36
36 37
37 38
38 39
39 40
40 41
41 42
42 43
43 44
44 45
45 46
46 47
47 48
48 49
49 50
50 51
51 52
52 53
53 54
54 55
55 56
56 57
57 58
58 59
59 60
60 61
61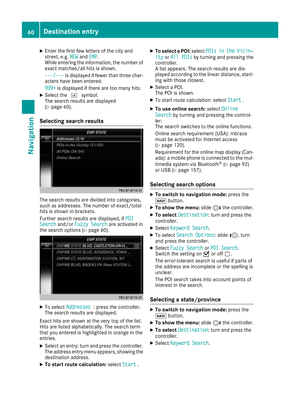 62
62 63
63 64
64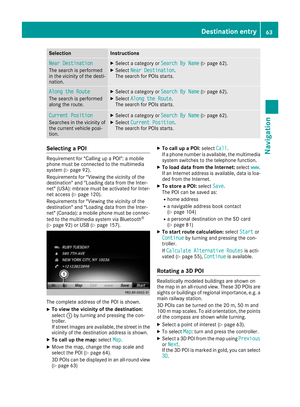 65
65 66
66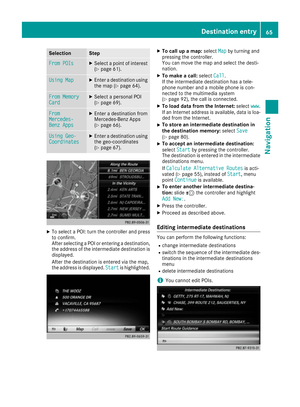 67
67 68
68 69
69 70
70 71
71 72
72 73
73 74
74 75
75 76
76 77
77 78
78 79
79 80
80 81
81 82
82 83
83 84
84 85
85 86
86 87
87 88
88 89
89 90
90 91
91 92
92 93
93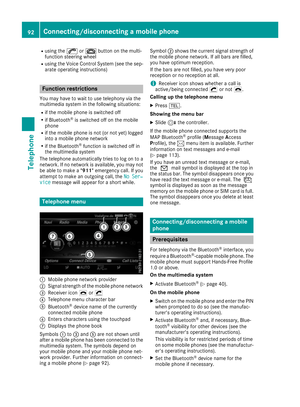 94
94 95
95 96
96 97
97 98
98 99
99 100
100 101
101 102
102 103
103 104
104 105
105 106
106 107
107 108
108 109
109 110
110 111
111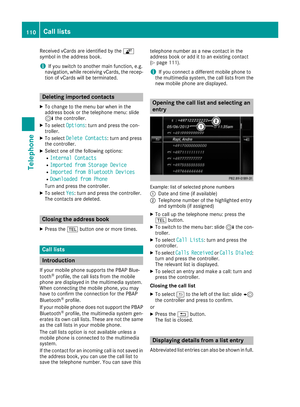 112
112 113
113 114
114 115
115 116
116 117
117 118
118 119
119 120
120 121
121 122
122 123
123 124
124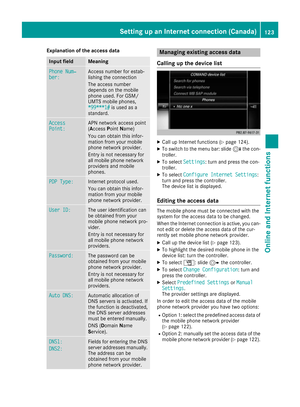 125
125 126
126 127
127 128
128 129
129 130
130 131
131 132
132 133
133 134
134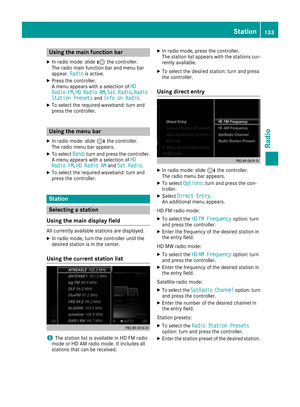 135
135 136
136 137
137 138
138 139
139 140
140 141
141 142
142 143
143 144
144 145
145 146
146 147
147 148
148 149
149 150
150 151
151 152
152 153
153 154
154 155
155 156
156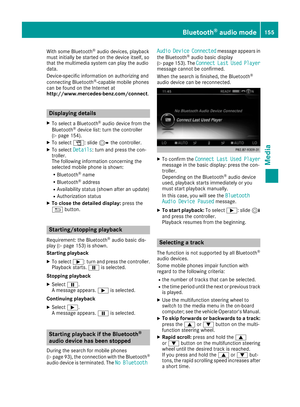 157
157 158
158 159
159 160
160 161
161 162
162 163
163 164
164 165
165 166
166 167
167 168
168 169
169 170
170 171
171 172
172 173
173 174
174 175
175 176
176 177
177