Page 137 of 178

XSlide9the controller.
XTo select the Delete Highlighted Sta‐tion/Channeloption in the additional menu:
turn and press the controller.
XTo select Yes: turn and press the controller.
The highlighted station is deleted.
or
XTo select No: turn and press the controller.
The process is canceled.
iFrequencies have already been stored in the
multimedia system. There are 100 preset
positions available.
Activating/deactivating the station
presets display
You can use this function to change to the sta-
tion presets display.
Activating
XIn radio mode: slide 6the controller.
XTo select Preset: turn and press the control-
ler.
XTo select Station Preset View: On: turn
and press the controller.
The station preset display appears.
XTo switch between the stored stations: turn
the controller.
Deactivating
XIn radio mode: slide 6the controller.
XTo select Preset: turn and press the control-
ler.
XTo select StationPresetView:Off: turn
and press the controller.
A view of the last waveband you listened to
appears.
Tagging music tracks
If an Apple®device is connected, the music
tracks and artist displayed in the radio text can be stored. You have the option of purchasing
this track using iTunes Store
®. Not all radio sta-
tions support this function.
XIn radio mode: slide 6the controller.
The radio menu bar appears.
XTo select Options: turn and press the con-
troller.
XSelect Tag This Track.
A message appears about storing the track
information.
Displaying station information
XIn radio mode: slide 6the controller.
The radio menu bar appears.
XTo select Options: turn and press the con-
troller.
XYou can determine whether or not the artist,
track or station name are shown in the main
display area with Oorª before Show
Sta‐tion Information.
Calling up sound settings
XIn radio mode: slide 6the controller.
The radio menu bar appears.
XTo select à: turn and press the controller.
The sound menu appears (Ypage 165).
Displaying information
This function is available in HD FM radio and HD
AM radio mode.
Reception is only possible if the radio stations
provide the relevant information.
XIn radio mode: slide 6the controller.
XTo select Info: turn and press the controller.
Information on the currently received pro-
gram is displayed.
Displaying information135
Radio
Page 138 of 178

If available, you will see:
Rthe track that is currently being played
Rthe artist of the track that is currently being
played
Rthe album name
Rthe channel abbreviation
Rthe logo of the station or Artist Experience®
Back to radio display:
XTo selectInfo: slide6and press the con-
troller.
Satellite radio
General notes
The satellite radio mode requires satellite radio
equipment and registration with a satellite radio
provider.
Note that the categories and channels shown in
the illustrations depend on the program content
offered by the provider. The illustrations and
descriptions in these operating instructions may
therefore differ from the channels and catego-
ries offered by the provider.
Satellite radio mode may be temporarily unavail-
able or interrupted for a variety of reasons.
These include environmental or topographical
conditions as well as other factors beyond the
control of Mercedes-Benz USA, LLC. This means
operation may not be possible in certain areas.
These include:
Rtunnels
Rparking garages
Rlocations inside or next to buildings
Rlocations in the vicinity of other structures
Sirius XM®Satellite Radio offers more than 140
digital-quality radio channels, providing 100%
commercial-free music, sports, news and enter-
tainment.
Sirius XM
®Satellite Radio uses a fleet of high-
performance satellites to broadcast around the
clock throughout the USA and Canada.
The satellite radio program is available for a
monthly fee. Details are available from the Sirius
XM
®Service Center and at
http://www.siriusxm.com (USA) or
http://www.siriusxm.ca (Canada).
Your new Mercedes-Benz vehicle comes with
Sirius XM
®Satellite Radio pre-installed at the factory. This service is free for a six-month trial
period. About a month before the trial period
ends, information will be provided on how to
extend this subscription. An acoustic signal
sounds and a message is shown, describing how
the subscription can be extended.
iSirius, XM and all related marks and logos
are trademarks of Sirius XM Radio Inc. and its
subsidiaries. All other marks, channel names
and logos are the property of their respective
owners. All rights reserved.
Registering satellite radio
:Phone number of provider
;Sirius XM®ID of your satellite receiver
XSwitch on satellite radio mode (Ypage 137).
The satellite radio main menu appears show-
ing the preview channel. You cannot select
any other stations.
XSlide 6the controller.
The radio menu bar appears.
XTo select Options: turn and press the con-
troller.
XTo select Service: turn and press the con-
troller.
The service information screen appears.
Once the telephone connection has been estab-
lished:
XFollow the instructions of the service staff.
The activation process may take up to
10 minutes. If the activation is completed
successfully, the Updating Channels...
message appears in the display, followed by
the satellite radio main menu.
iYou can also have the satellite service acti-
vated online. To do this, visit
136Satellite radio
Radio
Page 139 of 178
 or
http://www.siriusxm.ca (Canada).
iIf registration is not included when purchas-
ing the system, your credit card details will be
required to activate your account.
If t")
http://www.siriusxm.com(USA) or
http://www.siriusxm.ca (Canada).
iIf registration is not included when purchas-
ing the system, your credit card details will be
required to activate your account.
If the satellite receiver is not installed correctly, the Device
Unavailablemessage will appear.
Switching to satellite radio
XTo show the main function bar: slide 5the
controller.
XTo select Radio: turn and press the controller.
The radio display appears. You will hear the
last station played on the last waveband
selected.
XTo select Radioin radio mode: slide 5and
press the controller.
The menu with the available radio modes
appears.
XTo select SatRadio: turn and press the con-
troller.
The No
Servicemessage appears if there is no
signal.
Satellite radio overview
:Main function bar
;Preset
=Channel name and channel number
?Channel information
AStation presets menu
BCategory list
CKeyword search
DOptions menu
Channel information ?can be viewed in detail
(
Ypage 139).
Selecting a category
Satellite radio channels are sorted into catego-
ries. You can choose between various catego-
ries such as News/Discussions, Sports and
Country (if available). The category list is sorted
alphabetically. The content of the categories is
sorted by channel numbers.
XTo call up the category list: selectCate‐
goryin the menu bar by turning and pressing
the controller.
The category list appears.
XTo select a category: turn the controller and
press to confirm.
The category selected is shown in the display.
You hear the channel last selected for this
category.
The #dot indicates the current setting.
At the beginning of the category list, the All
Channelscategory appears. This category
enables you to browse all available channels.
Selecting a channel
Channel search
XWhen the display/section window is selec-
ted, slide 8or9 the controller.
The multimedia system searches in both
directions (ascending and descending) and
stops at the next channel found in the selec-
ted category.
Entering channel numbers directly
XTo select Options: turn and press the con-
troller.
XTo select Direct Entry: turn and press the
controller.
An input menu appears.
XTo select a channel number: turn and press
the controller.
XThe multimedia system sets the selected
channel.
iYou can only select currently permitted dig-
its.
Satellite radio137
Radio
Page 140 of 178

Selecting a channel via the satellite
radio station list
You can select the channel using the station list
displaying the artists and tracks that are cur-
rently playing.
XTo selectOptions: turn and press the con-
troller.
XTo select Current Station List withArtist&Title: turn and press the control-
ler.
The channel list appears.
XSelect the desired channel
Keyword search
XTo select the keyword search èin the
menu bar: turn and press the controller.
XTo enter the required search term: turn and
press the controller.
Direct and indirect results are shown.
XSelect the required result.
The relevant channel is played.
Memory functions
Quick save:
XSet the desired channel in satellite radio
mode.
XPress and hold the controller until the preset
list appears.
XTo select the preset number: turn and press
the controller.
A tone confirms that the storing process was
successful. Saving a channel using the edit function:
XIn satellite radio mode, slide
6the control-
ler.
XTo select Preset: turn and press the control-
ler.
XTo select Edit Station Preset: turn and
press the controller.
The list of saved channels appears.
XTo select the preset: turn the controller and
press for about 2 seconds.
The newly saved channel overwrites the exist-
ing preset.
iThere are 100 presets available.
Presets menu view
You can use this function to change to the sta-
tion presets display.
Activating
XIn radio mode: slide 6the controller.
XTo select Preset: turn and press the control-
ler.
XTo select Station Preset View: On: turn
and press the controller.
The station preset display appears.
XTo switch between the stored stations: turn
the controller.
Deactivating
XIn radio mode: slide 6the controller.
XTo select Preset: turn and press the control-
ler.
XTo select StationPresetView:Off: turn
and press the controller.
A view of the last waveband you listened to
appears.
Music and sports alerts
General notes
This function makes it possible to store a pro-
gram alert for your favorite artists, tracks or
sporting events.
You can store up to 30 music and sports alerts
(favorites).
Music alerts can only be saved whilst a track is
being played. You can also specify sports alerts
via the menu option. The system then continu-
138Satellite radio
Radio
Page 141 of 178

ously searches through all the channels. If a
match is found with a saved message, you will
be informed. A window appears with the respec-
tive information.
Setting a music alert
XTo selectOptions: turn and press the con-
troller.
XTo select Alert for Artist, Track &SportsEvent: turn and press the controller.
A menu appears.
XSelect Add New Alert.
A window with a prompt appears.
XSelect ArtistorTrack.
The alert is set for the current artist or track.
The music alert window appears
XTo select Change ToorIgnore: turn and
press the controller.
If you select Change To
, the channel is
changed and the favorite artist or track is
played.
If you select Ignore
, the current channel will
continue playing.
Setting a sports alert
XTo select Options: turn and press the con-
troller.
XTo select Alert for Artist, Track &SportsEvent: turn and press the controller.
A menu appears.
XSelect Manage Sports Alerts.
A menu appears.
XSelect Select New Alerts.
A menu appears.
XSelect the desired team from a league, e.g.
college, NBA, NHL, NFL or MLB.
The alert function for the sports team is
added.
Editing music and sports alerts
XTo select Alert for Artist, Track &SportsEvent: turn and press the controller.
A menu appears.
XSelect Manage Music AlertsorManageSports Alerts.
A list of set alerts appears.
Tagging music tracks
If the channel supports this function, you are
able to transfer the music track currently playing
to an Apple
®device. You can then purchase it in
the iTunes®store.
XTo select Options: turn and press the con-
troller.
XTo select Tag This Track: turn and press
the controller.
A message about saving this music track on
the Apple
®device appears.
Displaying information
XTo select Infoin the radio menu bar: turn and
press the controller.
Information on the currently received pro-
gram is displayed.
If available, you will see:
Rthe channel logo
Rthe channel abbreviation
Satellite radio139
Radio
Page 142 of 178

Rthe artist of the track that is currently being
played
Rthe current track
XTo return to the radio display:selectInfoby sliding 6and pressing the controller.
Displaying service information
The provider's customer service center is avail-
able by phone at any time to answer any general
questions or questions on the versions availa-
ble.
XTo select Options: turn and press the con-
troller.
XTo select Service: turn and press the con-
troller.
The provider's details appear.
XTo return to the main display: press the
% button.
Channel list updates
During reception of a new channel list, the
Updating Channels...message is shown.
The channel last selected is switched to mute
until the update has been completed. Satellite
radio mode is not available during this process. Once the update has been completed, the sat-
ellite radio basic menu appears. If the channel
last selected is available, this channel will be
played.
Sound settings
Information on sound settings (Ypage 165).
140Satellite radio
Radio
Page 143 of 178

Your multimediasyste mequipment
These operatin ginstruction sdescribe all th e
standar dan doptional equipment of your multi-
media system, as available at th etime of going
to press. Country-specifi cdifference sare pos -
sible. Bear in min dthat your vehicle may no t
feature all function sdescribed here. Thi salso
applies to safety-relevan tsystems an dfunc-
tions.
Read th einformation on qualifie dspecialis t
workshop sin th evehicle Operator's Manual.
Activating medi amode
General notes
There are severa lways to activat emedia sour-
ce susin gth emultimedia system.
The relevant section sof th eOperator's Manual
describe th esimples tway to activat e amedia
source. Thi ssection describes all option sfo r
activatin gmedia sources. If you wish to play
external media sources, th edefault display
mus talready be turned on .
Connections for externa lmedi asour-
ces
The followin gexternal media sources can be
used :
RApple®devices (e.g. iPhon e®)
RUSBdevices (e.g. US Bstick, MP3 player)
Two US Bports are located in th estowag e
spac eunder th earmrest.
RCD
RDV Dvideo
RSD cards
Rdevices wit hBluetoot h®connection
Activating medi ausing th ebutton
XTo cal lup th emedia menu: press th eÕ
button.
The last media sourc eyou hav eset is dis -
played.
XPress th eÕ buttonagain .
The men uappears wit hth eavailable media
sources.
XTo selec tth emedia source: turn th econtrol-
ler an dpress to confirm .
Dependin gon th evehicle equipment ,th efol-
lowing media sources will be available :
RDisc
RMemory Card
RMediaRegister
RMedi aInterfac e 1
RMediaInterfac e 2
RBluetoothAudi oIf playable music files are found ,they will be
playe dby th emultimedia system.
Activating medi ausing th emain func-
tion ba r
XTo display th emain function bar :slid e5 the
controller .
XTo selectMedi a:turn an dpress th econtroller .
The last media sourc eyou hav eset is dis -
played.
XTo selec tMedi ain media mode: slid e5 and
press th econtroller .
The men uappears wit hth eavailable media
sources.
XTo selec tth emedia source: turn th econtrol-
ler an dpress to confirm .
If th emedia sourc econtain smusic or video
files, these will be played. The correspondin g
basi cdisplay appears .
Activating media mode141
Media
Page 144 of 178

Activating media using the device list
XIn media mode, slide6 thecontroller .
The media men ubar is shown.
XTo select Devices:tur nand press th econ-
troller .
The available media source swill be shown.
The #dot indicates th ecurren tsetting .
XSelectth emedia source .
If th emedia source contain smusic or video
files, these will be played .The corresponding
basic men uwill be shown.
Switching onautomatically
Afte rinserting aCD/DVD, th erespective media
mod eis automatically switched on by th emul-
timedia system.
If playable music file sare found, they will be
played by th emultimedia system.
If amedia function is already switched on in th e
multimedia system, this will be interrupted and
th ebasic display of th eCD/DV Dmod ewill
appear .If another function ,suc has navigation ,
is bein goperated, th ebasic display will no t
change. Only th emusic from th elast inserted
CD/DV Dwill be played .
Audio/video mode
Import ant safety notes
GWARNIN G
The CD/DV Ddrive is aclas s 1laser product.
If you open th ehousing of th eCD/DV Ddrive,
there is aris kof exposure to invisible laser
radiation .This laser radiation could damag e
your retina .There is aris kof injury.
Never open th ehousing .Always hav emain -
tenance and repair wor kcarrie dout at aquali-
fie dspecialis tworkshop .
GWARNING
Handlin gdisc swhile drivin gmay distrac tyou
from traffic conditions. You could also lose
control of th evehicle. There is aris kof an
accident.
Handle disc sonly when th evehicl eis station -
ary.
Bear in min dthat at aspee dof only 30 mph
(approximately 50 km/h), th evehicl ecover s a
distanc eof 44 ft (approximately 14 m)per sec-
ond.
Notes on audio/video mode
Permissible data carriers
RCD audio, CD-R and CD-RW
RDVD-R, DVD-V and DVD-RW
RSD card
RUSB storage device
Permissible file systems
RISO 9660/Joliet standard for CDs
RUDF for video DVDs
RFAT16, FAT32, exFAT and NTFS for SD card
and USB storage media
Multisession CDs
For multisession CDs, the content of the first
session determines how the multimedia system
processes the CD. The multimedia system plays
only one session and gives priority to the audio
CD session.
File structure of a data carrier
When you create a disc with compressed music
files, the tracks can be organized in folders. A
folder may also contain subfolders. The disc
may contain no more than eight directory levels.
Files beyond the eighth level will not be recog-
nized by the system.
iThe multimedia system supports data carri-
ers with up to 50,000 files.
In the case of a data carrier with more than
64 GB of stored data, only files in folders with the following names are supported: Music,
Pictures, Video.
Track and file names
When you create a disc with compressed musicfiles, you can assign names to the tracks and
folders.
142Audio/video mode
Media
 1
1 2
2 3
3 4
4 5
5 6
6 7
7 8
8 9
9 10
10 11
11 12
12 13
13 14
14 15
15 16
16 17
17 18
18 19
19 20
20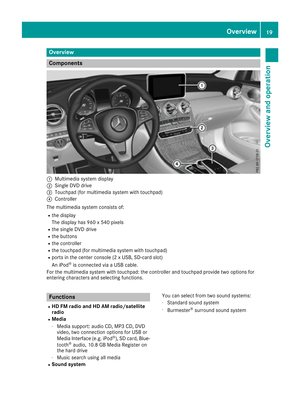 21
21 22
22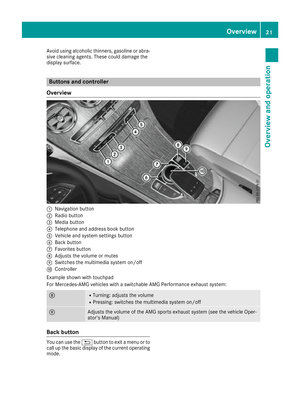 23
23 24
24 25
25 26
26 27
27 28
28 29
29 30
30 31
31 32
32 33
33 34
34 35
35 36
36 37
37 38
38 39
39 40
40 41
41 42
42 43
43 44
44 45
45 46
46 47
47 48
48 49
49 50
50 51
51 52
52 53
53 54
54 55
55 56
56 57
57 58
58 59
59 60
60 61
61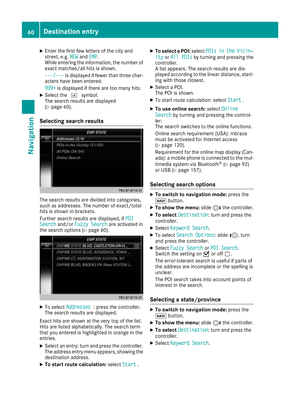 62
62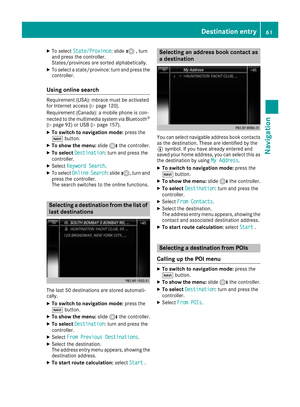 63
63 64
64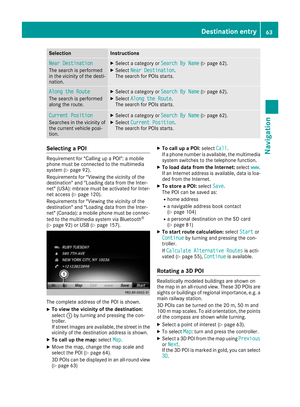 65
65 66
66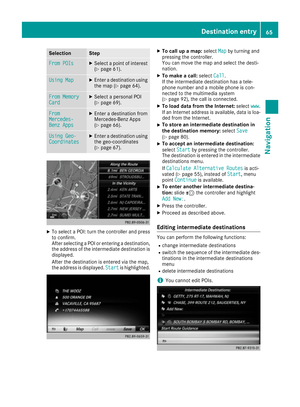 67
67 68
68 69
69 70
70 71
71 72
72 73
73 74
74 75
75 76
76 77
77 78
78 79
79 80
80 81
81 82
82 83
83 84
84 85
85 86
86 87
87 88
88 89
89 90
90 91
91 92
92 93
93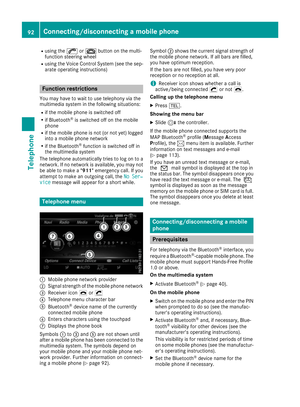 94
94 95
95 96
96 97
97 98
98 99
99 100
100 101
101 102
102 103
103 104
104 105
105 106
106 107
107 108
108 109
109 110
110 111
111 112
112 113
113 114
114 115
115 116
116 117
117 118
118 119
119 120
120 121
121 122
122 123
123 124
124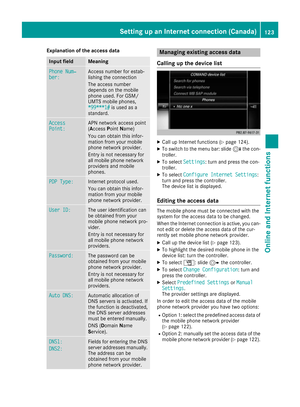 125
125 126
126 127
127 128
128 129
129 130
130 131
131 132
132 133
133 134
134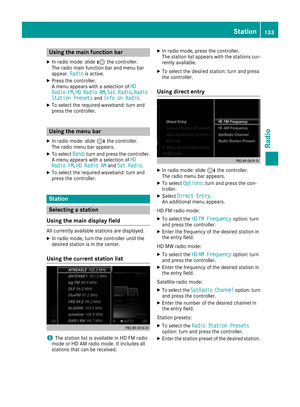 135
135 136
136 137
137 138
138 139
139 140
140 141
141 142
142 143
143 144
144 145
145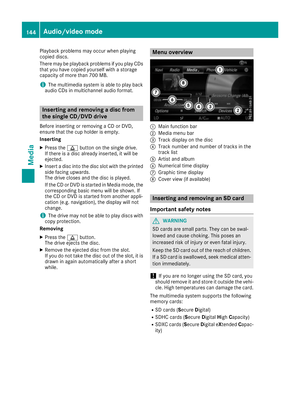 146
146 147
147 148
148 149
149 150
150 151
151 152
152 153
153 154
154 155
155 156
156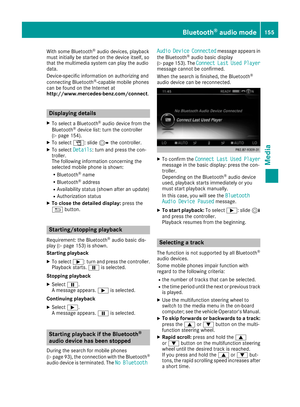 157
157 158
158 159
159 160
160 161
161 162
162 163
163 164
164 165
165 166
166 167
167 168
168 169
169 170
170 171
171 172
172 173
173 174
174 175
175 176
176 177
177