Page 161 of 178
.
Search results ar")
Keyword search
XTo selectKeyword Searchinthe category
list : turn and press the controller.
XEnter and confirm the characters of the
desired search using the controller
(
Ypage 149).
Search results are sorted according to the
availab lecategories, displayed and can then
be selected.
Selecting the playback option
XInmed iamode, slide6the controller.
The med iamenu bar isshown.
XTo select Options: turn and press the con-
troller.
XTo select the desired playback option: turn
and press the controller.
Ad ditional information on playback options
(
Ypage 145).
Selecting video settings
Vide ofile s from Ap ple®devices cannot be
played.
If playable vide ofile s are foun d,they will be
played bythe multimed iasystem.
XTo swit ch on full-screen mode: press the con-
troller inthe basic display.
XTo show the video menu: slide6the con-
troller infull-screen mode.
The Media Interface menu bar appears.
XTo select Options: turn and press the con-
troller.
XSelect Video Settings.
To change settings (
Ypage 161).
Video DVD mode
Important safety notes
GWARNING
The CD/DVD drive is a class 1 laser product.
If you open the housing of the CD/DVD drive,
there isa risk of exposure to invisible laser
radiation. This laser radiation could damage
your retina. There is a risk of injury.
Never open the housing. Always have main-
tenance and repair work carried out at a quali-
fied specialist workshop.
GWARNING
Han dling discs while driving may distract you
from traffic conditions. You could also lose
control of the vehicle. There is a risk of an
accident.
Handle discs only when the vehicleisstation-
ary.
Bear in mind that at a speed of only 30 mph
(approximately 50 km/h), the vehicle covers a
distance of 44 ft (approximately 14 m)per sec-
ond.
General notes
Notes on discs
!Do not affix stickers or labels to the discs.
They could peel off and damage the drive.
The drive is designed to receive EN 60908 standard discs. Therefore, you can
only use discs with a maximum thickness of
1.3 mm.
If you insert thicker discs, e.g. those that con-
tain data on both sides (DVD on one side and
audio data on the other), they cannot be ejec-
ted and can damage the drive.
Do not use discs with an 8 cm diameter, even
when using an adapter. Only use round discs
with a 12 cm diameter.
The variety of data media, burners and burn
software means there is no guarantee that the
system will be able to play discs that you have
copied yourself.
Video DVD mode159
Media
Z
Page 162 of 178

RPA Lor NTS Cstandard
You will gene")
DVD playback conditions
The multimedia systemcan play bac kvideo
DVDs produced accordin gto th efollowin g
standards:
RRegion code 1or region code 0(n oregion
code)
RPA Lor NTS Cstandard
You will generally fin dth erelevant details either
on th eDV Ditsel for on th eDV Dcase.
Wit hDVDs that do no tmee tth estandard
requirements ,you may encounter playback
problems.
iObserv eth efollowin gnotes:
RIt is also possible to play video DVDs wit h a
differen tregion code, provided that they
are produced in accordance wit hth ePA Lor
NTS Cstandard .If you inser t avideo DV D
wit h a differen tregion code, amessag eto
this effect appears .
RThe multimedia syste mis set to region
code 1at th efactory. Thi ssetting can be
changed at an authorized Mercedes-Ben z
Center. The region code can be changed up
to fiv etimes .
RIfaDV Dcanno tbe playe dbac kaccordin g
to national color transfe rmethod s(PA Lor
NTS Cstandards), problem swit hth eimage,
soun dor playback may occur .
Controloptions
There are four contro lmenus available in video
DV Dmode.
Mos tDVDs hav etheir own contro lmenu. The
DV Dis operated directl yusin gth econtroller or
DV Dfunctions.
Contro lmenu an d
functionOperation
RDVD' scontro l
men u
Selection of title,
scene, language,
subtitles .. .Operation wit hth e
controller
ROption smenu
Selection of bright -
ness, contrast,
color ,formatOperation usin gth e
men ubar Option s,
video setting s
Controlmenu an d
functionOperation
RVideo men u
Selection of scene,
fas tforwar dor
rewin dIn full-screen mode,
slide6 thecontrol-
ler
RDV Dfunction s
Selection of title,
scene, language,
subtitles .. .In full-screen mode,
press thecontroller
Function restrictions
Dependin gon th eDVD, certain function sor
action smay no tfunction at all. The symbol K
appears in th edisplay.
Switchin gon video DVD mode
RInser tand ejec t adiscfrom th esingle drive
(Ypage 144)
Further option sfo rswitchin gon :
RUsing th emain function bar (Ypage 141)
RUsing thedevic elist (Ypage 142)
RUsing th eÕ button (Ypage 141)
Showing th eDVD basic display
:Main function bar
;Main display field
=Media men ubar
160Video DVD mode
Media
Page 163 of 178

The DVD basic display can be shown in the fol-
lowing situations:
XTo show the DVD menu:press the%
button.
XTo show in the video DVD currently play-
ing: slide 6the controller.
The video menu appears.
XPress the controller.
The basic display appears.
Switching on DVD full-screen mode
It is possible to switch from the DVD basic dis-
play to full screen mode as follows:
XSlide 5the controller.
The main function bar and menu bar are hid-
den. A full-screen symbol will be shown.
XPress the controller.
The full-screen mode appears.
Calling up the options menu
Selecting options
XIn full-screen mode, slide 6the controller
The video menu appears.
XPress the controller.
The DVD basic display appears.
XTo select Optionsin the menu bar: turn and
press the controller.
A menu appears.
Skip to time
XTo select Skip to Time: turn and press the
controller.
A menu appears.
XTo set the time: turn the controller.
XTo hide the menu: press the %button.
Displaying the DVD functions
XTo select DVDFunctions: turn and press the
controller.
A menu appears (
Ypage 162).
Selecting video settings
Dynamic image enhancement
The dynamic image enhancement function auto-
matically matches brightness, contrast and
color to the film being played.
XTo activate or deactivate: tick or remove the
tick from the box in front of DynamicImageEnhancement.
Manual image enhancement
In order to manually adjust the brightness, con-
trast and color, the dynamic image enhance-
ment function and the automatic daylight
adjustment feature must be switched off.
XTo selectBrightness,Contrastor
Color: turn and press the controller.
A sliding menu appears.
XTo select the required value: turn the control-
ler.
XTo exit the sliding menu: slide 8the con-
troller.
Video DVD mode161
Media
Z
Page 164 of 178

Setting the picture format
The following screen format options are availa-
ble for the DVD currently being played:
RAuto
R16:9
R4:3
RZoom
XTo set the picture format: turn and press the
controller.
The dot before the menu entry shows the
selected format.
Showing the DVD's control menu
Most DVDs have theirown control menuwhich
can be operated using the controller.
Showing the DVD's control menu
XTo show DVD functions: in full screen video
mode, press the controller.
The DVD functions menu is shown.
XTo select Menufrom the DVD functions menu:
turn and press the controller.
The DVD functions menu is hidden and the
DVD's menu entries (e.g. scenes, language,
trailers) are displayed.
XTo select a menu entry: turn and press the
controller.
Operating the video menu
:Type of data medium
;Current title
=Shows the menu bars for the DVD basic dis- play
?Current scene
ATrack time Operating the video menu
XTo show the video menu: in full-screen video
mode, slide
6the controller.
XTo hide the video menu: slide 5the con-
troller.
XTo select the next or previous scene: turn the controller clockwise/counter-clockwise.
XTo fast forward or rewind: slide 9or8
the controller and hold until the desired posi- tion has been reached.
XTo show the menu bars for the DVD basic dis-
play: in the video menu, press the controller.
The video menu is hidden and the DVD basic
menu appears.
DVD functions
Showing/hiding the DVD functions
XTo show DVD functions: in full screen video
mode, press the controller.
The DVD functions menu is shown.
XTo hide DVD functions: select%from the
DVD functions.
XTo show the DVD basic display: selectò
from the DVD functions.
Overview of DVD functions
:Activates DVD control menu
;Hides DVD functions
=Shows the DVD basic display
?Confirms entry in control menu
ANavigates DVD lists
BJumps to the start of the scene
CDisplays camera perspectives
DShows subtitles
ESelects language
162Video DVD mode
Media
Page 165 of 178

FStops playback
GPauses playback
Using the DVD functions
XIn full-screen mode, press the controller
The DVD functions menu is shown.
It is possible to navigate in the DVD's control
menu when the arrows in the upper menu bar
are activated.
XTo select theXZ¬Yarrow to navigate in the
menu: turn the controller.
The active arrow is highlighted.
XTo select a menu entry: press the controller.
The next menu entry in the direction of the
arrow is highlighted.
XTo call up a highlighted menu entry: turn the
controller until ¬is highlighted.
XPress the controller.
The selected DVD scene is played.
XTo hide DVD functions: select &using the
controller.
XPress the controller.
The DVD functions menu is hidden.
If there are functions such as Display camera
perspectives on the DVD, these functions are
shown in the DVD functions menu.
XTo call up Display camera perspectives: turn
and press the controller
Continuing/stopping playback
Interrupting playback
XShow the DVD functions (Ypage 162).
XTo select Éfrom the DVD functions menu:
turn and press the controller.
The Ë display changes to Ì. Playback
is stopped. Continuing playback
XSelect
Ì.
Playback continues from the point where it
was interrupted.
Stopping playback
XWhile playback is interrupted select É
again.
Restarting playback
XSelect Ì.
Playback restarts from the beginning.
Pausing/continuing playback
Pausing playback
XShow the DVD functions (Ypage 162).
XSelect Ë: turn and press the controller.
The Ë display changes to Ì.
Continuing playback
XSelect Ì.
Selecting a scene/chapter
If the film is divided into scenes and chapters,
you can select these directly while the film is
running or you can skip progressively through
them. This is not possible at certain points for
some DVDs (e.g. during the opening credits).
It may also be possible to select the scene and
chapter from the functions stored on the DVD.
XTo skip forward or back: in the video menu,
turn the controller.
The next or previous scene in the film is skip-
ped to.
iThe DVD functions can also be used to make
selections (Ypage 162).
Picture viewer
General notes
If there are pictures on the active data medium,
you can view them on the multimedia system.
The following data media and picture formats
are supported:
RData media: Media Register, CD, DVD, USB
devices, SD cards
RPicture formats: jpeg, jpg, bmp, png
Picture viewer163
Media
Z
Page 166 of 178

The maximum image resolution is
20 megapixels.
It is not possible to view a picture from the driv-
er's side while the vehicle is in motion.
Displaying pictures
XIn media mode, slide6the controller.
XTo select Search: turn and press the control-
ler.
The category list appears.
XTo select Photos: turn and press the control-
ler.
A directory list appears. Folders and picture
files can be shown.
XSelect a folder or picture.
If there is no picture on the data medium, an
empty list is shown.
Searching for pictures on other data media
XYou can search for pictures on other data
media.
In the directory list, slide 8the controller.
The device list appears.
XTo select a data medium with picture files:
turn the controller and press to confirm.
A directory list appears. Folders and picture
files can be shown.
XSelect a folder or picture.
Starting a slide show
XWhile viewing a picture, press the controller.
The image menu appears.
XTo select Start Slideshow: turn and press
the controller.
The slide show starts.
XTo end the slide show: press the controller.
The image menu appears.
XSelect End Slide Show.
Changing the picture view
XWhile viewing a picture, press the controller.
The image menu appears.
XTo select Turn Clockwise: turn the control-
ler and press to confirm.
The picture rotates 90 degrees.
XSelect Turn Counterclockwise.
The picture rotates 90 degrees.
XSelect Zoom In.
The size of the picture increases. After you
have zoomed into the picture, you can move
the section of the picture.
XTo move the section of the picture: slide 4
and 1 the controller.
XTo revert to the original size: press the con-
troller.
or
XPress the %button.
Closing the picture viewer
XWhile viewing a picture, press the controller.
XTo select Close Picture Viewer: turn and
press the controller.
The multimedia system returns to the last
accessed media function.
164Picture viewer
Media
Page 167 of 178

Your multimediasyste mequipment
These operatin ginstruction sdescribe all th e
standar dan doptional equipment of your multi-
media system, as available at th etime of going
to press. Country-specifi cdifference sare pos -
sible. Bear in min dthat your vehicle may no t
feature all function sdescribed here. Thi salso
applies to safety-relevan tsystems an dfunc-
tions.
Read th einformation on qualifie dspecialis t
workshop sin th evehicle Operator's Manual.
Sound settings
Calling up th esound menu
You can mak evarious sound setting sfo rth e
differen taudio an dvideo sources. It is possible
to set more bass fo rradio mode than fo rCD
audio mode, fo rexample. The respective sound
men ucan be called up from th emen uof th e
desire dmode.
XSwitch to radio mode (Ypage 132).
or
XSwitch to media mode (Ypage 141).
XTo switch to themen ubar :slid e6 thecon-
troller.
XTo selec tà :turn an dpress th econtroller .
The men uappears wit hth elast setting
accessed, e.g. Equalizer
.
Sound men uoverview
FunctionOptions
EqualizerSets treble ,mid -
range an dbass
Balance/faderMoves th esound
focus :left/right an d
front/rea r
Setting treble, mid-range an dbass
XCall up th esound men u (Ypage 165).
XTurnth econtroller until Equalizeris brought
to th efront.
XTo activat erotary menus fo rtreble ,mid-range
an dbass :slid e6 thecontroller .
XTo switch between th erotary menus: slid e
8 or9 thecontroller .
XTo maketh edesire dEqualize rsettings: turn
th econtroller .
Rotary menus sho wtheset values.
XTo return to th emenu: slid e5 thecontrol-
ler .
XTo return to th ebasi cmenu: press th e%
butto nbriefly.
Adjusting th ebalance/fader
Balance moves th efocus of th esound between
lef tan dright .
Fader moves th efocus of th esound between
fron tan drear.
XCall up th esound men u (Ypage 165).
XTurnth econtroller until Balance/Faderis
brought to th efron tan dthen slid e6 the
controller .
Sound settings165
Sound
Page 168 of 178

XTo activate the menu for balance and fader:
press the controller.
XTo adjust the balance focus: slide8or
9 the controller.
XTo adjust the fader focus: slide 6or5 the
controller.
An image shows the sound focus set.
XTo exit the menu: press the %button.
Burmester®surround sound system
General notes
The Burmester®surround sound system is avail-
able for all functions in the radio and media
modes.
For the best sound, we recommend that the
Automatic Volume Adjustment
function is
deactivated (Ypage 41). For further information
on automatic volume adjustment, see
(
Ypage 40).
If using Bluetooth®audio mode, we recommend
you select the Boostsetting (Ypage 156).
Calling up the sound menu
You can make various sound settings for the
different audio and video sources. It is possible
to set more bass for radio mode than for CD
audio mode, for example. The respective sound
menu is called up from the menu of the desired mode.
XSwitch to radio mode (Ypage 132).
or
XSwitch to media mode (Ypage 141).
XTo switch to the menu bar: slide 6the con-
troller.
XTo select à: turn and press the controller.
The menu appears with the last setting
accessed, e.g. Equalizer
. Overview of Burmester
®surround sound sys-
tem
FunctionOptions
EqualizerSets treble, mid-
range and bass
Balance/faderMoves the sound
focus: left/right and
front/rear
SurroundOptimizes sound
playback for all seats
Setting treble, mid-range and bass
XCall up the sound menu (Ypage 166).
XTurn the controller until Equalizeris in the
center.
XSlide 6the controller.
The rotary menus for treble, mid-range and
bass are activated.
XTo switch between the rotary menus: slide
8 or9 the controller.
XTo make the desired Equalizersettings: turn
the controller.
The rotary menus show the set values.
XTo return to the menu: slide 5the control-
ler.
XTo return to the basic menu: press the %
button briefly.
166Burmester®surround sound system
Sound
 1
1 2
2 3
3 4
4 5
5 6
6 7
7 8
8 9
9 10
10 11
11 12
12 13
13 14
14 15
15 16
16 17
17 18
18 19
19 20
20 21
21 22
22 23
23 24
24 25
25 26
26 27
27 28
28 29
29 30
30 31
31 32
32 33
33 34
34 35
35 36
36 37
37 38
38 39
39 40
40 41
41 42
42 43
43 44
44 45
45 46
46 47
47 48
48 49
49 50
50 51
51 52
52 53
53 54
54 55
55 56
56 57
57 58
58 59
59 60
60 61
61 62
62 63
63 64
64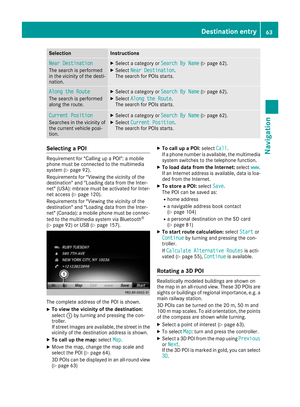 65
65 66
66 67
67 68
68 69
69 70
70 71
71 72
72 73
73 74
74 75
75 76
76 77
77 78
78 79
79 80
80 81
81 82
82 83
83 84
84 85
85 86
86 87
87 88
88 89
89 90
90 91
91 92
92 93
93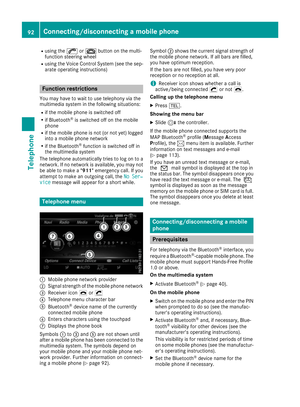 94
94 95
95 96
96 97
97 98
98 99
99 100
100 101
101 102
102 103
103 104
104 105
105 106
106 107
107 108
108 109
109 110
110 111
111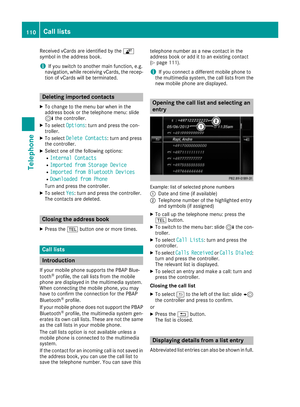 112
112 113
113 114
114 115
115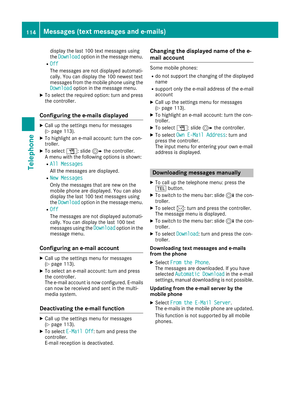 116
116 117
117 118
118 119
119 120
120 121
121 122
122 123
123 124
124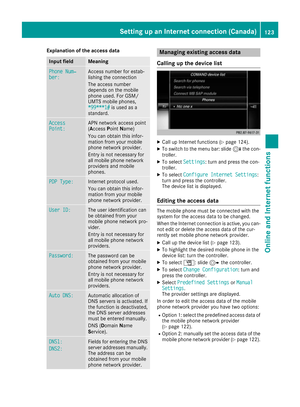 125
125 126
126 127
127 128
128 129
129 130
130 131
131 132
132 133
133 134
134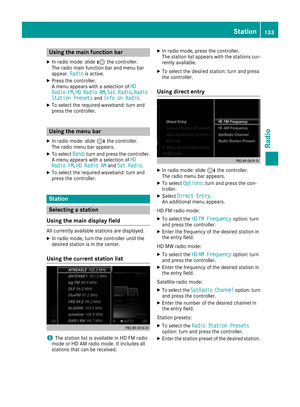 135
135 136
136 137
137 138
138 139
139 140
140 141
141 142
142 143
143 144
144 145
145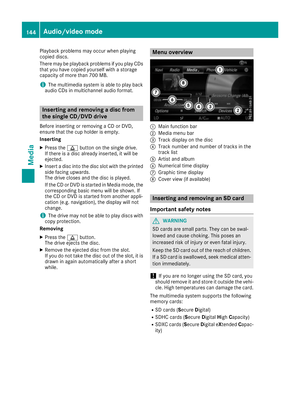 146
146 147
147 148
148 149
149 150
150 151
151 152
152 153
153 154
154 155
155 156
156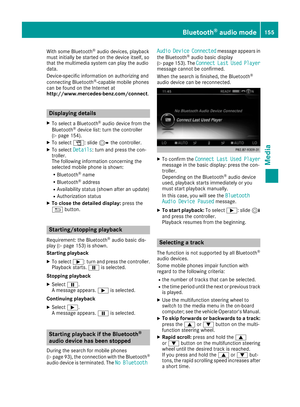 157
157 158
158 159
159 160
160 161
161 162
162 163
163 164
164 165
165 166
166 167
167 168
168 169
169 170
170 171
171 172
172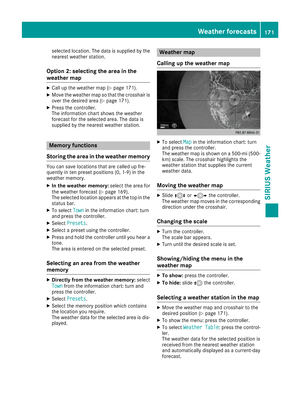 173
173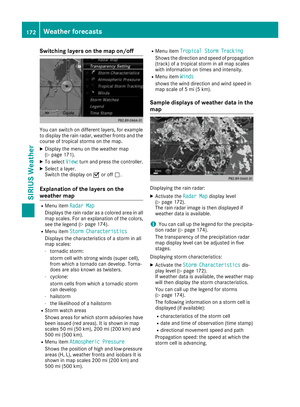 174
174 175
175 176
176 177
177