Page 65 of 178
.
XSelectNear Destination.
The search for POIs starts.")
SelectionInstructions
Near Destination
The search is performed
in the vicinity of the desti-
nation.
XSelect a category orSearch By Name(Ypage 62).
XSelectNear Destination.
The search for POIs starts.
Along the Route
The search is performed
along the route.
XSelect a category or Search By Name(Ypage 62).
XSelectAlong the Route.
The search for POIs starts.
Current Position
Searches in the vicinity of
the current vehicle posi-
tion.
XSelect a category or Search By Name(Ypage 62).
XSelectCurrent Position.
The search for POIs starts.
Selecting a POI
Requirement for "Calling up a POI": a mobile
phone must be connected to the multimedia
system (
Ypage 92).
Requirements for "Viewing the vicinity of the
destination" and "Loading data from the Inter-
net" (USA): mbrace must be activated for Inter-
net access (
Ypage 120).
Requirements for "Viewing the vicinity of the
destination" and "Loading data from the Inter-
net" (Canada): a mobile phone must be connec-
ted to the multimedia system via Bluetooth
®
(Ypage 92) or USB (Ypage 157).
The complete address of the POI is shown.
XTo view the vicinity of the destination:
select :by turning and pressing the con-
troller.
If street images are available, the street in the
vicinity of the destination address is shown.
XTo call up the map: selectMap.
XMove the map, change the map scale and
select the POI (Ypage 64).
3D POIs can be displayed in an all-round view (
Ypage 63)
XTo call up a POI: selectCall.
If a phone number is available, the multimedia
system switches to the telephone function.
XTo load data from the Internet: selectwww.
If an Internet address is available, data is loa- ded from the Internet.
XTo store a POI: selectSave.
The POI can be saved as:
Rhome address
Ra navigable address book contact
(Ypage 104)
Ra personal destination on the SD card
(Ypage 81)
XTo start route calculation: selectStartor
Continue
by turning and pressing the con-
troller.
If Calculate Alternative Routes
is acti-
vated (Ypage 55), Continueis available.
Rotating a 3D POI
Realistically modeled buildings are shown on
the map in an all-round view. These 3D POIs are
sights or buildings of regional importance, e.g. a
main railway station.
3D POIs can be turned on the 20 m, 50 m and
100 m map scales. To aid orientation, the points
of the compass are shown while turning.
XSelect a point of interest (Ypage 63).
XTo selectMap: turn and press the controller.
XSelect a 3D POI from the map using PreviousorNext.
If the 3D POI is marked in gold, you can select
3D
.
Destination entry63
Navigation
Z
Page 66 of 178

XSelect3D.
The 3D POI turns on its own axis.
XTo exit the all-round view, press the control-
ler.
Using the map
:Crosshair
;Distance of crosshair position from current
vehicle position
XTo switch to navigation mode: press the
Ø button.
XTo show the menu: slide6the controller.
XTo select Destination: turn and press the
controller.
XSelect Using Map.
The map with crosshair is shown.
XTo move the map: slide1, 4or2
the controller.
XTo change the map scale: turn the controller
until the desired map scale is selected.
The scale is displayed at the bottom.
To enlarge the map: turn the controller coun-
ter-clockwise.
To zoom the map out: turn the controller
clockwise.
XTo select a destination: press the controller.
XTo select a destination from the selection list:
turn and press the controller.
If the digital map provides navigable address
data, you will see the destination address in
the address entry menu.
XTo start route calculation: selectStart.
Entering intermediate destinations
Introduction
You can also map the route to the destination
yourself by entering up to four intermediate des-
tinations. The sequence of the intermediate des-
tinations can be changed at any time.
The multimedia system provides a selection of
predefined destinations in eight categories for
this purpose, such as Gas Station
. You can
also use the destination entry options to enter
intermediate destinations.
Creating intermediate destinations
XTo switch to navigation mode: press the
Ø button.
XTo show the menu: slide6the controller.
XTo select Destination: turn and press the
controller.
XSelect Intermediate Destinations.
XTo select a POI category or Other: turn and
press the controller.
After selecting one of the eight POI catego-
ries, available POIs are displayed:
Ralong the route
Rin the vicinity
The multimedia system first searches for des-
tinations on the route. The search for desti-
nations is then initiated in the area around the
current vehicle position.
XAfter selecting Other, select one of the des-
tination entry options.
SelectionStep
AddressEntryXEnter a destination by
address (Ypage 57).
KeywordSearchXSelect a destination
using a keyword search
(
Ypage 59).
From Previ‐ous Destina‐tions
XSelect a destination
from the list of last des-
tinations (
Ypage 61).
From Con‐tactsXSelect a contact from
the address book as the
destination (
Ypage 61).
64Destination entry
Navigation
Page 67 of 178
.
Using MapXEnter a destination using
the map (Ypage 64).
From MemoryCardXSelect a personal POI
(Ypage 69).
FromMercedes-Benz Apps
XEnter a")
SelectionStep
From POIsXSelect a point of interest(Ypage 61).
Using MapXEnter a destination using
the map (Ypage 64).
From MemoryCardXSelect a personal POI
(Ypage 69).
FromMercedes-Benz Apps
XEnter a destination from
Mercedes-Benz Apps
(
Ypage 66).
Using Geo-CoordinatesXEnter a destination using
the geo-coordinates
(
Ypage 67).
XTo select a POI: turn the controller and pressto confirm.
After selecting a POI or entering a destination,
the address of the intermediate destination is
displayed.
After the destination is entered via the map,
the address is displayed. Start
is highlighted.
XTo call up a map:selectMapby turning and
pressing the controller.
You can move the map and select the desti-
nation.
XTo make a call: selectCall.
If the intermediate destination has a tele-
phone number and a mobile phone is con-
nected to the multimedia system
(
Ypage 92), the call is connected.
XTo load data from the Internet: selectwww.
If an Internet address is available, data is loa- ded from the Internet.
XTo store an intermediate destination in
the destination memory: selectSave
(Ypage 80).
XTo accept an intermediate destination:
selectStart
by pressing the controller.
The destination is entered in the intermediate
destinations menu.
If Calculate Alternative Routes
is acti-
vated (Ypage 55), instead of Start, menu
point Continueis available.
XTo enter another intermediate destina-
tion:slide5the controller and highlight
Add New:
.
XPress the controller.
XProceed as described above.
Editing intermediate destinations
You can perform the following functions:
Rchange intermediate destinations
Rswitch the sequence of the intermediate des-
tinations in the intermediate destinations
menu
Rdelete intermediate destinations
iYou cannot edit POIs.
Destination entry65
Navigation
Z
Page 68 of 178

XTo select an intermediate destination in the
intermediate destinations menu: turn and
press the controller.
A menu appears.
XTo change an intermediate destination:
selectEdit
in the menu.
XChange the address, e.g. the city and street.
XTo select OK: turn and press the controller.
The intermediate destinations menu appears
and displays the changed intermediate desti-
nation.
You can enter the intermediate destinations and
the destination in any order. To change the
order, at least one intermediate destination and
the destination must be entered.
XTo change the order: in the menu, select
Move
.
XTurn the controller and move the intermediate destination or destination to the desired posi-
tion.
XPress the controller.
XTo delete an intermediate destination:
select Delete
in the menu.
Accepting intermediate destinations
for the route
XTo select Start Route Guidancein the
intermediate destinations menu: press the
controller.
The route is calculated with the entered inter-
mediate destinations.
If an intermediate destination was passed
during route guidance, a green tick mark will
be entered in the intermediate destinations
menu. Once the route has been recalculated,
the intermediate destination is deleted from
the intermediate destinations menu.
Saving as a personal route
You can save a route including intermediate
destinations on the SD card.
Requirements: the SD card has the FAT data
system format (e.g. FAT32).
XInsert the SD memory card (Ypage 144).
XTo select Save As Personal Routein the
intermediate destinations menu: press the
controller.
An input field appears.
XEnter a file name in the input field. Press OKto
confirm.
The route is saved to the SD memory card.
Searching for a gas station when the
fuel level is low
Requirement: the setting GasonReservemust
be enabled (Ypage 56).
If the fuel tank reserve level is displayed, you will
see the Reserve Fuel Would you like to
start a search for surrounding gasstations?message.
XTo select YesorNo: turn and press the con-
troller.
If you select Yes
: the gas station search
starts. When the search is complete, a list of
the gas stations available along the route or in
the vicinity is displayed.
If you select No
: the search is canceled.
XSelect the gas station.
The address of the gas station is displayed.
XTo selectStart: press the controller.
The selected gas station is entered into posi-
tion 1 of the intermediate destinations menu.
Route guidance begins.
If the intermediate destinations menu already
contains four intermediate destinations, a
prompt will be displayed, asking you whether you wish to enter the gas station into position
1. If you select Yes
, the gas station is trans-
ferred into the list and intermediate destina-
tion 4 is deleted.
Entering a destination from
Mercedes-Benz Apps
Requirement (USA): mbrace is activated for the
Mercedes-Benz Apps (Ypage 120).
Requirement (Canada): a mobile phone is con-
nected to the multimedia system via Bluetooth
®
(Ypage 92) or USB (Ypage 157).
XTo switch to navigation mode: press the
Ø button.
XTo show the menu: slide6the controller.
66Destination entry
Navigation
Page 69 of 178

XTo selectDestination: turn and press the
controller.
XSelect From Mercedes-Benz Apps.
The list of Mercedes-Benz Apps appears.
Using geo-coordinates
XTo switch to navigation mode: press the
Ø button.
XTo show the menu: slide6the controller.
XTo select Destination: turn and press the
controller.
XSelect Using Geo-Coordinates.
Geo-coordinates (longitude and latitude) are
entered in degrees, minutes and seconds.
XTo enter geo-coordinates: turn the control-
ler.
The value for degree, minute or second
changes.
XTo move the selection within the line: slide
1 the controller.
XTo move the selection between lines: slide
4the controller.
XTo confirm the value: press the controller.
XTo store geo-coordinates: selectSaveby
turning and pressing the controller.
The destination with the geo-coordinates can
be saved as:
Ra home address in the address book
Ra navigable address book contact
For further information on the address
book, see (
Ypage 104)
Ra personal destination on the SD card
(Ypage 81)
XTo start route calculation: selectStart
RouteGuidanceby turning and pressing the
controller.
Personal POIs and routes
General notes
The use of personal POIs for displaying traffic
surveillance equipment is not permitted in every country. Please observe the country-specific
regulations and always drive at a suitable speed.
Personal POIs are filed in categories:
RNot Classified
Standard entry for personal POIs
RMercedes-Benz Apps
Personal POIs (destinations, routes) that you
have imported via the online functions.
RCategories which you have created yourself,
e.g. on your PC
Personal routes are not categorized.
Settings for personal POIs
Displaying on the map
Requirements: an SD card with personal POIs is
inserted (Ypage 145).
The SD card has the FAT data system format
(e.g. FAT32).
All personal POIs of the selected category are
displayed on the map with a corresponding sym-
bol.
If the "Alert when approaching" function is acti-
vated (
Ypage 68), the symbols are displayed
up to a map scale of 2 mi.
XTo switch to navigation mode: press the
Ø button.
XTo show the menu: slide6the controller.
XTo select Options: turn and press the con-
troller.
XSelect Personal POIs.
XSelectDisplay on the Map.
The menu displays the categories available on
the SD card.
XTo select a category: turn the controller and
press to confirm.
All personal POIs in the selected category are
displayed Oor not displayed ª, depending
on the previous status.
Personal POIs and routes67
Navigation
Z
Page 70 of 178
.
The SD car dhas th eFA Tdat asystem format
(e.g. FAT32).
If th evehicl eis approachin g apersonal POI ,this
i")
Alert when approaching
Requirements: an SD cardwit hpersonal POI sis
inserted (Ypage 145).
The SD car dhas th eFA Tdat asystem format
(e.g. FAT32).
If th evehicl eis approachin g apersonal POI ,this
is highlighte don th emap and/o ran audible sig-
nal sounds.
Fo rthis purpose ,bot hth ecorresponding func-
tion Approaching POI Cue
and th ecategory
containing th epersonal POI mus tbe activated.
XTo switch to navigation mode: press the
Ø button.
XTo sho wthemenu: slide6 thecontroller .
XTo select Options:tur nand press th econ-
troller .
XSelectPersonal POI s.
XSelectApproaching POI Cue.
The men udisplays th ecategorie savailable on
th eSD card.
XSelec tAudibl eorOptica l.
The function is switched on Oor off ª,
depending on th eprevious status .
XTo selectacategory: turnth econtroller and
press to confirm .
The function is switched on Oor off ª,for
all personal POI sof this category, depending
on th eprevious setting .
Saving personal POIs and routes
Gene ral notes
Personal POI sand routes are geodat awhic hare
saved in open GPX format (GP S E xchange for -
mat )on th eSD card.
Requirements: th eSD car dhas th eFA Tdat a
system format (e.g. FAT32).
Personal POI fr omcurrent vehicle posi-
ti on or cros shair position
XInsertth eSD memory car d (Ypage 145).
XTo switch to navigation mode: press the
Ø button.
XWhen th emap is displayed, press th econ-
troller until amessage appears.
The curren tvehicl eposition is saved to th e
Not Classifie d
category on theSD car d
and also store din th e"Las tdestinations"
memory (
Ypage 81).
If th e"Mov emap" function is selected
(
Ypage 54), th ecrosshair position is saved.
iIf no SD car dis inserted, th epersonal POI
will only be store din th e"Las tdestinations"
memory.
Personal POI fr omdestination address
XInser tth eSD memory car d (Ypage 145).
XTo switch to navigation mode: press the
Ø button.
XCall up th eaddress entr ymen uand ente rth e
destination address (Ypage 57).
XTo select Save,slid e6 thecontroller .
XTurn and press th econtroller .
XTo make aselection ,tur nand press th econ-
troller .
XEnterth ename.
XSelec t acategory.
The curren taddress is saved as apersonal
POI on th eSD card.
iYou can select adestination from th eFro mPreviousDestinationsorFro mContactsmemories and sav eit on th eSD card.
RFro mPrevious Destinations(Ypage 61)
RFro mContacts(Ypage 61 )
Personal route fr oma tour including
intermediate destinations
XInser tth eSD memory car d (Ypage 145).
XTo switch to navigation mode: press the
Ø button.
XEnter adestination ,e.g. by address
(Ypage 57).
XStart rout ecalculation (Ypage 59).
68Personal POIs and routes
Navigation
Page 71 of 178
.
XSelectSave As Personal Routein the
intermediate destinations menu.
The route is saved in the Personal Routes
folder on the SD card.
Importing personal d")
XEnter an intermediate destination
(Ypage 64).
XSelectSave As Personal Routein the
intermediate destinations menu.
The route is saved in the Personal Routes
folder on the SD card.
Importing personal destinations and
routes via Mercedes-Benz Apps
You can import destinations and routes into the
navigation via the Mercedes-Benz apps. These
have their own symbol and are filed in the
Mercedes-Benz Apps
category.
Mercedes-Benz apps are, for example:
RDownload POI
RLocal Search
You can save the imported destinations and
routes as personal POIs and routes (
Ypage 68).
When importing routes, please note:
RThe Mercedes-Benz Apps may generate a
route based on a different map from the one
used by the multimedia system. Points on the
route may therefore be situated off the digital roads.
RThe Mercedes-Benz Apps minimize the num-
ber of route points offered.
For this reason an imported route com-
menced in the multimedia system may devi-
ate from the original route from the
Mercedes-Benz Apps.
Selecting and editing personal POIs
and routes
Selecting
The example shows a personal POI.
XInsert the SD memory card (Ypage 145).
XTo switch to navigation mode: press the
Ø button.
XTo show the menu: slide6the controller.
XTo select Destination: turn and press the
controller.
XSelect From Memory Card.
The menu displays the categories available on
the SD card.
XTo select a category or Personal Routes,
turn and press the controller.
The available personal POIs or route entries
are displayed.
XSelect personal POI or personal route.
The address of the personal POI appears or
the personal route is displayed in the map.
If a large number of entries are stored, a register
for quick selection appears. Personal POIs and
routes can be saved and sorted with different
character sets (e .g. Latin, Cyrillic, Arabic).
XTo select a register: slide9 the control-
ler.
XTo select a character: turn and press the con- troller.
XTo select a character set for sorting: slide
9 the controller to select B.
XPress the controller.
The available character sets are displayed.
The#dot indicates the current setting.
XTurn and press the controller.
Editing
The example shows a personal route.
Personal POIs and routes69
Navigation
Z
Page 72 of 178
.
XTo explore a personal POI or personal
route:turn and press the controller to select
Map
.
The map with the crosshair appears and
shows the destinati")
XSelect personal POI or personal route
(Ypage 69).
XTo explore a personal POI or personal
route:turn and press the controller to select
Map
.
The map with the crosshair appears and
shows the destination.
XScroll the map (Ypage 54).
XSet the map scale (Ypage 82).
XTo switch to the menu: press the %button.
XTo call the personal POI: turn and press the
controller to select Call
.
If a mobile phone is connected to the multi-
media system and the telephone number is
available, the call is connected (
Ypage 98).
XTo save a personal POI: turn and press the
controller to select Save
.
XContinue saving (Ypage 80).
XTo edit the name and symbol: turn and
press the controller to select Edit
.
XSelectChange NameorEdit Icon.
XCharacter entry (Ypage 30).
XSelect a symbol.
XTo delete a personal POI or route: turn and
press the controller to select Delete
.
A prompt will appear.
XSelect YesorNo.
If you select Yes, the personal destination or
personal route is deleted.
XTo select the outward and return routes:
select Swap
by turning and pressing the con-
troller.
The starting and destination positions of your
personal route, and thus the direction for
route guidance, are switched round. One-way
streets or restricted intersections are taken
into consideration. Therefore, the outward
and return routes may differ from each other.
XTo start route guidance: turn and press the
controller to select Start
.
Recording the route
General notes
Routes are recorded using the SD card.
Requirements: the SD card has the FAT data
system format (e.g. FAT32). When recording the route, bear in mind the fol-
lowing:
RIf the SD card is inserted, it must not be
removed during recording.
RIf route recording is started manually, it must
be finished manually before the multimedia
system is switched off (e
.g. when the engine
is switched off).
RThe multimedia system minimizes the num-
ber of route points recorded. Therefore when
the recorded route is subsequently com-
menced, it may differ from the route that was
originally recorded.
Starting/finishing route recording
XInsert the SD memory card (Ypage 145).
XTo switch to navigation mode: press the
Ø button.
XTo show the menu: slide6the controller.
XTo select Destination: turn and press the
controller.
XSelect From Memory Card.
XSelectStart Route Recording.
The route is recorded and REC appears at the
bottom edge of the screen.
XTo stop recording, select End RouteRecordingfrom the menu.
The route is stored under Personal Routes.
Displaying/editing the recorded route
XInsert the SD memory card (Ypage 145).
XTo switch to navigation mode: press the
Ø button.
XTo show the menu: slide6the controller.
XTo select Destination: turn and press the
controller.
XSelect From Memory Card.
XSelectPersonal Routes.
Previously recorded routes are displayed.
XTo select a route, turn and press the control-
ler.
The map appears with a menu. The recorded
route is shown on the map in blue.
XTo calculate a route: selectStart.
XTo change the name and symbol: select
Edit
.
XSelect Change NameorEdit Icon.
70Personal POIs and routes
Navigation
 1
1 2
2 3
3 4
4 5
5 6
6 7
7 8
8 9
9 10
10 11
11 12
12 13
13 14
14 15
15 16
16 17
17 18
18 19
19 20
20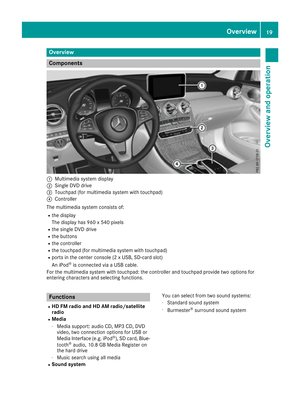 21
21 22
22 23
23 24
24 25
25 26
26 27
27 28
28 29
29 30
30 31
31 32
32 33
33 34
34 35
35 36
36 37
37 38
38 39
39 40
40 41
41 42
42 43
43 44
44 45
45 46
46 47
47 48
48 49
49 50
50 51
51 52
52 53
53 54
54 55
55 56
56 57
57 58
58 59
59 60
60 61
61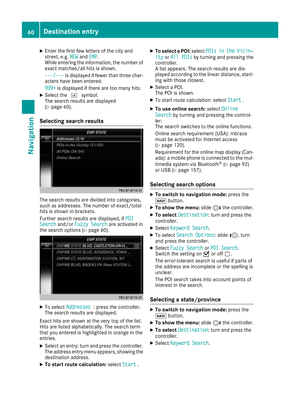 62
62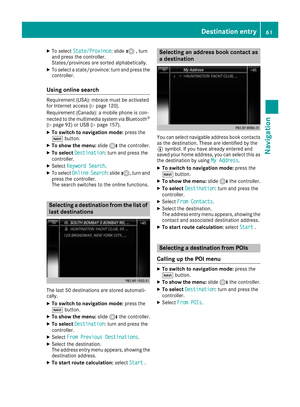 63
63 64
64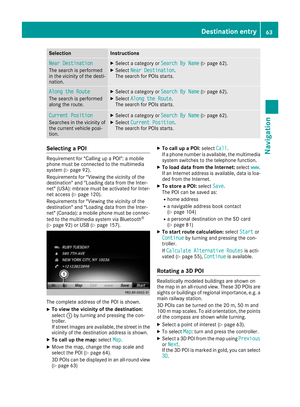 65
65 66
66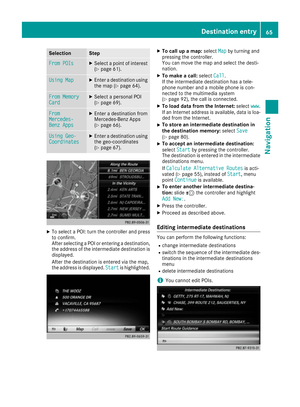 67
67 68
68 69
69 70
70 71
71 72
72 73
73 74
74 75
75 76
76 77
77 78
78 79
79 80
80 81
81 82
82 83
83 84
84 85
85 86
86 87
87 88
88 89
89 90
90 91
91 92
92 93
93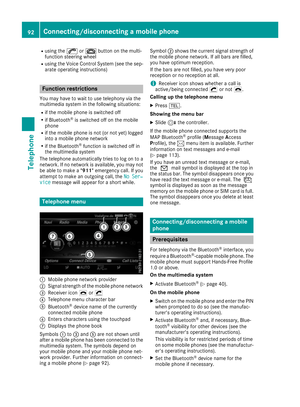 94
94 95
95 96
96 97
97 98
98 99
99 100
100 101
101 102
102 103
103 104
104 105
105 106
106 107
107 108
108 109
109 110
110 111
111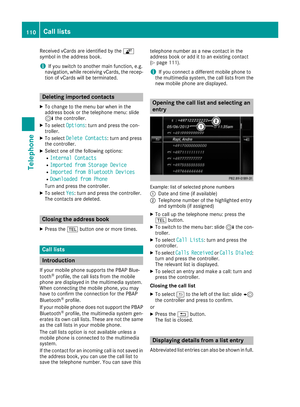 112
112 113
113 114
114 115
115 116
116 117
117 118
118 119
119 120
120 121
121 122
122 123
123 124
124 125
125 126
126 127
127 128
128 129
129 130
130 131
131 132
132 133
133 134
134 135
135 136
136 137
137 138
138 139
139 140
140 141
141 142
142 143
143 144
144 145
145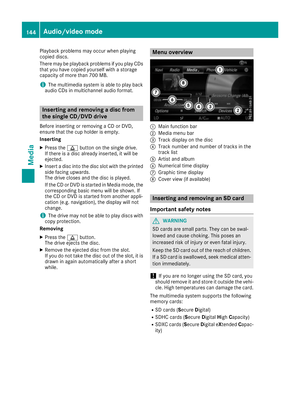 146
146 147
147 148
148 149
149 150
150 151
151 152
152 153
153 154
154 155
155 156
156 157
157 158
158 159
159 160
160 161
161 162
162 163
163 164
164 165
165 166
166 167
167 168
168 169
169 170
170 171
171 172
172 173
173 174
174 175
175 176
176 177
177