Page 33 of 178

Character entry options
You can enter characters using the controller or
the touch pad.With the controller, y")
R¬
Confirms an entry
R&
Cancels input
RS
Inserts a paragraph
Character entry (navigation)
Character entry options
You can enter characters using the controller or
the touch pad.With the controller, you enter
characters using a character bar. To enter using
the touch pad,draw the character inthe entry
fiel d.The multimedia system supports th isusing
a handwrit ing recognition function.
Entering characters using the charac-
ter bar
:Characters STUTenteredbythe user
(orange)
;Characters automatically added bythe mul-
tim edia system EBÜLL
=Switches to keyword search
?Characters not currently availab le
ACurrently selected character
BCharacters currently available
CCharacter bar
The example shows theaddr ess entry
(
Ypage 57).
XTo enter a cha racter: turn,slide6or5
and press the controller.
Selected character :isentered inthe upper
lin e. The multimedia systemaddsthe missing
characters and shows the entry that best
matches the current input. The characters are availab
leB or not ?,
depending on the characters already entered and the data stored in the digital map.
The Gsymbol indicates that an entry exists
more than once.
XTo delete a cha racter: slide6and turn the
controller, then press it after selecting
.
XTo delete an entire entry :slide 6and turn
the controller, then after selecting
press and hold downthe controller until the
entire entry is deleted.
XTo switch tokey word search: slide6and
turn the controller, then press it after select-
ing =(
Ypage 59 ).
XTo confi rman entry :slide 6and turn the
controller, then press it after selecting¬.
or
XSlide 5the controller repeatedly until the
character bar disappears.
The location selection list appears. The selec-
ted entry is highlighted.
:Cursor
;Entry line
The example shows the character entry when
you save a destination as a nav igablecontact in
the addr ess book (
Ypage 58).
XTo select an input line: slide6and turn
the controller, then press itafter selecting 4
or 5.
or
XSlid e5 the controller repeatedly until the
character bar disappears.
XTurn and press the controller.
XTo move the cursor: select the input line.
XSlide6 and turn the controller, then press it
after selecting 2or3.
Character entry (navigation)31
Overview and operation
Page 34 of 178

XTo change the character bar language:
slide6and turn the controller, then press it
after selecting B.
A menu appears.
XTo select the language: turn and press the
controller.
The character set for the selected language is set.
Functions in the character bar
RÄ
Switches between digits and symbols
R*
Switches the character bar to uppercase/
lowercase letters
RB
Changes the country setting for the character
bar
R
Deletes a character/an entry
Rè
Switches to keyword search (
Ypage 59)
R45
Selects the input line
R23
Moves the cursor within the input line
R¬
Confirms an entry
R&
Cancels input
Entering characters using the touch-
pad
Alternatively, you can enter characters using the
touchpad (Ypage 23). Character entry is sup-
ported by a handwriting recognition function.
An example is the address entry (
Ypage 57).
XWith one finger, draw the desired character,
e.g. the letter B, on the touch-sensitive sur-
face.
In the list (e.g. City), the first entry that starts
with the letter entered is highlighted. You can
draw the next character on the touch-sensi-
tive surface.
If the character that you have entered can be
interpreted in different ways, these options
are displayed.
XTo select a character suggestion: turn the
controller.
The selected character is used for the list dis-
play instead of the automatically recognized
character. Character entry can be continued.
XTo delete a character: touch the touch-sen-
sitive surface with your finger and glide your
finger to the left.
The character last entered is deleted.
XTo complete the entry and switch to the
list: press the touchpad.
32Character entry (navigation)
Overview and operation
Page 35 of 178

;To rename aselected favorite
(Ypage 33 )
=To move aselected favorite (Ypage 34)
?To delete aselected favorite (Ypage 34)
XTo displa yth")
Favorites
Overview of favorites
:To addane wfavorite (Ypage 33)
;To rename aselected favorite
(Ypage 33 )
=To move aselected favorite (Ypage 34)
?To delete aselected favorite (Ypage 34)
XTo displa yth efavorite soverview: press
th efavorite sbutto non th econtroller.
XTo show th emen ubar :slide 6thecon-
troller .
You can manage atotal of 20 favorites.
To do so use th efollowin gfunctions:
RDisplayin gand selecting favorite s
(Ypage 33 )
RAddingfavorite s (Ypage 33)
RRenamin gfavorite s (Ypage 33 )
RMoving favorite s (Ypage 34)
RDeleting favorite s (Ypage 34)
Displaying and selecting favorites
XTo displa yth efavorite soverview: press
th efavorite sbutto non th econtroller.
XTo call up afavorite :tur nand press th econ-
troller .
Adding favorites
Adding predefined favorites
XPress th efavorite sbutto non th econtroller.
XTo show th emen ubar :slide 6thecon-
troller .
XTo select Reassign:tur nand press th econ-
troller .
The categories and predefine dfavorite sare
displayed.
Categories are
RNavigatio n
REntertainmen t
RTel
RVehicle
R®
RClimateContro l
XTo select acategory: turnth econtroller and
press to confirm .
The available favorite sare displayed.
XTo select afavorite :tur nand press th econ-
troller .
XTo add afavorite at th edesired position:
tur nand press th econtroller.
If there is already afavorite at this position ,
then this will be deleted.
Adding your own favorites
You can store phon enumber sfrom th ephon e
book ,radi ostation sor destination sas favorites.
A phon enumber from th ephon ebook is used as
an example.
XCall up th ephon ebook (Ypage 101).
XSearc hfor and highligh t acontact
(Ypage 101).
XTo ad d atelephone number as afavorite
at th edesired position: press and hold the
favorite sbutto non th econtroller until th e
favorite sare displayed.
XTurn and press th econtroller.
If there is already afavorite at this position ,it
will be deleted and replace dby ane wone.
Renaming favorites
XPress th efavorite sbutto non th econtroller.
The favorite sare displayed.
XTo select afavorite to be renamed: turnth e
controller.
XTo show th emen ubar :slide 6thecon-
troller .
XTo select Rename:tur nand press th econtrol -
ler.
Favorites33
Overview and operation
Page 36 of 178
XEnter characters using the controller
(Ypage 30) or the touchpad (Ypage 26).
XTo finish the entry:selectOK.
The favorite has been renamed.
Moving favorites
XPress the favorites button on the controller.
The favorites are displayed.
XTo select a favorite to be moved: turn the
controller.
XTo show the menu bar: slide6the con-
troller.
XTo select Move: turn and press the controller.
XTo store a favorite in the desired order:
turn and press the controller.
If a favorite is stored over another favorite, the
favorite underneath is deleted.
Deleting favorites
XPress the favorites button on the controller.
The favorites are displayed.
XTo select a favorite to be deleted: turn the
controller.
XTo show the menu bar: slide6the con-
troller.
XTo select Delete: turn and press the control-
ler.
XTo select Yes: turn and press the controller.
The favorite is deleted.
XIf you select No, the process will be canceled.
34Favorites
Overviewand operation
Page 37 of 178

Your multimediasyste mequipment
These operatin ginstruction sdescribe all th e
standar dan doptional equipment of your multi-
media system, as available at th etime of going
to press. Country-specifi cdifference sare pos -
sible. Bear in min dthat your vehicle may no t
feature all function sdescribed here. Thi salso
applies to safety-relevan tsystems an dfunc-
tions.
Read th einformation on qualifie dspecialis t
workshop sin th evehicle Operator's Manual.
Important safet ynotes
GWARNING
If you operat emobile communication equip-
men twhil edriving, you will be distracted from
traffic conditions. You could also los econtro l
of th evehicle. There is aris kof an accident.
Only operat ethis equipment when th evehicle
is stationary.
You mus tobserv eth elegal requirements fo rth e
country in whic hyou are currentl ydrivin gwhen
operatin gmobile communication sequipment in
th evehicle.
Display settings
Setting th ebrightness
The brightness detecte dby th edisplay ligh tsen -
sor affects th esetting option sfo rthis function .
XPress theØ button.
or
XPress Vehicl ein themain function bar .
The vehicle men uis displayed.
XTo switch to th emen ubar :slid e6 thecon-
troller.
XTo selec tSystem Settings:turn an dpress
th econtroller .
A men uappears .
XTo selec tDispla y:turn an dpress th econ-
troller.
A men uappears .
XSelectBrightness.
A contro lappears .
XSelectth edesire dbrightness.
Display design
The display feature soptimize ddesign sfo rday-
time an dnight-time operation .You can set th e
design by manually selecting day or night design
or opt fo ran automatic setting .
XPress theØ button.
or
XPress Vehicl ein themain function bar .
The vehicle men uis displayed.
XTo switch to th emen ubar :slid e6 thecon-
troller.
XTo selec tSystem Settings:turn an dpress
th econtroller .
A men uappears .
XTo selec tDispla y:turn an dpress th econ-
troller.
A men uappears .
XSelectDa yMode,Nigh tModeor Auto.
The #dot indicates th ecurren tsetting .
DesignExplanation
DayModeThe display is set perma-
nently to day design .
NightModeThe display is set perma-
nently to night design .
AutomaticThe multimedia syste m
evaluates th edat aof th e
ligh tsensor an dautomat -
ically switches over th e
display design .
Display settings35
System settings
Z
Page 38 of 178

Switching the display on/off
To switch off the display
XPress theØbutton.
or
XPress Vehiclein the main function bar.
The vehicle menu is displayed.
XTo select Display Off: slide6, turn and
press the controller.
The display goes out.
XTo switch the display on again: press the
controller.
Time settings
General information
The multimedia system can automatically set
the time and date.
The following navigation system functions
require the time, time zone and summer/stand-
ard time to be set correctly in order to work
properly:
Rroute guidance on routes with time-depend-
ent traffic guidance
Rcalculation of expected time of arrival
Switching automatic time on and off
The Automatic Time Settingsfunction is
used to activate or deactivate the automatic
setting of the time and date. This function is
activated when the vehicle leaves the factory.
XPress the Øbutton.
or
XPress Vehiclein the main function bar.
The vehicle menu is displayed.
XTo switch to the menu bar: slide 6the con-
troller.
XTo select Time: turn and press the controller.
A menu appears.
XTo select AutomaticTimeSettings: press
the controller.
XTo switch the function on Oor off ª: press
the controller.
Setting the time zone
To set the time zone, the Automatic TimeSettingsfunction must be activated .
XPress theØbutton.
or
XPress Vehiclein the main function bar.
The vehicle menu is displayed.
XTo switch to the menu bar: slide 6the con-
troller.
XTo select Time: turn and press the controller.
A menu appears.
XTo select Time Zone:: turn and press the
controller.
A list of countries appears. The #dot indi-
cates the current setting.
XTo select the country in which you are
currently driving: turn and press the con-
troller.
The country is accepted.
A time zone list may also be displayed,
depending on the country selected.
XTo select the desired time zone: turn and
press the controller.
The time zone is accepted.
A list of available options for setting summer
time appears (
Ypage 36).
Setting summer and standard time
Using the Daylight Saving Timefunction,
you can set the automatic changeover to sum-
mer time or switch the summer time settings on and off. The changeover to summer time advan-
ces the time by one hour.
The Daylight
SavingTimefunction or Auto‐maticoption is not available in all countries.
XPress theØbutton.
or
XPress Vehiclein the main function bar.
The vehicle menu is displayed.
XTo switch to the menu bar: slide 6the con-
troller.
XTo select Time: turn and press the controller.
A menu appears.
36Time settings
System settings
Page 39 of 178

XTo selectDaylight Saving Time: turn and
press the controller.
A list of available options for setting summer
time appears.
XTo select Automatic,Onor Off: turn and
press the controller.
SettingFunction
AutomaticThe summer and
standard time are
automatically
changed over.
OnThe clock is advanced
one hour ahead of
standard time.
OffThe standard time for
the chosen time zone
is selected.
Manual time setting
Using the manual time settings, you can set the
time forwards or backwards by up to several
hours.
XPress the Øbutton.
or
XPress Vehiclein the main function bar.
The vehicle menu is displayed.
XTo switch to the menu bar: slide 6the con-
troller.
XTo select Time: turn and press the controller.
A menu appears.
XTo select Set Time Manually: turn and
press the controller.
An analog clock appears.
XTo set the hour: turn the controller.
XTo highlight minutes: slide 9the control-
ler.
XTo set minutes: turn and press the controller. The time is accepted.
The Automatic Time Settings
function is
deactivated ª.
iIfAutomatic Time Settingsis reactiva-
ted, the previous settings for time zone and
summer time changeover are restored.
Setting the time and date format
Use this function to set the time and date format for all displays in the vehicle.
XPress the Øbutton.
or
XPress Vehiclein the main function bar.
The vehicle menu is displayed.
XTo switch to the menu bar: slide 6the con-
troller.
XTo select Time: turn and press the controller.
A menu appears.
XTo select Format: turn and press the control-
ler.
XTo select the desired date format: turn and
press the controller.
The #dot indicates the current setting.
XTo select the desired time format: turn and
press the controller.
The #dot indicates the current setting.
AbbreviationMeaning
YYYY/MM/DDYear/Month/Day
date format, year (all
four digits)
YY/MM/DDYear/Month/Day
date format, year
(two digits)
MM/DD/YYYYMonth/Day/Year
date format, year (all
four digits)
DD/MM/YYYYDay/Month/Year
date format, year (all
four digits)
Time settings37
System settings
Z
Page 40 of 178
Hours : Minutes
(24 hour time format)
HH:MM (AM/PM)Hours : Minutes
(AM/PM time format)
Text reader settings
XPress theØbutton.
or
XPress Vehicleinthe main function b")
AbbreviationMeaning
HH:MM (24 hrs)Hours : Minutes
(24 hour time format)
HH:MM (AM/PM)Hours : Minutes
(AM/PM time format)
Text reader settings
XPress theØbutton.
or
XPress Vehicleinthe main function bar.
The veh iclemenu is displ ayed.
XToswit ch to the menu bar: slide6the con-
troller.
XTo select System Settings: turn and press
the controller.
A menu appears.
XTo select Text Reader Speed: turn and
press the controller.
A list appears.
XSelect Fast,Mediumor Slow.
The #dot indicates the current setting.
Voice Control System settings
Opening/closing the help window
i
If the set system language isnot supported
by the Voice Control System, English will be
selected.
The help window also shows you information on
audible instructions:
Rduring ind ividualization
Rduring subsequent operation of the Voice
Control System
XPress the Øbutton.
or
XPress Vehicleinthe main function bar.
The veh iclemenu is displ ayed.
XToswit ch to the menu bar: slide6the con-
troller.
XTo select System Settings: turn and press
the controller.
A menu appears.
XTo select VoiceControl: turn and press the
controller.
XSelect Help Window.
You have switched the help window on Oor
off ª.
More information on the Voice Control System
is available inthe separate operating instruc-
tions.
Individualization
Using ind ividualization, you can fine-tune the
Voice Control System to your own voice. This
will help improve voice recognition; see the sep-
arate operating instructions.
Wi-Fi
Overview
Establishing a Wi-Fi connection between the
multimedia system and a Wi-Fi-enabled device,
such as a tablet computer or smartphone,
requires the foll owing:
RWi-Fi must be activated on the multimedia
system and on the device to be connected.
If the multimedia system isto be used as a Wi-Fi
hotspot:
RThe multimedia system must beconnected to
an Internet-enabled mobile phone via Blue-
tooth
®or USB.
RThe Internet access data for the mobile phone
network provide r must be selected or set in
the multimedia system
RAn Internet connection must be established
on the multimedia system.
Activating Wi-Fi
XTo select Vehiclefrom the main function bar:
turn and press the controller.
XTo swit ch to the menu bar: slide 6the con-
troller.
XSelect System Settings.
XSelect WiFi.
The Wi-Fi menu appears.
38Wi-Fi
System settings
 1
1 2
2 3
3 4
4 5
5 6
6 7
7 8
8 9
9 10
10 11
11 12
12 13
13 14
14 15
15 16
16 17
17 18
18 19
19 20
20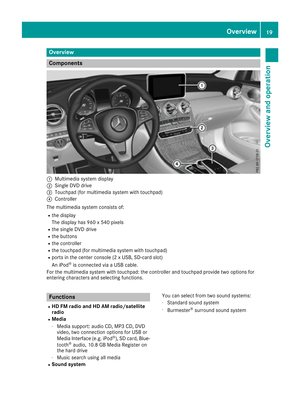 21
21 22
22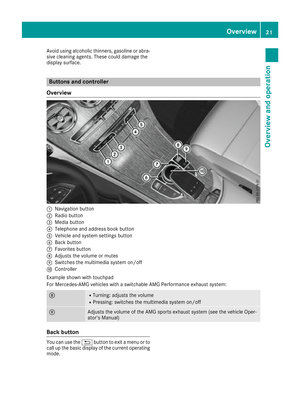 23
23 24
24 25
25 26
26 27
27 28
28 29
29 30
30 31
31 32
32 33
33 34
34 35
35 36
36 37
37 38
38 39
39 40
40 41
41 42
42 43
43 44
44 45
45 46
46 47
47 48
48 49
49 50
50 51
51 52
52 53
53 54
54 55
55 56
56 57
57 58
58 59
59 60
60 61
61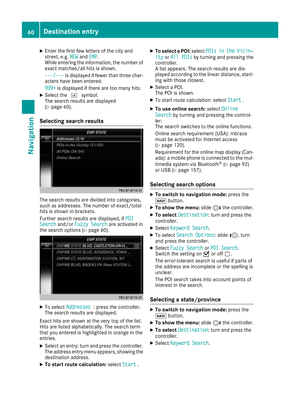 62
62 63
63 64
64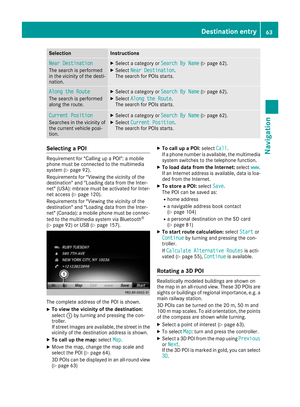 65
65 66
66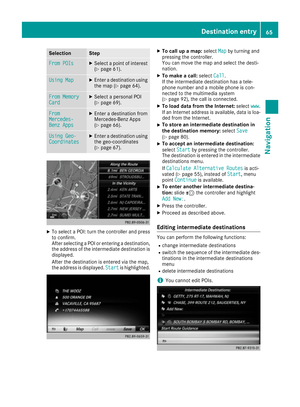 67
67 68
68 69
69 70
70 71
71 72
72 73
73 74
74 75
75 76
76 77
77 78
78 79
79 80
80 81
81 82
82 83
83 84
84 85
85 86
86 87
87 88
88 89
89 90
90 91
91 92
92 93
93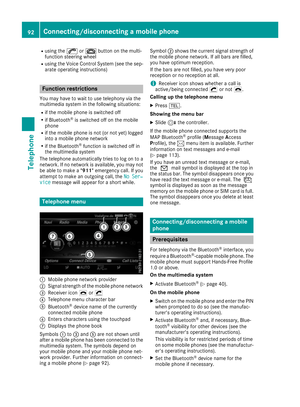 94
94 95
95 96
96 97
97 98
98 99
99 100
100 101
101 102
102 103
103 104
104 105
105 106
106 107
107 108
108 109
109 110
110 111
111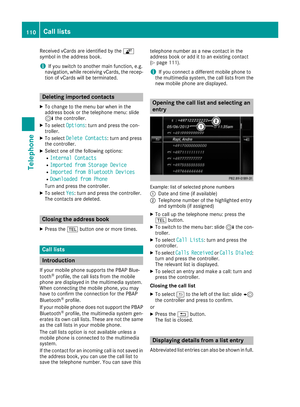 112
112 113
113 114
114 115
115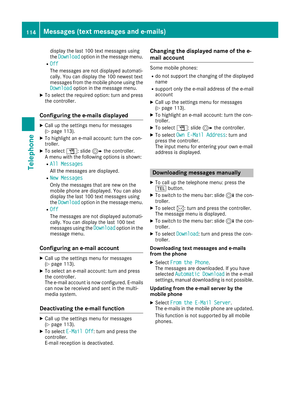 116
116 117
117 118
118 119
119 120
120 121
121 122
122 123
123 124
124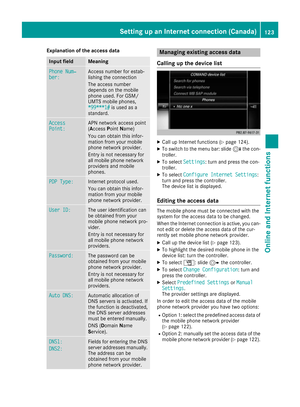 125
125 126
126 127
127 128
128 129
129 130
130 131
131 132
132 133
133 134
134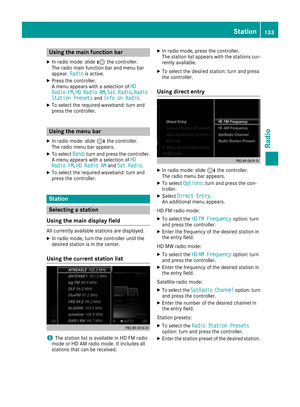 135
135 136
136 137
137 138
138 139
139 140
140 141
141 142
142 143
143 144
144 145
145 146
146 147
147 148
148 149
149 150
150 151
151 152
152 153
153 154
154 155
155 156
156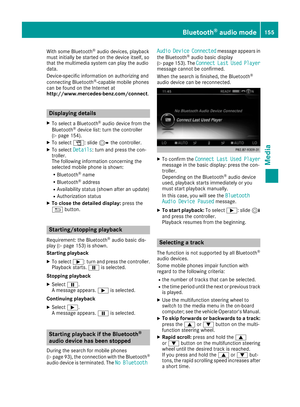 157
157 158
158 159
159 160
160 161
161 162
162 163
163 164
164 165
165 166
166 167
167 168
168 169
169 170
170 171
171 172
172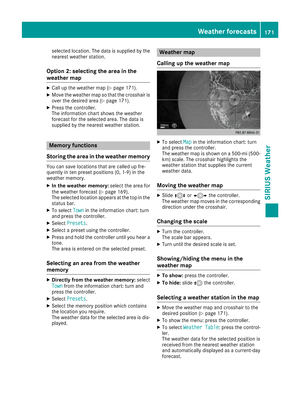 173
173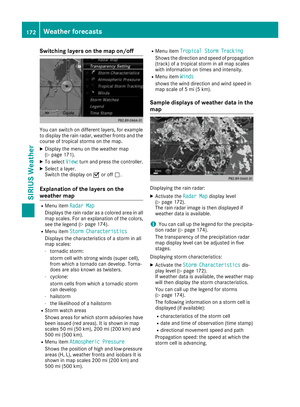 174
174 175
175 176
176 177
177 or the touchpad (Ypage 26).
XTo finish the entry:selectOK.
The favorite has been renamed.
Moving favorites
XPress the favorites button on the controll")