Page 337 of 419

Chevrolet Colorado Owner Manual (GMNA-Localizing-U.S./Canada/Mexico-10122675) - 2017 - crc - 8/22/16
336 Vehicle Care
Warning (Continued)
the device if it is contacting the
vehicle, and do not spin the
vehicle's wheels.
If you do find traction devices that
will fit, install them on the rear
tires.
Caution
If the vehicle has a tire size other
than 255/65R17 AT, 265/60R18,
265/65R17 or 265/70R16, use tire
chains only where legal and only
when you must. Use chains that
are the proper size for the tires.
Install them on the tires of the
rear axle. Do not use chains on
the tires of the front axle. Tighten
them as tightly as possible with
the ends securely fastened. Drive
slowly and follow the chain
manufacturer's instructions. If you
can hear the chains contacting
(Continued)
Caution (Continued)
the vehicle, stop and retighten
them. If the contact continues,
slow down until it stops. Driving
too fast or spinning the wheels
with chains on will damage the
vehicle.
If a Tire Goes Flat
It is unusual for a tire to blowoutwhile driving, especially if the tiresare maintained properly. If air goesout of a tire, it is much more likely toleak out slowly. But if there ever is ablowout, here are a few tips aboutwhat to expect and what to do:
If a front tire fails, the flat tirecreates a drag that pulls the vehicletoward that side. Take your foot offthe accelerator pedal and grip thesteering wheel firmly. Steer tomaintain lane position, and thengently brake to a stop, well off theroad, if possible.
Arearblowout,particularlyonacurve, acts much like a skid andmay require the same correction asused in a skid. Stop pressing theaccelerator pedal and steer tostraighten the vehicle. It may bevery bumpy and noisy. Gently braketo a stop, well off the road,if possible.
{Warning
Driving on a flat tire will cause
permanent damage to the tire.
Re-inflating a tire after it has been
driven on while severely
underinflated or flat may cause a
blowout and a serious crash.
Never attempt to re-inflate a tire
that has been driven on while
severely underinflated or flat.
Have your dealer or an authorized
tire service center repair or
replace the flat tire as soon as
possible.
Page 338 of 419

Chevrolet Colorado Owner Manual (GMNA-Localizing-U.S./Canada/Mexico-10122675) - 2017 - crc - 8/22/16
Vehicle Care 337
{Warning
Lifting a vehicle and getting under
it to do maintenance or repairs is
dangerous without the
appropriate safety equipment and
training. If a jack is provided with
the vehicle, it is designed only for
changing a flat tire. If it is used for
anything else, you or others could
be badly injured or killed if the
vehicle slips off the jack. If a jack
is provided with the vehicle, only
use it for changing a flat tire.
If a tire goes flat, avoid further tireand wheel damage by driving slowlyto a level place, well off the road,if possible. Turn on the hazardwarning flashers. SeeHazardWarning Flashers0149.
{Warning
Changing a tire can be
dangerous. The vehicle can slip
off the jack and roll over or fall
causing injury or death. Find a
level place to change the tire. To
help prevent the vehicle from
moving:
1. Set the parking brake firmly.
2. Put an automatictransmission in P (Park) or amanual transmission in1(First)orR(Reverse).
3. For four-wheel-drivevehicles, be sure thetransfer case is in a drivegear–not in N (Neutral).
4. Turn off the engine and donot restart while the vehicleis raised.
5. Do not allow passengers toremain in the vehicle.
(Continued)
Warning (Continued)
6. Place wheel blocks,if equipped, on both sides ofthe tire at the oppositecorner of the tire beingchanged.
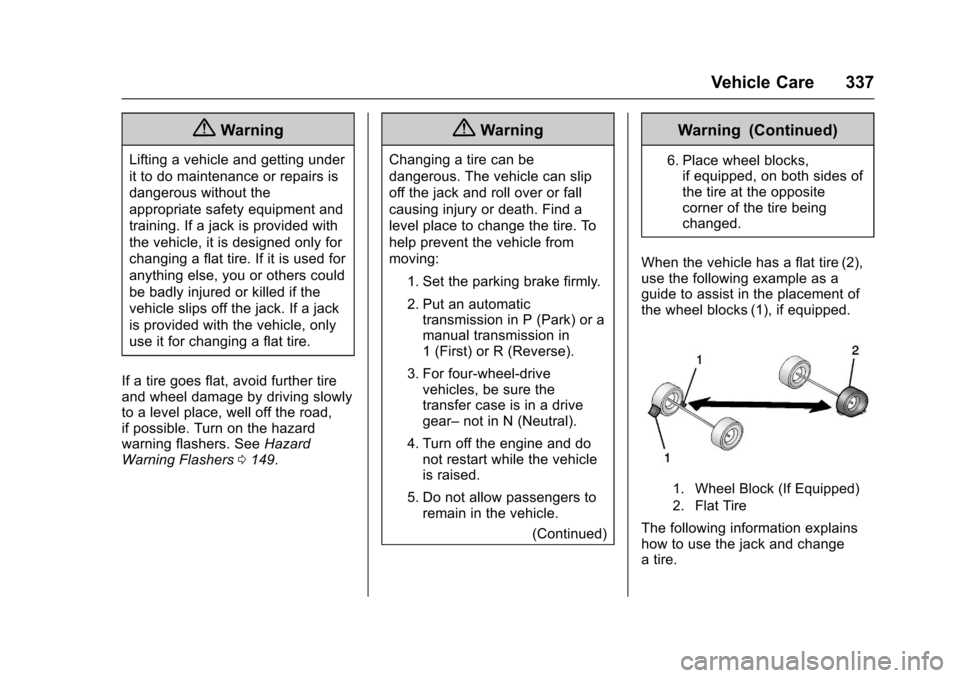
When the vehicle has a flat tire (2),use the following example as aguide to assist in the placement ofthe wheel blocks (1), if equipped.
1. Wheel Block (If Equipped)
2. Flat Tire
The following information explainshow to use the jack and changeatire.
Page 339 of 419
Chevrolet Colorado Owner Manual (GMNA-Localizing-U.S./Canada/Mexico-10122675) - 2017 - crc - 8/22/16
338 Vehicle Care
Tire Changing
Removing the Spare Tire and
Tools
Crew Cab
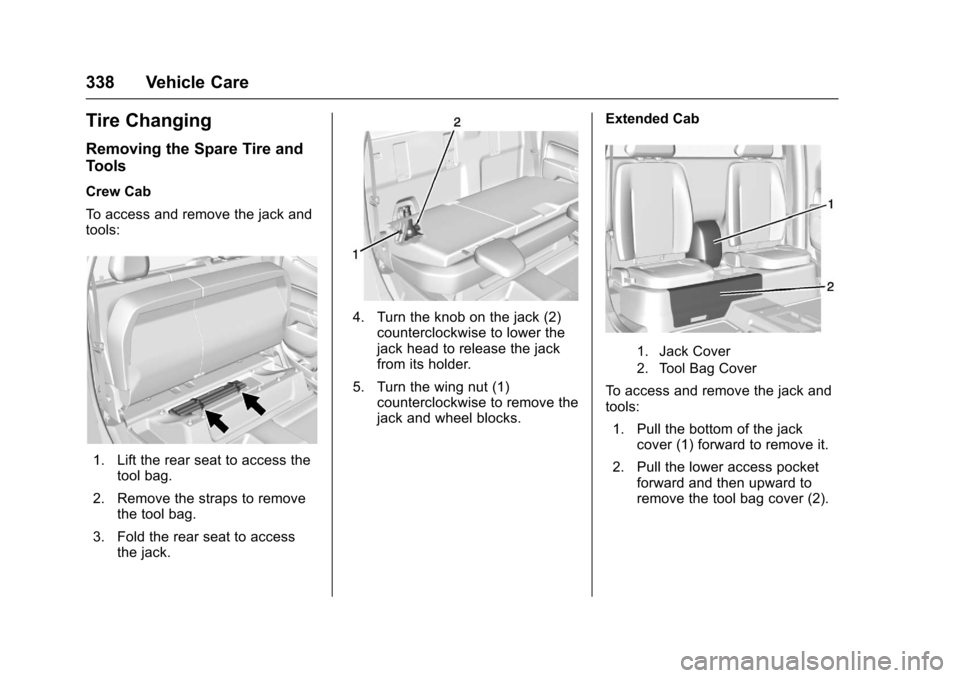
To a c c e s s a n d r e m o v e t h e j a c k a n dtools:
1. Lift the rear seat to access thetool bag.
2. Remove the straps to removethe tool bag.
3. Fold the rear seat to accessthe jack.
4. Turn the knob on the jack (2)counterclockwise to lower thejack head to release the jackfrom its holder.
5. Turn the wing nut (1)counterclockwise to remove thejack and wheel blocks.
Extended Cab
1. Jack Cover
2. Tool Bag Cover
To a c c e s s a n d r e m o v e t h e j a c k a n dtools:
1. Pull the bottom of the jackcover (1) forward to remove it.
2. Pull the lower access pocketforward and then upward toremove the tool bag cover (2).
Page 340 of 419

Chevrolet Colorado Owner Manual (GMNA-Localizing-U.S./Canada/Mexico-10122675) - 2017 - crc - 8/22/16
Vehicle Care 339
3. Turn the knob on the jack (1)counterclockwise to lower thejack head to release the jackfrom its holder.
4. Turn the wing nut (2)counterclockwise to remove thejack and wheel blocks.
5. Turn the wing nut (3)counterclockwise to remove thetool bag.
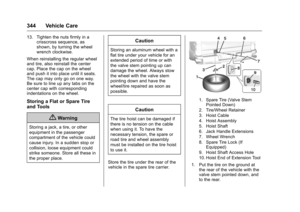
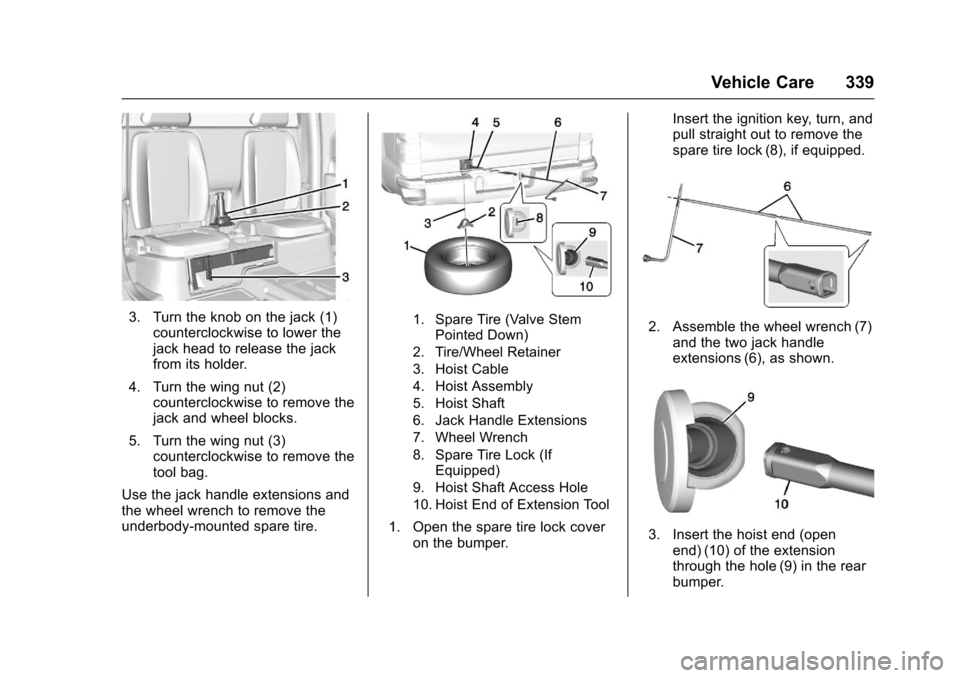
Use the jack handle extensions andthe wheel wrench to remove theunderbody-mounted spare tire.
1. Spare Tire (Valve StemPointed Down)
2. Tire/Wheel Retainer
3. Hoist Cable
4. Hoist Assembly
5. Hoist Shaft
6. Jack Handle Extensions
7. Wheel Wrench
8. Spare Tire Lock (IfEquipped)
9. Hoist Shaft Access Hole
10. Hoist End of Extension Tool
1. Open the spare tire lock coveron the bumper.
Insert the ignition key, turn, andpull straight out to remove thespare tire lock (8), if equipped.
2. Assemble the wheel wrench (7)and the two jack handleextensions (6), as shown.
3. Insert the hoist end (openend) (10) of the extensionthrough the hole (9) in the rearbumper.
Page 341 of 419

Chevrolet Colorado Owner Manual (GMNA-Localizing-U.S./Canada/Mexico-10122675) - 2017 - crc - 8/22/16
340 Vehicle Care
Do not use the chiseled end ofthe wheel wrench.
Be sure the hoist end of theextension (10) connects to thehoist shaft. The ribbed squareend of the extension is used tolower the spare tire.
4. Turn the wheel wrenchcounterclockwise to lower thespare tire to the ground.Continue to turn the wheelwrench until the spare tire canbe pulled out from under thevehicle.
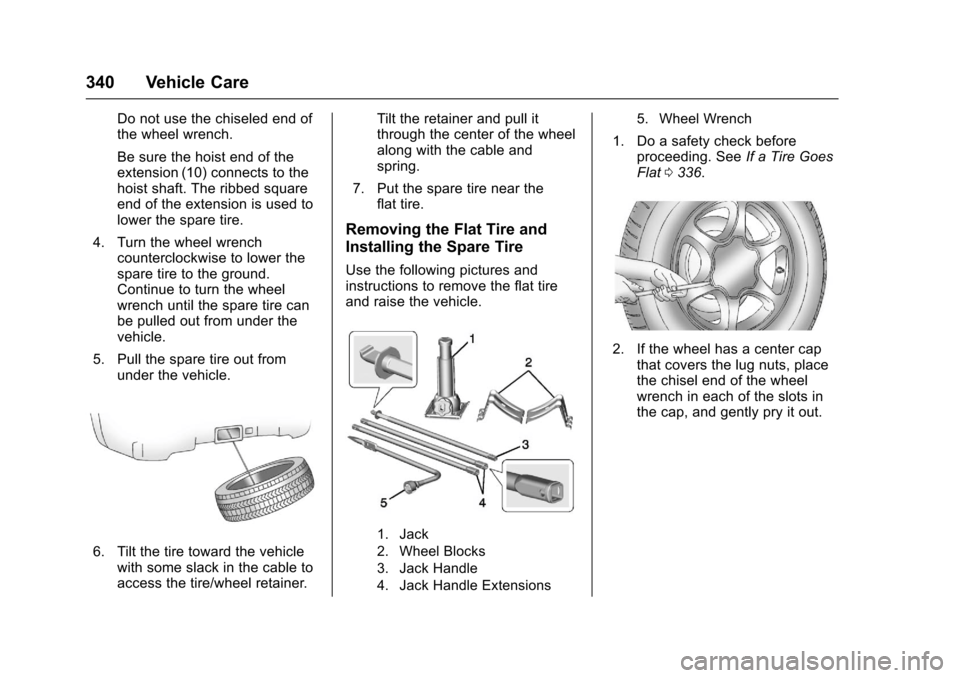
5. Pull the spare tire out fromunder the vehicle.
6. Tilt the tire toward the vehiclewith some slack in the cable toaccess the tire/wheel retainer.
Tilt the retainer and pull itthrough the center of the wheelalong with the cable andspring.
7. Put the spare tire near theflat tire.
Removing the Flat Tire and
Installing the Spare Tire
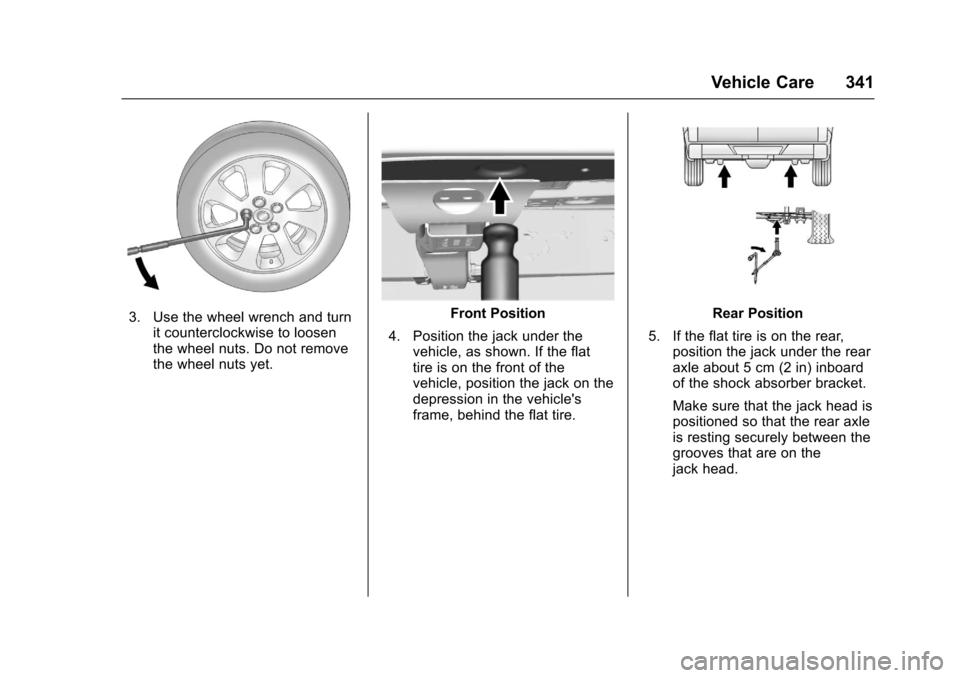
Use the following pictures andinstructions to remove the flat tireand raise the vehicle.
1. Jack
2. Wheel Blocks
3. Jack Handle
4. Jack Handle Extensions
5. Wheel Wrench
1. Do a safety check beforeproceeding. SeeIf a Tire GoesFlat0336.
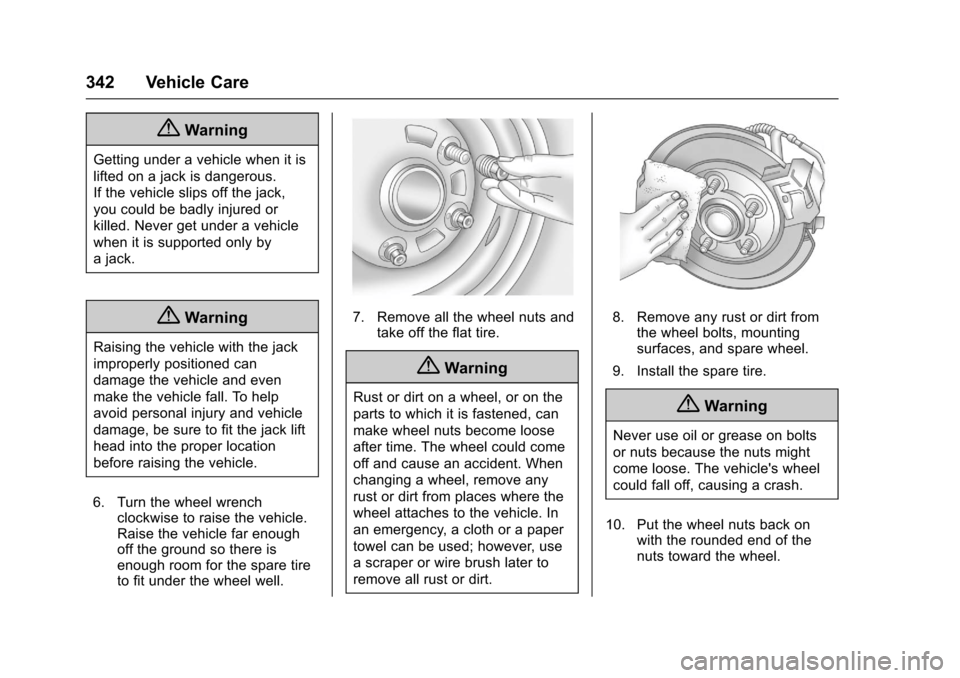
2. If the wheel has a center capthat covers the lug nuts, placethe chisel end of the wheelwrench in each of the slots inthe cap, and gently pry it out.
Page 342 of 419
Chevrolet Colorado Owner Manual (GMNA-Localizing-U.S./Canada/Mexico-10122675) - 2017 - crc - 8/22/16
Vehicle Care 341
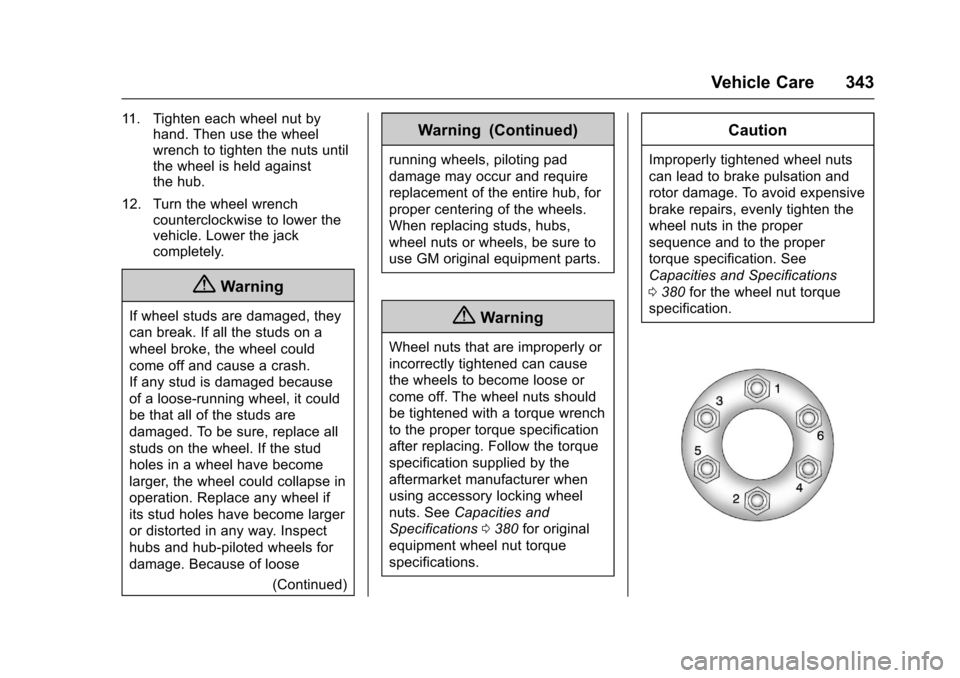
3. Use the wheel wrench and turnit counterclockwise to loosenthe wheel nuts. Do not removethe wheel nuts yet.
Front Position
4. Position the jack under thevehicle, as shown. If the flattire is on the front of thevehicle, position the jack on thedepression in the vehicle'sframe, behind the flat tire.
Rear Position
5. If the flat tire is on the rear,position the jack under the rearaxle about 5 cm (2 in) inboardof the shock absorber bracket.
Make sure that the jack head ispositioned so that the rear axleis resting securely between thegrooves that are on thejack head.
Page 343 of 419

Chevrolet Colorado Owner Manual (GMNA-Localizing-U.S./Canada/Mexico-10122675) - 2017 - crc - 8/22/16
342 Vehicle Care
{Warning
Getting under a vehicle when it is
lifted on a jack is dangerous.
If the vehicle slips off the jack,
you could be badly injured or
killed. Never get under a vehicle
when it is supported only by
ajack.
{Warning
Raising the vehicle with the jack
improperly positioned can
damage the vehicle and even
make the vehicle fall. To help
avoid personal injury and vehicle
damage, be sure to fit the jack lift
head into the proper location
before raising the vehicle.
6. Turn the wheel wrenchclockwise to raise the vehicle.Raise the vehicle far enoughoff the ground so there isenough room for the spare tireto fit under the wheel well.
7. Remove all the wheel nuts andtake off the flat tire.
{Warning
Rust or dirt on a wheel, or on the
parts to which it is fastened, can
make wheel nuts become loose
after time. The wheel could come
off and cause an accident. When
changing a wheel, remove any
rust or dirt from places where the
wheel attaches to the vehicle. In
an emergency, a cloth or a paper
towel can be used; however, use
ascraperorwirebrushlaterto
remove all rust or dirt.
8. Remove any rust or dirt fromthe wheel bolts, mountingsurfaces, and spare wheel.
9. Install the spare tire.
{Warning
Never use oil or grease on bolts
or nuts because the nuts might
come loose. The vehicle's wheel
could fall off, causing a crash.
10. Put the wheel nuts back onwith the rounded end of thenuts toward the wheel.
Page 344 of 419

Chevrolet Colorado Owner Manual (GMNA-Localizing-U.S./Canada/Mexico-10122675) - 2017 - crc - 8/22/16
Vehicle Care 343
11 . Ti g h t e n e a c h w h e e l n u t b yhand. Then use the wheelwrench to tighten the nuts untilthe wheel is held againstthe hub.
12. Turn the wheel wrenchcounterclockwise to lower thevehicle. Lower the jackcompletely.
{Warning
If wheel studs are damaged, they
can break. If all the studs on a
wheel broke, the wheel could
come off and cause a crash.
If any stud is damaged because
of a loose-running wheel, it could
be that all of the studs are
damaged. To be sure, replace all
studs on the wheel. If the stud
holes in a wheel have become
larger, the wheel could collapse in
operation. Replace any wheel if
its stud holes have become larger
or distorted in any way. Inspect
hubs and hub⇣piloted wheels for
damage. Because of loose
(Continued)
Warning (Continued)
running wheels, piloting pad
damage may occur and require
replacement of the entire hub, for
proper centering of the wheels.
When replacing studs, hubs,
wheel nuts or wheels, be sure to
use GM original equipment parts.
{Warning
Wheel nuts that are improperly or
incorrectly tightened can cause
the wheels to become loose or
come off. The wheel nuts should
be tightened with a torque wrench
to the proper torque specification
after replacing. Follow the torque
specification supplied by the
aftermarket manufacturer when
using accessory locking wheel
nuts. SeeCapacities and
Specifications0380for original
equipment wheel nut torque
specifications.
Caution
Improperly tightened wheel nuts
can lead to brake pulsation and
rotor damage. To avoid expensive
brake repairs, evenly tighten the
wheel nuts in the proper
sequence and to the proper
torque specification. See
Capacities and Specifications
0380for the wheel nut torque
specification.