Page 41 of 322

CD
CD
.... N
" N .... 0
0
Ill co
Instrument illumination
Fig. 34 Instrument illum inatio n
The brightness of the instrument cluster and the
center console can be adjusted.
~ Press the knob to release it .
~ Turn the knob toward"·" or"+" to reduce or in
crease the b rightness .
~ Press the knob aga in to return it to its original
pos it ion.
Vision
Adjusting the exterior mirrors
F ig. 35 Driver 's door: knob for the exter ior mirrors
Turn the knob to the desired pos ition:
Q/P -Adjusting the left/ right exter io r mir ror.
Move the knob in the desired direction .
4lil-Heating the mirror glass depending on the
outside temperat ure.
8 • Folding exterior mirrors* . In the Infotain
ment system, you can select if the mirrors fold in
automatically when you lock the vehicle
9 page 29.
Lights and V ision
Front passenger 's e xterior mirror tilt
function*
T o help you see the curb when backing into a
parking space, the surface of the mirror ti lts
slight ly. For this to happen, the knob must be in
the position for the front passenger's outside
mirror .
You can adjust the tilted mirror s urface by turn
ing the knob in the desired d irection. When you
move out of reverse and into another gear, the
new mirror position is stored and assigned to the
key you are using .
The m irror goes back into its or iginal position
once you drive forward faster than 9 mph
(15 km/h) or turn the ignition off .
A WARNING
Curved m irror surfaces (convex) enlarge the
field of vision. However, they make objects in
the m irror appear smalle r and farthe r away.
Your may estimate incorrec tly when you use
these m irrors to gauge your distance from the
vehicles behind yo u when changing lanes,
which increases the risk of an accident.
(D Note
If t he mir ror housing was moved by outs ide
fo rces (such as an impact when maneuver
i ng), you must use the power fo ld ing funct ion
to fold the mirror a ll the way out . The mirror
housing must not be moved back into place
by hand because th is would impair the func
tion of the mirror mechanism.
(D Tips
If the power ad justing function ma lfunctions,
the glass in both m irrors can be adjusted by
pressing on the edge of it by hand .
39
Page 42 of 322

Lights and Vision
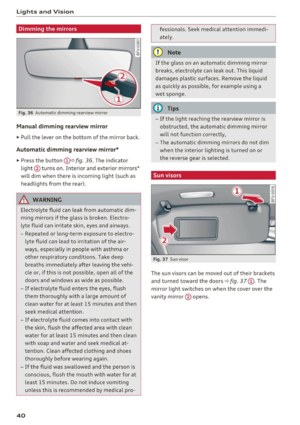
Dimming the mirrors
Fig. 36 Automatic d imm ing rearview mirror
Manual dimming rea rview mirror
.. Pull the lever on the bottom of the mirror back.
Automatic dimm ing rearview mirror*
.. Press t he button @Qfig.
36 . The indicator
li ght @turns o n. Interior and exterior mirro rs *
will dim w hen the re is i ncom ing light (such as
headlights from the rear) .
A WARNING
Electro lyte fluid can leak from automat ic dim
m ing mir rors i f the g lass is broken . Electro
lyte f luid can irritate skin, eyes and airways.
- Repeated or long-te rm exposure to elect ro-
lyte fluid can lead to irritation of the air
ways, especially in peop le wit h asthma or
ot he r resp irato ry co ndi tions. Tak e deep
breath s immed iate ly after leaving the veh i
cl e or, if this is no t possible, o pen a ll of th e
doors and win dows as wide as possible .
-If elec troly te f lu id ente rs the eyes, flush
t h em thor oughly wi th a la rge amoun t of
cl ean wa ter for a t least 15 mi nutes an d then
seek medical attention.
- If e lec trolyte f lu id comes into con tact w ith
t h e skin , flush the affected a rea wit h clean
water for at least 15 minutes a nd the n clean
with soap and water and seek medica l at
tentio n. Clean affected cloth ing and shoes
t h oroughly bef ore wearing again.
- If the fluid was swallowe d an d the person is
conscious, fl ush the mouth with water for at
least 15 m inutes. Do not induce vomiting
unless this is recommended by me dica l pro-
40
fessiona ls . Seek medical attention immedi
ately .
(D Note
I f the glass on an a utomat ic dimming mirro r
breaks, electro lyte can lea k out . This liquid
damages p lastic sur faces. Remove t he liquid
as quickly as possible, fo r example using a
wet sponge.
@ Tips
- If the light reaching the rearview mirror is
obstructed, the automatic d imm ing mirror
w ill not function correctly,
- The automatic dimming m irrors do not dim
when the interio r lighting is turned o n or
the reverse gear is se lected .
Sun v isors
Fi g. 37 Sun visor
m
-0 0 ::1-u.. co
T he sun visors can be moved out of their brackets
and tu rned toward the doors
Q fig . 37 @. The
mirror light switches on when the cover over the
vanity mir ror @ ope ns.
Page 43 of 322

CD
CD
.... N
" N ...... 0
0
Ill co
Windshield wipers
Switching the windshield wipers on
Fig. 38 Windshie ld wiper lever
Move the windshield wiper lever to the corre
sponding position:
@ -windshield w ipers off
@ -interval mode. To increase/decrease the wip
er intervals, move the switch ® to the left/right.
In vehicles with a rain sensor*, the wipers turn on in the rain once the vehicle speed exceeds ap
proximately 2 mph (4 km/h). The higher the sen
sitivity of the rain sensor* is set (switch ® to the
right), the earlier the windsh ield wipers react to
mo isture on the windsh ield. You can deact ivate
the rain sensor mode* in the Infotainment sys
tem, which switches the intermi ttent mode on.
Select in the Infotainment system:
I MENU! but
ton>
Vehicle > left control button >Driver as sis
tance > Rain sensor
> Off.
@ -slow wiping
@ -fast wip ing
© -sing le w ipe If you hold the lever in th is posi
tion longer, the wipers switch from slow wiping
to fast w iping.
® -clean the windshield To eliminate water
droplets, the windshield wipers perform one af
terwipe after several seconds while driving in
temperatures above 39 °F (4 °C). You can switch
this function off by moving the lever to position
@ within 10 seconds of the afterwipe . The after
wipe function is reactivated the next t ime you
switch the ignition on.
C leaning the headlights* . The headlight washer
system* only functions when the lights are
Lights and V ision
switched on. The headlights are automatically
cleaned the first time and every fifth time the
l ever is moved to position
® ·
A WARNING
--
- The rain sensor* is only intended to assist
the driver. The driver may still be responsi
ble for manually sw itch ing the w ipers on
based on visibility cond itions.
- The windsh ield may not be treated w ith wa
ter-repelling w indshield coating agents. Un
favorable condit ions, such as wetness, dark
ness, and when the sun is low, can cause in
creased glare, wh ich increases the risk of an
accident. Wiper blade chatter is also possi
b le.
- Properly functioning windshield wiper
b lad es are required for a cl ear v iew and safe
driving
<:::> page 42, Replacing windshield
wiper blades .
(D Note
-If there is frost, make sure the windshield
w iper blades are not frozen to the wind
shield. Switching on the windshield w ipers
when the blades are frozen to the wind
shield can damage the wiper blades.
- Prior to using a car wash, the w indshield
wiper system must be switched off (lever in
position 0). This prevents the wipers from
switching on unintentionally and caus ing
damage to the windsh ield wiper system.
(D Tips
- The windshie ld wipers switch off when the
ignition is switched off. You can activate the
w indshield wipers after the ignition is
switched back on by moving the w indshield
w iper lever to any position.
- Wor n or dirty windshield w iper blades result
in streaking. This can affect the rain sensor*
function . Check your w indshield w iper
blades regularly .
- The washer f luid nozzles in the windsh ield
washer system are heated * at low tempera-
tures when the ign ition is o n. .,.
41
Page 44 of 322

Lights and Vi sion
- When stopping temporarily, such as at a
traffic light, the speed of the windshie ld
wipers automatica lly reduces by one level.
Cleaning windshield wiper blades
Clean the wiper blades when you see wiper
streaks . Clean the wiper blades with a soft towel
and glass cleaner.
~ Pl ace the windshield wiper arms in the service
position ¢
page 42.
~ Fold the windshield wiper arms away from the
windshield .
A WARNING
,--
Dirty windshield wiper blades can impair vi-
sion , which increases the risk of an accident .
Replacing windshield wiper blades
Fig. 39 Re mov ing w indshi eld w iper b lade s
Wind shield wiper ser vice po sition /blade
replacement po sition
~ To b ring the windshield wipers into the service
pos ition, turn the ignition off and move the
windshield wiper lever into position @
¢ page 41, fig. 38.
~ To bring the wipers into the starting position,
turn the ignit ion on and move the windshield
wiper lev er into position @ for at least two sec
onds ¢
page 41, fig. 38.
Remov ing th e wip er bl ade
~ Fo ld the windshield wiper arm away from the
windshield.
~ Press the locking knob(!)¢ fig. 39 on the wiper
blade . Hold the wiper blade firm ly.
42
~ Remove the wiper blade in the direction of the
arrow .
Installing the wipe r blade
~ Insert the new wipe r blade into the mount on
the wipe r arm @un ti l you hear it latch into
place.
~ Place the wiper arm back on the windshield.
~ Turn the service position off.
A WARNING
-
For safety reasons, the windshield wiper
blades should be rep laced once or twice each
year .
@ Note
-The windshield w iper blades must only be
folded away when in the service position!
Otherwise, you risk damaging the paint on
the hood or the windshield wiper motor.
- You should not drive your vehicle or press
the windsh ield wiper lever when the wiper
arms are folded away from the windshield.
T he windshield w ipers would move back in
to their or iginal pos it ion and could damage
the hood and windshie ld.
(D Tips
- You can also use the se rvice pos it ion, for ex
ample, if you want to protect the windshield
from ic in g by using a cover.
- You cannot activate the service posit io n
when the hood is open.
Page 45 of 322

CD
CD
.... N
" N .... 0
0
Ill co
Digital compass
Switching the compass on and off
Applies to: vehicles with digital compass
Fig. 40 Rearview mirror : digita l compass is switc hed on
., To turn the compass on or off, press the button
@ until the compass display in the mirror turns
on or off.
The digital compass only works when the ignition is turned on . The directions are indicated with ab
breviations :
N (north), NE (northeast), E (east),
SE (southeast), S (south), SW (southwest), W
(west), NW (northwest).
(D Tips
To prevent inaccurate compass readings, do
not bring any remote controls, electrical devi
ces or metallic objects near the mirror .
Lights and V ision
Adjusting the magnetic zone
Applies to: vehicles with digita l compass
Fi g. 41 North Amer ica: magnetic zone map
., Press and hold the button (D ~ page 43, fig. 40
until the number of the magnetic zone appea rs
in the interior rearview mirror.
., Press the button
CD repeatedly to select the
correct magnetic zone. The selection mode
turns off after a few seconds .
Calibrating the compass
Applies to: vehicles wit h digita l compass
If the display is incorrect or inaccurate, the com
pass must be recalibrated .
., Press and hold the button
CD until a C appears
in the interior rearview mirror .
., Drive in a circle at about 5 mph (10 km/h) until
a direction is displayed in the rearview mirror.
A WARNING
-
-To reduce the r isk to yourse lf and other driv-
ers, calibrate the compass in an area where
there is no traffic.
- Always pay attention to the traffic and the
area around your vehicle if you are reading
the compass while driving .
43
Page 46 of 322

Sea ts and stor age
Seats and storage
General information
A WARNING
See c> page 180, Safe driving for important
information, tips, suggestions and warnings
that you should read and follow for your own
safety and the safety of yo ur passengers .
Front seats
Power seat adjustment
Appl ies to veh icles with power adjustable seats
Fig. 42 Front seat: power seat adjustment
@-lumbar s upport or mult ifunct ion but
ton* c>
page 44. To adjust the lumbar support,
press the button in the applicable location.
@ -Moving the seat up/down: press the button
upward/downwa rd . To adjust the front seat cush
ion, press the front button up/down. To adjust
the rear seat cushion, press the rear button up/
down.
@ -Moving the seat fo rwa rd/back: press the bu t
ton fo rward/b ack.
@ -Adjusting the backrest angle : press the but
ton fo rwa rd/back.
© -Lengthening/shortening the upper thigh sup
port* : lift the grip handle.
A WARNING
- Only adjust the front seat with when the ve
hicle is stat iona ry . Otherwise, this increases
the risk of an ac ciden t
44
-The power front seats can also be adjusted
when the ignition is switched off. For this reason, children should never be left unat
tended i n the vehicle -they could be injured!
- Exercise caution when adjusting the seat
he ight. Unsupervised or careless seat ad
justment can pinch fingers or hands caus ing
injuries .
- The front seat backrests must not be re
clined too far back when d riving, because
this impa irs the effect iveness of the safety
be lts and airbag sys tem, which in creases
the risk of i njury.
- To m inimize the r isk of injury during s udden
braking or a collision, the dr iver and the
fron t passenger must no t drive or ride with
the backrest in the re clined position. The
safety belts and airbag system can on ly pro
vide the greatest protection possible w hen
the backrests are in the upright posit ion and
the safety belts are worn correctly. The
more a backrest is reclined, the greater the
ris k of injury due to an incorrect seating po
sition and safety belt posit ion .
Multifunction button
App lies to : vehicles with mult ifunct io n bu tto n
You can adjust the side bolsters using the multi
function button .
.,. If you t urn the mult ifunct ion b utton (D
c> page 44, fig. 42 to the left or right, the side
bolsters on the seat backrests will increase/de
crease the lateral support.
@ Tips
The air in the side bolsters* is released as
soon as the driver's door ope ns. Thi s makes is
possib le to enter and exit the veh icle more
comfo rtably. As soon as you start dr iving the
vehicle, the side bolsters fi ll.
Page 47 of 322

CD
CD
.... N
" N ...... 0
0
Ill co
Easy seat entry
Applies to: vehicles with entry assistance
Easy seat entry makes it easier to get into the
back seats .
Fig. 43 Driver 's sea t: loop on the seat backr est
~ To fold the front seat backrests forward, pull
on the loop and fold the seat backrest.
A WARNING
Always make sure the front seats are upright
and securely locked in place when driving.
Center armrest
Applies to: vehicles with center arm rest
Fig . 44 A rmr est b etw een the driver's/fr ont passen ger's
seats .
°' -
~ To ad just the angle, raise the armrest <=> fig. 44
notch by notch .
~ To bring the armrest back down , raise it out of
the top notch and fold it back down . T hen lift
the armrest to the desired position, if necessa
ry .
Please note that the driver's ability to move his or
arm may be restricted when the armrest is folded
down . Because of this, the armrest should not be
folded down during c ity driving.
Seats and storage
The armrest can slide forward and back.
There is a storage compartment under the arm
rest.
Rear bench seat
Rear seat passengers must meet certain criteria .
Fig. 45 Correct sea ted pos it io n on t he re ar bench seat
_&. WARNING
- The rear bench seat may only carry persons
with a height of up to 4 feet 9 inches (57 in/
1.45
m).
- At the same time, the minimum distance
between the head and the rear window
when sitting upright should not be less than
1 inch (2.5 cm) . Taller people could suffer
severe injuries when closing the luggage
compartment lid or during a collision. Al
ways pay attention to the rear passengers
when closing the luggage compartment lid.
- No heavy, hard objects may be placed on the
luggage compartment cover. They endanger
the vehicle passengers when opening the luggage compartment lid or when braking
suddenly .
45
Page 48 of 322

Sea ts and stor age
Ashtray
Applies to: vehicles with ashtray
Fig . 4 6 Center armrest folded up: ashtray
The ashtray is placed in the center console under
the center armrest . Lift up the cover to open. In
sert the ashtray sec urely back i nto the holde r af
ter eve ry remova l (empty ing).
A WARNING
Never use the ashtray to hold paper, because
this increases the risk of a fire .
Cigarette lighter and
socket
Fig. 4 7 Center armrest fo lded up: cigarette lighter
The cigarette lighter or socket on ly functions
when the ignition is switched on.
Using the cigarette lighter
.,. Fol d the cen ter armrest up to reach the c iga
ret te lighter, if necessary .
.,. Press the ciga re tte lighter in .
.,. Remove the cigarette lighter when it pops out.
46
U si ng th e soc ket
.,. Fold the center armrest up to reach the socket,
if necessary .
.,. Remove the cigarette lighter, if necessary .
.,. Insert the plug for the electrical device into the
socket.
The cigarette lighter has a standard 12 Volt sock
et that electr ical accessories can be connected to.
The power consumption at the outlet must not
exceed 100 watts.
A WARNING
Be carefu l when using the cigarette lighter.
Inattentive or unsupervised use of the ciga
re tte lighter can cause burns.
(D Note
- To reduce the risk of damage to the vehicle
electrical system, neve r attempt to charge
the vehicle battery by connecting accesso ries that p rovide powe r, such as solar panels
or battery chargers, to the 12 Volt sockets
or the ciga rette lighte r.
- To reduce the risk of damage to the sockets,
only use plugs t hat fit correctly.
-