Page 49 of 322

CD
CD
.... N
" N ...... 0
0
Ill co
Storage
Beverage holders
Fig. 48 Cup holder
Fig. 49 Center armrest folded up: cup holder*
Cup holder* under the center armre st
.,. Fold up the center armrest c> page 45.
.,. Fold the plastic bracket toward the rear, if nec
essary
c::> fig . 49 .
A WARNING
Spilled hot liquid can increase the risk of acci
dents and injuries.
- Never drive with containers that conta in hot
liquid such as coffee o r tea. The hot liquid
cou ld spill and ca use bu rns d uring a co lli
sion, sudden braking or other vehicle move
ment. Spilled hot liquid can a lso in crease
the risk of accidents and injur ies .
- Only use soft contai ne rs in the cup ho lders.
Hard cups and g lasses can increase the risk
of injury during a collision .
- Never use the cup holder or the adapter as
an ashtray -this is a fire hazard .
Seats and storag e
(D Note
Beverage containers in the cup holders should
a lways have a lid . If not, beverages could spill
and cause damage to veh icle equipment, such
electron ics or seat covers.
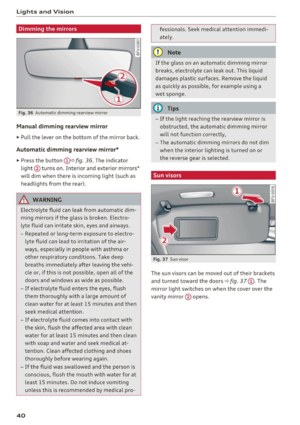
Additional storage compartments
You w ill find a range of storage compartments
and holders at d ifferent locat ions in the vehicle.
- Compartments in the doors
- Storage area in the glove compartment . The
glove compartment can be locked using the
mechanical key¢
page 26.
-Storage compartment under the center arm
rest*
- Storage compartment on the rear side of the
front seat*. The compartment can hold a maxi
mum weight of 2.2 lbs (1 kg).
- Coat hooks
A WARNING
- No heavy or hard objects may be p laced on
the storage compartment behind the rear
seat backrest. There is a risk of inju ring the
veh icle passengers when braking sudde nly .
- Always leave the lid on the glove compa rt
ment cover closed whil e driv ing to red uce
the r isk of inju ry.
- O nly use the storage compartments in the
door trim panels to store sma ll objects tha t
will not stick out of the compartment a nd
impair the ra nge of the side airbags.
- Make sure that the v iew to the rear is not
obs truc ted by hanging ga rments.
- H ang o nly lightweight clothing and be sure
that the re are no heavy or sharp-edged ob
jects in the po ckets.
- Do not use coat hange rs to hang the cloth
ing be ca use this could impair the effec tive
ness of the side air bags*.
(D Note
Objects on the rear she lf that rub against the
r ear window can damage the rear w indow
hea ting wi res .
47
Page 50 of 322

Sea ts and stor age
Roof rack
The roof rack must only be secured in the posi
tioning bolt area.
Fig . SO Mount ing locat ions fo r roof rac k
If luggage or cargo is to be carried on the roof,
you must observe the following:
- Yo ur vehicle has ae rodynami c rain channels
molded in to the roof . T h is is why convent ional
roo f luggage racks ca nnot be used . We recom
mend using roof rails from the Aud i Genu ine
Accessories program.
- These roof rai ls are the bas is for a complete
roof rack system . For safety reasons, some ad
ditional attachments are necessary to transport luggage, bicycles, surf boards, skis and small
boats safely . All these components are availa
ble at yo ur authorized Aud i dealer .
- The permitted roof load for your veh icle is 165
lbs (75 kg) . The roof load is a combination of
the weight of the carrier system and the cargo .
- When using roof rack systems with a lower load
capacity, you cannot use the maximum permis
s ible roof load . In this case, the roof rack can
o nly be loaded to the weight lim it given in the
i nstallation guide.
Inst allation
When installing the support feet, make sure they
are only placed in the positioning bolt area be
tween the side wa ll frame and the roof frame
trim ¢
fig. 50. The positioning bolt is visible as
soon as you push the sealing lip back from the
room frame tr im us ing t he des igna ted tool.
48
A WARNING
- The cargo must be secure ly attached on the
roof rack; otherw ise you increase the r isk of
an accident .
- You must u nder no circ umstances exceed
the permissible roof load, the permissible
axle loads o r the pe rm issib le overa ll we ight
of yo ur vehicle be cause this increases the
ris k of an a cc iden t.
- Please note that there is a h igher r is k of an
accident when transporting heavy objec ts or
objec ts wi th a l arge sur face on the roof r ack,
since the handling characterist ics change
due to a shift in the center of gravity or the
greater surface area exposed to the wind . So
adapt your driving and speed to the actual
conditions.
(D Note
If yo u use ot her roof l uggage rack systems or
do not install the racks as intended, any dam
age to the vehicle is not covered by the war ranty . Carefu lly follow the assembly and in
stallation instructions included with the roof
rack carrier system.
® For the sake of the environment
A roof rack is often left mounted out of con
venience even if it is no longer used. Your ve hicle w ill use more fue l due to the inc reased
wind res istance. So remove t he roof rack after
u sing it.
Luggage compartment
General information
A WARNING
Read and fo llow the important safety preca u
tions in
Q page 185, Stowing luggage.
Page 51 of 322

CD co .... N
" N ...... 0
0
Ill co
Luggage compartment cover
The luggage compartment cover blocks the view
into the luggage compa rtment.
Fi g. 51 Opened rear lid wit h luggage compartment cover
... gi 0
~
ir----- ----------- ------CD
Fig. 52 Unlocked luggage compartment cover
Removing the luggag e compartment cover
.,. To unlock the luggage compartment cover, turn
the twist lock to the horizontal position
¢fig. 51.
.. Grip the s ide of the luggage compartment cov
er and pull the cover in the direction of the ar
row¢
fig. 52.
Install ing the luggage compartment cover
.. Place the luggage compartment cover with the
retainers on the pins and slide the cover up
ward .
.. Turn the twist lock with gentle pressure to the
vertical position.
_&. WARNING
- To red uce the risk of accidents, never install
the luggage compartment cover without se
c ur ing it.
- The luggage compartment cover is not a
surface for s to ring objects. Objects placed
on the cover cou ld en danger a ll vehicle oc-
Seats and storag e
cupants during sudden bra king maneuvers
or in a crash.
(D Note
The defogge r and antenna w ires in t he rear
window can be damaged by objects on t he
l uggage compartment cover rubbing against
them.
Increasing the size of the luggage
compartment
To expand the luggage compartment, both sec
tions of the backrest can be separated or can be
folded forward together .
Fig . 53 Backrest release lever ( left side)
Folding the backrest forward
.. Push the rele ase lever¢ fig. 53 in the d irection
of t he arrow .
.. Fold t he backrest forward .
Folding the backrest back into the upright
position
.,. Fold the backrest down u ntil it la tches secu rely
¢ _&. .
_&. WARNING
-The back rest must be securely latched to
ensure the safety be lt is protecting the rear
seat pos itions.
- The back rest must be securely latched so
objects cannot slide fo rward out of the lug
gage compartment during sudden braking.
49
Page 52 of 322
Sea ts and stor age
(D Note
Make sure the safety belt is not pinched in the
backrest lock and damaged when the rear
seat backrest if folded back.
Lowering the cargo floor
In exceptional situations, the cargo floor can be
lowered.
F ig. 54 Luggage compartme nt: cargo floor removed
Fig. 55 Luggage compartment: spare tire removed
• Remove the cargo floor¢ page 281.
• Remove the plastic floo r panel ¢ fig. 54.
• Turn the handle counter-clockwise to remove
and remove the foam piece .
• Remove the spare tire.
• Reinsert the foam piece and tu rn the handle
clockwise to tighten .
.,. Now reinsert the cargo floor.
A WARNING
Please note that you are no longer mob ile in
the event of a flat tire. Please note the legal
regulat ions before remov ing the spare tire .
50
Page 53 of 322

co
co
.... N
" N .... 0
0
Vl c:o
Warm and cold Climate control system
Description
The climate control system warms, cools and re
moves humidity from the air in the vehicle interi
or. It functions most effectively when the w in
dows are closed. If there is a build-up of heat in
side the vehicle, ventilation can help to speed up
the cooling process.
Pollutant filter
The pollutant filter removes pollutants such as
dust and pollen from the air.
Key recognition
Certain settings are automatically stored and as
signed to the remote contro l key being used .
A WARNING
Poor visibility can lead to accidents.
- For safer driving, keep all windows free of
ice, snow and fog.
- Become familiar as quickly as possible with
the correct use and function of the climate
control system, especially with the defrost
ing and defogging function.
- When the temperature is below freezing,
only use the windshield washer system after
the windsh ield has been warmed by the cli
mate control system. The washer fluid could
freeze on the windshield and impair visibili
ty .
(D Note
-If you suspect that the climate control sys
tem is damaged, switch the system off to
Warm and cold
prevent further damage and have it checked
by an authorized Audi dea ler or authorized
Audi Service Facility.
- Repairs to the Audi climate control system
require special technical know ledge and
special tools. See an authorized Audi dealer
or authorized Audi Service Facility.
(® For the sake of the environment
Reducing the amount of fuel used also re
duces the amount of pollutants that enter the
air.
(D Tips
- To prevent interference with the heating
and cooling output and to prevent the win
dows from fogging over, the air intake in
front of the windshield must be free of ice,
snow or leaves.
- Condensation from the cooling system can
drip and form a puddle of water under the
vehicle. This is normal and does not mean
there is a leak .
- The energy management system may switch
the seat heating* or rear window defroster
off temporarily . These systems are availab le
aga in as soon as the energy supp ly has been
restored.
- The flows through the vents under the rear
w indow . Make s ure the openings are not
covered when plac ing clothing on the lug
gage compartment cover .
51
Page 54 of 322

Warm and cold
Automatic climate control system controls
Fig. 56 Automatic climate co ntrol syste m: controls
You can control the functions through the dial,
buttons in the dial and the buttons . Press the
buttons to turn the functions on or off . The LED
i n a button w ill light up when the funct ion is
sw itched on .
We recommend pressing the
IAU TOI button and
setting the temperature to 72 °F (22 °C) . The au
tomatic climate control system automatically
maintains a temperature once it has been set .
The air temperature coming from the vents, the
b lower speed, and the air dis tribution are also
automatically adjuste d. In all heati ng mode func
tions except
defrost, the blower only switches to
a higher speed once the engine coolant has
reached a certain temperat ure.
~ Adjusting the blower
The blower speed can be adjusted in small incre
ments using the dial @. The blower should al
ways run at a low setting to prevent the windows
from fogging and to ensure a continuous ex
change of air inside the vehicle. You can adjust
the volume of a ir generated by the blower to your
preference . To have the blower regulated auto
mat ically, press the
IAUTOI butto n.
IA/C l Switching cooling mode on and off
The cooling system is turned on and off w ith the
IA/C l button. The air is not cooled and humidity is
not removed when cooling mode is switched off.
52
This can cause fog on the w indows. Coo ling mode
switches off automatically when the outside tem
perature is below zero .
The temperature can be adjusted with the con
trol @.
I• I • I Adjusting the tempe rature
The temperature can be adjusted in small incre
ments using the dial@.
I AUTO I Switching automatic mode on and off
The au tomatic mode is turned on using the
IAUTOI button. AUTO mode switches off once a
button in the climate control system is pressed.
Automat ic mode maintains a constant tempera
ture inside the vehicle . Air temperature , airflow
and air distribution are controlled automatically.
Adjusting the air distribution
The air distribution can be adjusted with the con
tro l@ . To have the air distribution regulated au
tomatica lly, press the
IAUTO l button.
The round ai r vents in the cockpit a re adjustable
¢ page 53.
To keep the front side windows from fogg ing up
i n damp weather, we recommend ope ning the
s ide air vents and tilting them to the side.
Page 55 of 322

CD
CD
.... N
" N ...... 0
0
Ill co
1- 1 Switching recirculation mode on and off
The recirculation mode can be turned on manual
l y or automatica lly* .
- Swi tchi ng manual recirculat ion mode on and
off: press
l '-"'> I
- Automa tic* recirculation mode: auto rec ircula
t ion needs to be activa ted in the Infotainmen t
system. Selec t in the Infota inment system :
I MENU I button >Vehicle > left control button
>Vehicle settings> Air conditioning > Auto re
circulation .
The air quality sensor that is de
signed for diese l and gasoline exhaust auto
matically switches the recirculation mode on or
off depend ing on the level of pollutants in the
outside air .
In recircu lation mode, the air inside the vehicle is
circu lated and filtered . This prevents the unfil
tered air outside the vehicle from entering the
vehicle interio r. We recommend switching recir
culation mode on when dr iv ing through a tunnel
or when sitting in traffic
c::> .&,.
Recirculation mode is switched off by pressing
the ~ button or
I AU TO I orl w MAX !.
I@ MAXI Switching defrost on and off
The winds hield and side windows are defrosted
or cleared of condensation as quickly as possible.
The optimum amount of a ir flows main ly out of
the vents under the windshield . Recirculation
mode switches off . The temperature is controlled
automatically .
The
IAUTOI button switches the defroster off.
I @ REAR I Switching the rear window defogger
on and off
If the rear w indow defogger is activated when
the ignition is switched on, the battery manage
ment determines based on the battery charge if
it is possib le to turn on. Otherwise, the rear win
dow defogger functions with the engine running
and switches off automatically after approxi
mately 10 -20 min utes, depending on the out
side temperature.
To prevent t he rear w indow defogger from
switching off automatically, press and hold the
I@ REARI button for more than two seconds. This
Warm and cold
remains stored up to approximately 15 minutes
after t urning off the ignition.
.&_ WARNING
-
You should not use the recirculation mode for
an extended period since no fresh a ir is drawn
in. With the air-conditioning switched off, the
windows can fog up, which increases the risk
of an acc ident .
Adjusting the air vents
Fig. 57 Cock pit: adjust ing the a ir vents
To adjust the direction of air flow, turn the
ridged outer ad justment wheel
(D e::> fig . 57.
To adjust the amount of air flow , move the lever
@ on the a ir vent. To stop the air flow, move the
lever all the way to the left.
Seat heating
Fig. 58 Air vents: seat heat ing
The seat heating has three levels . The se lected
heat leve l is indicated by the LED.
.,. To switch the seat heating on, press the~ but
ton once.
.,. To switch to a lower level, press the~ button
aga in.
IJl,,
53
Page 56 of 322

Warm and cold
"'T o switch the seat heating off, press the~ but-
ton repeatedly unti l the LED turns off.
The seat heating sw itches automatically from
setting 3 to setting 2 after 10 minutes.
When seat h eat ing sh ould not be switched
on
Do n ot turn the seat heating on under the follow
ing circumstances:
- T he seat is unoccupied .
- The seat is covered with a seat cover .
- The seat is covered with a child seat.
- The seat is damp or wet.
A WARNING
Individuals with reduced sensitivity to pain or
temperature could develop burns when using
the seat heating function . To reduce the risk
of injury, these individuals should not use
seat heat ing .
(D Note
To avoid damage to the heat ing elements in
the seats, do not kneel on the seats or place
heavy loads on a small area of the seat .
(D Tips
-The setting for the seat heating on the driv
er's side is ass igned to the key that is in use .
- If the front passenger's seat heating is
turned on, it will not turn on again automat
i cally if more than 10 m inutes have passed
between sw itching the ignition off and
switching i t on again.
54