2016 MERCEDES-BENZ GLS SUV Media
[x] Cancel search: MediaPage 102 of 397
Operating the panorama sliding sun-
roof
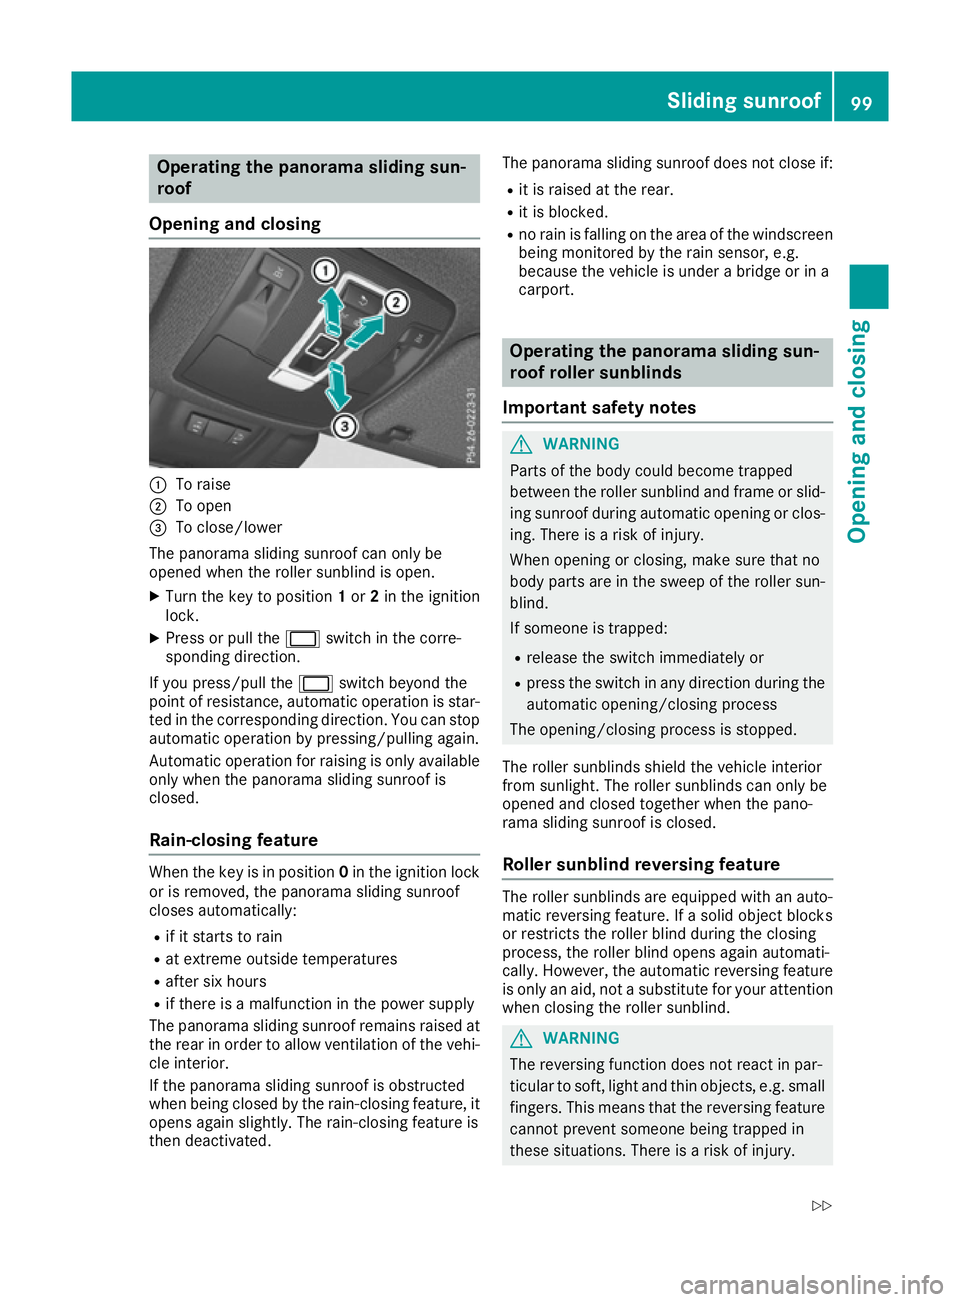
Opening and closing :
To raise
; To open
= To close/lower
The panorama sliding sunroof can only be
opened when the roller sunblind is open.
X Turn the key to position 1or 2in the ignition
lock.
X Press or pull the 2switch in the corre-
sponding direction.
If you press/pull the 2switch beyond the
point of resistance, automatic operation is star-
ted in the corresponding direction. You can stop automatic operation by pressing/pulling again.
Automatic operation for raising is only available
only when the panorama sliding sunroof is
closed.
Rain-closing feature When the key is in position
0in the ignition lock
or is removed, the panorama sliding sunroof
closes automatically:
R if it starts to rain
R at extreme outside temperatures
R after six hours
R if there is a malfunction in the power supply
The panorama sliding sunroof remains raised at
the rear in order to allow ventilation of the vehi-
cle interior.
If the panorama sliding sunroof is obstructed
when being closed by the rain-closing feature, it opens again slightly. The rain-closing feature is
then deactivated. The panorama sliding sunroof does not close if:
R it is raised at the rear.
R it is blocked.
R no rain is falling on the area of the windscreen
being monitored by the rain sensor, e.g.
because the vehicle is under a bridge or in a
carport. Operating the panorama sliding sun-
roof roller sunblinds
Important safety notes G
WARNING
Parts of the body could become trapped
between the roller sunblind and frame or slid- ing sunroof during automatic opening or clos-
ing. There is a risk of injury.
When opening or closing, make sure that no
body parts are in the sweep of the roller sun- blind.
If someone is trapped:
R release the switch immediately or
R press the switch in any direction during the
automatic opening/closing process
The opening/closing process is stopped.
The roller sunblinds shield the vehicle interior
from sunlight. The roller sunblinds can only be
opened and closed together when the pano-
rama sliding sunroof is closed.
Roller sunblind reversing feature The roller sunblinds are equipped with an auto-
matic reversing feature. If a solid object blocks
or restricts the roller blind during the closing
process, the roller blind opens again automati-
cally. However, the automatic reversing feature
is only an aid, not a substitute for your attention
when closing the roller sunblind. G
WARNING
The reversing function does not react in par-
ticular to soft, light and thin objects, e.g. small fingers. This means that the reversing featurecannot prevent someone being trapped in
these situations. There is a risk of injury. Sliding sunroof
99Opening and closing
Z
Page 103 of 397
When closing the roller sunblind, make sure
that no body parts are in the sweep.
If someone is trapped:
R release the switch immediately or
R press the switch in any direction during the
automatic closing process
The closing process is stopped.
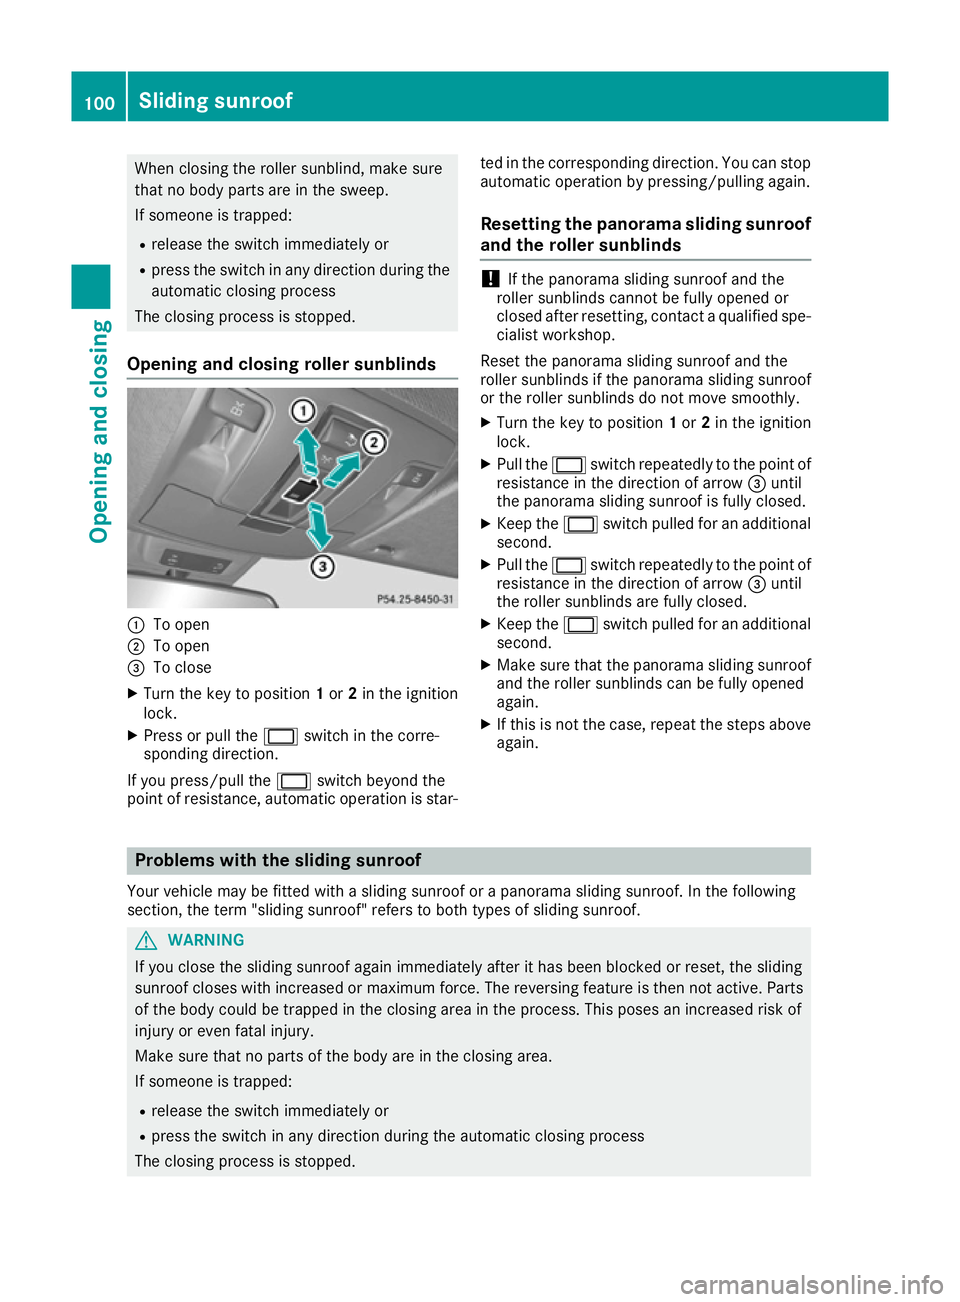
Opening and closing roller sunblinds :
To open
; To open
= To close
X Turn the key to position 1or 2in the ignition
lock.
X Press or pull the 2switch in the corre-
sponding direction.
If you press/pull the 2switch beyond the
point of resistance, automatic operation is star- ted in the corresponding direction. You can stop
automatic operation by pressing/pulling again.
Resetting the panorama sliding sunroof
and the roller sunblinds !
If the panorama sliding sunroof and the
roller sunblinds cannot be fully opened or
closed after resetting, contact a qualified spe- cialist workshop.
Reset the panorama sliding sunroof and the
roller sunblinds if the panorama sliding sunroof
or the roller sunblinds do not move smoothly.
X Turn the key to position 1or 2in the ignition
lock.
X Pull the 2switch repeatedly to the point of
resistance in the direction of arrow =until
the panorama sliding sunroof is fully closed.
X Keep the 2switch pulled for an additional
second.
X Pull the 2switch repeatedly to the point of
resistance in the direction of arrow =until
the roller sunblinds are fully closed.
X Keep the 2switch pulled for an additional
second.
X Make sure that the panorama sliding sunroof
and the roller sunblinds can be fully opened
again.
X If this is not the case, repeat the steps above
again. Problems with the sliding sunroof
Your vehicle may be fitted with a sliding sunroof or a panorama sliding sunroof. In the following
section, the term "sliding sunroof" refers to both types of sliding sunroof. G
WARNING
If you close the sliding sunroof again immediately after it has been blocked or reset, the sliding
sunroof closes with increased or maximum force. The reversing feature is then not active. Parts of the body could be trapped in the closing area in the process. This poses an increased risk of
injury or even fatal injury.
Make sure that no parts of the body are in the closing area.
If someone is trapped:
R release the switch immediately or
R press the switch in any direction during the automatic closing process
The closing process is stopped. 100
Sliding sunroofOpening and closing
Page 104 of 397
Problem
Possible causes/consequences and
M
MSolutions The sliding sunroof can-
not be closed and you
cannot see the cause. If the sliding sunroof is obstructed during closing and reopens again
slightly:
X Immediately after the sliding sunroof blocks, pull the 2switch in
the overhead control panel down to the point of resistance and hold it until the sliding sunroof is closed.
The sliding sunroof is closed with increased force.
If the sliding sunroof is obstructed again during closing and reopens
again slightly:
X Immediately after the sliding sunroof blocks, pull the 2switch in
the overhead control panel down to the point of resistance and hold it until the sliding sunroof is closed.
The sliding sunroof is closed without the automatic reversing fea-
ture. Sliding sunroof
101Opening and closing Z
Page 114 of 397
Folding down the seats in the second
row electrically Important safety notes
G
WARNING
If the seat and seat backrest are not engaged they could fold forwards, e.g. when braking
suddenly or in the event of an accident.
R The seat or seat backrest which is not
engaged will then push the vehicle occu-
pant against the seat belt. The seat belt
cannot protect as intended and could result
in additional injury.
R A child restraint system will then no longer
be supported or positioned correctly and
will no longer perform its intended function.
R The seat backrest cannot restrain objects
or loads in the luggage compartment.
This poses an increased risk of injury.
Always ensure that the seat and the seat
backrest are engaged as described:
R before passengers travel on a seat with the
EASY-ENTRY/EXIT feature
R after adjusting the seat
R after the EASY-ENTRY/EXIT feature has
been used
R after you have folded the luggage compart-
ment enlargement forward G
WARNING
The seat does not engage in the entry/exit
position. The seat may fold back suddenly,
e.g. when accelerating, braking, in the event
of a sudden change of direction or an acci-
dent. Persons in the sweep of the seat could
be trapped. There is a risk of injury.
Always fold back a seat that has been folded
forward before pulling away. Make sure that
the seat and the seat backrest are engaged.
General notes Getting in or out from third row of seats: you canfold forward the outer seats on the left and right
of the second row of seats electronically. If one of the two outer rear seats in the second
row of seats is in the entry/exit position: the
display message:
2nd
2nd seat seat row,
row,right
right Not
Not
locked
locked appears in the multifunction display, for
example.
When you fold the seat back until it engages, the display message disappears.
To ensure that the seat backrest is fully
engaged, pull firmly on the seat backrest.
i Further related subjects:
R Luggage compartment enlargement (fold-
ing down the second row of seats)
(Y page 315)
R Folding the seats in the third row of seats
down/up (Y page 107)
Folding the seats forwards
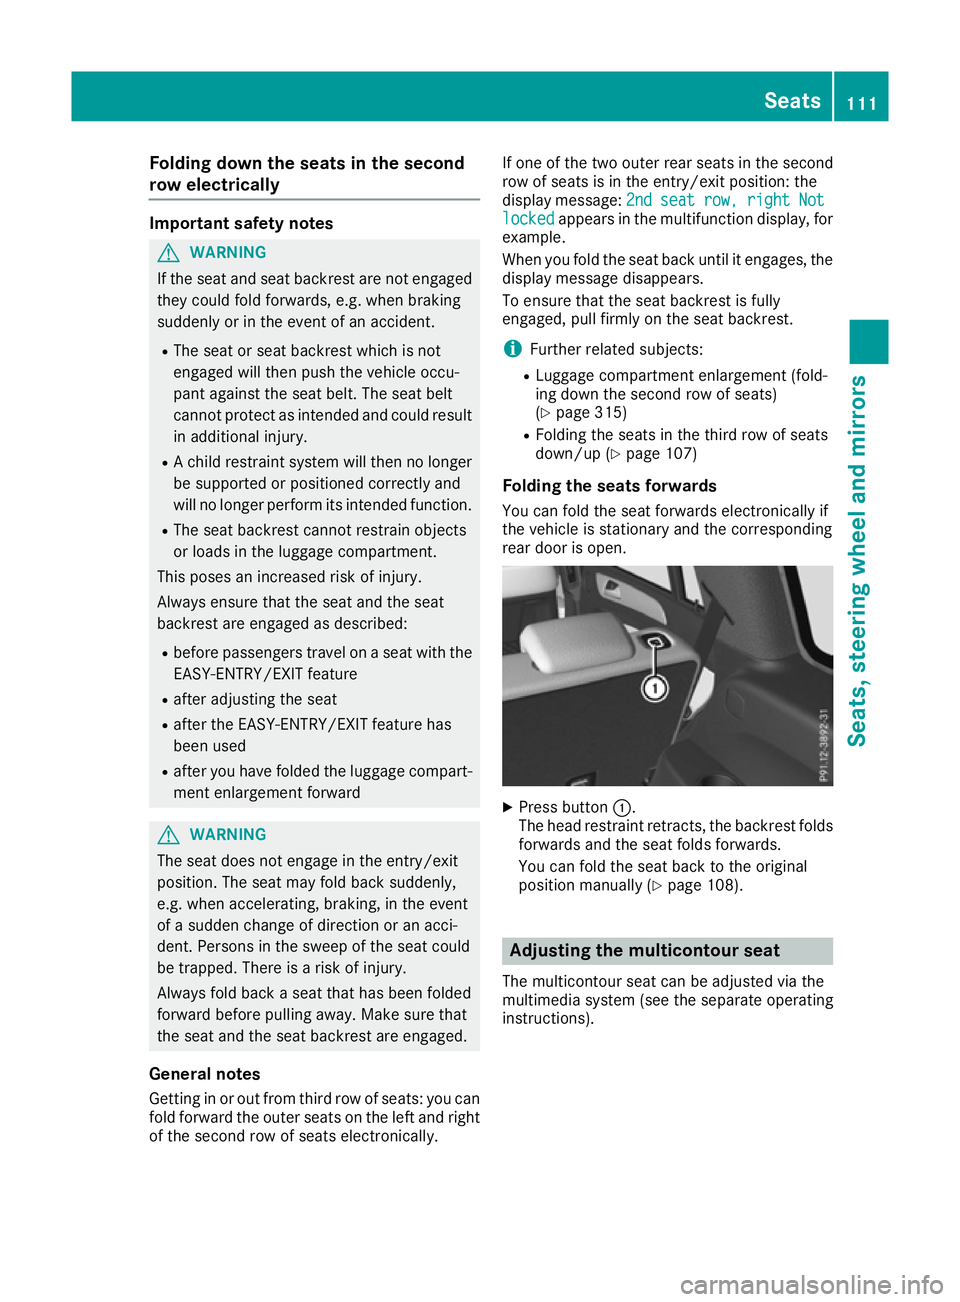
You can fold the seat forwards electronically if
the vehicle is stationary and the corresponding
rear door is open. X
Press button :.
The head restraint retracts, the backrest folds
forwards and the seat folds forwards.
You can fold the seat back to the original
position manually (Y page 108). Adjusting the multicontour seat
The multicontour seat can be adjusted via the
multimedia system (see the separate operating
instructions). Seats
111Seats, steering wheel and mirrors Z
Page 120 of 397
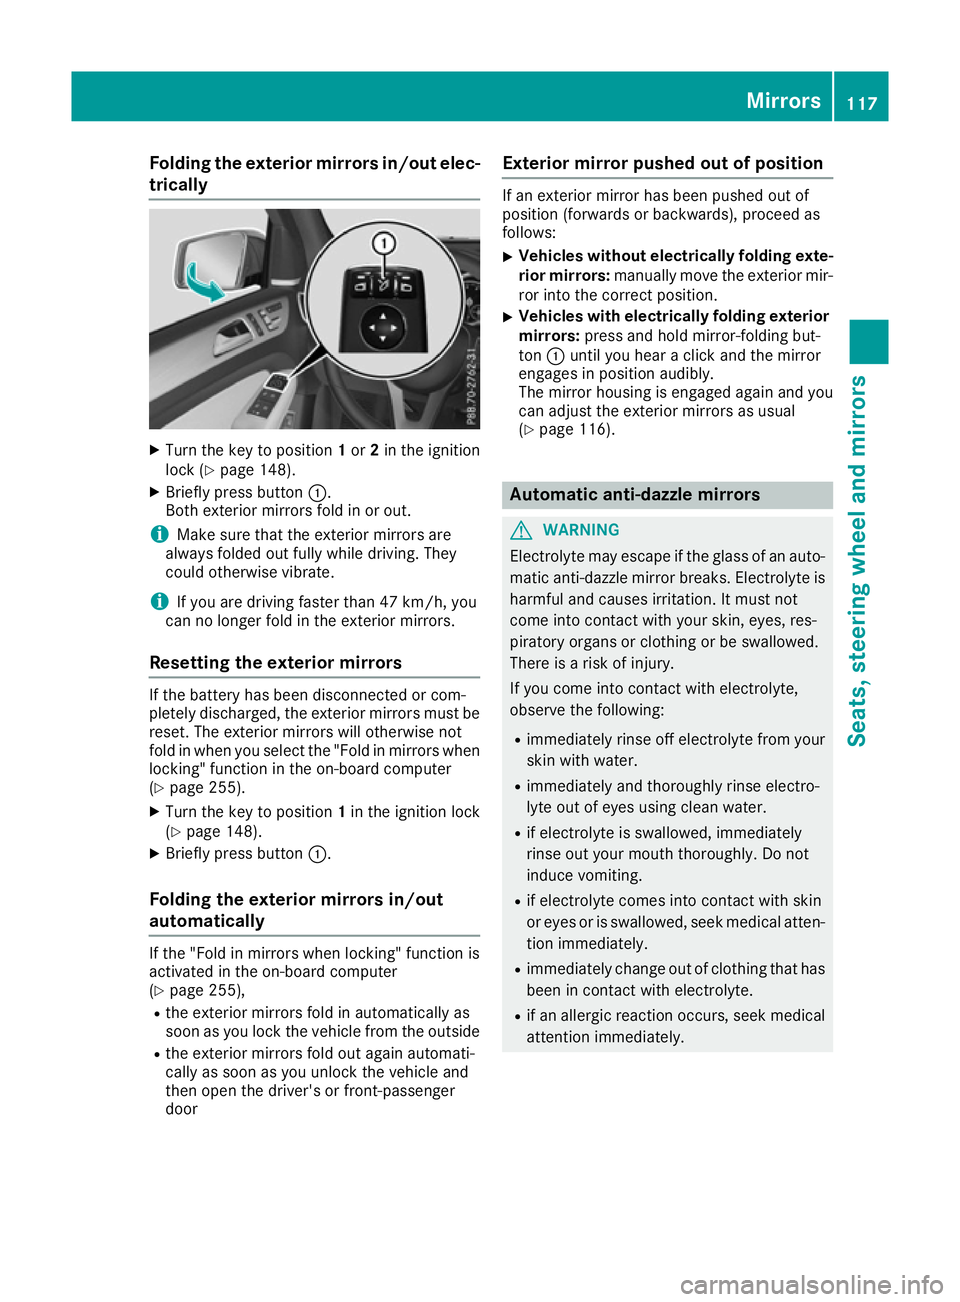
Folding the exterior mirrors in/out elec-
trically X
Turn the key to position 1or 2in the ignition
lock (Y page 148).
X Briefly press button :.
Both exterior mirrors fold in or out.
i Make sure that the exterior mirrors are
always folded out fully while driving. They
could otherwise vibrate.
i If you are driving faster than 47 km/h, you
can no longer fold in the exterior mirrors.
Resetting the exterior mirrors If the battery has been disconnected or com-
pletely discharged, the exterior mirrors must be
reset. The exterior mirrors will otherwise not
fold in when you select the "Fold in mirrors whenlocking" function in the on-board computer
(Y page 255).
X Turn the key to position 1in the ignition lock
(Y page 148).
X Briefly press button :.
Folding the exterior mirrors in/out
automatically If the "Fold in mirrors when locking" function is
activated in the on-board computer
(Y page 255),
R the exterior mirrors fold in automatically as
soon as you lock the vehicle from the outside
R the exterior mirrors fold out again automati-
cally as soon as you unlock the vehicle and
then open the driver's or front-passenger
door Exterior mirror pushed out of position If an exterior mirror has been pushed out of
position (forwards or backwards), proceed as
follows:
X Vehicles without electrically folding exte-
rior mirrors: manually move the exterior mir-
ror into the correct position.
X Vehicles with electrically folding exterior
mirrors: press and hold mirror-folding but-
ton :until you hear a click and the mirror
engages in position audibly.
The mirror housing is engaged again and you
can adjust the exterior mirrors as usual
(Y page 116). Automatic anti-dazzle mirrors
G
WARNING
Electrolyte may escape if the glass of an auto- matic anti-dazzle mirror breaks. Electrolyte is
harmful and causes irritation. It must not
come into contact with your skin, eyes, res-
piratory organs or clothing or be swallowed.
There is a risk of injury.
If you come into contact with electrolyte,
observe the following:
R immediately rinse off electrolyte from your
skin with water.
R immediately and thoroughly rinse electro-
lyte out of eyes using clean water.
R if electrolyte is swallowed, immediately
rinse out your mouth thoroughly. Do not
induce vomiting.
R if electrolyte comes into contact with skin
or eyes or is swallowed, seek medical atten-
tion immediately.
R immediately change out of clothing that has
been in contact with electrolyte.
R if an allergic reaction occurs, seek medical
attention immediately. Mirrors
117Seats, steering wheel and mirrors Z
Page 128 of 397
The
K indicator lamp in the instrument
cluster goes out. The _indicator lamp in
the multifunction display remains lit.
X To switch off: move the combination switch
back to its normal position or move the light
switch to another position.
The _ indicator lamp in the multifunction
display goes out. Headlamps misted up on the inside
Under certain climatic and physical conditions,
moisture may form in the headlamp. This mois-
ture will not impair the function of the headlamp. Interior lighting
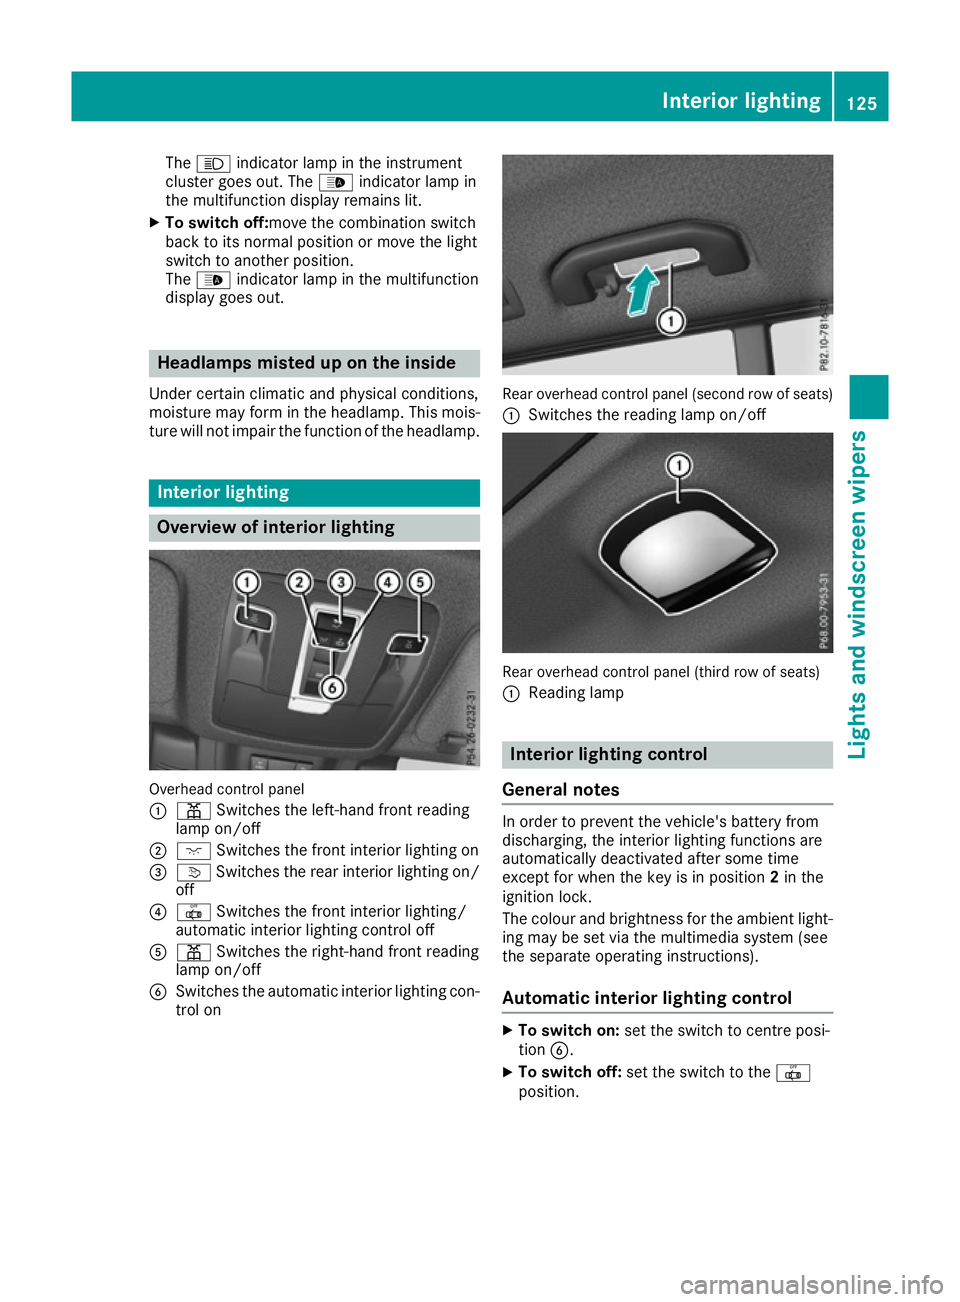
Overview of interior lighting
Overhead control panel
:
p Switches the left-hand front reading
lamp on/off
; c Switches the front interior lighting on
= v Switches the rear interior lighting on/
off
? | Switches the front interior lighting/
automatic interior lighting control off
A p Switches the right-hand front reading
lamp on/off
B Switches the automatic interior lighting con-
trol on Rear overhead control panel (second row of seats)
: Switches the reading lamp on/off Rear overhead control panel (third row of seats)
:
Reading lamp Interior lighting control
General notes In order to prevent the vehicle's battery from
discharging, the interior lighting functions are
automatically deactivated after some time
except for when the key is in position
2in the
ignition lock.
The colour and brightness for the ambient light-
ing may be set via the multimedia system (see
the separate operating instructions).
Automatic interior lighting control X
To switch on: set the switch to centre posi-
tion B.
X To switch off: set the switch to the |
position. Interior lighting
125Lights and windscreen wipers Z
Page 129 of 397
The interior lighting automatically switches on if
you:
R unlock the vehicle
R open a door
R remove the key from the ignition lock
The interior lighting is activated for a short time
when the key is removed from the ignition lock.
This delayed switch-off can be adjusted via the
multimedia system (see separate Owner's Man- ual). Crash-responsive emergency lighting
The interior lighting is activated automatically if
the vehicle is involved in an accident.
X To switch off the crash-responsive emer-
gency lighting: press the hazard warning
lamp button.
or X Lock and then unlock the vehicle using the
key. Replacing bulbs (vehicles with LED
headlamps)
The front and rear light clusters of your vehicle
are equipped with LED bulbs. Do not replace the
vehicle's bulbs yourself. Contact a qualified spe- cialist workshop with the necessary specialist
knowledge and tools to carry out the work
required.
Lamps are an important aspect of vehicle safety.
You must therefore make sure that these func-
tion correctly at all times. Have the headlamp
setting checked regularly. Replacing bulbs (vehicles with halo-
gen headlamps) Important safety notes
G
WARNING
Bulbs, lamps and plug connectors can
become very hot during use. When replacing a bulb, you could burn yourself on these com-
ponents. There is a risk of injury. Allow these components to cool down before
replacing the bulb.
Do not use a bulb if it has been dropped or if its
glass tube has been scratched.
The bulb may explode if:
R you touch it
R it is hot
R you drop it
R you scratch it
Use bulbs only in closed lamps that have been
designed for this purpose. Fit only spare bulbs of the same type and the specified voltage.
Marks on the glass tube reduce the service life
of the bulb. Do not touch the glass tube with
your bare hands. If necessary, clean the glass
tube when cold with alcohol or spirit and rub it
off with a lint-free cloth.
Protect bulbs from moisture during operation.
Do not allow bulbs to come into contact with
liquids.
Replace only the bulbs listed (Y page 126).
Have the bulbs that you cannot replace yourself
replaced at a qualified specialist workshop.
If you require assistance replacing bulbs, con-
sult a qualified specialist workshop.
If the new bulb does not light up either, consult
a qualified specialist workshop.
Headlamps and lamps are an important aspect
of vehicle safety. You must therefore make sure
that these function correctly at all times. Have
the headlamp setting checked regularly. Overview of bulb replacement - bulb
types
You can replace the following bulbs. The details for the bulb types can be found in the legend. 126
Replacing bulbs (vehicles with halogen headlamps)Lights and windscreen wipers
Page 137 of 397
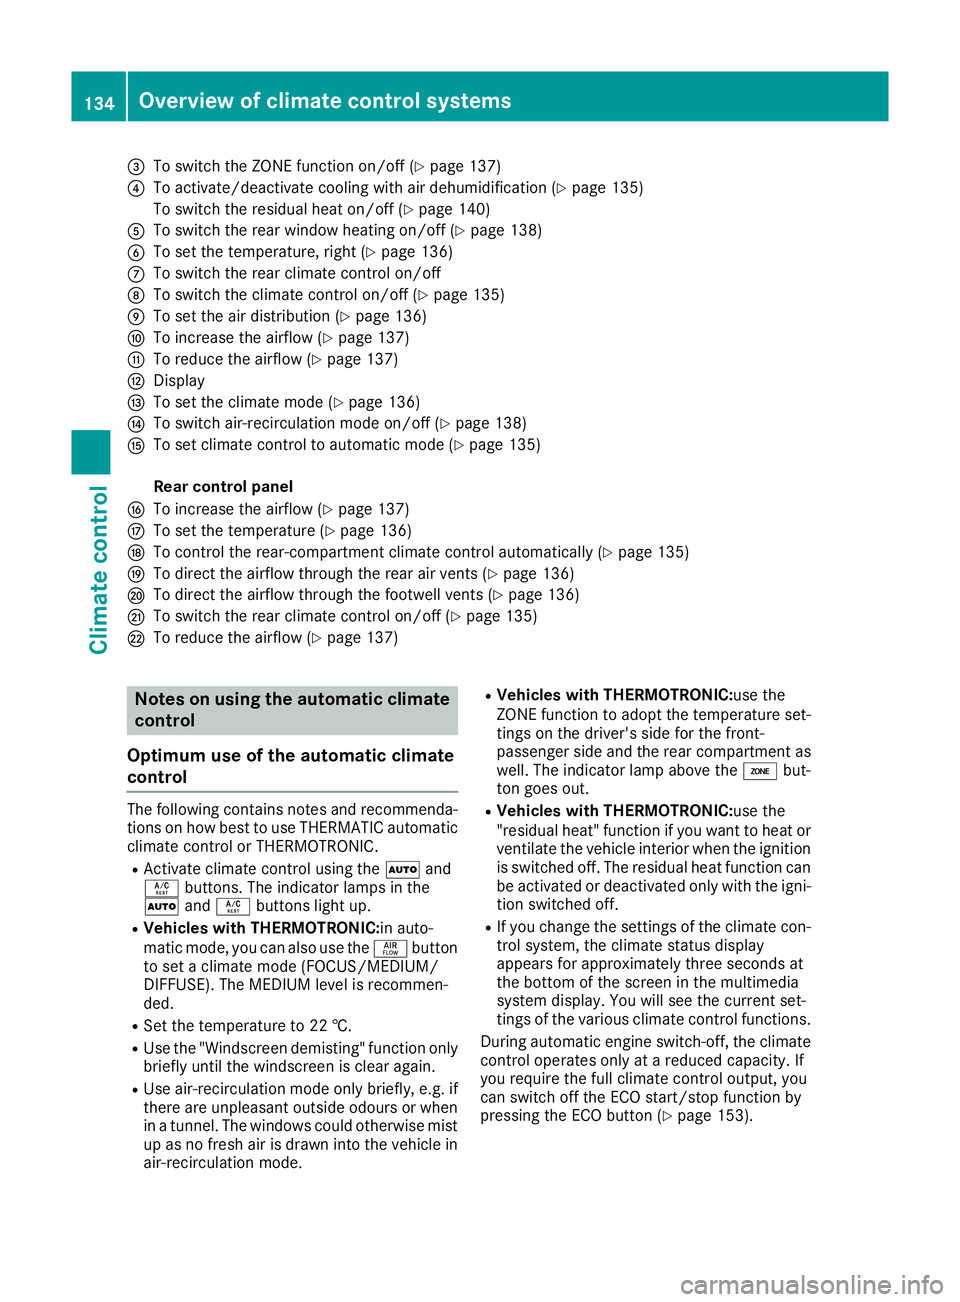
=
To switch the ZONE function on/off (Y page 137)
? To activate/deactivate cooling with air dehumidification (Y page 135)
To switch the residual heat on/off (Y page 140)
A To switch the rear window heating on/off (Y page 138)
B To set the temperature, right (Y page 136)
C To switch the rear climate control on/off
D To switch the climate control on/off (Y page 135)
E To set the air distribution (Y page 136)
F To increase the airflow (Y page 137)
G To reduce the airflow (Y page 137)
H Display
I To set the climate mode (Y page 136)
J To switch air-recirculation mode on/off (Y page 138)
K To set climate control to automatic mode (Y page 135)
Rear control panel
L To increase the airflow (Y page 137)
M To set the temperature (Y page 136)
N To control the rear-compartment climate control automatically (Y page 135)
O To direct the airflow through the rear air vents (Y page 136)
P To direct the airflow through the footwell vents (Y page 136)
Q To switch the rear climate control on/off (Y page 135)
R To reduce the airflow (Y page 137)Notes on using the automatic climate
control
Optimum use of the automatic climate
control The following contains notes and recommenda-
tions on how best to use THERMATIC automatic climate control or THERMOTRONIC.
R Activate climate control using the Ãand
Á buttons. The indicator lamps in the
à andÁ buttons light up.
R Vehicles with THERMOTRONIC:in auto-
matic mode, you can also use the ñbutton
to set a climate mode (FOCUS/MEDIUM/
DIFFUSE). The MEDIUM level is recommen-
ded.
R Set the temperature to 22 †.
R Use the "Windscreen demisting" function only
briefly until the windscreen is clear again.
R Use air-recirculation mode only briefly, e.g. if
there are unpleasant outside odours or when
in a tunnel. The windows could otherwise mist up as no fresh air is drawn into the vehicle in
air-recirculation mode. R
Vehicles with THERMOTRONIC:use the
ZONE function to adopt the temperature set-
tings on the driver's side for the front-
passenger side and the rear compartment as well. The indicator lamp above the ábut-
ton goes out.
R Vehicles with THERMOTRONIC:use the
"residual heat" function if you want to heat or
ventilate the vehicle interior when the ignitionis switched off. The residual heat function can
be activated or deactivated only with the igni- tion switched off.
R If you change the settings of the climate con-
trol system, the climate status display
appears for approximately three seconds at
the bottom of the screen in the multimedia
system display. You will see the current set-
tings of the various climate control functions.
During automatic engine switch-off, the climate
control operates only at a reduced capacity. If
you require the full climate control output, you
can switch off the ECO start/stop function by
pressing the ECO button (Y page 153).134
Overview of climate control systemsClimate control