2016 MERCEDES-BENZ GLS SUV bonnet
[x] Cancel search: bonnetPage 9 of 397
Engaging the park position ............ 156
Gliding mod
e................................. 159
Kickdown ....................................... 159
Manual shifting .............................. 160
Oil temperature (on-board com-
puter, Mercedes-AMG vehicles) ..... 255
Overview ........................................ 156
Problem (fault) ............................... 163
Pulling away ................................... 150
Starting the engine ........................ 150
Steering wheel gearshift paddle s... 160
Trailer towing ................................. 159
Transmission position display ........ 158
Transmission positions .................. 158
Automatic transmission emer-
gency running mode ......................... 163
AUX jacks
CD/DVD drive ............................... 311
Auxiliary heating
Setting ........................................... 253
Auxiliary heating/ventilation
Display message ............................ 288
Important safety notes .................. 140
Problem (display message) ............ 144
Remote control .............................. 141
Setting the departure time ............. 143
Switching on/off (on the centre
console) ......................................... 141
Axle load, permissible (trailer tow-
ing) ...................................................... 390 B
Back button ....................................... 304
Bag hook ............................................ 317
Ball coupling
Swinging in .................................... 235
Swinging out .................................. 235
BAS (Brake Assist System) ................. 69
Battery (key)
Checking .......................................... 84
Important safety notes .................... 84
Replacing ......................................... 84
Battery (vehicle)
Charging ........................................ 353
Display message ............................ 272
Important safety notes .................. 351
Jump starting ................................. 354 Overview ........................................ 351
Belt
see Seat belts
Belt tensioner
Activation ......................................... 54
Blind Spot Assist
Activating/deactivating ................. 250
Display message ............................ 279
Notes/function .............................. 219
Trailer towing ................................. 220
see Active Blind Spot Assist
Blootooth ®
Connecting a different mobile
phone ............................................ 307
BlueTEC
Topping up AdBlue ®
....................... 166
BlueTEC (AdBlue ®
) ............................. 384
Bluetooth ®
Searching for a mobile phone ........ 307
See also Digital Owner's Manua l... 303
Telephony ...................................... 306
Bonnet
Active bonnet (pedestrian protec-tion) ............................................... 332
Closing ........................................... 333
Display message ............................ 287
Important safety notes .................. 332
Opening ......................................... 333
Boot
see Tailgate
Brake Assist
see BAS (Brake Assist System)
Brake fluid
Display message ............................ 263
Note s............................................. 386
Brake force distribution
see EBD (electronic brake force
distribution)
Brake lamps
Adaptive ........................................... 72
Display message ............................ 270
Brakes
ABS .................................................. 69
Adaptive Brake Assist ...................... 71
BAS .................................................. 69
Brake fluid (notes) ......................... 386
Display message ............................ 259 6
Index
Page 36 of 397
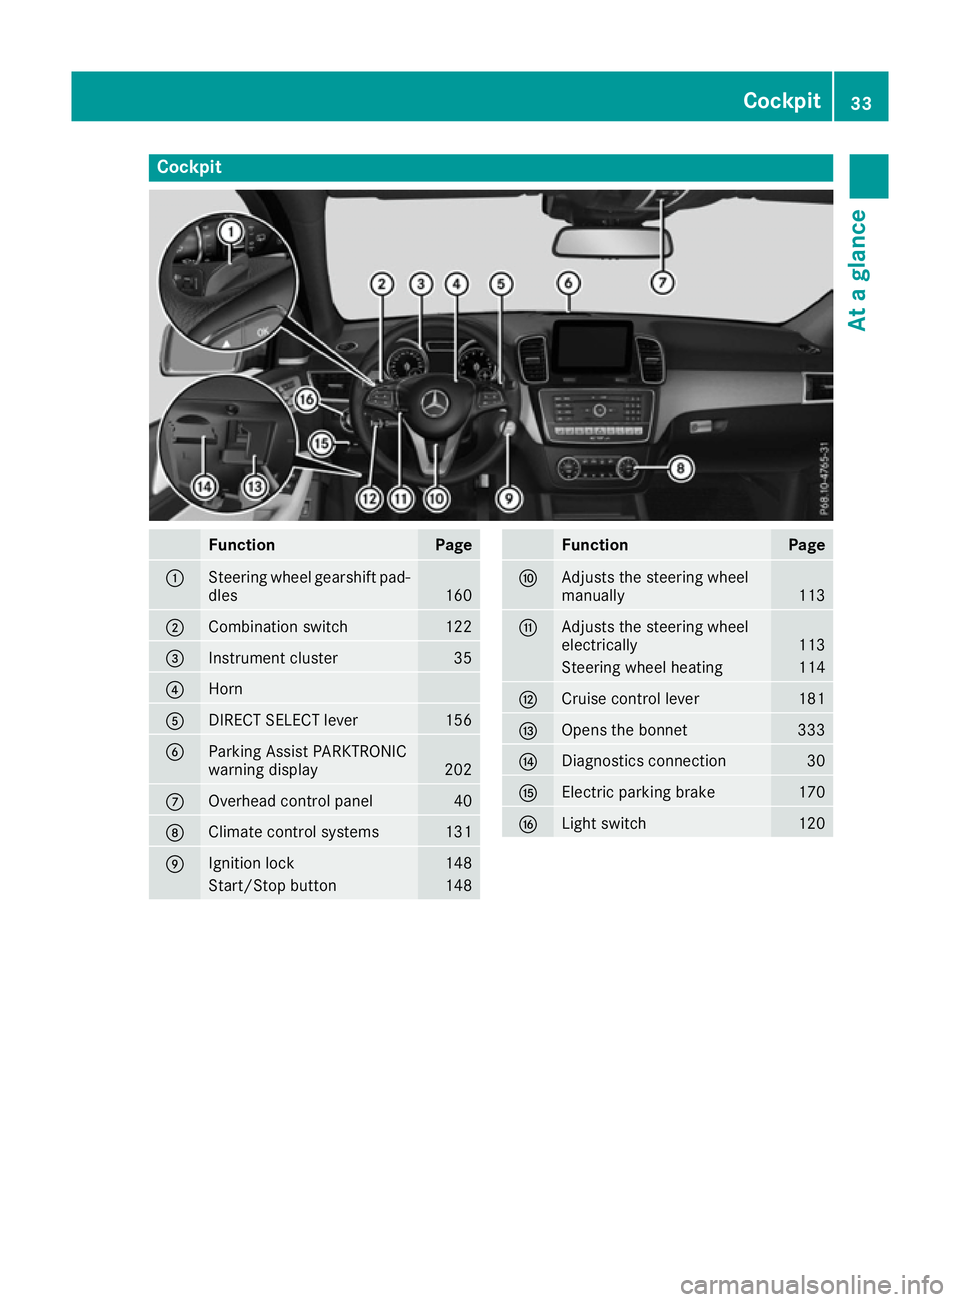
Cockpit
Function Page
:
Steering wheel gearshift pad-
dles 160
;
Combination switch 122
=
Instrument cluster 35
?
Horn
A
DIRECT SELECT lever 156
B
Parking Assist PARKTRONIC
warning display
202
C
Overhead control panel 40
D
Climate control systems 131
E
Ignition lock 148
Start/Stop button 148 Function Page
F
Adjusts the steering wheel
manually
113
G
Adjusts the steering wheel
electrically
113
Steering wheel heating 114
H
Cruise control lever 181
I
Opens the bonnet 333
J
Diagnostics connection 30
K
Electric parking brake 170
L
Light switch 120Cockpit
33At a glance
Page 37 of 397
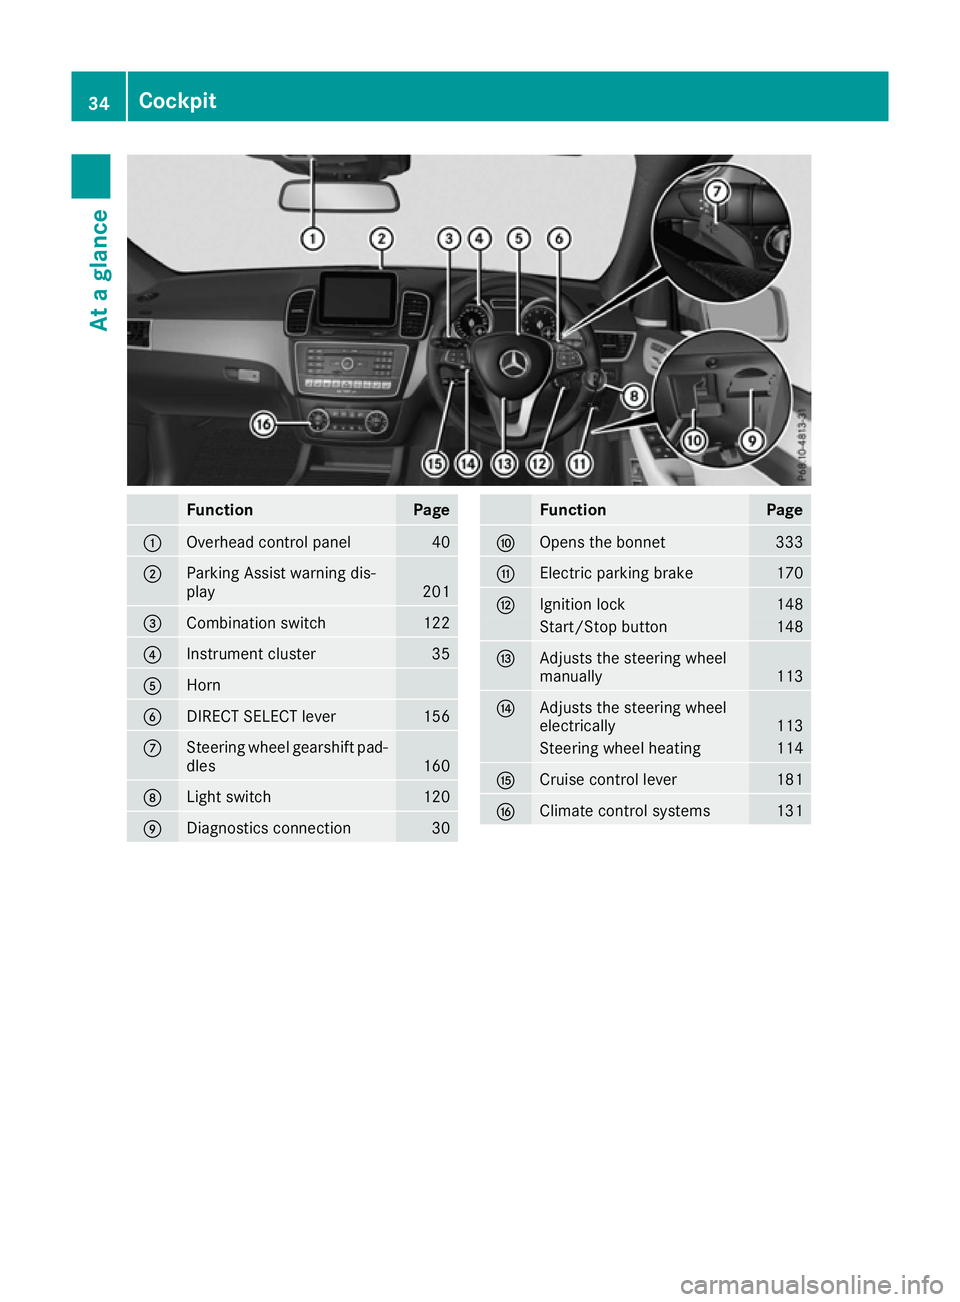
Function Page
:
Overhead control panel 40
;
Parking Assist warning dis-
play
201
=
Combination switch 122
?
Instrument cluster 35
A
Horn
B
DIRECT SELECT lever 156
C
Steering wheel gearshift pad-
dles 160
D
Light switch 120
E
Diagnostics connection 30 Function Page
F
Opens the bonnet 333
G
Electric parking brake 170
H
Ignition lock 148
Start/Stop button 148
I
Adjusts the steering wheel
manually
113
J
Adjusts the steering wheel
electrically
113
Steering wheel heating 114
K
Cruise control lever 181
L
Climate control systems 13134
CockpitAt a glance
Page 82 of 397
A visual and audible alarm is triggered if the
alarm system is primed and you open:
R a door
R the vehicle with the emergency key element
R the tailgate
R the bonnet
X To stop the alarm with the key: press the
% or& button on the key.
The alarm stops.
or X Insert the key into the ignition lock.
The alarm stops.
X To stop the alarm using KEYLESS-GO:
grasp the outside door handle. The key must
be outside the vehicle.
The alarm stops.
or X Press the Start/Stop button on the dash-
board. The key must be inside the vehicle.
The alarm stops.
The alarm does not switch off, even if you close the open door that has triggered it, for example. Tow-away protection
Function An audible and visual alarm is triggered if your
vehicle's angle of inclination is altered while
tow-away protection is primed. This can occur if
the vehicle is jacked up on one side, for exam-
ple.
Priming X
Make sure that:
R the doors are closed
R the tailgate is closed
Only then is tow-away protection primed.
X Lock the vehicle with the key or KEYLESS-GO.
Tow-away protection is primed after approx-
imately 60 second s. Switching off X
To switch off with the key: unlock the vehi-
cle using the key.
or X Insert the key into the ignition lock.
Tow-away protection is switched off automat-
ically.
X To switch off with KEYLESS-GO: unlock the
vehicle using KEYLESS-GO.
or X Press the Start/Stop button on the dash-
board. The key must be inside the vehicle.
Tow-away protection is switched off automat-
ically.
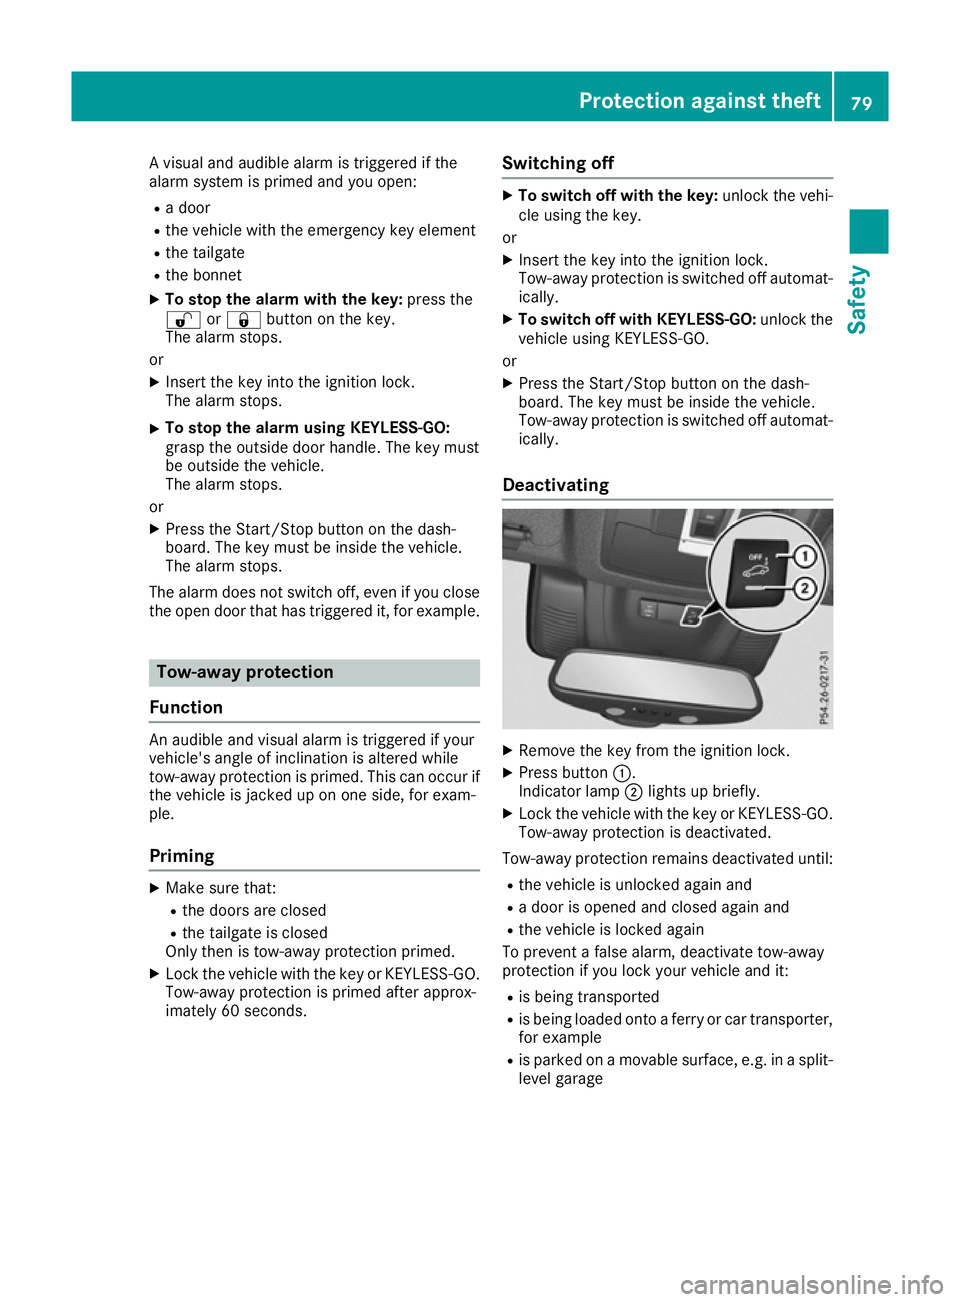
Deactivating X
Remove the key from the ignition lock.
X Press button :.
Indicator lamp ;lights up briefly.
X Lock the vehicle with the key or KEYLESS-GO.
Tow-away protection is deactivated.
Tow-away protection remains deactivated until:
R the vehicle is unlocked again and
R a door is opened and closed again and
R the vehicle is locked again
To prevent a false alarm, deactivate tow-away
protection if you lock your vehicle and it:
R is being transported
R is being loaded onto a ferry or car transporter,
for example
R is parked on a movable surface, e.g. in a split-
level garage Protection against theft
79Safety Z
Page 130 of 397
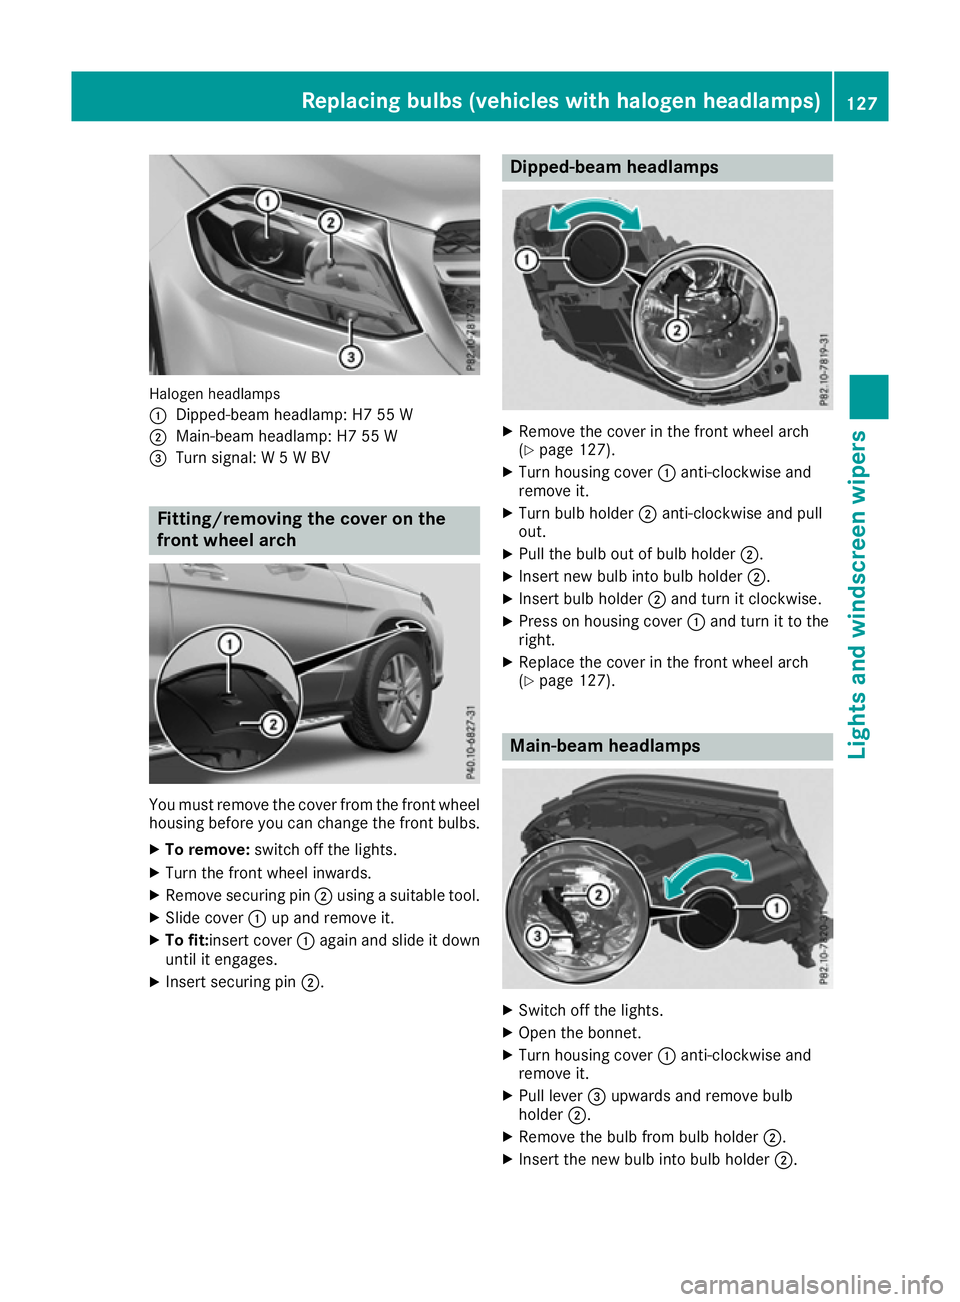
Halogen headlamps
:
Dipped-beam headlamp: H7 55 W
; Main-beam headlamp: H7 55 W
= Turn signal: W 5 W BV Fitting/removing the cover on the
front wheel arch You must remove the cover from the front wheel
housing before you can change the front bulbs.
X To remove: switch off the lights.
X Turn the front wheel inwards.
X Remove securing pin ;using a suitable tool.
X Slide cover :up and remove it.
X To fit: insert cover :again and slide it down
until it engages.
X Insert securing pin ;. Dipped-beam headlamps
X
Remove the cover in the front wheel arch
(Y page 127).
X Turn housing cover :anti-clockwise and
remove it.
X Turn bulb holder ;anti-clockwise and pull
out.
X Pull the bulb out of bulb holder ;.
X Insert new bulb into bulb holder ;.
X Insert bulb holder ;and turn it clockwise.
X Press on housing cover :and turn it to the
right.
X Replace the cover in the front wheel arch
(Y page 127). Main-beam headlamps
X
Switch off the lights.
X Open the bonnet.
X Turn housing cover :anti-clockwise and
remove it.
X Pull lever =upwards and remove bulb
holder ;.
X Remove the bulb from bulb holder ;.
X Insert the new bulb into bulb holder ;. Replacing bulbs (vehicles with halogen headlamps)
127Lights and windscreen wipers Z
Page 131 of 397

X
Simultaneously press bulb holder ;and pull
lever =downwards.
X Press on housing cover :and turn it to the
right. Turn signals
X
Switch off the lights.
X Open the bonnet.
X Turn housing cover :anti-clockwise and
remove it.
X Turn bulb holder ;anti-clockwise and pull
out.
X Pull the bulb out of bulb holder ;.
X Insert new bulb into bulb holder ;.
X Insert bulb holder ;and turn it clockwise.
X Press on housing cover :and turn it to the
right. Windscreen wipers
Switching the windscreen wipers on/
off
! Do not operate the windscreen wipers when
the windscreen is dry, as this could damage
the wiper blades. Moreover, dust that has col-
lected on the windscreen can scratch the
glass if wiping takes place when the wind-
screen is dry.
If it is necessary to switch on the windscreen wipers in dry weather conditions, always
operate them using washer fluid.
! If the windscreen wipers leave smears on
the windscreen after the vehicle has been
washed in an automatic car wash, this may be
due to wax or other residue. Clean the wind- screen with washer fluid after an automatic
car wash.
! Intermittent wiping with rain sensor: due to
optical influences and the windscreen becom-
ing dirty in dry weather conditions, the wind-
screen wipers may be activated inadvertently. This could damage the windscreen wiper
blades or scratch the windscreen.
For this reason, you should always switch off
the windscreen wipers in dry weather. Combination switch
1 $ Windscreen wipers off
2 Ä Intermittent wipe, low (rain sensor set
to low sensitivity)
3 Å Intermittent wipe, high (rain sensor
set to high sensitivity)
4 ° Continuous wipe, slow
5 ¯ Continuous wipe, fast
B í Single wipe
C î Wipes with washer fluid
X Turn the key to position 1or 2in the ignition
lock (Y page 148).
X Turn the combination switch to the corre-
sponding position.
In the ÄorÅ position, the appropriate
wiping frequency is set automatically according to the intensity of the rain. In the Åposition,
the rain sensor is more sensitive than in the
Ä position, causing the windscreen wiper to
wipe more frequently.
Vehicles with MAGIC VISION CONTROL: the
washer fluid is fed through the wiper blades and when wiping with washer fluid îthe washer
fluid is emitted directly from the blades.
If the wiper blades are worn, the windscreen will
no longer be wiped properly. This could mean
you are unable to observe the traffic conditions. 128
Windscreen wipersLights and windscreen wipers
Page 132 of 397
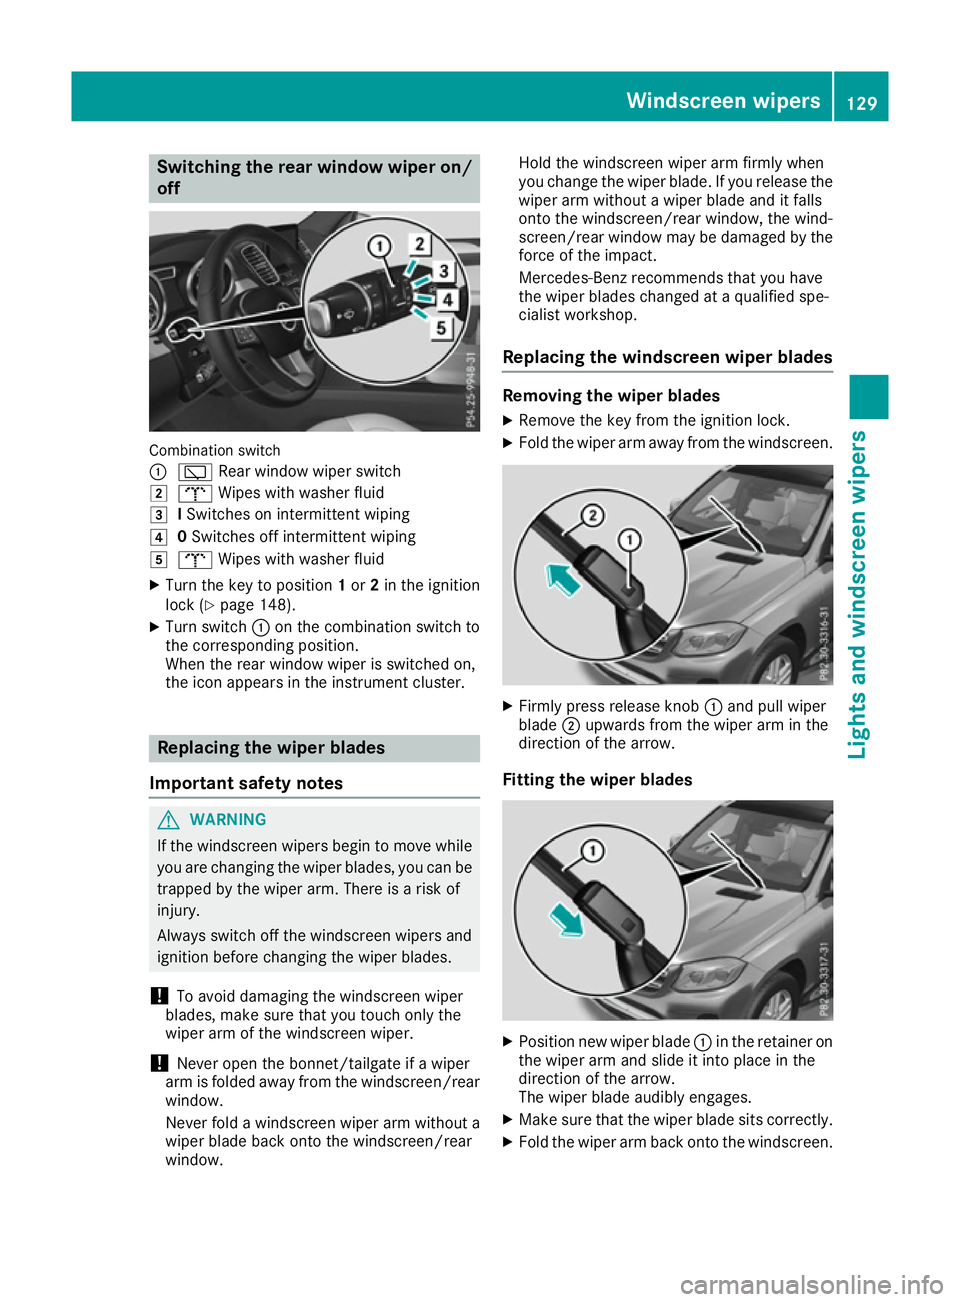
Switching the rear window wiper on/
off Combination switch
:
è Rear window wiper switch
2 b Wipes with washer fluid
3 ISwitches on intermittent wiping
4 0Switches off intermittent wiping
5 b Wipes with washer fluid
X Turn the key to position 1or 2in the ignition
lock (Y page 148).
X Turn switch :on the combination switch to
the corresponding position.
When the rear window wiper is switched on,
the icon appears in the instrument cluster. Replacing the wiper blades
Important safety notes G
WARNING
If the windscreen wipers begin to move while
you are changing the wiper blades, you can be trapped by the wiper arm. There is a risk of
injury.
Always switch off the windscreen wipers and
ignition before changing the wiper blades.
! To avoid damaging the windscreen wiper
blades, make sure that you touch only the
wiper arm of the windscreen wiper.
! Never open the bonnet/tailgate if a wiper
arm is folded away from the windscreen/rear
window.
Never fold a windscreen wiper arm without a
wiper blade back onto the windscreen/rear
window. Hold the windscreen wiper arm firmly when
you change the wiper blade. If you release the
wiper arm without a wiper blade and it falls
onto the windscreen/rear window, the wind-
screen/rear window may be damaged by the
force of the impact.
Mercedes-Benz recommends that you have
the wiper blades changed at a qualified spe-
cialist workshop.
Replacing the windscreen wiper blades Removing the wiper blades
X Remove the key from the ignition lock.
X Fold the wiper arm away from the windscreen. X
Firmly press release knob :and pull wiper
blade ;upwards from the wiper arm in the
direction of the arrow.
Fitting the wiper blades X
Position new wiper blade :in the retainer on
the wiper arm and slide it into place in the
direction of the arrow.
The wiper blade audibly engages.
X Make sure that the wiper blade sits correctly.
X Fold the wiper arm back onto the windscreen. Windscreen wipers
129Lights and windscreen wipers Z
Page 147 of 397
X
Insert new battery =with the lettering facing
upwards.
X Slide battery cover ;in the opposite direc-
tion to the arrow on the remote control until it engages.
Problems with the auxiliary heating/ventilation Problem
Possible causes/consequences and
M
MSolutions FAIL¨ The signal transmission between the transmitter and the vehicle is
faulty.
X
Change your position in relation to the vehicle, moving closer if
necessary. FAIL The auxiliary heating/ventilation cannot be switched on or has
switched itself off.
The starter battery is not sufficiently charged.
X Charge the starter battery. The fuel tank content is below the reserve fuel level.
X Refuel at the nearest filling station. The auxiliary heating/ventilation is malfunctioning.
X Have the auxiliary heating/ventilation checked at a qualified spe-
cialist workshop. Adjusting the air vents
Important safety notes
G
WARNING
Very hot or very cold air can flow from the air vents. This could result in burns or frostbite in the immediate vicinity of the air vents. There
is a risk of injury.
Make sure that all vehicle occupants always
maintain a sufficient distance to the air out-
lets. If necessary, redirect the airflow to
another area of the vehicle interior.
In order to ensure the direct flow of fresh air
through the air vents into the vehicle interior,
please observe the following notes:
R keep the air inlet grille on the bonnet and in
the engine compartment on the front-
passenger side free of blockages, such as ice,
snow or leaves.
R never cover the vents or ventilation grilles in
the vehicle interior i
For virtually draught-free ventilation, adjust
the sliders of the air vents to the centre posi- tion. Adjusting the centre air vents
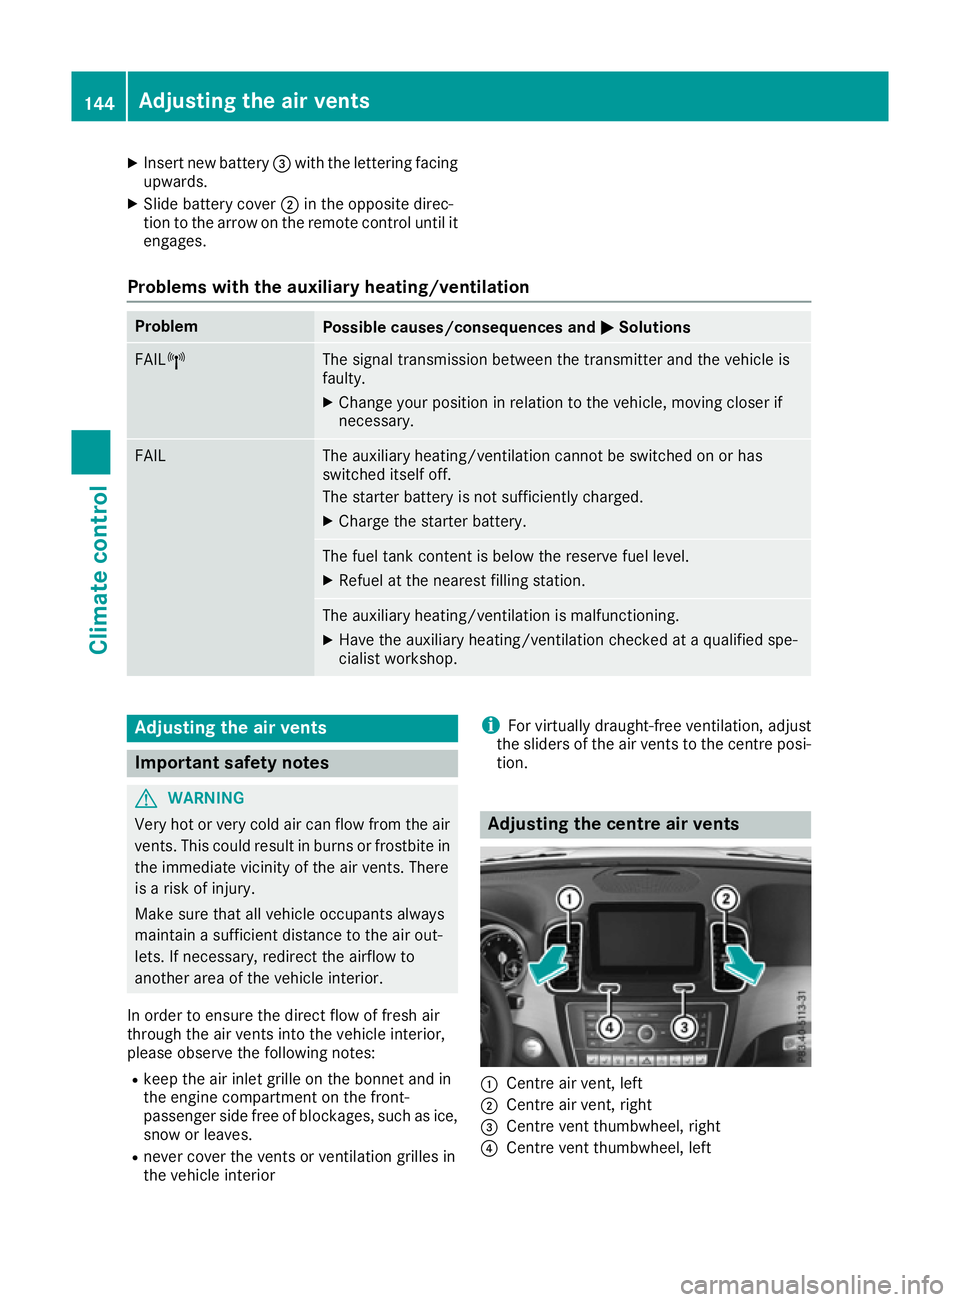
:
Centre air vent, left
; Centre air vent, right
= Centre vent thumbwheel, right
? Centre vent thumbwheel, left 144
Adjusting the air ventsClimate control