2016 MERCEDES-BENZ GLS SUV charging
[x] Cancel search: chargingPage 9 of 397
Engaging the park position ............ 156
Gliding mod
e................................. 159
Kickdown ....................................... 159
Manual shifting .............................. 160
Oil temperature (on-board com-
puter, Mercedes-AMG vehicles) ..... 255
Overview ........................................ 156
Problem (fault) ............................... 163
Pulling away ................................... 150
Starting the engine ........................ 150
Steering wheel gearshift paddle s... 160
Trailer towing ................................. 159
Transmission position display ........ 158
Transmission positions .................. 158
Automatic transmission emer-
gency running mode ......................... 163
AUX jacks
CD/DVD drive ............................... 311
Auxiliary heating
Setting ........................................... 253
Auxiliary heating/ventilation
Display message ............................ 288
Important safety notes .................. 140
Problem (display message) ............ 144
Remote control .............................. 141
Setting the departure time ............. 143
Switching on/off (on the centre
console) ......................................... 141
Axle load, permissible (trailer tow-
ing) ...................................................... 390 B
Back button ....................................... 304
Bag hook ............................................ 317
Ball coupling
Swinging in .................................... 235
Swinging out .................................. 235
BAS (Brake Assist System) ................. 69
Battery (key)
Checking .......................................... 84
Important safety notes .................... 84
Replacing ......................................... 84
Battery (vehicle)
Charging ........................................ 353
Display message ............................ 272
Important safety notes .................. 351
Jump starting ................................. 354 Overview ........................................ 351
Belt
see Seat belts
Belt tensioner
Activation ......................................... 54
Blind Spot Assist
Activating/deactivating ................. 250
Display message ............................ 279
Notes/function .............................. 219
Trailer towing ................................. 220
see Active Blind Spot Assist
Blootooth ®
Connecting a different mobile
phone ............................................ 307
BlueTEC
Topping up AdBlue ®
....................... 166
BlueTEC (AdBlue ®
) ............................. 384
Bluetooth ®
Searching for a mobile phone ........ 307
See also Digital Owner's Manua l... 303
Telephony ...................................... 306
Bonnet
Active bonnet (pedestrian protec-tion) ............................................... 332
Closing ........................................... 333
Display message ............................ 287
Important safety notes .................. 332
Opening ......................................... 333
Boot
see Tailgate
Brake Assist
see BAS (Brake Assist System)
Brake fluid
Display message ............................ 263
Note s............................................. 386
Brake force distribution
see EBD (electronic brake force
distribution)
Brake lamps
Adaptive ........................................... 72
Display message ............................ 270
Brakes
ABS .................................................. 69
Adaptive Brake Assist ...................... 71
BAS .................................................. 69
Brake fluid (notes) ......................... 386
Display message ............................ 259 6
Index
Page 25 of 397
Telephone compartment ................3
13
Telephone module with Bluetooth ®
(SAP profile) Activating and connecting the
module .......................................... .308
Charging a mobile phone .............. .310
Connecting the mobile phone ....... .309
Connecting the module via a USB
cable .............................................. 308
Data modem mode ........................ 309
Installing the module ..................... 308
Introduction ................................... 307
Saving/deleting the PIN for the
SIM card ........................................ 310
Settings ......................................... 310
SIM card mode .............................. 309
Text messages ............................... 310
Transferring the phone book .......... 310
Temperature
Coolant (display in the instrument
cluster) .......................................... 242
Coolant (on-board computer,
Mercedes-AMG vehicles) .............. .255
Engine oil (on-board computer,
Mercedes-AMG vehicles) .............. .255
Outside temperature ..................... .241
Setting (climate control) ................ 136
Transmission oil (on-board com-
puter, Mercedes-AMG vehicles) ..... 255
TEMPOMAT
Function/notes ............................ .180
Text messages
Telephone module with Blue-
tooth ®
(SAP profile) ....................... 310
Through-loading ................................ 315
Time
see Separate Owner's manual
Timing (RACETIMER) ......................... 256
TIREFIT Kit
Declaration of conformity ................ 29
Important safety notes .................. 348
Storage location ............................ 346
Tyre pressure not reached ............. 350
Tyre pressure reached ................... 350
Using ............................................. 349
Tool
see Vehicle tool kit Top Tether
............................................ 60
Total distance recorder .................... 244
Tow-away protection
Activating ......................................... 79
Deactivating ..................................... 79
Function .......................................... .79
Tow-starting
Emergency engine starting ............ 359
Important safety notes .................. 356
Towing
Important safety notes .................. 356
Notes for 4MATIC vehicles ............ 358
Transporting the vehicle ................ 358
Towing a trailer
Active Blind Spot Assist ................. 224
Active Lane Keeping Assist ............ 227
Axle load, permissibl e.................... 390
ESP ®
(Electronic Stability Pro-
gram) ............................................... 74
Failure check for LEDs ................... 238
Parking Assist PARKTRONIC .......... 201
Pulling away with a traile r.............. 151
Swinging out the ball coupling ....... 235
Swinging the ball coupling in ......... 235
Trailer tow hitch display message .. 288
Towing away
Fitting the towing ey e.................... 357
Removing the towing eye ............... 357
With both axles on the ground ....... 358
Towing eye ......................................... 345
Traffic Sign Assist
Activating/deactivating the warn-ing function .................................... 250
Display message ............................ 278
Function/note s............................. 217
Important safety notes .................. 218
Instrument cluster display ............. 218
Trailer coupling
see Towing a trailer
Trailer towing
7-pin connecto r............................. 238
Blind Spot Assist ............................ 220
Cleaning the trailer tow hitch ......... 342
Coupling up a traile r...................... 236
Decoupling a trailer ....................... 237
Driving tips .................................... 234
Important safety notes .................. 233 22
Index
Page 128 of 397
The
K indicator lamp in the instrument
cluster goes out. The _indicator lamp in
the multifunction display remains lit.
X To switch off: move the combination switch
back to its normal position or move the light
switch to another position.
The _ indicator lamp in the multifunction
display goes out. Headlamps misted up on the inside
Under certain climatic and physical conditions,
moisture may form in the headlamp. This mois-
ture will not impair the function of the headlamp. Interior lighting
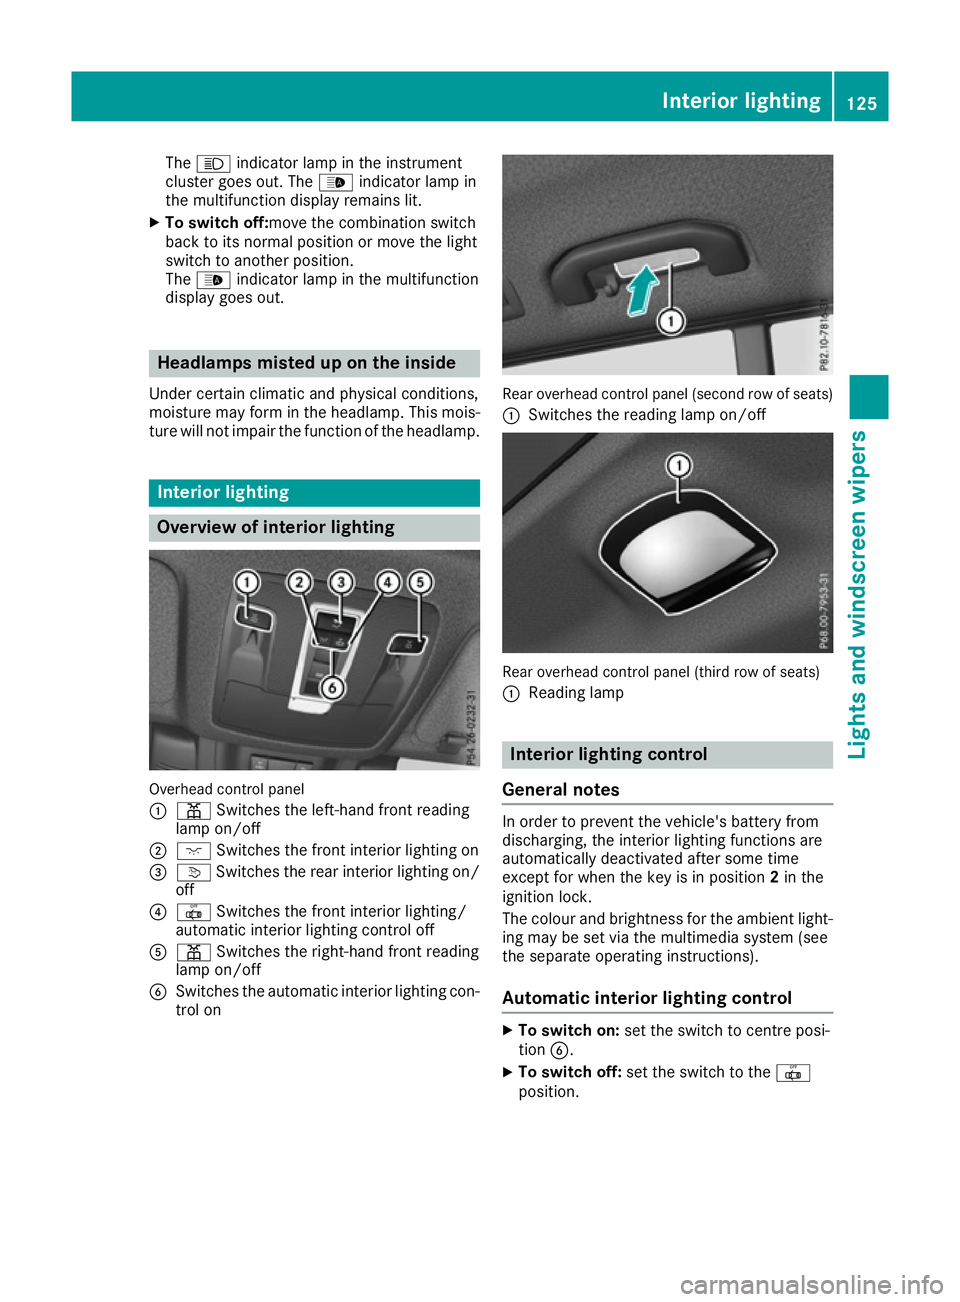
Overview of interior lighting
Overhead control panel
:
p Switches the left-hand front reading
lamp on/off
; c Switches the front interior lighting on
= v Switches the rear interior lighting on/
off
? | Switches the front interior lighting/
automatic interior lighting control off
A p Switches the right-hand front reading
lamp on/off
B Switches the automatic interior lighting con-
trol on Rear overhead control panel (second row of seats)
: Switches the reading lamp on/off Rear overhead control panel (third row of seats)
:
Reading lamp Interior lighting control
General notes In order to prevent the vehicle's battery from
discharging, the interior lighting functions are
automatically deactivated after some time
except for when the key is in position
2in the
ignition lock.
The colour and brightness for the ambient light-
ing may be set via the multimedia system (see
the separate operating instructions).
Automatic interior lighting control X
To switch on: set the switch to centre posi-
tion B.
X To switch off: set the switch to the |
position. Interior lighting
125Lights and windscreen wipers Z
Page 174 of 397
In addition, at least one of the following condi-
tions must be fulfilled:
R The engine is switched off
R The driver is not wearing a seat belt and the
driver's door is opened
R The system is malfunctioning
R The power supply is insufficient
R The vehicle is stationary for a lengthy period
The red !indicator lamp in the instrument
cluster lights up.
The electric parking brake is not automatically
applied if the engine is switched off by the ECO
start/stop function.
Releasing automatically The electric parking brake is released automat-
ically when all of the following conditions are
fulfilled:
R the engine is running.
R the transmission is in position Dor R
R the seat belt is fastened
R you depress the accelerator pedal
If the transmission is in position R, the boot lid
must be closed.
If your seat belt is not fastened, the following
conditions must be fulfilled for the electric park-
ing brake to be released automatically:
R the driver's door is closed
R you have shifted out of transmission position
P or you have previously driven faster than
3 km/h
i Ensure that you do not depress the accel-
erator pedal unintentionally. Otherwise, the
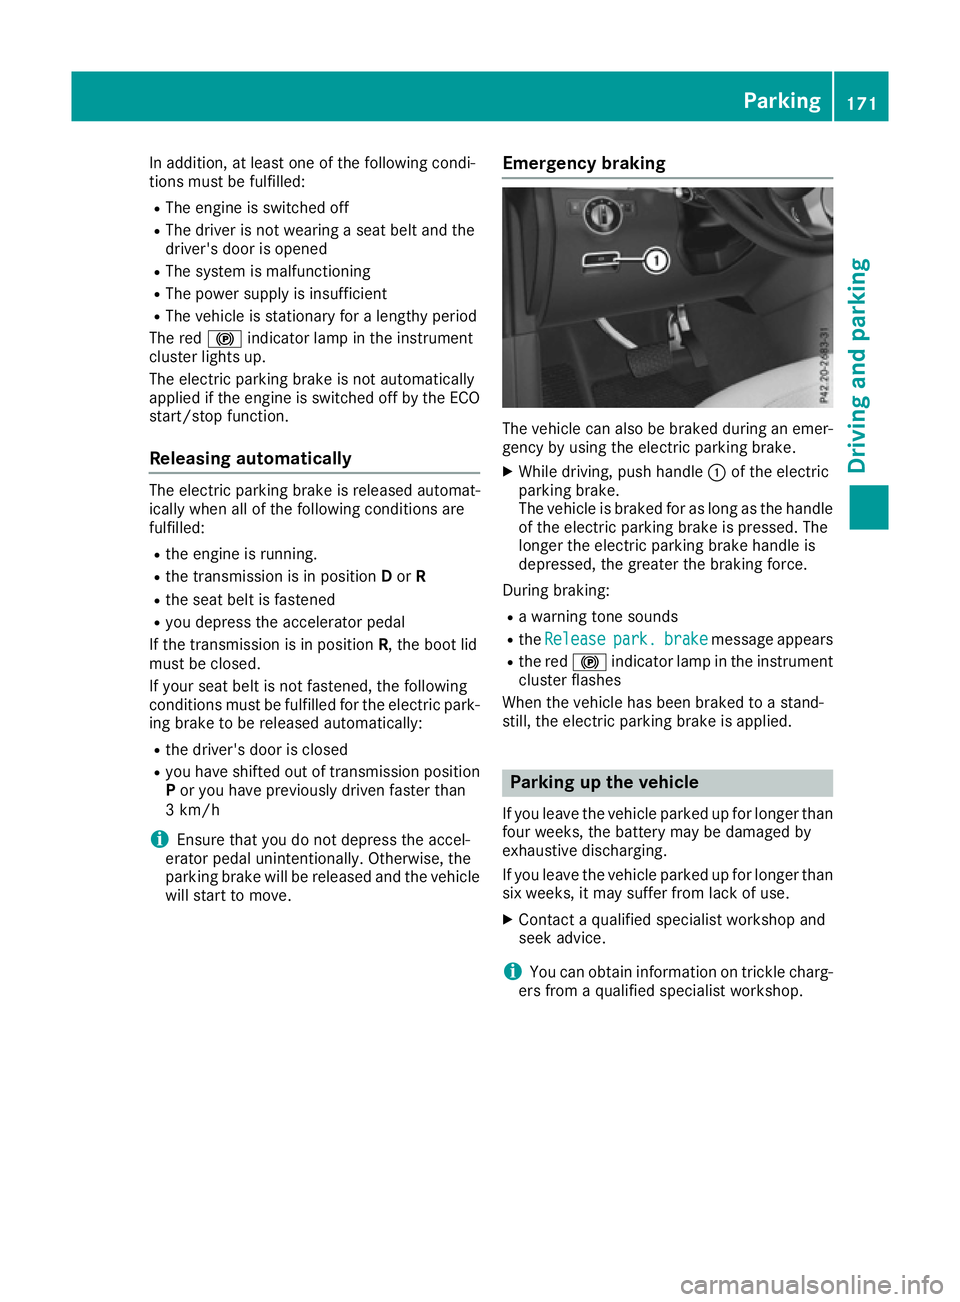
parking brake will be released and the vehicle will start to move. Emergency braking The vehicle can also be braked during an emer-
gency by using the electric parking brake.
X While driving, push handle :of the electric
parking brake.
The vehicle is braked for as long as the handle of the electric parking brake is pressed. The
longer the electric parking brake handle is
depressed, the greater the braking force.
During braking:
R a warning tone sounds
R the Release Release park.
park.brake
brakemessage appears
R the red !indicator lamp in the instrument
cluster flashes
When the vehicle has been braked to a stand-
still, the electric parking brake is applied. Parking up the vehicle
If you leave the vehicle parked up for longer than
four weeks, the battery may be damaged by
exhaustive discharging.
If you leave the vehicle parked up for longer than
six weeks, it may suffer from lack of use.
X Contact a qualified specialist workshop and
seek advice.
i You can obtain information on trickle charg-
ers from a qualified specialist workshop. Parking
171Driving and parking Z
Page 311 of 397
The following functions are available using the
module:
R hands-free mode
R data modem mode (Y page 309)
R sending and receiving text messages
(Y page 310)
R access to the phone book of the mobile phone
(if supported by the mobile phone)
(Y page 310)
R charging a mobile phone via the USB connec-
tion (Y page 310)
i The module is not available in all vehicles,
depending on the equipment.
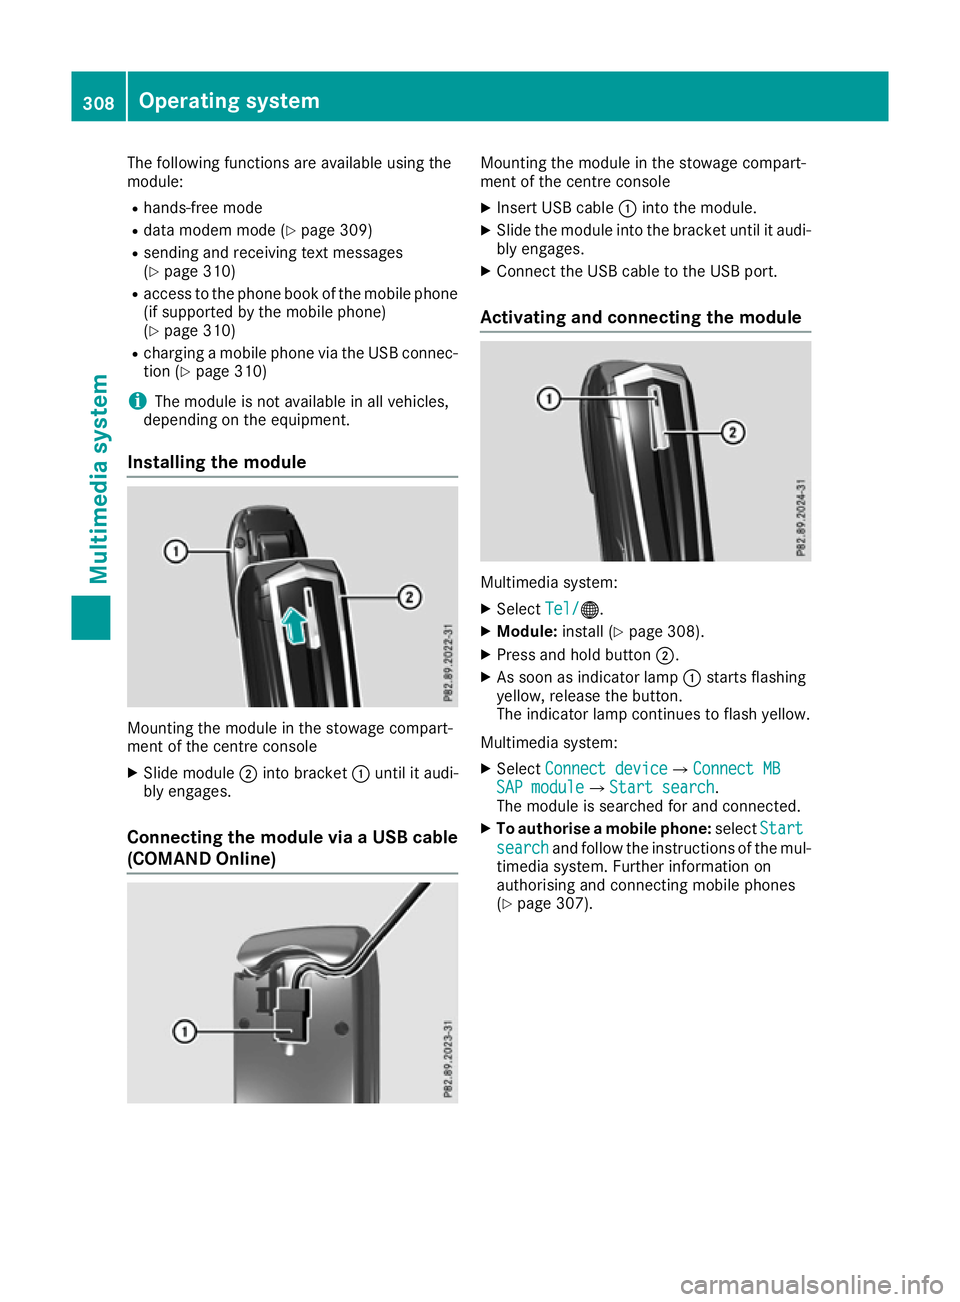
Installing the module Mounting the module in the stowage compart-
ment of the centre console
X Slide module ;into bracket :until it audi-
bly engages.
Connecting the module via a USB cable (COMAND Online) Mounting the module in the stowage compart-
ment of the centre console
X Insert USB cable :into the module.
X Slide the module into the bracket until it audi-
bly engages.
X Connect the USB cable to the USB port.
Activating and connecting the module Multimedia system:
X Select Tel/ Tel/®.
X Module: install (Y page 308).
X Press and hold button ;.
X As soon as indicator lamp :starts flashing
yellow, release the button.
The indicator lamp continues to flash yellow.
Multimedia system: X Select Connect device Connect deviceQConnect MB Connect MB
SAP module
SAP moduleQStart search Start search.
The module is searched for and connected.
X To authorise a mobile phone: selectStart
Start
search
search and follow the instructions of the mul-
timedia system. Further information on
authorising and connecting mobile phones
(Y page 307). 308
Operating systemMultimedia system
Page 313 of 397
For further information on data mode without
telephony with COMAND Online (see the man-
ufacturer's operating instructions).
Settings Storing/deleting the SIM card PIN
Multimedia system:
X Select Connect
Connect device
deviceQMB MBSAP
SAP module
module
phones
phones
X Highlight the mobile phone.
X To select G: navigate to the right.
X Activate Oor deactivate ªStore PINStore PIN.
Transferring the phone book In order to use the phone book of the mobile
phone via the multimedia system, the phone
book must be transferred using the module.
The transfer of data may take up to ten minutes.
Transmission occurs automatically after a Blue-
tooth ®
connection is automatically established.
Text messages Requirements
The module is connected with the mobile phone
(Y page 309) or is being used in the SIM card
mode (Y page 309).
Activating/deactivating text message
downloading from the mobile phone Dial number Function
00080 Text message down-
loading is deactiva-
ted.
00081 Text message down-
loading is activated.
For further information on receiving text mes-
sages when using the telephone module (see
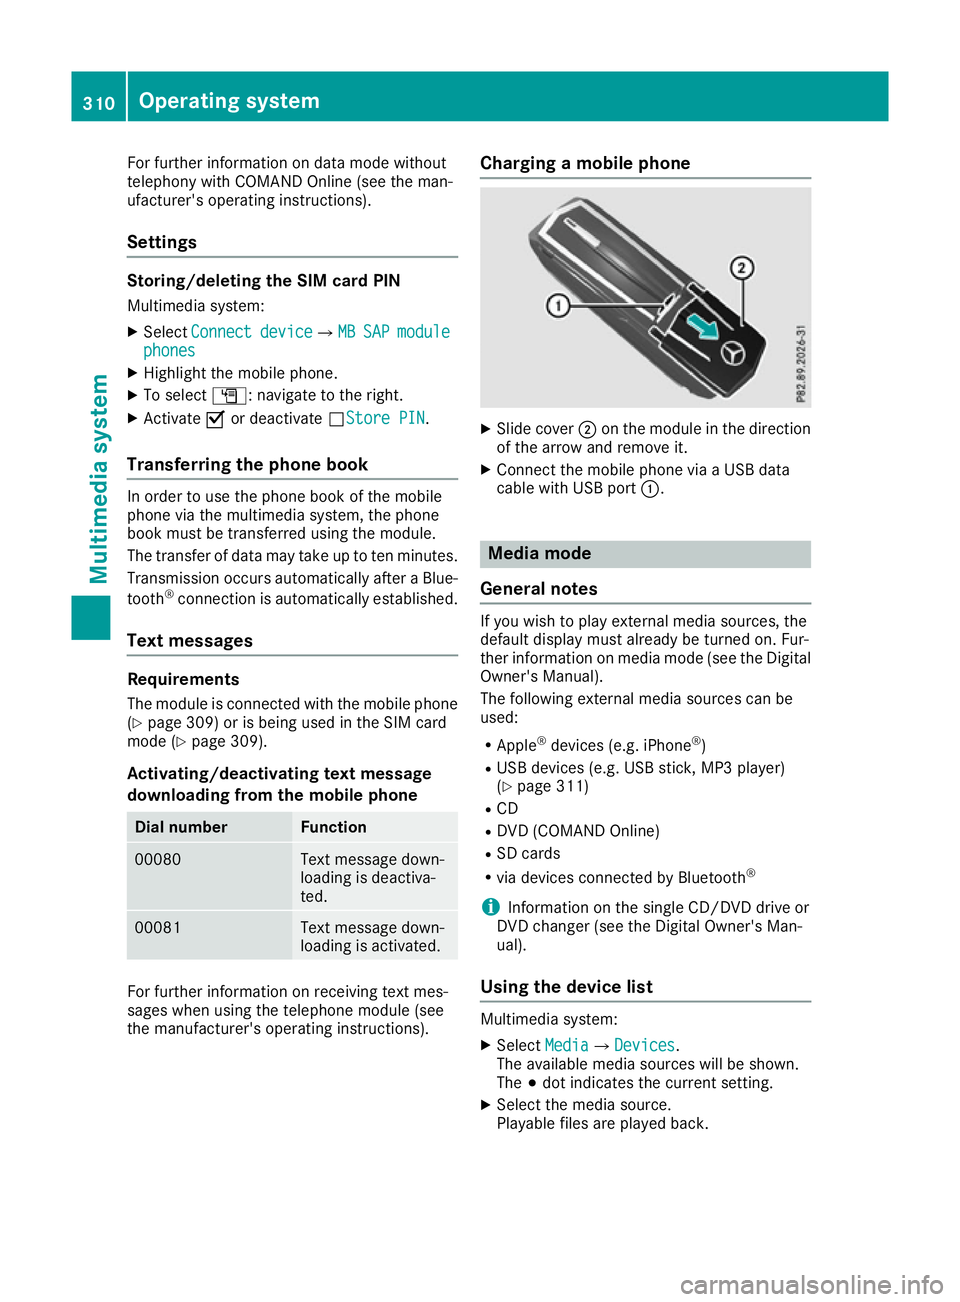
the manufacturer's operating instructions). Charging a mobile phone X
Slide cover ;on the module in the direction
of the arrow and remove it.
X Connect the mobile phone via a USB data
cable with USB port :. Media mode
General notes If you wish to play external media sources, the
default display must already be turned on. Fur-
ther information on media mode (see the Digital
Owner's Manual).
The following external media sources can be
used:
R Apple ®
devices (e.g. iPhone ®
)
R USB devices (e.g. USB stick, MP3 player)
(Y page 311)
R CD
R DVD (COMAND Online)
R SD cards
R via devices connected by Bluetooth ®
i Information on the single CD/DVD drive or
DVD changer (see the Digital Owner's Man-
ual).
Using the device list Multimedia system:
X Select Media MediaQDevices Devices.
The available media sources will be shown.
The #dot indicates the current setting.
X Select the media source.
Playable files are played back. 310
Operating systemMultimedia system
Page 328 of 397
You can find more information on the Mercedes-
Benz emergency call system in the separate
multimedia system operating instructions. Mobile phone
Important safety notes G
WARNING
Operating mobile communications equip-
ment while driving distracts you from paying
attention to traffic conditions. This could also cause you to lose control of the vehicle. There
is a risk of an accident.
Use this device only when the vehicle is sta-
tionary.
You must observe the legal requirements for the country in which you are currently driving when
operating mobile communications equipment in the vehicle.
If it is permitted by law to operate communica-
tions equipment while the vehicle is in motion,
you may only do so if the traffic situation per-
mits. You may otherwise be distracted from the
traffic conditions, cause an accident and injure
yourself and others.
Excessive levels of electromagnetic radiation
may cause damage to your health and to the
health of others. The use of an exterior aerial
takes into consideration the scientific discus-
sion surrounding the possible health risk posed
by electromagnetic fields.
Mercedes-Benz recommends the use of an
approved exterior aerial. This ensures:
R optimal mobile phone reception quality in the
vehicle
R that mutual interference between the vehicle
electronics and mobile phones is minimised
An exterior aerial has the following advantages:
R it conducts the electromagnetic fields gener-
ated by a wireless device to the exterior
R the field strength in the vehicle interior is
lower than in a vehicle that does not have an
exterior aerial
Information on retrofitting two-way radios and
mobile phones (RF transmitters) (Y page 379).General notes There are various mobile phone brackets that
may be fitted in your vehicle; in some cases,
these are country-specific.
More information on suitable mobile phones,
mobile phone brackets and on connecting Blue-
tooth ®
-capable mobile phones with the multi-
media system can be obtained:
R at your Mercedes-Benz Service Centre
R on the Internet at http://www.mercedes-
benz.com/connect
The functions and services available when you
use the phone depend on your mobile phone
model and service provider.
Using a mobile phone To connect a mobile phone to the exterior aerial
and charge it, insert it into the mobile phone
bracket.
X Open the telephone compartment
(Y page 313).
X Place the mobile phone bracket into the pre-
installed fitting; see the separate installation
instructions for the mobile phone fitting.
X Insert the mobile phone into the mobile phone
bracket; see the separate installation instruc-
tions for the mobile phone fitting.
i The mobile phone can also be operated
without being in the bracket. However, the
charging function and aerial function are not
available.
In order to use Bluetooth ®
(SAP profile) on your
telephone module, you must first insert the tele-
phone module into the pre-installed fitting. This connects it to the exterior aerial. If you wish to
charge the mobile phone, then you must con-
nect it to a USB port.
Further information on the telephone module
with Bluetooth ®
(SAP profile) can be found in the
Digital Owner's Manual.
Operating the mobile phone You can operate the telephone using the
6
and ~ buttons on the multifunction steering
wheel. You can operate other mobile phone
functions via the on-board computer
(Y page 248).
When you remove the key from the ignition lock, the mobile phone is disconnected from the vehi- Features
325Stowing and features Z
Page 354 of 397
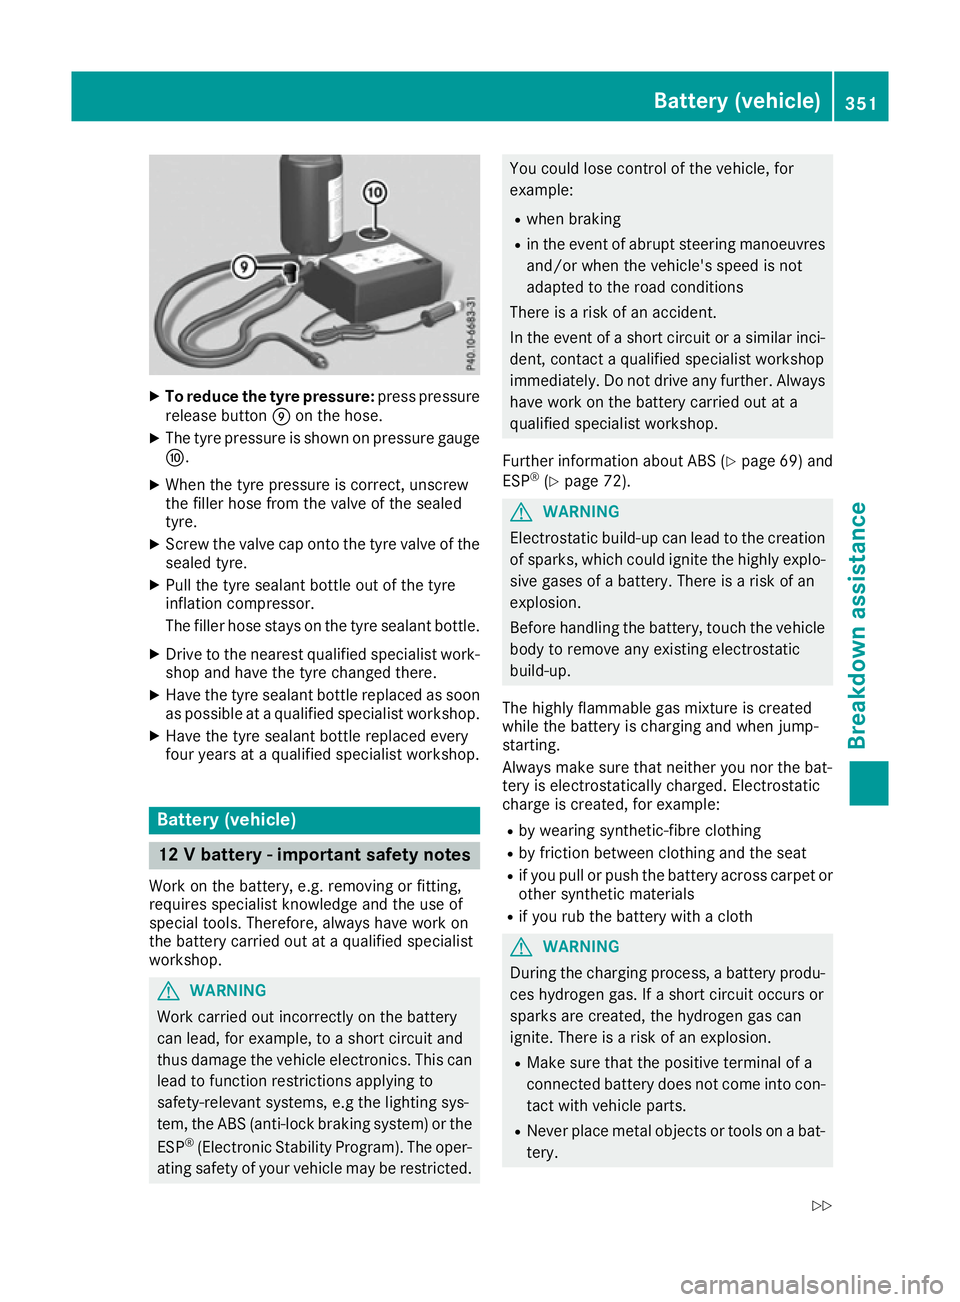
X
To reduce the tyre pressure: press pressure
release button Eon the hose.
X The tyre pressure is shown on pressure gauge
F.
X When the tyre pressure is correct, unscrew
the filler hose from the valve of the sealed
tyre.
X Screw the valve cap onto the tyre valve of the
sealed tyre.
X Pull the tyre sealant bottle out of the tyre
inflation compressor.
The filler hose stays on the tyre sealant bottle.
X Drive to the nearest qualified specialist work-
shop and have the tyre changed there.
X Have the tyre sealant bottle replaced as soon
as possible at a qualified specialist workshop.
X Have the tyre sealant bottle replaced every
four years at a qualified specialist workshop. Battery (vehicle)
12 V battery - important safety notes
Work on the battery, e.g. removing or fitting,
requires specialist knowledge and the use of
special tools. Therefore, always have work on
the battery carried out at a qualified specialist
workshop. G
WARNING
Work carried out incorrectly on the battery
can lead, for example, to a short circuit and
thus damage the vehicle electronics. This can lead to function restrictions applying to
safety-relevant systems, e.g the lighting sys-
tem, the ABS (anti-lock braking system) or the
ESP ®
(Electronic Stability Program). The oper-
ating safety of your vehicle may be restricted. You could lose control of the vehicle, for
example:
R when braking
R in the event of abrupt steering manoeuvres
and/or when the vehicle's speed is not
adapted to the road conditions
There is a risk of an accident.
In the event of a short circuit or a similar inci-
dent, contact a qualified specialist workshop
immediately. Do not drive any further. Always have work on the battery carried out at a
qualified specialist workshop.
Further information about ABS (Y page 69)and
ESP ®
(Y page 72). G
WARNING
Electrostatic build-up can lead to the creation of sparks, which could ignite the highly explo-
sive gases of a battery. There is a risk of an
explosion.
Before handling the battery, touch the vehicle body to remove any existing electrostatic
build-up.
The highly flammable gas mixture is created
while the battery is charging and when jump-
starting.
Always make sure that neither you nor the bat-
tery is electrostatically charged. Electrostatic
charge is created, for example: R by wearing synthetic-fibre clothing
R by friction between clothing and the seat
R if you pull or push the battery across carpet or
other synthetic materials
R if you rub the battery with a cloth G
WARNING
During the charging process, a battery produ- ces hydrogen gas. If a short circuit occurs or
sparks are created, the hydrogen gas can
ignite. There is a risk of an explosion.
R Make sure that the positive terminal of a
connected battery does not come into con-
tact with vehicle parts.
R Never place metal objects or tools on a bat-
tery. Battery (vehicle)
351Breakdown assis tance
Z