2016 MERCEDES-BENZ GLS SUV height adjustment
[x] Cancel search: height adjustmentPage 22 of 397

Fitting/removing the cover (front
wheel arch) .................................... 127
General notes ................................ 126
Important safety notes .................. 126
Main-beam headlamp s................... 127
Overview of bulb types .................. 126
Turn signals (front) ......................... 128
Replacing the battery (auxiliary
heating remote control) .................... 143
Rescue card ......................................... 31
Reserve (fuel tank)
see Fuel
Reserve fuel
Display message ............................ 274
Warning lamp ................................. 298
Residual heat (climate control) ........ 140
Restraint system
Display message ............................ 267
Introduction ..................................... 42
Warning lamp ................................. 298
Warning lamp (function) ................... 43
Rev counter ........................................ 241
Reversing camera
Cleaning instructions ..................... 341
Display in the multimedia system .. 208
Function/note s............................. 207
Switching on/of f........................... 208
Reversing feature
Panorama sliding sunroo f................ 97
Roller sunblind s............................... 99
Side windows ................................... 93
Sliding sunroof ................................. 97
Tailgate ............................................ 90
Reversing lamp (display message) .. 270
Roller sunblind
Panorama sliding sunroo f................ 99
Roof carrier ........................................ 319
Roof lining and carpets (cleaning
instructions) ...................................... 344
Roof load (maximum) ........................ 387
Route (navigation)
see Route guidance (navigation)
Route guidance
See also Digital Owner's Manua l... 303
Route guidance (navigation) ............ 245 S
Safety Children in the vehicle ..................... 57
see Occupant safety
see Operating safety
Safety system
see Driving safety systems
SD card
Inserting ........................................ 311
Inserting/removing ........................ 311
Removing ....................................... 311
SD memory card
See also Digital Owner's Manua l... 303
Selecting ........................................ 247
Seat belt
Correct usage .................................. 45
Switching belt adjustment on/off
(on-board computer) ...................... 254
Seat belts
Adjusting the driver's and front-
passenger seat belt ......................... 46
Adjusting the height ......................... 46
Cleaning ......................................... 344
Display message ............................ 266
Fastening ......................................... 46
Important safety guidelines ............. 44
Introduction ..................................... 44
Rear seat belt status indicator ......... 47
Releasing ......................................... 46
Warning lamp ................................. 291
Warning lamp (function) ................... 46
Seats
Adjusting (electrically) ................... 104
Adjusting the 4-way lumbar sup-
port ................................................ 112
Adjusting the head restraint .......... 104
Calling up a stored setting (mem-
ory function) .................................. 119
Cleaning the cover ......................... 343
Correct driver's seat position ........ 102
Entry position (3rd row of seats) .... 109
Exit position (3rd row of seats) ...... 109
Folding down/up (3rd row of
seats) ............................................. 107
Folding the 2nd row of seats
forward electrically ........................ 111 Index
19
Page 106 of 397

G
WARNING
You could lose control of the vehicle while
driving if you:
R adjust the driver's seat, steering wheel or
mirrors
R fasten the seat belt
There is a risk of an accident.
Adjust the driver's seat, head restraint, steer-
ing wheel and mirrors and fasten your seat
belt before starting the engine. G
WARNING
If you adjust the seat height carelessly, you or other vehicle occupants could be trapped andthereby injured. Children in particular could
accidentally press the electrical seat adjust-
ment buttons and become trapped. There is a
risk of injury.
While moving the seats, make sure that your
hands or other body parts do not get under the
lever assembly of the seat adjustment sys-
tem. G
WARNING
The head restraints cannot provide the inten-
ded protection unless they are fitted and
adjusted correctly. There is an increased risk of injury to the head and neck in the event of
an accident or sudden braking, for example.
Always drive with the head restraints fitted.
Ensure that the centre of the head restraints
support the back of each vehicle occupant's
head at eye level before driving off. G
WARNING
The seat belt does not offer the intended level of protection if you have not moved the back-
rest to an almost vertical position. When brak-
ing or in the event of an accident, you could
slide underneath the seat belt and sustain
abdomen or neck injuries, for example. This
poses an increased risk of injury or even fatal injury.
Adjust the seat properly before beginning
your journey. Always ensure that the backrest is in an almost vertical position and that the
shoulder section of your seatbelt is routed
across the centre of your shoulder.
! To avoid damage to the seats and the seat
heating, observe the following information:
R do not spill any liquids on the seats. If liquid
is spilled on the seats, dry them as soon as possible.
R if the seat covers are damp or wet, do not
switch on the seat heating. The seat heat-
ing should also not be used to dry the seats.
R clean the seat covers as recommended;
see "Interior care".
R do not transport heavy loads on the seats.
Do not place sharp objects on the seat
cushions, e.g. knives, nails or tools. The
seats should only be occupied by passen-
gers, if possible.
R when the seat heating is in operation, do
not cover the seats with insulating materi-
als, e.g. blankets, coats, bags, seat covers,
child seats or booster seats.
! Make sure that there are no objects in the
footwell under or behind the seats when mov- ing the seats back. There is a risk that the
seats and/or the objects could be damaged.
i The head restraints cannot be removed from
the front seats. The rear-compartment head
restraints, however, can be removed
(Y page 106).
For more information, contact a qualified spe-
cialist workshop.
i Further related subjects:
R Luggage compartment enlargement (fold-
ing down the rear bench seat)
(Y page 315) Seats
103Seats, steering wheel and mirrors Z
Page 107 of 397

Adjusting the seats electrically
:
Head restraint height
; Seat cushion angle
= Seat height
? Seat fore-and-aft adjustment
A Backrest angle
i Vehicles with memory function: if PRE-
SAFE ®
has been triggered, the front-
passenger seat will be moved to a better posi- tion if it was previously in an unfavourable
position.
i Vehicles with memory function: when the
seat is moved forwards or backwards, the
headrest is moved up or down automatically. Adjusting the head restraints
Important safety notes G
WARNING
You could lose control of the vehicle while
driving if you:
R adjust the driver's seat, steering wheel or
mirrors
R fasten the seat belt
There is a risk of an accident.
Adjust the driver's seat, head restraint, steer-
ing wheel and mirrors and fasten your seat
belt before starting the engine. G
WARNING
The head restraints cannot provide the inten-
ded protection unless they are fitted and
adjusted correctly. There is an increased risk of injury to the head and neck in the event of
an accident or sudden braking, for example.
Always drive with the head restraints fitted.
Ensure that the centre of the head restraints
support the back of each vehicle occupant's
head at eye level before driving off.
Do not interchange the head restraints of the
front and rear seats. Otherwise, you will not be
able to adjust the height and angle of the head
restraints to the correct position.
Adjust the head restraint fore-and-aft position
so that it is as close as possible to the back of
your head.
Observe the important safety guidelines for
seats (Y page 102).
Adjusting the head restraints manually Adjusting the head restraint height
X
To raise: pull the head restraint up to the
desired position.
X To lower: press release catch :in the direc-
tion of the arrow and push the head restraint down to the desired position. 104
SeatsSeats
, steering wheel and mirrors
Page 108 of 397

Adjusting the head restraint fore-and-aft
position This function allows you to adjust the distance
between the head restraint and the back of the
head.
X To move forwards: pull the head restraint
forwards in the direction of the arrow until it
engages.
There are a number of detents.
X To move backwards: press and hold release
button :and push the head restraint back-
wards.
X When the head restraint is in the desired posi-
tion, release the button and make sure that
the head restraint is engaged in position.
i Adjust the head restraint so that the back of
your head is as close to the head restraint as possible.
Adjusting the head restraints electri-
cally X
To adjust the head restraint height: slide
the switch for the head restraint adjustment
(Y page 104) up or down in the direction of the
arrow. Adjusting the luxury head restraints The first row of seats has luxury head restraints.
X To adjust the side bolsters: push or pull
right- and/or left-hand side bolster :into
the desired position.
X To adjust the fore-and-aft position of the
head restraint:
push or pull the head
restraint in the direction of arrow ;.
i Adjust the head restraint so that the back of
your head is as close to the head restraint as possible.
Rear seat head restraints Adjusting the rear seat head restraint
height
X
If the head restraint is fully lowered, it is nec-
essary to press release catch :.
X To raise: pull the head restraint up to the
desired height.
X To lower: press release catch :and push
the head restraint down until it is in the
desired position. Seats
105Seats, steering wheel and mirrors Z
Page 117 of 397

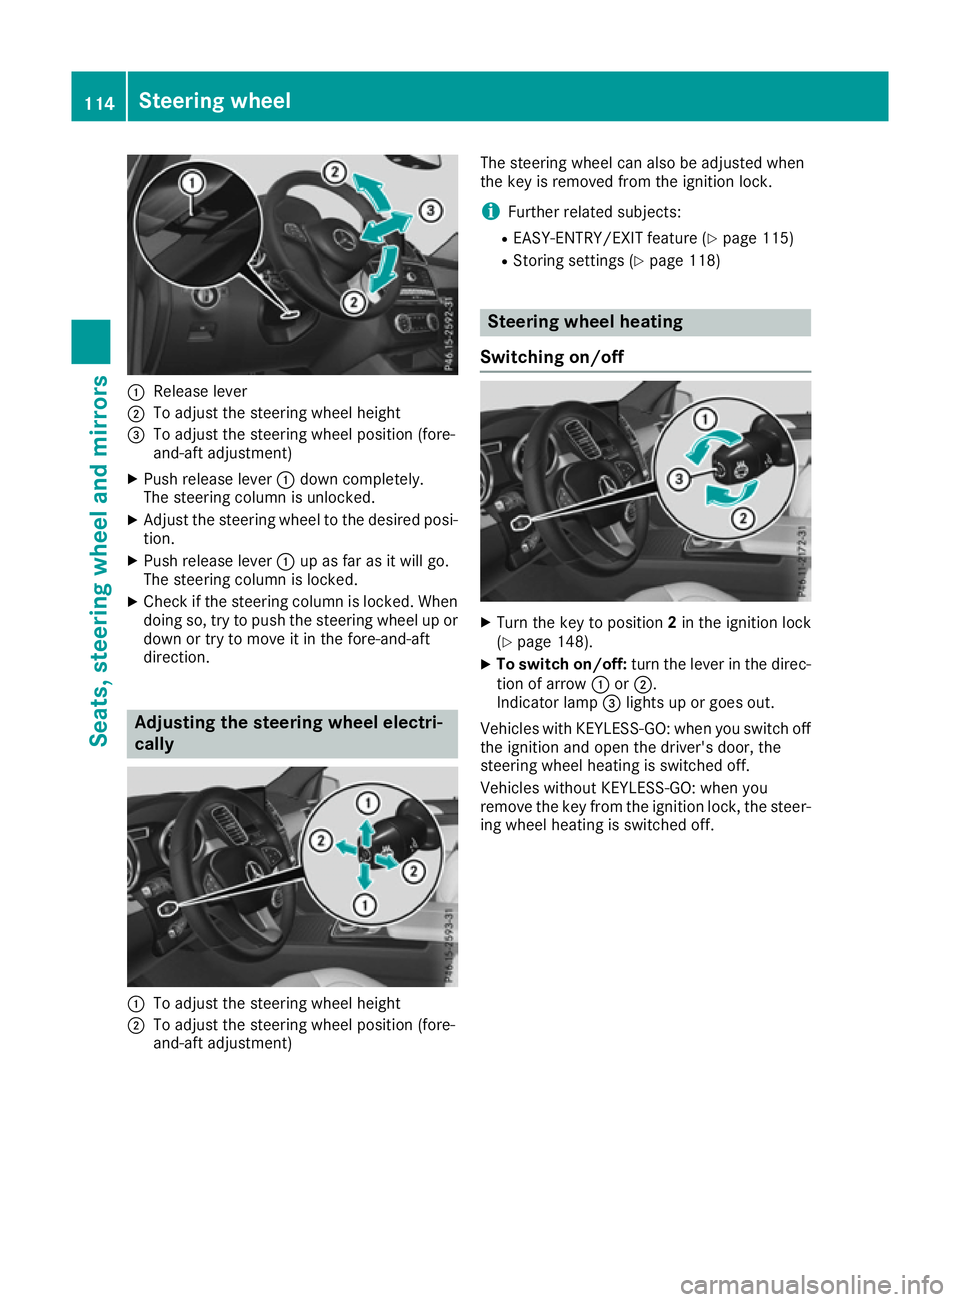
:
Release lever
; To adjust the steering wheel height
= To adjust the steering wheel position (fore-
and-aft adjustment)
X Push release lever :down completely.
The steering column is unlocked.
X Adjust the steering wheel to the desired posi-
tion.
X Push release lever :up as far as it will go.
The steering column is locked.
X Check if the steering column is locked. When
doing so, try to push the steering wheel up or
down or try to move it in the fore-and-aft
direction. Adjusting the steering wheel electri-
cally :
To adjust the steering wheel height
; To adjust the steering wheel position (fore-
and-aft adjustment) The steering wheel can also be adjusted when
the key is removed from the ignition lock.
i Further related subjects:
R EASY-ENTRY/EXIT feature (Y page 115)
R Storing settings (Y page 118) Steering wheel heating
Switching on/off X
Turn the key to position 2in the ignition lock
(Y page 148).
X To switch on/off: turn the lever in the direc-
tion of arrow :or;.
Indicator lamp =lights up or goes out.
Vehicles with KEYLESS-GO: when you switch off the ignition and open the driver's door, the
steering wheel heating is switched off.
Vehicles without KEYLESS-GO: when you
remove the key from the ignition lock, the steer-
ing wheel heating is switched off. 114
Steering wheelSeats
, steering wheel and mirrors
Page 196 of 397

Always select as low a vehicle level as possi-
ble and adjust your driving style accordingly. G
WARNING
When driving with a lowered or raised chassis frame, the driving and braking characteristics
may be seriously affected. A raised chassis
frame may also exceed the permissible vehi-
cle height. There is a risk of an accident.
Set the driving level before pulling away. G
WARNING
Due to the high centre of gravity, the vehicle
may start to skid and overturn in the event of abrupt steering manoeuvres and/or when the
vehicle's speed is not adapted to the road
conditions. There is a risk of an accident.
Always adapt your speed and driving style to
the vehicle's driving characteristics and to the prevailing road and weather conditions.
! When driving on extremely rough terrain,
select a high vehicle level in good time. Make
sure there is always sufficient ground clear-
ance. You will otherwise damage the vehicle.
R SUVs overturn considerably more often than
other vehicle types.
If this vehicle is not driven in a safe manner, it can lead to an accident, to the vehicle over-
turning as well as serious or even fatal inju-
ries.
R In the event of an accident with the vehicle
overturning, passengers who are not wearing
their seat belt are considerably more likely to die than passengers wearing their seat belt.
You and all vehicle occupants should always
wear your seat belts.
Basic settings The extent to which the vehicle is raised or low-
ered depends on the basic setting selected.
Select:
R the Comfort orSport drive program for driv-
ing on normal roads
R the Offroad drive program for driving on eas-
ily negotiable off-road terrain
R the Offroad Plus drive program for off-road
driving R
Offroad level 1 for driving on easily negotiable
off-road terrain
R Offroad level 2 for driving on normal off-road
terrain
R Offroad level 3 for freeing the vehicle from
especially difficult off-road terrain at low
speeds
The individual vehicle levels differ from the nor- mal level as follows:
R –15 mm in the Sportdrive program
R +/–0 mm in the Comfortdrive program
R + 30 mm in the Offroaddrive program
R + 60 mm in the Offroad Plusdrive program
R + 30 mm in offroad level 1
R + 60 mm in offroad level 2
R + 90 mm in offroad level 3
Setting the vehicle level !
Make sure there is enough ground clear-
ance when the vehicle is being lowered. It
could otherwise hit the ground, damaging the
underbody. Setting the vehicle level using the selector
wheel
X Start the engine.
X Press selector wheel :.
Selector wheel :extends.
X To raise the vehicle: turn selector wheel :
clockwise ;.
The vehicle is raised.
X To lower the vehicle: turn selector wheel :
anti-clockwise ?.
The vehicle is lowered.
During the adjustment, the Lowering
Lowering orVehi‐ Vehi‐
cle
cle rising
rising message appears in the multifunc-
tion display. Driving systems
193Driving and parking Z
Page 203 of 397

X
Start the engine.
If indicator lamp ;is lit:
X Press button :.
Indicator lamp ;flashes while the vehicle is
being lowered, and goes out as soon as the
desired vehicle level is reached.
Vehicles with no trailer coupled: the vehi-
cle is adjusted to the height of the selected
drive program (Y page 155).
Vehicles with a trailer coupled: the vehicle
is adjusted to normal level regardless of the
drive program selected (Y page 155). The
vehicle remains at normal level, even if you
change drive programs.
During the adjustment, the Lowering
Lowering mes-
sage appears in the multifunction display.
If you press the %ora button on the
multifunction steering wheel, the message will
disappear. AMG RIDE CONTROL
General notes The electronically controlled damping system
works continuously. This improves driving
safety and ride comfort.
The damping is tuned individually to each wheel
and depends on:
R your driving style, e.g. sporty
R the road surface condition, e.g. bumps
R your individual selection of Sport, Sport + or
Comfort
The suspension setting can be adjusted using
the corresponding button in the centre console
or the DYNAMIC SELECT controller
(Y page 155).
If the ignition is switched off for less than four
hours, the previously selected drive program is
activated when the engine is next started. If the
ignition is switched off for more than four hours, Comfort mode is activated when the engine is
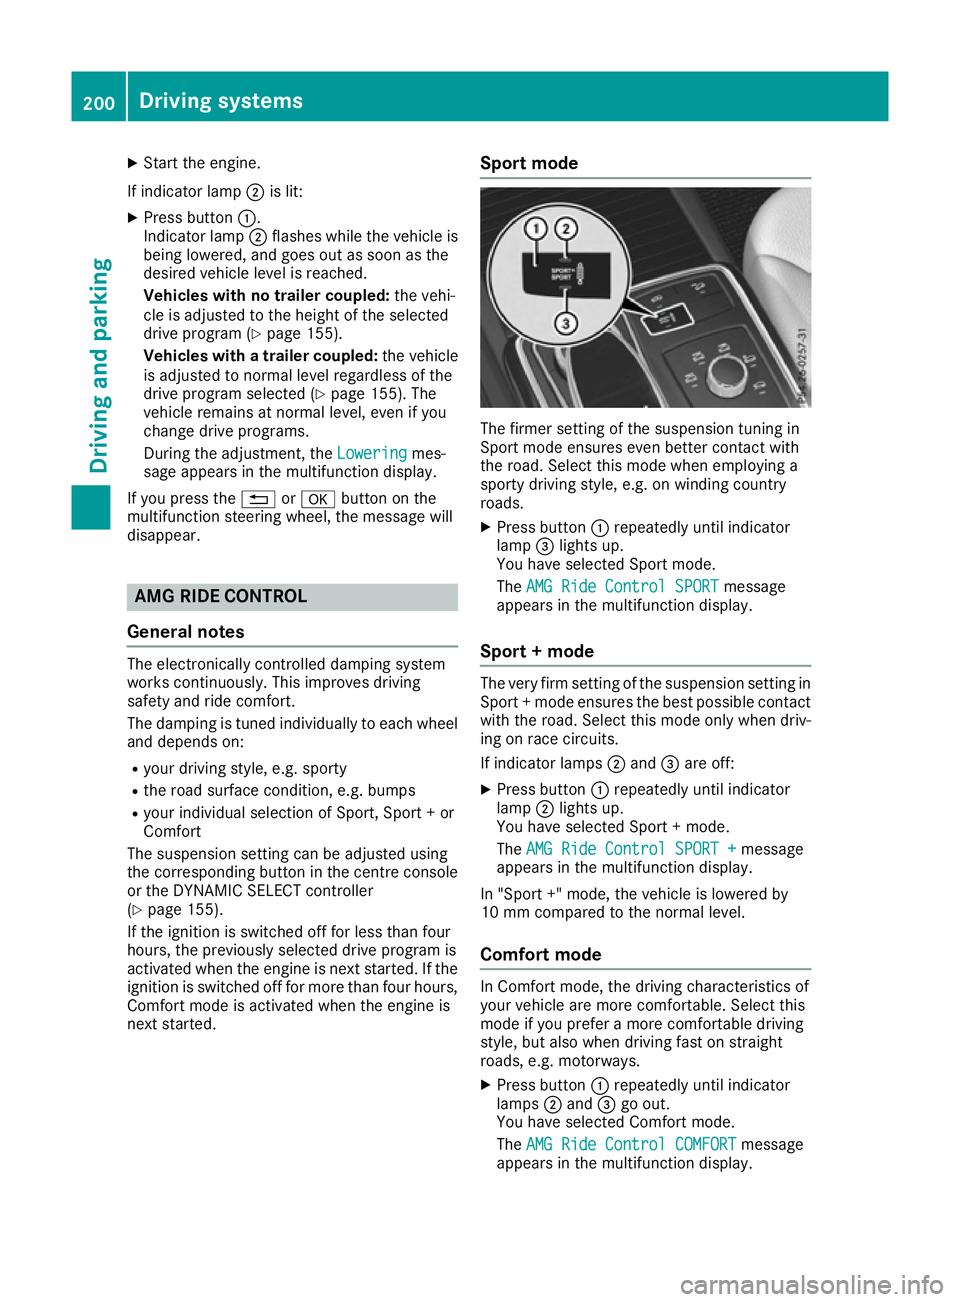
next started. Sport mode The firmer setting of the suspension tuning in
Sport mode ensures even better contact with
the road. Select this mode when employing a
sporty driving style, e.g. on winding country
roads.
X Press button :repeatedly until indicator
lamp =lights up.
You have selected Sport mode.
The AMG Ride Control SPORT AMG Ride Control SPORT message
appears in the multifunction display.
Sport + mode The very firm setting of the suspension setting in
Sport + mode ensures the best possible contact
with the road. Select this mode only when driv-
ing on race circuits.
If indicator lamps ;and =are off:
X Press button :repeatedly until indicator
lamp ;lights up.
You have selected Sport + mode.
The AMG Ride Control SPORT + AMG Ride Control SPORT + message
appears in the multifunction display.
In "Sport +" mode, the vehicle is lowered by
10 mm compared to the normal level.
Comfort mode In Comfort mode, the driving characteristics of
your vehicle are more comfortable. Select this
mode if you prefer a more comfortable driving
style, but also when driving fast on straight
roads, e.g. motorways.
X Press button :repeatedly until indicator
lamps ;and =go out.
You have selected Comfort mode.
The AMG Ride Control COMFORT AMG Ride Control COMFORT message
appears in the multifunction display. 200
Driving systemsDriving and parking