2016 MERCEDES-BENZ GLS SUV towing capacity
[x] Cancel search: towing capacityPage 7 of 397

1, 2, 3 ...
4ETS (Electronic Traction System) see ETS/4ETS (Electronic Trac-
tion System)
4MATIC (permanent four-wheel
drive) .................................................. 227
12 V socket
see Sockets
360° camera
Cleaning .........................................3 41
Display in the multimedia system .. 214
Function/notes ............................ .212 A
ABS (Anti-lock Braking System) Display message ............................ 259
Function/notes ................................ 69
Important safety notes .................... 69
Warning lamp ................................. 293
Accident
Automatic measures after an acci-
dent ................................................. 57
Activating media mode
General notes ................................ 310
Activating/deactivating air-recir-
culation mode ................................... .138
Activating/deactivating cooling
with air dehumidification ................. 135
Active Blind Spot Assist
Activating/deactivating (on-
board computer) ............................ 250
Display message ............................ 279
Function/notes ............................ .222
Towing a trailer .............................. 224
Active Brake Assist
Activating or deactivating .............. 250
Display message ............................ 264
Function/notes ................................ 70
Active Brake Assist with cross-
traffic function
Activating or deactivating .............. 250
Display message ............................ 265
Function/notes ................................ 75
Important safety notes .................... 76
Warning lamp ................................. 301 Active Curve System
Display message ............................ 276
Function/notes ............................ .198
Active Lane Keeping Assist
Activating/deactivating (on-
board computer) ............................ 251
Display message ............................ 278
Function/notes ............................ .224
Towing a trailer .............................. 227
Active light function ......................... 123
ADAPTIVE BRAKE ................................. 75
Adaptive Brake Assist
Function/notes ................................ 71
Adaptive brake lights .......................... 72
Adaptive Damping System
Function/notes ............................ .200
Adaptive Highbeam Assist Plus
Display message ............................ 271
Function/notes ............................ .124
Switching on/off ........................... 124
AdBlue ®
Display message ............................ 274
Filling capacity ............................... 385
Important safety notes .................. 384
Topping up ..................................... 166
Additives (engine oil) ........................ 385
Address book
See also Digital Owner's Manual ... 303
Adjusting the headlamp range ......... 122
Adjusting the volume
COMAND Online ............................ 304
Adjusting volume
Audio 20 ........................................ 304
ADS (Adaptive Damping System)
Function/notes ............................ .197
Air conditioning
General notes ................................ 131
Air filter (white display message) .... 274
AIR FLOW .......................................... .136
Air pressure
see Tyre pressure
Air vents
Glove compartment ....................... 145
Important safety notes .................. 144
Rear ............................................... 145
Setting .......................................... .144
Setting the centre air vents ........... 144 4
Index
Page 14 of 397

ECO start/stop function
Automatic engine start .................. 152
Automatic engine switch-off .......... 152
Deactivating/activating ................ .153
General information ....................... 151
Important safety notes .................. 151
Introduction ................................... 151
Electromagnetic compatibility
Declaration of conformity ................ 28
Electronic Stability Program
see ESP ®
(Electronic Stability Program)
Emergency
Automatic measures after an acci-
dent ................................................. 57
Emergency key
Unlocking the driver's door .............. 89
Emergency key element
Function/notes ................................ 83
General notes .................................. 83
Inserting .......................................... 84
Locking vehicle ................................ 89
Removing ......................................... 83
Emergency release
Driver's door ................................... .89
Emergency spare wheel
General notes ................................ 375
Important safety notes .................. 375
Inflating the collapsible spare
wheel ............................................ .377
Removing ....................................... 375
Storage location ............................ 375
Stowing .......................................... 375
Emergency unlocking
Tailgate ............................................ 93
Vehicle ............................................. 89
Engine
Display message ............................ 271
ECO start/stop function ................ 151
Engine number ............................... 381
Jump-starting ................................. 354
Running irregularl y......................... 154
Starting (important safety notes )... 149
Starting problems .......................... 154
Starting the engine with the key .... 150
Starting with KEYLESS GO ............. 150
Stopping ........................................ 169
Tow-starting (vehicle) ..................... 359 Warning lamp (engine diagnos-
tics) ............................................... 298
Engine electronics
Notes ............................................. 379
Problem (fault) ............................... 154
Engine jump starting
see Jump starting (engine)
Engine oil
Additives ........................................ 385
Checking the oil level ..................... 334
Checking the oil level using the
dipstick .......................................... 334
Display message ............................ 273
Filling capacity ............................... 385
Notes about oil grade s................... 385
Notes on oil level/consumption .... 334
Temperature (on-board computer, Mercedes-AMG vehicles) ............... 255
Topping up ..................................... 334
Engine switch-off
see ECO start/stop function
Entering an address
See also Digital Owner's Manua l... 303
Environmental protection
Returning an end-of-life vehicle ....... 26
ESP ®
(Electronic Stability Pro-
gram)
AMG menu (on-board computer) ... 256
Characteristics ................................. 73
Deactivating/activating ................... 73
Display message ............................ 259
Function/note s................................ 72
General notes .................................. 72
Important safety guidelines ............. 73
Trailer stabilisation .......................... 74
Warning lamp ................................. 295
ETS/4ETS (Electronic Traction Sys-
tem) ...................................................... 72
Exhaust pipe (cleaning instruc-
tions) .................................................. 342
Exterior lighting
see Lights
Exterior mirrors
Adjusting ....................................... 116
Anti-dazzle mode (automatic) ........ 117
Folding in when locking (on-boardcomputer) ...................................... 255 Index
11
Page 319 of 397

!
The backrest is heavy. Therefore, exercise
care when folding it down. Make sure that the
head restraints are pushed all the way in so
that the backrests and seat cushions are not
damaged.
Observe the loading guidelines (Y page 312).
The left-hand and right-hand backrests in the
2nd row of seats can be folded forwards sepa-
rately to increase the luggage compartment
capacity.
On vehicles with a third row of seats, you must
fold down the 3rd row of seats beforehand
(Y page 107) to obtain maximum luggage com-
partment enlargement.
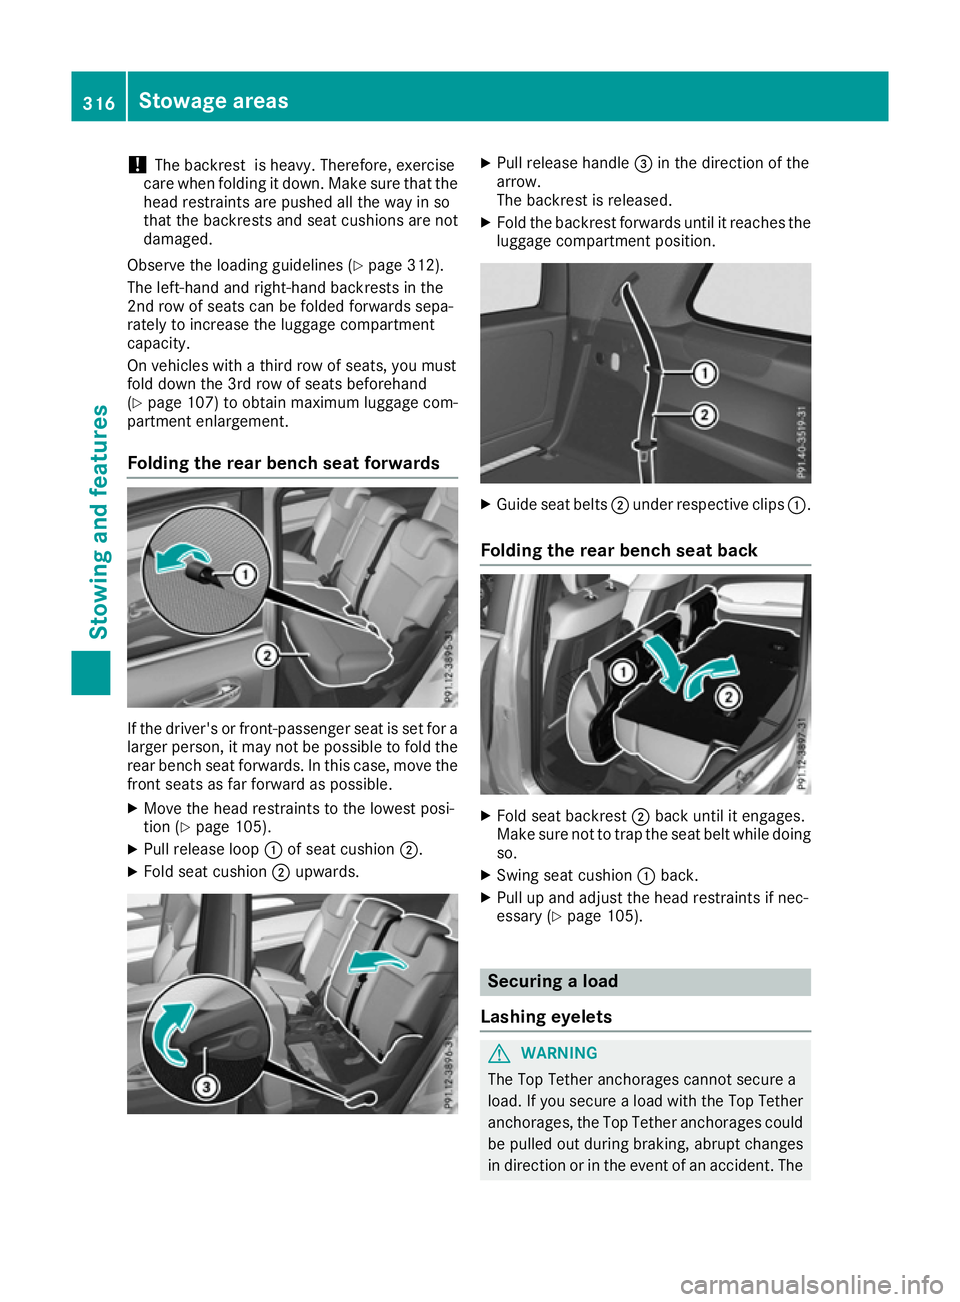
Folding the rear bench seat forwards If the driver's or front-passenger seat is set for a
larger person, it may not be possible to fold the
rear bench seat forwards. In this case, move the front seats as far forward as possible.
X Move the head restraints to the lowest posi-
tion (Y page 105).
X Pull release loop :of seat cushion ;.
X Fold seat cushion ;upwards. X
Pull release handle =in the direction of the
arrow.
The backrest is released.
X Fold the backrest forwards until it reaches the
luggage compartment position. X
Guide seat belts ;under respective clips :.
Folding the rear bench seat back X
Fold seat backrest ;back until it engages.
Make sure not to trap the seat belt while doing so.
X Swing seat cushion :back.
X Pull up and adjust the head restraints if nec-
essary (Y page 105). Securing a load
Lashing eyelets G
WARNING
The Top Tether anchorages cannot secure a
load. If you secure a load with the Top Tether
anchorages, the Top Tether anchorages could be pulled out during braking, abrupt changes
in direction or in the event of an accident. The 316
Stowage areasStowing and features
Page 323 of 397

Depending on the vehicle equipment, ensure
that when the roof carrier is fitted you can:
R raise the sliding sunroof fully
R open the panorama sliding sunroof fully
R open the tailgate fully
You will find information on the maximum roof
load in the "Technical data" section
(Y page 387).
An incorrectly secured roof carrier or roof load
may become detached from the vehicle. You
must therefore ensure that you observe the roof
carrier manufacturer's installation instructions.
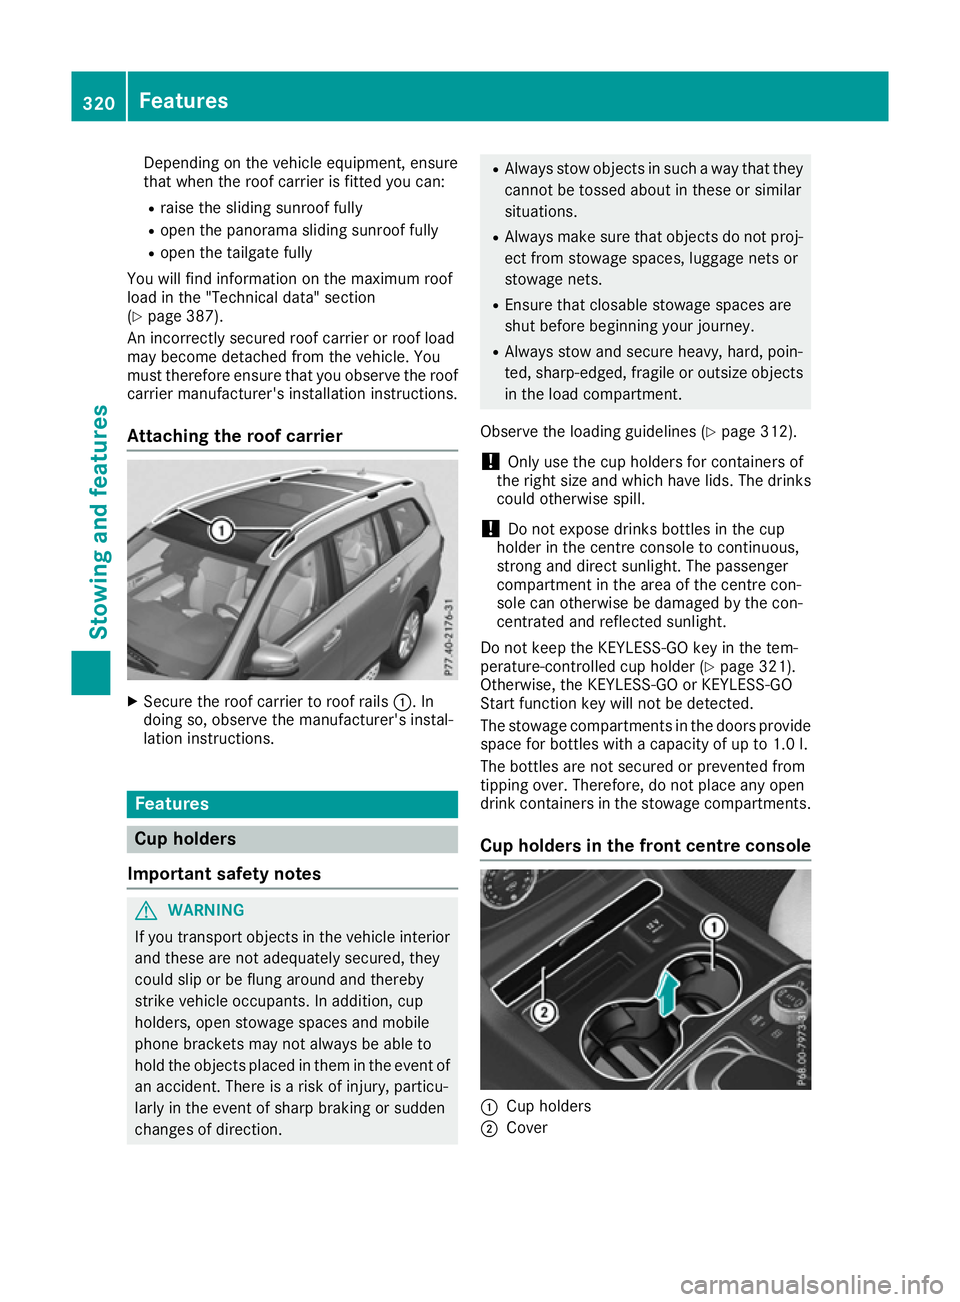
Attaching the roof carrier X
Secure the roof carrier to roof rails :. In
doing so, observe the manufacturer's instal-
lation instructions. Features
Cup holders
Important safety notes G
WARNING
If you transport objects in the vehicle interior and these are not adequately secured, they
could slip or be flung around and thereby
strike vehicle occupants. In addition, cup
holders, open stowage spaces and mobile
phone brackets may not always be able to
hold the objects placed in them in the event of an accident. There is a risk of injury, particu-
larly in the event of sharp braking or sudden
changes of direction. R
Always stow objects in such a way that they
cannot be tossed about in these or similar
situations.
R Always make sure that objects do not proj-
ect from stowage spaces, luggage nets or
stowage nets.
R Ensure that closable stowage spaces are
shut before beginning your journey.
R Always stow and secure heavy, hard, poin-
ted, sharp-edged, fragile or outsize objects
in the load compartment.
Observe the loading guidelines (Y page 312).
! Only use the cup holders for containers of
the right size and which have lids. The drinks
could otherwise spill.
! Do not expose drinks bottles in the cup
holder in the centre console to continuous,
strong and direct sunlight. The passenger
compartment in the area of the centre con-
sole can otherwise be damaged by the con-
centrated and reflected sunlight.
Do not keep the KEYLESS-GO key in the tem-
perature-controlled cup holder (Y page 321).
Otherwise, the KEYLESS-GO or KEYLESS-GO
Start function key will not be detected.
The stowage compartments in the doors provide
space for bottles with a capacity of up to 1.0 l.
The bottles are not secured or prevented from
tipping over. Therefore, do not place any open
drink containers in the stowage compartments.
Cup holders in the front centre console :
Cup holders
; Cover 320
FeaturesStowing and features
Page 349 of 397

the vehicle. For more information on which tools
are required to perform a wheel change on your vehicle, consult a qualified specialist workshop.
Necessary tyre-changing tools may include, for
example:
R jack
R wheel chock
R wheel wrench
R ratchet ring spanner
R centring pin
i The jack weighs approximately 3.4 kg.
The maximum load-bearing capacity of the
jack can be found on the adhesive label on the
jack.
The jack is maintenance-free. If there is a
malfunction, please contact a qualified spe-
cialist workshop.
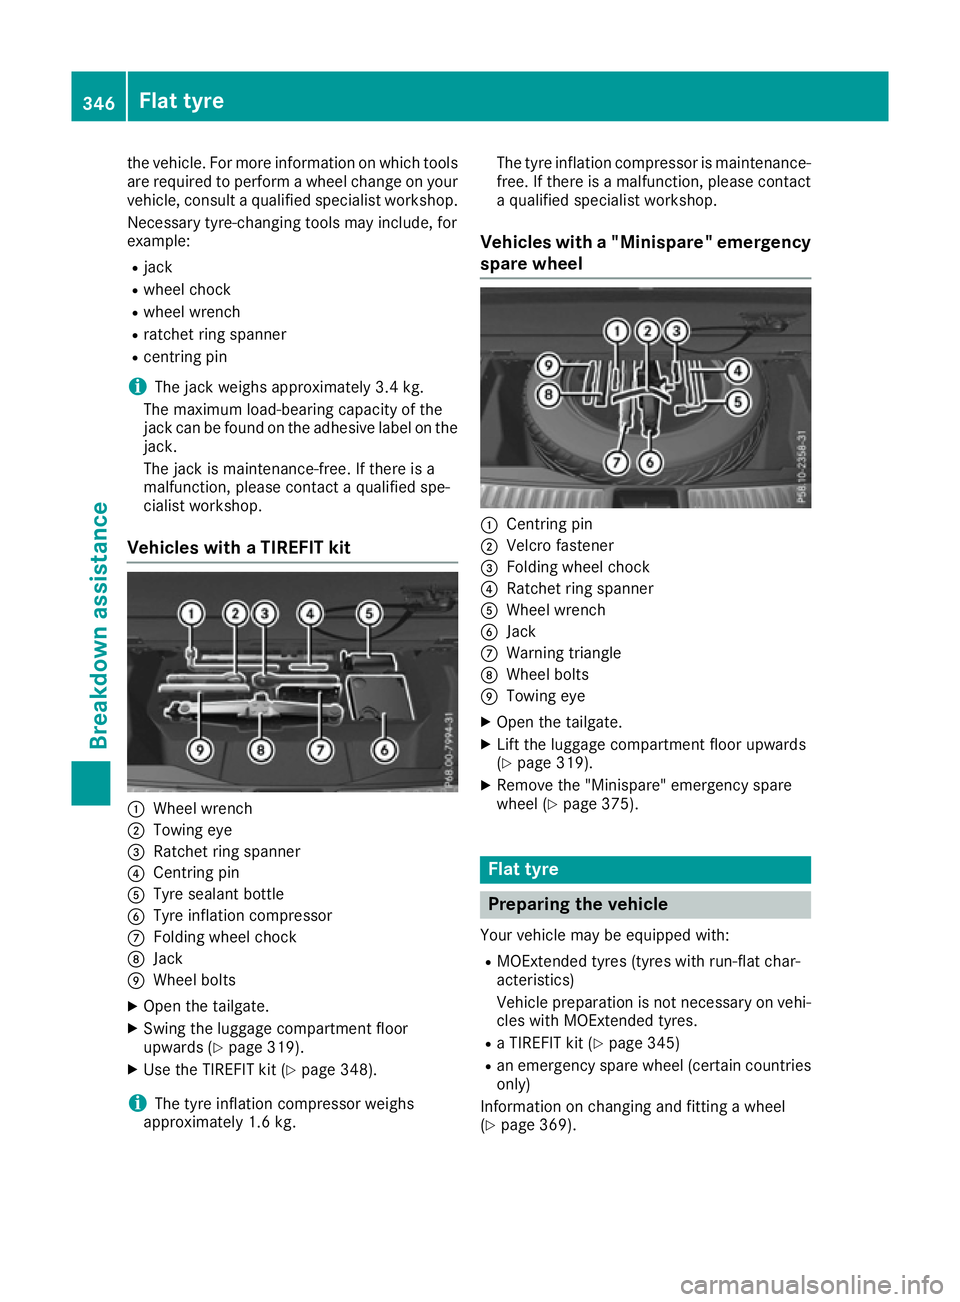
Vehicles with a TIREFIT kit :
Wheel wrench
; Towing eye
= Ratchet ring spanner
? Centring pin
A Tyre sealant bottle
B Tyre inflation compressor
C Folding wheel chock
D Jack
E Wheel bolts
X Open the tailgate.
X Swing the luggage compartment floor
upwards (Y page 319).
X Use the TIREFIT kit (Y page 348).
i The tyre inflation compressor weighs
approximately 1.6 kg. The tyre inflation compressor is maintenance-
free. If there is a malfunction, please contact a qualified specialist workshop.
Vehicles with a "Minispare" emergency
spare wheel :
Centring pin
; Velcro fastener
= Folding wheel chock
? Ratchet ring spanner
A Wheel wrench
B Jack
C Warning triangle
D Wheel bolts
E Towing eye
X Open the tailgate.
X Lift the luggage compartment floor upwards
(Y page 319).
X Remove the "Minispare" emergency spare
wheel (Y page 375). Flat tyre
Preparing the vehicle
Your vehicle may be equipped with: R MOExtended tyres (tyres with run-flat char-
acteristics)
Vehicle preparation is not necessary on vehi- cles with MOExtended tyres.
R a TIREFIT kit (Y page 345)
R an emergency spare wheel (certain countries
only)
Information on changing and fitting a wheel
(Y page 369). 346
Flat tyreBreakdown assistance