2016 MERCEDES-BENZ GLS SUV oil temperature
[x] Cancel search: oil temperaturePage 9 of 397
Engaging the park position ............ 156
Gliding mod
e................................. 159
Kickdown ....................................... 159
Manual shifting .............................. 160
Oil temperature (on-board com-
puter, Mercedes-AMG vehicles) ..... 255
Overview ........................................ 156
Problem (fault) ............................... 163
Pulling away ................................... 150
Starting the engine ........................ 150
Steering wheel gearshift paddle s... 160
Trailer towing ................................. 159
Transmission position display ........ 158
Transmission positions .................. 158
Automatic transmission emer-
gency running mode ......................... 163
AUX jacks
CD/DVD drive ............................... 311
Auxiliary heating
Setting ........................................... 253
Auxiliary heating/ventilation
Display message ............................ 288
Important safety notes .................. 140
Problem (display message) ............ 144
Remote control .............................. 141
Setting the departure time ............. 143
Switching on/off (on the centre
console) ......................................... 141
Axle load, permissible (trailer tow-
ing) ...................................................... 390 B
Back button ....................................... 304
Bag hook ............................................ 317
Ball coupling
Swinging in .................................... 235
Swinging out .................................. 235
BAS (Brake Assist System) ................. 69
Battery (key)
Checking .......................................... 84
Important safety notes .................... 84
Replacing ......................................... 84
Battery (vehicle)
Charging ........................................ 353
Display message ............................ 272
Important safety notes .................. 351
Jump starting ................................. 354 Overview ........................................ 351
Belt
see Seat belts
Belt tensioner
Activation ......................................... 54
Blind Spot Assist
Activating/deactivating ................. 250
Display message ............................ 279
Notes/function .............................. 219
Trailer towing ................................. 220
see Active Blind Spot Assist
Blootooth ®
Connecting a different mobile
phone ............................................ 307
BlueTEC
Topping up AdBlue ®
....................... 166
BlueTEC (AdBlue ®
) ............................. 384
Bluetooth ®
Searching for a mobile phone ........ 307
See also Digital Owner's Manua l... 303
Telephony ...................................... 306
Bonnet
Active bonnet (pedestrian protec-tion) ............................................... 332
Closing ........................................... 333
Display message ............................ 287
Important safety notes .................. 332
Opening ......................................... 333
Boot
see Tailgate
Brake Assist
see BAS (Brake Assist System)
Brake fluid
Display message ............................ 263
Note s............................................. 386
Brake force distribution
see EBD (electronic brake force
distribution)
Brake lamps
Adaptive ........................................... 72
Display message ............................ 270
Brakes
ABS .................................................. 69
Adaptive Brake Assist ...................... 71
BAS .................................................. 69
Brake fluid (notes) ......................... 386
Display message ............................ 259 6
Index
Page 14 of 397

ECO start/stop function
Automatic engine start .................. 152
Automatic engine switch-off .......... 152
Deactivating/activating ................ .153
General information ....................... 151
Important safety notes .................. 151
Introduction ................................... 151
Electromagnetic compatibility
Declaration of conformity ................ 28
Electronic Stability Program
see ESP ®
(Electronic Stability Program)
Emergency
Automatic measures after an acci-
dent ................................................. 57
Emergency key
Unlocking the driver's door .............. 89
Emergency key element
Function/notes ................................ 83
General notes .................................. 83
Inserting .......................................... 84
Locking vehicle ................................ 89
Removing ......................................... 83
Emergency release
Driver's door ................................... .89
Emergency spare wheel
General notes ................................ 375
Important safety notes .................. 375
Inflating the collapsible spare
wheel ............................................ .377
Removing ....................................... 375
Storage location ............................ 375
Stowing .......................................... 375
Emergency unlocking
Tailgate ............................................ 93
Vehicle ............................................. 89
Engine
Display message ............................ 271
ECO start/stop function ................ 151
Engine number ............................... 381
Jump-starting ................................. 354
Running irregularl y......................... 154
Starting (important safety notes )... 149
Starting problems .......................... 154
Starting the engine with the key .... 150
Starting with KEYLESS GO ............. 150
Stopping ........................................ 169
Tow-starting (vehicle) ..................... 359 Warning lamp (engine diagnos-
tics) ............................................... 298
Engine electronics
Notes ............................................. 379
Problem (fault) ............................... 154
Engine jump starting
see Jump starting (engine)
Engine oil
Additives ........................................ 385
Checking the oil level ..................... 334
Checking the oil level using the
dipstick .......................................... 334
Display message ............................ 273
Filling capacity ............................... 385
Notes about oil grade s................... 385
Notes on oil level/consumption .... 334
Temperature (on-board computer, Mercedes-AMG vehicles) ............... 255
Topping up ..................................... 334
Engine switch-off
see ECO start/stop function
Entering an address
See also Digital Owner's Manua l... 303
Environmental protection
Returning an end-of-life vehicle ....... 26
ESP ®
(Electronic Stability Pro-
gram)
AMG menu (on-board computer) ... 256
Characteristics ................................. 73
Deactivating/activating ................... 73
Display message ............................ 259
Function/note s................................ 72
General notes .................................. 72
Important safety guidelines ............. 73
Trailer stabilisation .......................... 74
Warning lamp ................................. 295
ETS/4ETS (Electronic Traction Sys-
tem) ...................................................... 72
Exhaust pipe (cleaning instruc-
tions) .................................................. 342
Exterior lighting
see Lights
Exterior mirrors
Adjusting ....................................... 116
Anti-dazzle mode (automatic) ........ 117
Folding in when locking (on-boardcomputer) ...................................... 255 Index
11
Page 25 of 397
Telephone compartment ................3
13
Telephone module with Bluetooth ®
(SAP profile) Activating and connecting the
module .......................................... .308
Charging a mobile phone .............. .310
Connecting the mobile phone ....... .309
Connecting the module via a USB
cable .............................................. 308
Data modem mode ........................ 309
Installing the module ..................... 308
Introduction ................................... 307
Saving/deleting the PIN for the
SIM card ........................................ 310
Settings ......................................... 310
SIM card mode .............................. 309
Text messages ............................... 310
Transferring the phone book .......... 310
Temperature
Coolant (display in the instrument
cluster) .......................................... 242
Coolant (on-board computer,
Mercedes-AMG vehicles) .............. .255
Engine oil (on-board computer,
Mercedes-AMG vehicles) .............. .255
Outside temperature ..................... .241
Setting (climate control) ................ 136
Transmission oil (on-board com-
puter, Mercedes-AMG vehicles) ..... 255
TEMPOMAT
Function/notes ............................ .180
Text messages
Telephone module with Blue-
tooth ®
(SAP profile) ....................... 310
Through-loading ................................ 315
Time
see Separate Owner's manual
Timing (RACETIMER) ......................... 256
TIREFIT Kit
Declaration of conformity ................ 29
Important safety notes .................. 348
Storage location ............................ 346
Tyre pressure not reached ............. 350
Tyre pressure reached ................... 350
Using ............................................. 349
Tool
see Vehicle tool kit Top Tether
............................................ 60
Total distance recorder .................... 244
Tow-away protection
Activating ......................................... 79
Deactivating ..................................... 79
Function .......................................... .79
Tow-starting
Emergency engine starting ............ 359
Important safety notes .................. 356
Towing
Important safety notes .................. 356
Notes for 4MATIC vehicles ............ 358
Transporting the vehicle ................ 358
Towing a trailer
Active Blind Spot Assist ................. 224
Active Lane Keeping Assist ............ 227
Axle load, permissibl e.................... 390
ESP ®
(Electronic Stability Pro-
gram) ............................................... 74
Failure check for LEDs ................... 238
Parking Assist PARKTRONIC .......... 201
Pulling away with a traile r.............. 151
Swinging out the ball coupling ....... 235
Swinging the ball coupling in ......... 235
Trailer tow hitch display message .. 288
Towing away
Fitting the towing ey e.................... 357
Removing the towing eye ............... 357
With both axles on the ground ....... 358
Towing eye ......................................... 345
Traffic Sign Assist
Activating/deactivating the warn-ing function .................................... 250
Display message ............................ 278
Function/note s............................. 217
Important safety notes .................. 218
Instrument cluster display ............. 218
Trailer coupling
see Towing a trailer
Trailer towing
7-pin connecto r............................. 238
Blind Spot Assist ............................ 220
Cleaning the trailer tow hitch ......... 342
Coupling up a traile r...................... 236
Decoupling a trailer ....................... 237
Driving tips .................................... 234
Important safety notes .................. 233 22
Index
Page 151 of 397
!
Do not warm up the engine when the vehicle
is stationary. Drive off immediately. Avoid
high engine speeds and driving at full throttle
until the engine has reached its operating
temperature.
Only shift the automatic transmission to the
desired drive position when the vehicle is sta- tionary.
Where possible, avoid spinning the drive
wheels when pulling away on slippery roads.
You could otherwise damage the drive train.
! Mercedes-AMG vehicles:
at low engine oil
temperatures (below +20 †), the maximum
engine speed is restricted in order to protect
the engine. To protect the engine and main-
tain smooth engine operation, avoid driving at full throttle when the engine is cold. Key positions
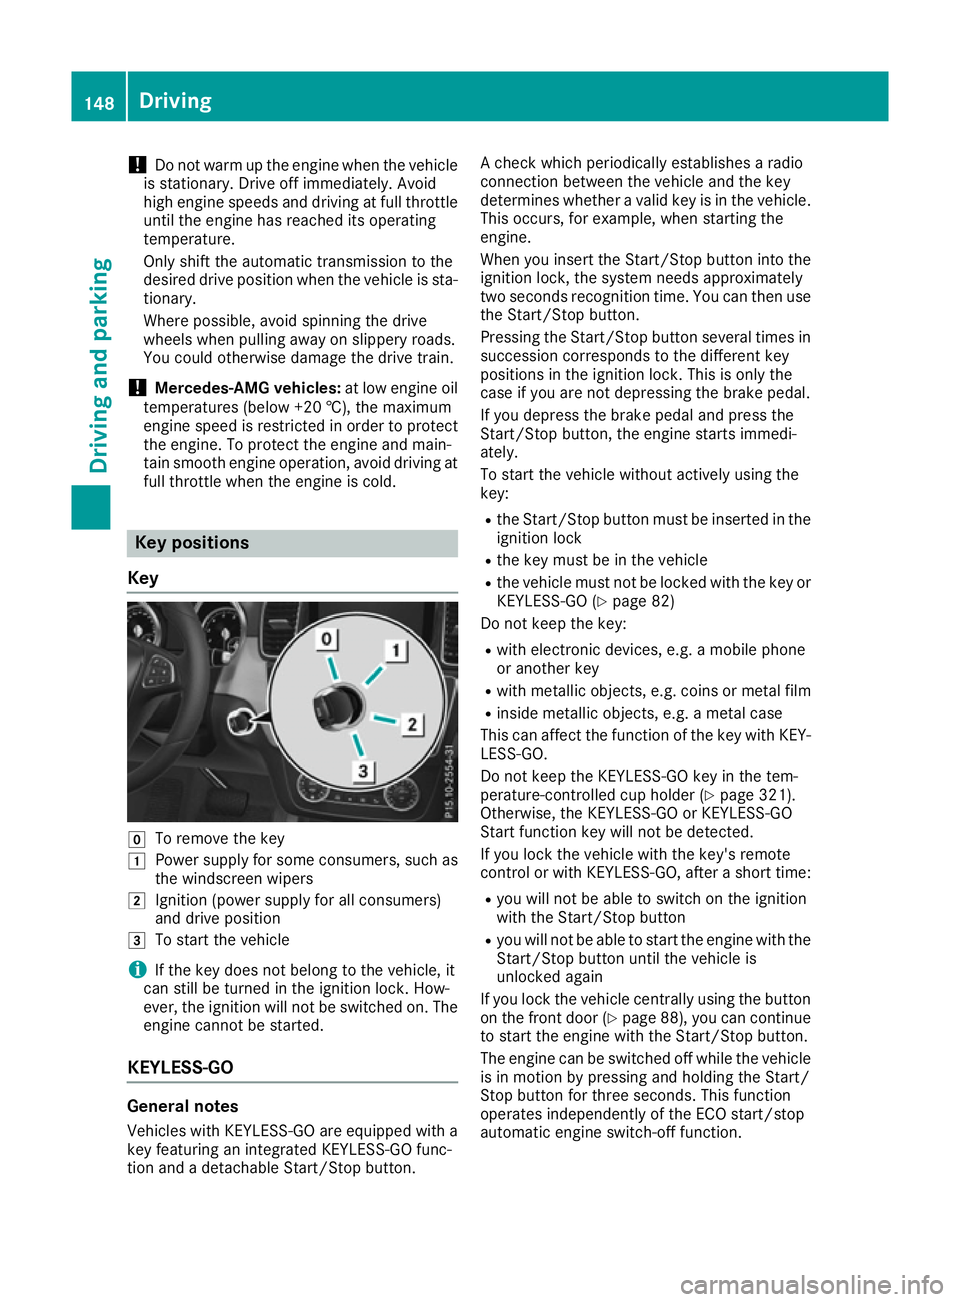
Key g
To remove the key
1 Power supply for some consumers, such as
the windscreen wipers
2 Ignition (power supply for all consumers)
and drive position
3 To start the vehicle
i If the key does not belong to the vehicle, it
can still be turned in the ignition lock. How-
ever, the ignition will not be switched on. The
engine cannot be started.
KEYLESS-GO General notes
Vehicles with KEYLESS-GO are equipped with a
key featuring an integrated KEYLESS-GO func-
tion and a detachable Start/Stop button. A check which periodically establishes a radio
connection between the vehicle and the key
determines whether a valid key is in the vehicle.
This occurs, for example, when starting the
engine.
When you insert the Start/Stop button into the
ignition lock, the system needs approximately
two seconds recognition time. You can then use the Start/Stop button.
Pressing the Start/Stop button several times in
succession corresponds to the different key
positions in the ignition lock. This is only the
case if you are not depressing the brake pedal.
If you depress the brake pedal and press the
Start/Stop button, the engine starts immedi-
ately.
To start the vehicle without actively using the
key:
R the Start/Stop button must be inserted in the
ignition lock
R the key must be in the vehicle
R the vehicle must not be locked with the key or
KEYLESS-GO (Y page 82)
Do not keep the key:
R with electronic devices, e.g. a mobile phone
or another key
R with metallic objects, e.g. coins or metal film
R inside metallic objects, e.g. a metal case
This can affect the function of the key with KEY- LESS-GO.
Do not keep the KEYLESS-GO key in the tem-
perature-controlled cup holder (Y page 321).
Otherwise, the KEYLESS-GO or KEYLESS-GO
Start function key will not be detected.
If you lock the vehicle with the key's remote
control or with KEYLESS-GO, after a short time:
R you will not be able to switch on the ignition
with the Start/Stop button
R you will not be able to start the engine with the
Start/Stop button until the vehicle is
unlocked again
If you lock the vehicle centrally using the button
on the front door (Y page 88), you can continue
to start the engine with the Start/Stop button.
The engine can be switched off while the vehicle is in motion by pressing and holding the Start/
Stop button for three seconds. This function
operates independently of the ECO start/stop
automatic engine switch-off function. 148
DrivingDriving and parking
Page 258 of 397
X
Press the :or9 button to select the
Belt adjustment
Belt adjustment function.
If the Belt
Belt adjustment
adjustment function is activated,
the vehicle seat belt is shown in orange in the
multifunction display.
X Press the abutton to save the setting.
For further information on belt adjustment, see
(Y page 46).
Switching the fold mirrors in when lock-
ing function on/off This function is only available when the vehicle is
equipped with the electrical fold-in function.
When you activate the Auto. fold-in mir‐
Auto. fold-in mir‐
rors rors function, the exterior mirrors are folded in
when the vehicle is locked. The exterior mirrors fold out automatically again as soon as you
unlock the vehicle.
X Press the =or; button on the steering
wheel to select the Settings
Settings menu.
X Press the :or9 button to select the
Convenience Convenience submenu.
X Press ato confirm.
X Press the :or9 button to select the
Auto. fold-in mirrors
Auto. fold-in mirrors function.
If the Auto. fold-in mirrors
Auto. fold-in mirrors function is
switched on, the multifunction display shows
the exterior mirror in orange.
X Press the abutton to save the setting. If you have switched on the
Auto. fold-in
Auto. fold-in
mirrors
mirrors function and you fold the exterior mir-
rors in using button :, they will not fold out
automatically (Y page 117).
You can then only fold out the exterior mirrors
using button :. Resetting to factory settings X
Press the =or; button on the steering
wheel to select the Settings Settingsmenu.
X Press the :or9 button to select the
Factory setting
Factory setting submenu.
X Press ato confirm.
The Reset all settings?
Reset all settings? message
appears.
X Press the :or9 button to select No
Noor
Yes
Yes.
X Press the abutton to confirm the selec-
tion.
If you have selected Yes Yes, the multifunction
display shows a confirmation message.
For safety reasons, not all functions are reset:
the Limit Limit speed
speed(winter
(winter tyres)
tyres)function of
the permanent speed limiter can only be set in
the Vehicle
Vehicle submenu.
For safety reasons, the Daytime driving
Daytime driving
lights
lights function in the Lights
Lightssubmenu is only
reset if the engine is switched off. ON&OFFROAD menu
X Press the =or; button on the steering
wheel to select the ON&OFFROAD
ON&OFFROADmenu.
You can view the current off-road program set-
tings in the ON&OFFROAD ON&OFFROAD menu:
R Vehicles with the Off-Road Engineering pack-
age (Y page 229)
R Vehicles without the Off-Road Engineering
package (Y page 228) AMG menu (Mercedes-AMG vehicles)
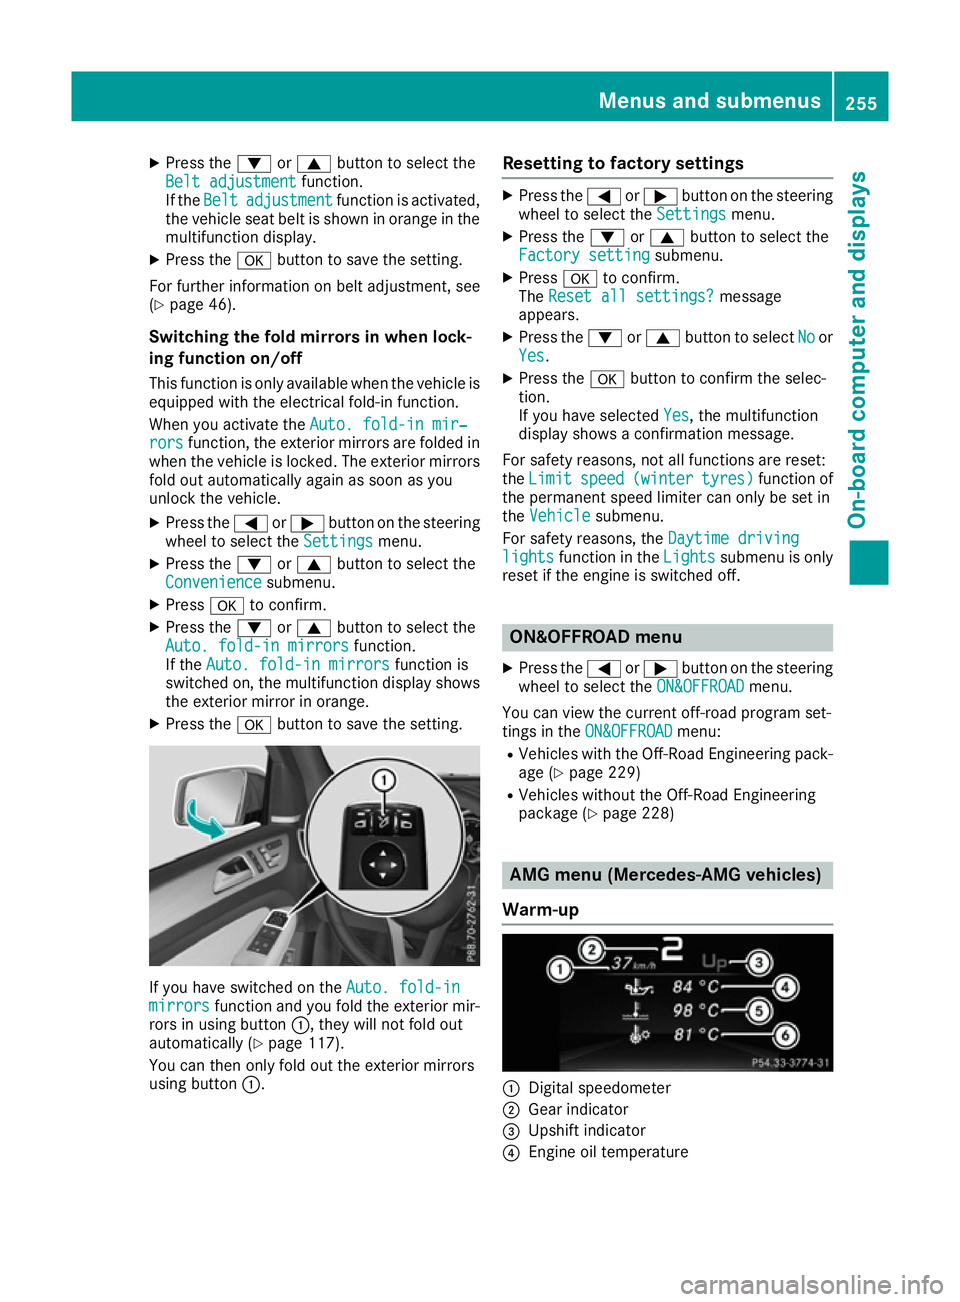
Warm-up :
Digital speedometer
; Gear indicator
= Upshift indicator
? Engine oil temperature Menus and submenus
255On-board computer and displays Z
Page 259 of 397
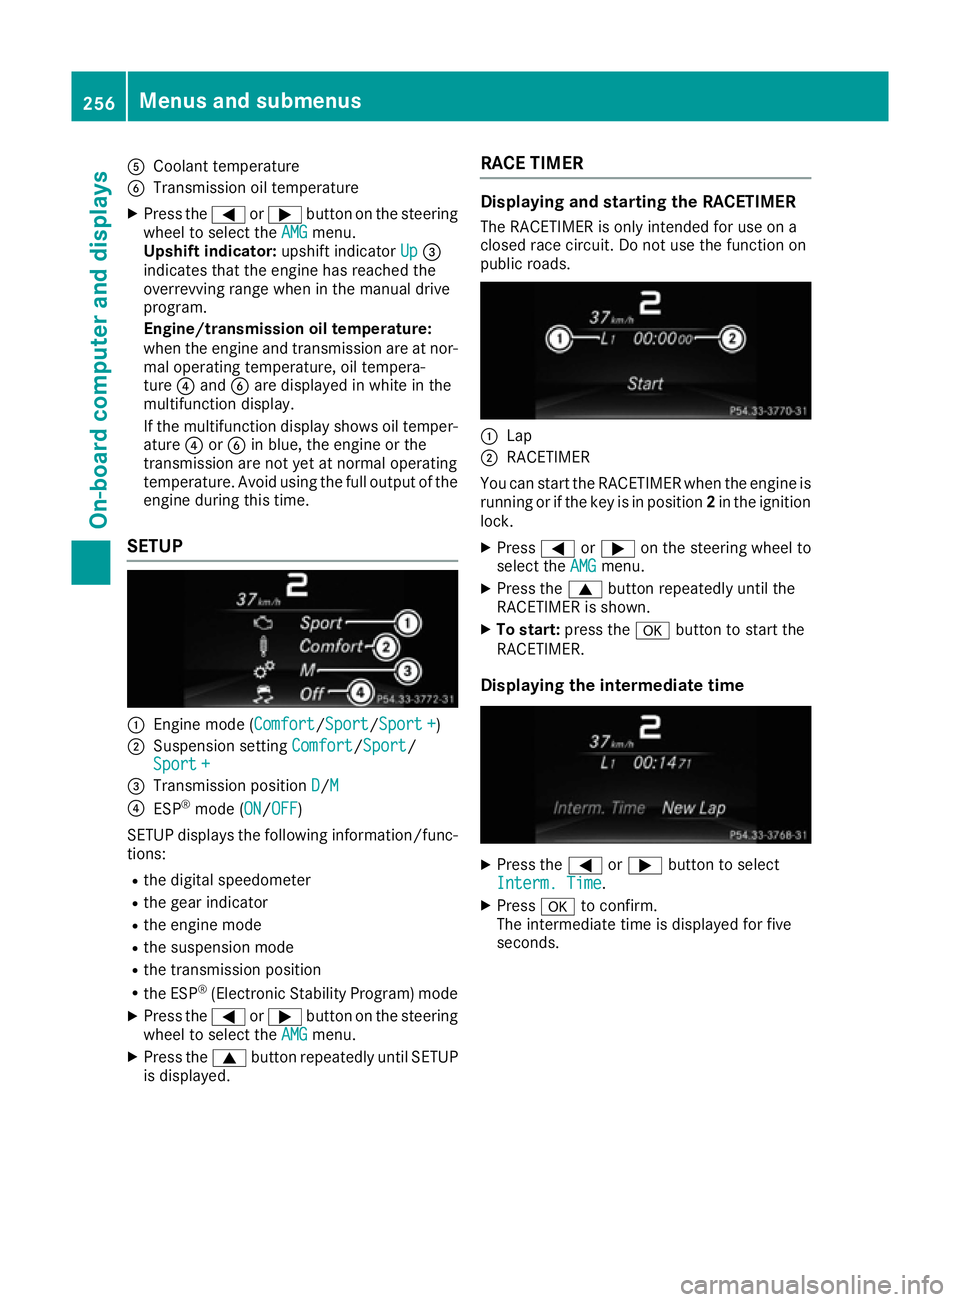
A
Coolant temperature
B Transmission oil temperature
X Press the =or; button on the steering
wheel to select the AMG
AMG menu.
Upshift indicator: upshift indicatorUp
Up=
indicates that the engine has reached the
overrevving range when in the manual drive
program.
Engine/transmission oil temperature:
when the engine and transmission are at nor-
mal operating temperature, oil tempera-
ture ?and Bare displayed in white in the
multifunction display.
If the multifunction display shows oil temper- ature ?orB in blue, the engine or the
transmission are not yet at normal operating
temperature. Avoid using the full output of the engine during this time.
SETUP :
Engine mode (Comfort Comfort/SportSport/Sport + Sport +)
; Suspension setting Comfort
Comfort/Sport
Sport/
Sport +
Sport +
= Transmission position D
D/M
M
? ESP ®
mode ( ON
ON/OFFOFF)
SETUP displays the following information/func- tions:
R the digital speedometer
R the gear indicator
R the engine mode
R the suspension mode
R the transmission position
R the ESP ®
(Electronic Stability Program) mode
X Press the =or; button on the steering
wheel to select the AMG
AMG menu.
X Press the 9button repeatedly until SETUP
is displayed. RACE TIMER Displaying and starting the RACETIMER
The RACETIMER is only intended for use on a
closed race circuit. Do not use the function on
public roads. :
Lap
; RACETIMER
You can start the RACETIMER when the engine is running or if the key is in position 2in the ignition
lock.
X Press =or; on the steering wheel to
select the AMG AMGmenu.
X Press the 9button repeatedly until the
RACETIMER is shown.
X To start: press the abutton to start the
RACETIMER.
Displaying the intermediate time X
Press the =or; button to select
Interm. Time
Interm. Time.
X Press ato confirm.
The intermediate time is displayed for five
seconds. 256
Menus and submenusOn-board computer and displays
Page 337 of 397
Engine oil
Important safety notes G
WARNING
Certain components in the engine compart-
ment could be very hot, e.g. the engine, the
radiator and parts of the exhaust system.
There is a risk of injury when accessing the
engine compartment.
As far as possible, allow the engine to cool
down and only touch the components descri- bed in the following. G
WARNING
If engine oil comes into contact with hot com- ponents in the engine compartment, it may
ignite. There is a risk of fire and injury.
Make sure that engine oil does not spill out
over the filler neck. Allow the engine to cool
down and thoroughly clean the components
that have come into contact with engine oil
before you start the engine.
General notes Depending on your driving style, the vehicle
consumes up to 0.8 litres of oil per 1,000 km.
The oil consumption may be higher than this
when the vehicle is new or if you frequently drive at high engine speeds.
Depending on the engine, the oil dipstick may beinstalled at a different location.
When checking the oil level:
R park the vehicle on a level surface.
R the engine should be switched off for approx-
imately five minutes if the engine is at normal
operating temperature.
R if the engine is not at normal operating tem-
perature, e.g. if the engine was only started
briefly, wait approximately 30 minute sbefore
carrying out the measurement. Checking the oil level using the oil dip-
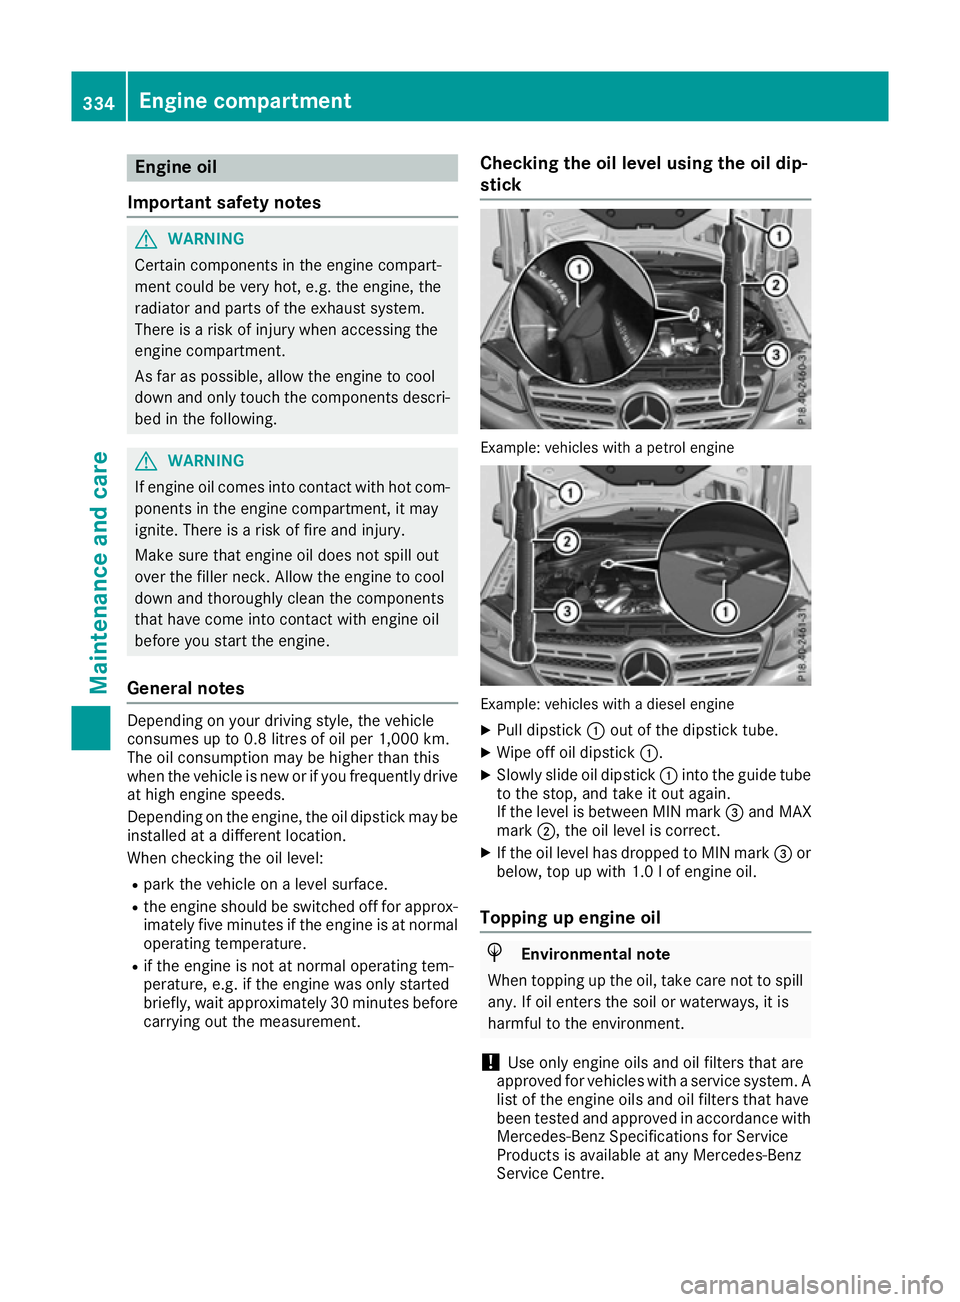
stick Example: vehicles with a petrol engine
Example: vehicles with a diesel engine
X Pull dipstick :out of the dipstick tube.
X Wipe off oil dipstick :.
X Slowly slide oil dipstick :into the guide tube
to the stop, and take it out again.
If the level is between MIN mark =and MAX
mark ;, the oil level is correct.
X If the oil level has dropped to MIN mark =or
below, top up with 1.0 lof engine oil.
Topping up engine oil H
Environmental note
When topping up the oil, take care not to spill any. If oil enters the soil or waterways, it is
harmful to the environment.
! Use only engine oils and oil filters that are
approved for vehicles with a service system. A list of the engine oils and oil filters that have
been tested and approved in accordance with
Mercedes-Benz Specifications for Service
Products is available at any Mercedes-Benz
Service Centre. 334
Engine compartmentMaintenance and care
Page 338 of 397
The following cause engine failure or damage
to the exhaust system:
R Use of engine oils and oil filters that have
not been expressly approved for the service
system
R Replacement of engine oil and oil filter after
the replacement interval specified by the
service system has expired
R Use of engine oil additives
! Do not add too much oil. Topping up with too
much engine oil can result in damage to the
engine or to the catalytic converter. Have
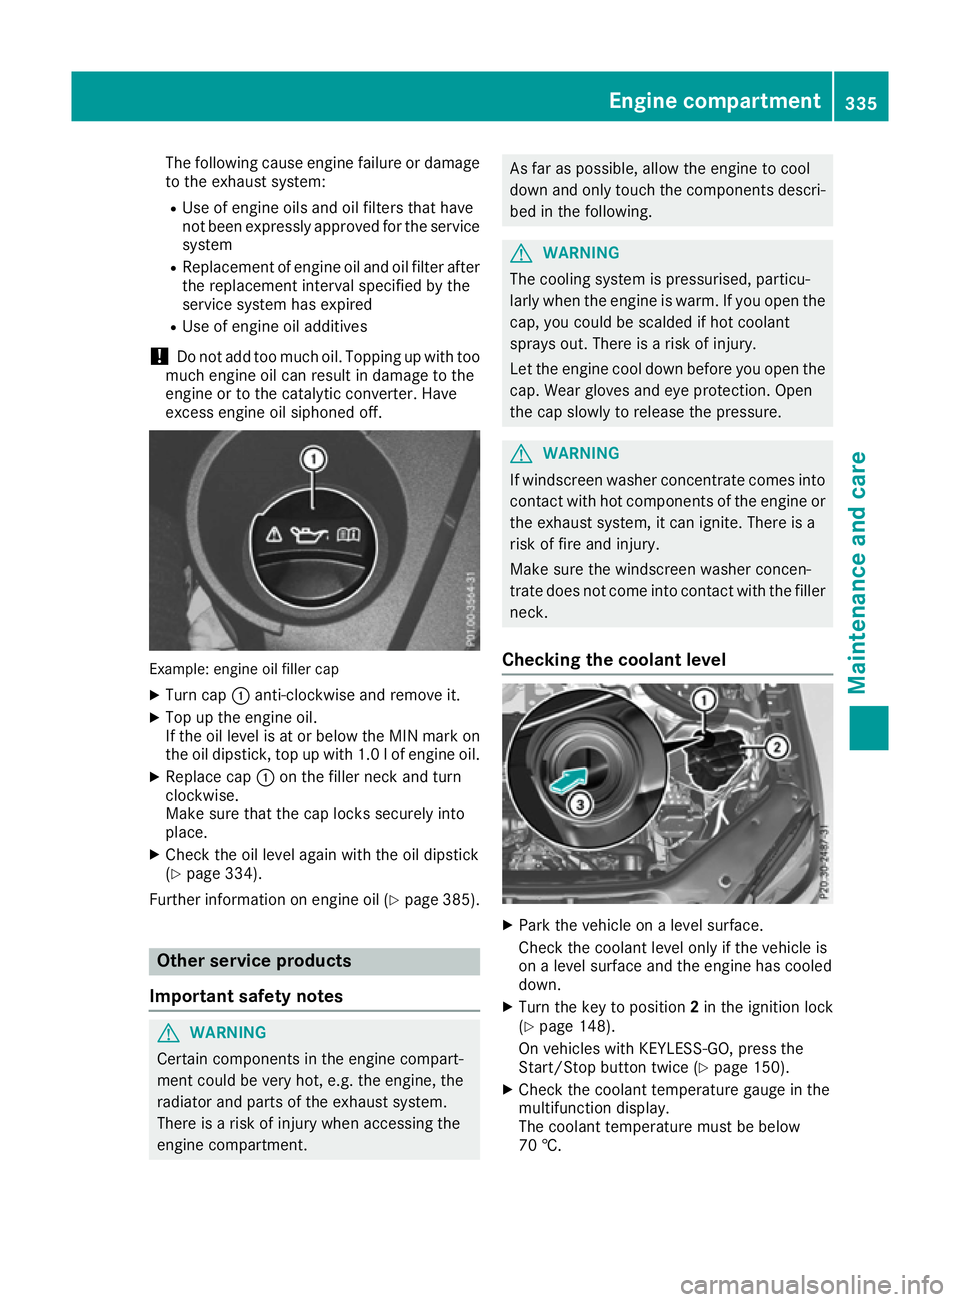
excess engine oil siphoned off. Example: engine oil filler cap
X Turn cap :anti-clockwise and remove it.
X Top up the engine oil.
If the oil level is at or below the MIN mark on
the oil dipstick, top up with 1.0 lof engine oil.
X Replace cap :on the filler neck and turn
clockwise.
Make sure that the cap locks securely into
place.
X Check the oil level again with the oil dipstick
(Y page 334).
Further information on engine oil (Y page 385).Other service products
Important safety notes G
WARNING
Certain components in the engine compart-
ment could be very hot, e.g. the engine, the
radiator and parts of the exhaust system.
There is a risk of injury when accessing the
engine compartment. As far as possible, allow the engine to cool
down and only touch the components descri-
bed in the following. G
WARNING
The cooling system is pressurised, particu-
larly when the engine is warm. If you open the cap, you could be scalded if hot coolant
sprays out. There is a risk of injury.
Let the engine cool down before you open the
cap. Wear gloves and eye protection. Open
the cap slowly to release the pressure. G
WARNING
If windscreen washer concentrate comes into contact with hot components of the engine or
the exhaust system, it can ignite. There is a
risk of fire and injury.
Make sure the windscreen washer concen-
trate does not come into contact with the filler neck.
Checking the coolant level X
Park the vehicle on a level surface.
Check the coolant level only if the vehicle is
on a level surface and the engine has cooled
down.
X Turn the key to position 2in the ignition lock
(Y page 148).
On vehicles with KEYLESS-GO, press the
Start/Stop button twice (Y page 150).
X Check the coolant temperature gauge in the
multifunction display.
The coolant temperature must be below
70 †. Engine compartment
335Maintenance and care Z