2016 MERCEDES-BENZ GLS SUV dimensions
[x] Cancel search: dimensionsPage 24 of 397
Speedometer
Digital ............................................ 245
In the Instrument cluster ................. 35
Segments ...................................... 241
Selecting a display unit .................. 251
Start/Stop button
Starting the engine ........................ 150
Start/stop function
see ECO start/stop function
Starting (engine) ................................ 149
STEER CONTROL ..................................78
Steering
Display message ............................2 89
Steering Pilot
Activating/deactivating ................. 250
Display message ............................ 281
Steering wheel
Adjusting (electrically) ................... 114
Adjusting (manually) ...................... 113
Button overview ............................... 36
Buttons (on-board computer) ......... 242
Cleaning ......................................... 343
Important safety notes .................. 113
Steering wheel heating .................. 114
Storing settings (memory func-
tion) ............................................... 118
Steering wheel gearshift paddles .... 160
Steering wheel heating
Problem (malfunction) ................... 115
Switching on/of f........................... 114
Stopwatch (RACETIMER) ................... 256
Stowage areas ................................... 312
Stowage compartments
Armrest (under) ............................. 313
Centre console .............................. 314
Centre console (rear) ..................... 314
Cup holde r..................................... 320
Glove compartment ....................... 313
Important safety information ......... 312
Spectacles compartment ............... 314
Stowage net ....................................... 314
Stowage space
Stowage net ................................... 314
Summer tyres
In winter ........................................ 363
Sun blind
Rear side window s......................... 322 Sun visor
............................................ 322
Suspension settings
AMG RIDE CONTROL sports sus-
pension .......................................... 200
SETUP (on-board computer) .......... 256
Switching on media mode
Via the device list .......................... 310
Switching the auxiliary heating/
ventilation
On/off ........................................... 141 T
Tailgate Display message ............................ 286
Emergency unlocking ....................... 93
Important safety notes .................... 89
Limiting the opening angle ............... 92
Opening dimensions ...................... 387
Opening/closing (automatically
from inside) ...................................... 92
Opening/closing (automatically
from outside) ................................... 90
Opening/closing (from outside) ....... 90
Power closing .................................. 88
Tank
see Fuel tank
Technical data
Capacities ...................................... 381
Information .................................... 379
Trailer load s................................... 390
Tyres/wheels ................................. 374
Vehicle data ................................... 387
Telephone
Accepting a call (multifunction
steering wheel) .............................. 248
Authorising a mobile phone (con-
necting) ......................................... 307
Connecting a Mobile phone (gen-
eral information) ............................ 306
Display message ............................ 289
Menu (on-board computer) ............ 248
Number from the phone book ........ 248
Redialling ....................................... 249
Rejecting/ending a call ................. 248
See also Digital Owner's Manua l... 303
Switching between mobile
phones ........................................... 307 Index
21
Page 27 of 397
Leaving parked up .........................1
71
Locking (in an emergency) .............. .89
Locking (key) ................................... 81
Lowering ........................................ 373
Operating safety .............................. 27
Parking .......................................... 168
Pulling away ................................... 150
Raising ........................................... 371
Registration ..................................... 30
Securing from rolling away ............ 370
Towing away .................................. 356
Transporting .................................. 358
Unlocking (in an emergency) ........... 89
Unlocking (key) ................................ 81
Vehicle data ................................... 387
Vehicle battery
see Battery (vehicle)
Vehicle data ....................................... 387
Vehicle data (off-road driving)
Approach/departure angle ............ 389
Fording depth ................................ 388
Maximum gradient climbing abil-
ity .................................................. 389
Vehicle dimensions ........................... 387
Vehicle emergency locking ................ 89
Vehicle identification number
see VIN
Vehicle identification plate .............. 380
Vehicle level
AIRMATIC ...................................... 198
Vehicle level (display message) ....... 275
Vehicle tool kit .................................. 345
Video
Operating the DVD ......................... 247
See also Digital Owner's Manua l... 303
VIN ...................................................... 380
Seat ............................................... 381
Type plate ...................................... 380 W
Warning and indicator lamps ABS ................................................ 293
Brakes ........................................... 292
Distance Pilot DISTRONIC ............. 301
Distance warning signal ................. 301
ESP ®
.............................................. 295
ESP ®
OFF ....................................... 296 Fuel tank ........................................ 298
LIM (cruise control) ........................ 181
LIM (Distance Pilot DISTRONIC) .... 185
LIM (variable limiter) ...................... 183
Overview .......................................... 35
Parking brake ................................ 298
PASSENGER AIR BAG ...................... 43
Reserve fue l................................... 298
Seat belt ........................................ 291
Tyre pressure monitor ................... 302
Warning triangle ................................ 345
Washer fluid
Display message ............................ 289
Weather display (COMAND Online)
See also Digital Owner's Manua l... 303
Wheel and tyre combinations
Tyres .............................................. 374
Wheel bolt tightening torque ........... 373
Wheel chock ...................................... 370
Wheels
Changing a wheel .......................... 369
Changing/replacing ....................... 369
Checking ........................................ 361
Cleaning ......................................... 340
Emergency spare wheel ................. 375
Fitting a new wheel ........................ 372
Fitting a wheel ............................... 370
Important safety notes .................. 361
Information on driving .................... 361
Overview ........................................ 361
Removing a wheel .......................... 372
Snow chains .................................. 364
Storing ........................................... 370
Tightening torque ........................... 373
Wheel size/tyre size ...................... 374
Windowbag
Display message ............................ 267
Operation ......................................... 49
Windows
Cleaning ......................................... 340
see Side windows
Windscreen
Demisting ...................................... 137
Windscreen washer fluid
see Windscreen washer system
Windscreen washer system
Important safety notes .................. 387
Topping up ..................................... 336 24
Index
Page 92 of 397
X
To power close a door: push the door into
the lock up to the first detent position.
Power closing will pull the door fully closed.
X To power close the tailgate: lightly press
the tailgate downwards.
Power closing will pull the tailgate fully
closed. Unlocking/locking the driver's door
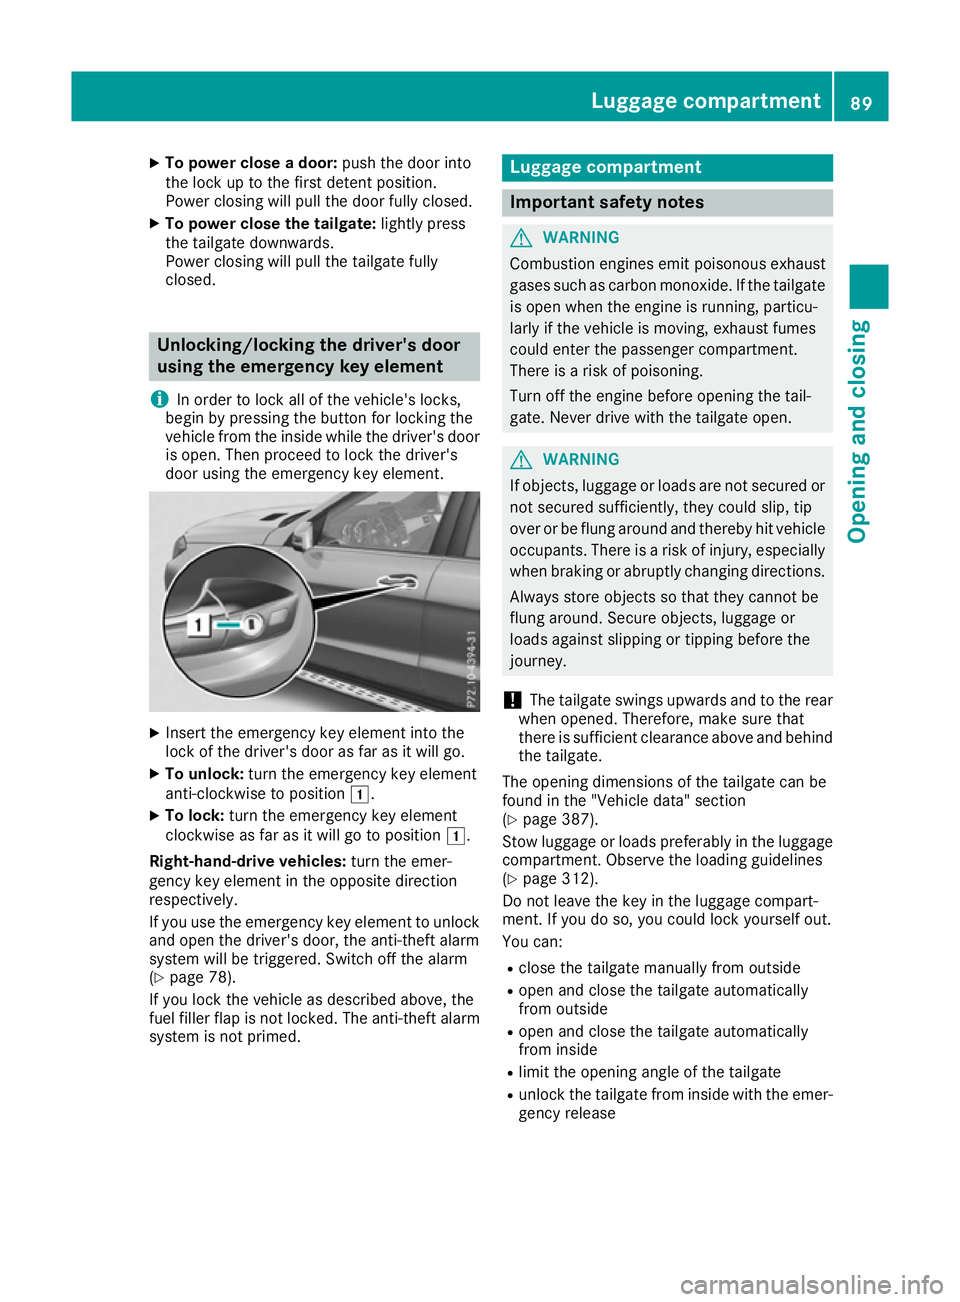
using the emergency key element
i In order to lock all of the vehicle's locks,
begin by pressing the button for locking the
vehicle from the inside while the driver's door
is open. Then proceed to lock the driver's
door using the emergency key element. X
Insert the emergency key element into the
lock of the driver's door as far as it will go.
X To unlock: turn the emergency key element
anti-clockwise to position 1.
X To lock: turn the emergency key element
clockwise as far as it will go to position 1.
Right-hand-drive vehicles: turn the emer-
gency key element in the opposite direction
respectively.
If you use the emergency key element to unlock
and open the driver's door, the anti-theft alarm
system will be triggered. Switch off the alarm
(Y page 78).
If you lock the vehicle as described above, the
fuel filler flap is not locked. The anti-theft alarm
system is not primed. Luggage compartment
Important safety notes
G
WARNING
Combustion engines emit poisonous exhaust
gases such as carbon monoxide. If the tailgate is open when the engine is running, particu-
larly if the vehicle is moving, exhaust fumes
could enter the passenger compartment.
There is a risk of poisoning.
Turn off the engine before opening the tail-
gate. Never drive with the tailgate open. G
WARNING
If objects, luggage or loads are not secured or not secured sufficiently, they could slip, tip
over or be flung around and thereby hit vehicle
occupants. There is a risk of injury, especially when braking or abruptly changing directions.
Always store objects so that they cannot be
flung around. Secure objects, luggage or
loads against slipping or tipping before the
journey.
! The tailgate swings upwards and to the rear
when opened. Therefore, make sure that
there is sufficient clearance above and behind
the tailgate.
The opening dimensions of the tailgate can be
found in the "Vehicle data" section
(Y page 387).
Stow luggage or loads preferably in the luggage
compartment. Observe the loading guidelines
(Y page 312).
Do not leave the key in the luggage compart-
ment. If you do so, you could lock yourself out.
You can:
R close the tailgate manually from outside
R open and close the tailgate automatically
from outside
R open and close the tailgate automatically
from inside
R limit the opening angle of the tailgate
R unlock the tailgate from inside with the emer-
gency release Luggage compartment
89Opening and closing Z
Page 94 of 397
be opened from the inside after the vehicle has
been locked from the outside. You can only open the rear doors from inside the vehicle if they are
not secured by the child-proof locks
(Y page 67). The anti-theft alarm system is trig-
gered if the door is opened from the inside.
Switch off the alarm (Y page 78).
The anti-theft alarm system is triggered if the
door is opened from the inside. Switch off the
alarm (Y page 78).
All countries: G
WARNING
Parts of the body could become trapped dur-
ing automatic closing of the tailgate. More-
over, people, e.g. children, may be standing in the closing area or may enter the closing area
during the closing process. There is a risk of
injury.
Make sure that nobody is in the vicinity of the closing area during the closing process.
Use one of the following options to stop the
closing process:
R press the Fbutton on the key
R pull or press the remote operating switch
on the driver's door
R press the closing or locking button on the
tailgate
R pull the handle on the tailgate G
WARNING
Combustion engines emit poisonous exhaust
gases such as carbon monoxide. If the tailgate is open when the engine is running, particu-
larly if the vehicle is moving, exhaust fumes
could enter the passenger compartment.
There is a risk of poisoning.
Turn off the engine before opening the tail-
gate. Never drive with the tailgate open.
! The tailgate swings upwards and to the rear
when opened. Therefore, make sure that
there is sufficient clearance above and behind
the tailgate.
Two warning tones sound while the tailgate is
opening or closing. The opening dimensions of the tailgate can be
found in the "Vehicle data" section
(Y
page 387).
i Notes on the automatic reversing feature for
the tailgate (Y page 90).
Opening the tailgate automatically You can open the tailgate automatically using
the key or the handle in the tailgate.
X Press and hold the Fbutton on the key
until the tailgate opens.
or X When the tailgate is unlocked, pull the tailgate
handle and let it go again immediately.
or X With the tailgate stopped in an intermediate
position, pull the tailgate upwards.
You can release the tailgate as soon as the
tailgate starts to open.
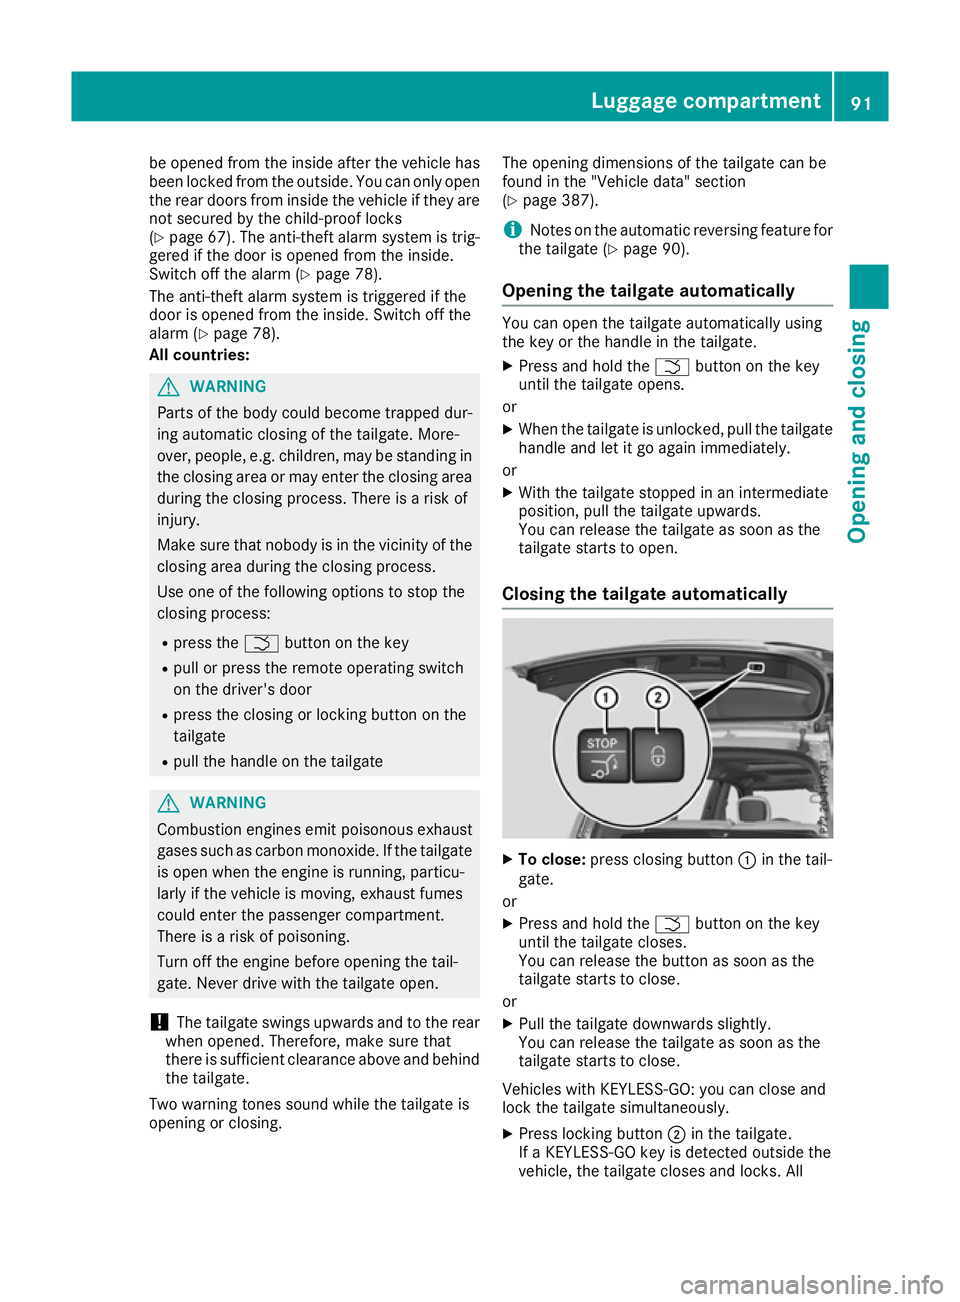
Closing the tailgate automatically X
To close: press closing button :in the tail-
gate.
or X Press and hold the Fbutton on the key
until the tailgate closes.
You can release the button as soon as the
tailgate starts to close.
or X Pull the tailgate downwards slightly.
You can release the tailgate as soon as the
tailgate starts to close.
Vehicles with KEYLESS-GO: you can close and
lock the tailgate simultaneously. X Press locking button ;in the tailgate.
If a KEYLESS-GO key is detected outside the
vehicle, the tailgate closes and locks. All Luggage compartment
91Opening and closing Z
Page 95 of 397
doors must be shut and the key must be loca-
ted in the vicinity of the tailgate.
i There must not be a key in the ignition lock
in order to open and close the tailgate.
If the tailgate touches an object while closing, the closing procedure is interrupted and the
tailgate reopens.
i If a KEYLESS-GO key is detected in the lug-
gage compartment, the tailgate will not lock. Opening and closing automatically
from the inside
Important safety notes G
WARNING
Parts of the body could become trapped dur-
ing automatic closing of the tailgate. In addi-
tion, people may be standing in the closing
area or may enter the closing area, e.g. chil-
dren, during the closing procedure. There is a risk of injury.
Make sure that nobody is in the vicinity of theclosing area during the closing process.
Release the remote operating switch imme-
diately if somebody becomes trapped. To re-
open the tailgate pull on the remote operating
switch. G
WARNING
Combustion engines emit poisonous exhaust
gases such as carbon monoxide. If the tailgate is open when the engine is running, particu-
larly if the vehicle is moving, exhaust fumes
could enter the passenger compartment.
There is a risk of poisoning.
Turn off the engine before opening the tail-
gate. Never drive with the tailgate open.
! The tailgate swings upwards and to the rear
when opened. Therefore, make sure that
there is sufficient clearance above and behind
the tailgate.
Two warning tones sound while the tailgate is
opening or closing.
The opening dimensions of the tailgate can be
found in the "Vehicle data" section
(Y page 387). i
Notes on the automatic reversing feature for
the tailgate (Y page 90).
Opening and closing X
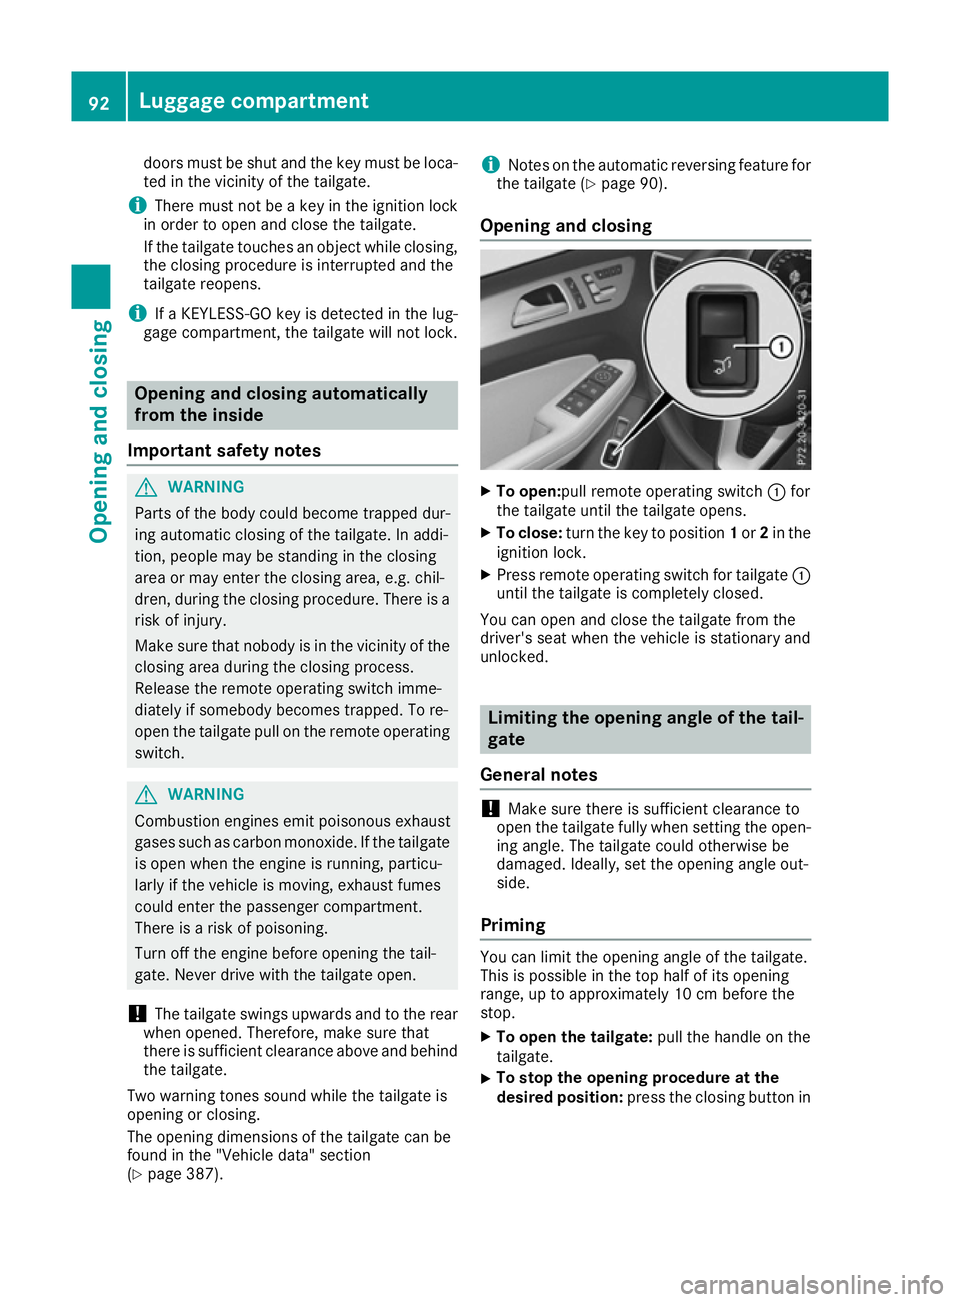
To open:pull remote operating switch :for
the tailgate until the tailgate opens.
X To close: turn the key to position 1or 2in the
ignition lock.
X Press remote operating switch for tailgate :
until the tailgate is completely closed.
You can open and close the tailgate from the
driver's seat when the vehicle is stationary and
unlocked. Limiting the opening angle of the tail-
gate
General notes !
Make sure there is sufficient clearance to
open the tailgate fully when setting the open- ing angle. The tailgate could otherwise be
damaged. Ideally, set the opening angle out-
side.
Priming You can limit the opening angle of the tailgate.
This is possible in the top half of its opening
range, up to approximately 10 cm before the
stop.
X To open the tailgate: pull the handle on the
tailgate.
X To stop the opening procedure at the
desired position:
press the closing button in92
Luggage compartmentOpening and closing
Page 96 of 397
the tailgate or pull the handle on the outside
of the tailgate again.
X To store the position: press and hold the
closing button in the tailgate until two short
tones sound.
The opening angle limiter is activated. The
tailgate then stops in the stored position
when opened.
Switching off X
Press and hold the closing button in the tail-
gate until you hear a short tone. Tailgate emergency release
General notes !
The tailgate swings upwards and to the rear
when opened. Therefore, make sure that
there is sufficient clearance above and behind
the tailgate.
The opening dimensions of the tailgate can be
found in the "Vehicle data" section
(Y page 387).
If the tailgate can no longer be unlocked:
R using the key, or
R using the remote operating switch in the door
control panel:
use the emergency release.
To open X
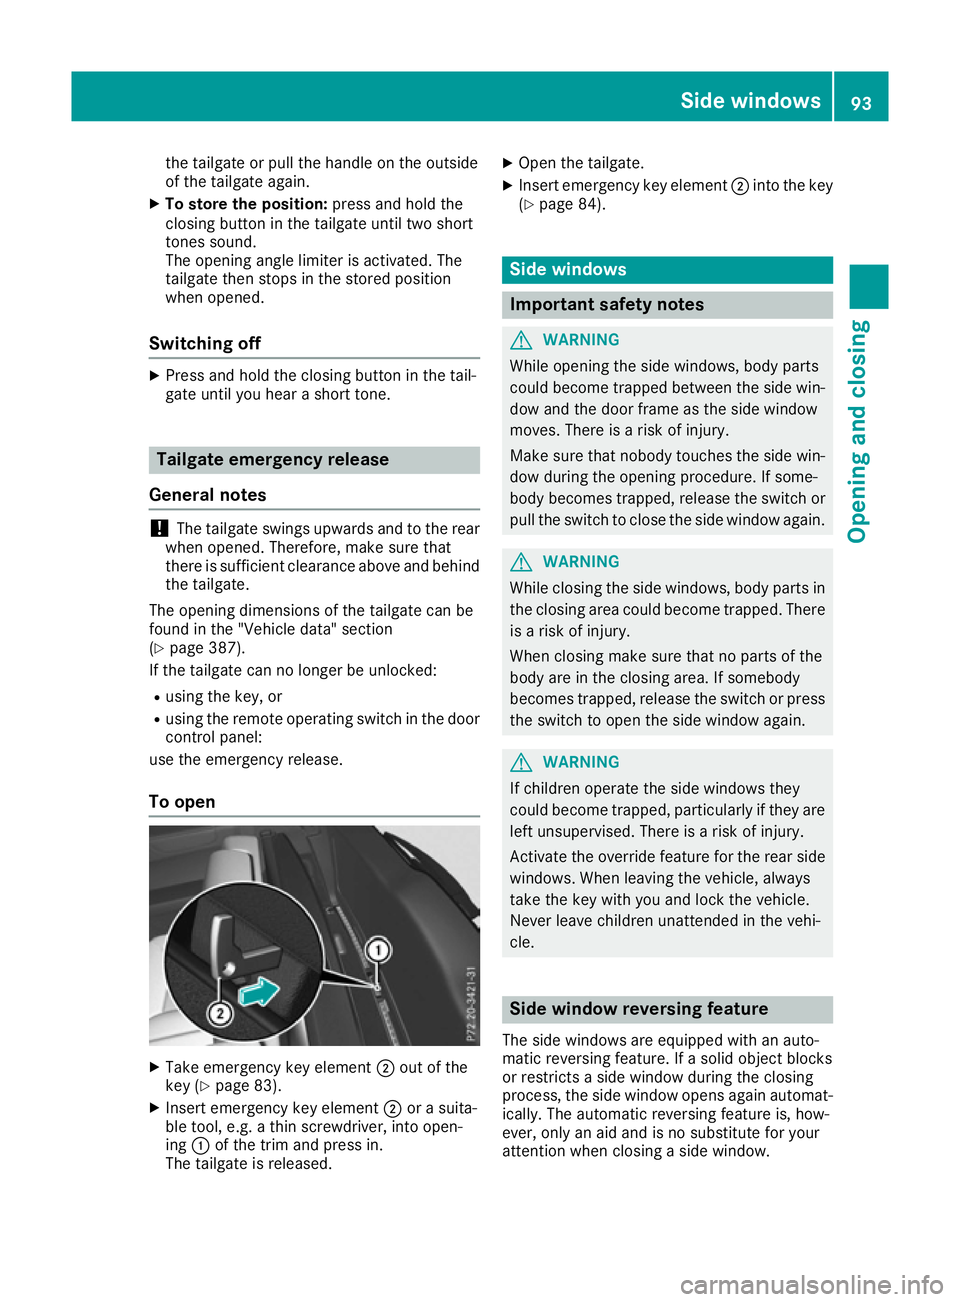
Take emergency key element ;out of the
key (Y page 83).
X Insert emergency key element ;or a suita-
ble tool, e.g. a thin screwdriver, into open-
ing :of the trim and press in.
The tailgate is released. X
Open the tailgate.
X Insert emergency key element ;into the key
(Y page 84). Side windows
Important safety notes
G
WARNING
While opening the side windows, body parts
could become trapped between the side win- dow and the door frame as the side window
moves. There is a risk of injury.
Make sure that nobody touches the side win-
dow during the opening procedure. If some-
body becomes trapped, release the switch or pull the switch to close the side window again. G
WARNING
While closing the side windows, body parts in the closing area could become trapped. There is a risk of injury.
When closing make sure that no parts of the
body are in the closing area. If somebody
becomes trapped, release the switch or press
the switch to open the side window again. G
WARNING
If children operate the side windows they
could become trapped, particularly if they are left unsupervised. There is a risk of injury.
Activate the override feature for the rear side
windows. When leaving the vehicle, always
take the key with you and lock the vehicle.
Never leave children unattended in the vehi-
cle. Side window reversing feature
The side windows are equipped with an auto-
matic reversing feature. If a solid object blocks
or restricts a side window during the closing
process, the side window opens again automat-
ically. The automatic reversing feature is, how-
ever, only an aid and is no substitute for your
attention when closing a side window. Side
windows
93Opening an d closing Z
Page 372 of 397
Radio type approval for the tyre pres-
sure monitor Country Radio type approval number
Argentina MW2433A
H-12337
GG4
H-12338
Brazil 2770-12-8001
Model: MW2433A
0381-13-8001
Model: GG4
Abu Dhabi
Dubai TRA, Registered NO
ER0092100/12
TRA, Registered NO
ER0099792/12
TRA, Registered NO
ER0076990/11
Dealer NO: DA0047074/10
Jordan Model: Gen Alpha Wal 2 TPMS
transmitter
Type Approval Number:
TRC/LPD/2012/114
Model: Gen Gamma Gen 4
433.92 Mhz.
Type Approval Number:
TRC/LPD/2012/190
Model: Corax 3 MRXMC34MA4
Type Approval Number:
TRC/LPD/2011/158
Type Number: LPD Morocco MR7319 ANRT 2012/
11/07/2012
MR7672 ANRT 2012/
23/11/2012
MR6706 ANRT 2011
Moldova 1024
Philip-
pines No: ESD-1206394C
No: ESD-1306871C
Serbia И 011 12 Country Radio type approval number
Singapore Compliance with IDA Standard
DA- 103365
South
Africa TA-2012/719
TA-2012/1540
TA-2011/1370
Changing a wheel
Flat tyre
You can find information on what to do in the
event of a flat tyre in the "Breakdown assis-
tance" section (Y page 346). Information on
driving with MOExtended tyres in the event of a flat tyre can be found under "Breakdown assis-
tance" (Y page 347).
Vehicles with an emergency spare wheel: in
the event of a flat tyre, fit the emergency spare
wheel according to the description under "Fit-
ting a wheel" (Y page 370). Interchanging the wheels
G
WARNING
Interchanging the front and rear wheels may
severely impair the driving characteristics if
the wheels or tyres have different dimensions. The wheel brakes or suspension components may also be damaged. There is a risk of acci-
dent.
Interchange front and rear wheels only if the
wheels and tyres are of the same dimensions.
! On vehicles fitted with a tyre pressure mon-
itor, electronic components are located in the wheel.
Tyre-fitting tools should not be applied in thearea of the valve, as this could damage the
electronic components.
Only have tyres changed at a qualified spe-
cialist workshop.
Interchanging the front and rear wheels of dif-
fering dimensions can render the general oper-
ating permit invalid.
Observe the instructions and safety notes in the "Fitting a wheel" section (Y page 370). Changing a wheel
369Wheels and tyres Z
Page 378 of 397
Emergency spare wheel
Important safety notes
G
WARNING
The wheel/tyre dimensions and the tyre type of the spare wheel/emergency spare wheel
and the wheel to be replaced may differ. Fit-
ting a spare wheel/emergency spare wheel
may severely impair the driving characteris-
tics. There is a risk of accident.
To prevent hazardous situations:
R Adapt your driving style accordingly and
drive carefully.
R Never fit more than one spare wheel/emer-
gency spare wheel if the dimensions are
different to those of the wheel being
replaced.
R Only use a spare wheel/emergency spare
wheel briefly if the dimensions are different
to those of the wheel being replaced.
R Do not switch off ESP ®
.
R Have the spare wheel/emergency spare
wheel in question replaced at the nearest
qualified specialist workshop. Make sure
that the wheel/tyre dimensions and tyre
type are correct.
! Mercedes-AMG vehicles with
"Minispare" emergency spare wheel: only
use the "Minispare" emergency spare wheel
on the rear axle. If you fit the "Minispare"
emergency spare wheel to the front axle, the braking system could be damaged.
If a tyre on the front axle is damaged, an
undamaged wheel on the rear axle must be
replaced first with the "Minispare" emergency
spare wheel. The damaged wheel on the front
axle can then be replaced by the undamaged wheel from the rear axle.
You must observe the instruction label on the"Minispare" emergency spare wheel.
When using an emergency spare wheel or spare wheel of a different size, you must not exceed
the maximum speed of 80 km/h.
Snow chains must not be fitted to emergency
spare wheels. General notes
You can ask for information regarding permitted emergency spare wheels at a Mercedes-Benz
Service Centre.
Fitting the emergency spare wheel is described under "Fitting a wheel" (Y page 370).
You should check the pressure of all your tyres, including the emergency spare wheel, regularly
as well as prior to long trips, and correct the
pressure as necessary (Y page 364). The value
on the wheel is valid.
An emergency spare wheel may also be fitted
against the direction of rotation. Observe the
time restriction on use as well as the speed lim- itation specified on the emergency spare wheel.
Replace the tyres after six years at the latest,
regardless of wear. This also applies to the
emergency spare wheel.
If you are driving with the emergency spare
wheel fitted, the tyre pressure loss warning sys- tem or the tyre pressure monitor cannot func-
tion reliably. Restart the tyre pressure loss warn-
ing system or tyre pressure monitor only once
the defective wheel has been replaced with a
new wheel.
Vehicles with tyre pressure monitor: after an
emergency spare wheel has been fitted, the sys- tem may still display the tyre pressure of the
removed wheel for a few minutes. The value dis-
played for the position where the emergency
spare wheel is fitted is not the same as the cur- rent tyre pressure of the emergency spare
wheel. Removing/stowing the emergency
spare wheel
Vehicles with a "Minispare" emergency
spare wheel under the luggage com-
partment floor Observe the instructions and safety notes in the
"Fitting a wheel" section (Y page 370).
Example image: vehicle without lockable lug-
gage compartment floor. Emergency spare wheel
375Wheels and tyres Z