2016 MERCEDES-BENZ GLS SUV fuel pressure
[x] Cancel search: fuel pressurePage 27 of 397
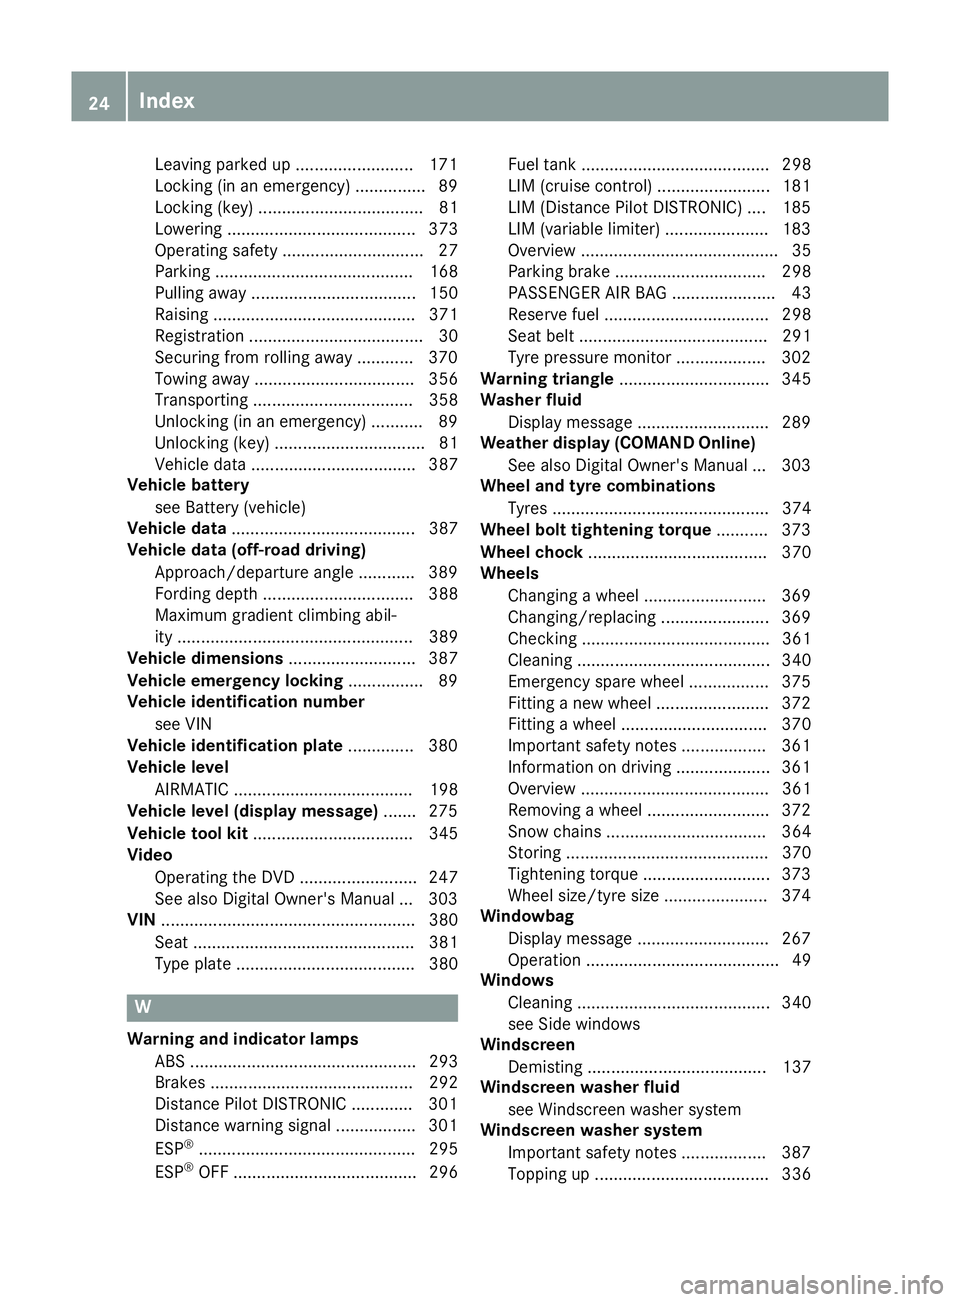
Leaving parked up .........................1
71
Locking (in an emergency) .............. .89
Locking (key) ................................... 81
Lowering ........................................ 373
Operating safety .............................. 27
Parking .......................................... 168
Pulling away ................................... 150
Raising ........................................... 371
Registration ..................................... 30
Securing from rolling away ............ 370
Towing away .................................. 356
Transporting .................................. 358
Unlocking (in an emergency) ........... 89
Unlocking (key) ................................ 81
Vehicle data ................................... 387
Vehicle battery
see Battery (vehicle)
Vehicle data ....................................... 387
Vehicle data (off-road driving)
Approach/departure angle ............ 389
Fording depth ................................ 388
Maximum gradient climbing abil-
ity .................................................. 389
Vehicle dimensions ........................... 387
Vehicle emergency locking ................ 89
Vehicle identification number
see VIN
Vehicle identification plate .............. 380
Vehicle level
AIRMATIC ...................................... 198
Vehicle level (display message) ....... 275
Vehicle tool kit .................................. 345
Video
Operating the DVD ......................... 247
See also Digital Owner's Manua l... 303
VIN ...................................................... 380
Seat ............................................... 381
Type plate ...................................... 380 W
Warning and indicator lamps ABS ................................................ 293
Brakes ........................................... 292
Distance Pilot DISTRONIC ............. 301
Distance warning signal ................. 301
ESP ®
.............................................. 295
ESP ®
OFF ....................................... 296 Fuel tank ........................................ 298
LIM (cruise control) ........................ 181
LIM (Distance Pilot DISTRONIC) .... 185
LIM (variable limiter) ...................... 183
Overview .......................................... 35
Parking brake ................................ 298
PASSENGER AIR BAG ...................... 43
Reserve fue l................................... 298
Seat belt ........................................ 291
Tyre pressure monitor ................... 302
Warning triangle ................................ 345
Washer fluid
Display message ............................ 289
Weather display (COMAND Online)
See also Digital Owner's Manua l... 303
Wheel and tyre combinations
Tyres .............................................. 374
Wheel bolt tightening torque ........... 373
Wheel chock ...................................... 370
Wheels
Changing a wheel .......................... 369
Changing/replacing ....................... 369
Checking ........................................ 361
Cleaning ......................................... 340
Emergency spare wheel ................. 375
Fitting a new wheel ........................ 372
Fitting a wheel ............................... 370
Important safety notes .................. 361
Information on driving .................... 361
Overview ........................................ 361
Removing a wheel .......................... 372
Snow chains .................................. 364
Storing ........................................... 370
Tightening torque ........................... 373
Wheel size/tyre size ...................... 374
Windowbag
Display message ............................ 267
Operation ......................................... 49
Windows
Cleaning ......................................... 340
see Side windows
Windscreen
Demisting ...................................... 137
Windscreen washer fluid
see Windscreen washer system
Windscreen washer system
Important safety notes .................. 387
Topping up ..................................... 336 24
Index
Page 29 of 397

Environmental protection
General notes
H
Environmental note
Daimler's declared policy is one of compre-
hensive environmental protection.
Our objectives are to use the natural resour-
ces which form the basis of our existence on
this planet sparingly and in a manner which
takes the requirements of both nature and
humanity into consideration.
You too can help to protect the environment
by operating your vehicle in an environmen-
tally-responsible manner.
Fuel consumption and the rate of engine,
transmission, brake and tyre wear depend on
the following factors:
R operating conditions of your vehicle
R your personal driving style
You can influence both factors. Therefore,
please bear the following in mind:
Operating conditions:
R avoid short trips, as these increase fuel
consumption.
R observe the correct tyre pressure.
R do not carry any unnecessary weight in the
vehicle.
R remove the roof rack once you no longer
need it.
R a regularly serviced vehicle will contribute
to environmental protection. You should
therefore adhere to the service intervals.
R all maintenance work should be carried out
at a qualified specialist workshop.
Personal driving style:
R do not depress the accelerator pedal when
starting the engine.
R do not warm up the engine when the vehicle
is stationary.
R drive carefully and maintain a safe distance
from the vehicle in front.
R avoid frequent, sudden acceleration and
braking. R
change gear in good time and use each gear
only up to Ôof its maximum engine speed.
R switch off the engine in stationary traffic.
R monitor the vehicle's fuel consumption. Returning an end-of-life vehicle
EU countries only:
Mercedes-Benz will take back your end-of-life
vehicle for environmentally-friendly disposal in
accordance with the European Union (EU) End-
Of-Life Vehicles Directive.
A network of vehicle take-back points and dis-
mantlers has been established for you to return
your vehicle. You can leave it at any of these
points free of charge. This makes an important
contribution to closing the recycling circle and
conserving resources.
For further information about the recycling and
disposal of end-of-life vehicles, and the take-
back conditions, please visit the national
Mercedes-Benz website for your country. Genuine Mercedes-Benz parts
H
Environmental note
Daimler AG also supplies reconditioned
assemblies and parts which are of the same
quality as new parts. For these, the same war-
ranty applies as for new parts.
! Airbags and seat belt tensioners, as well as
control units and sensors for these restraint
systems, may be installed in the following
areas of your vehicle:
R doors
R door pillars
R door sills
R seats
R dashboard
R instrument cluster
R centre console
Do not install accessories such as audio sys-
tems in these areas. Do not carry out repairs
or welding. You could impair the operating
efficiency of the restraint systems. 26
Introduction
Page 38 of 397
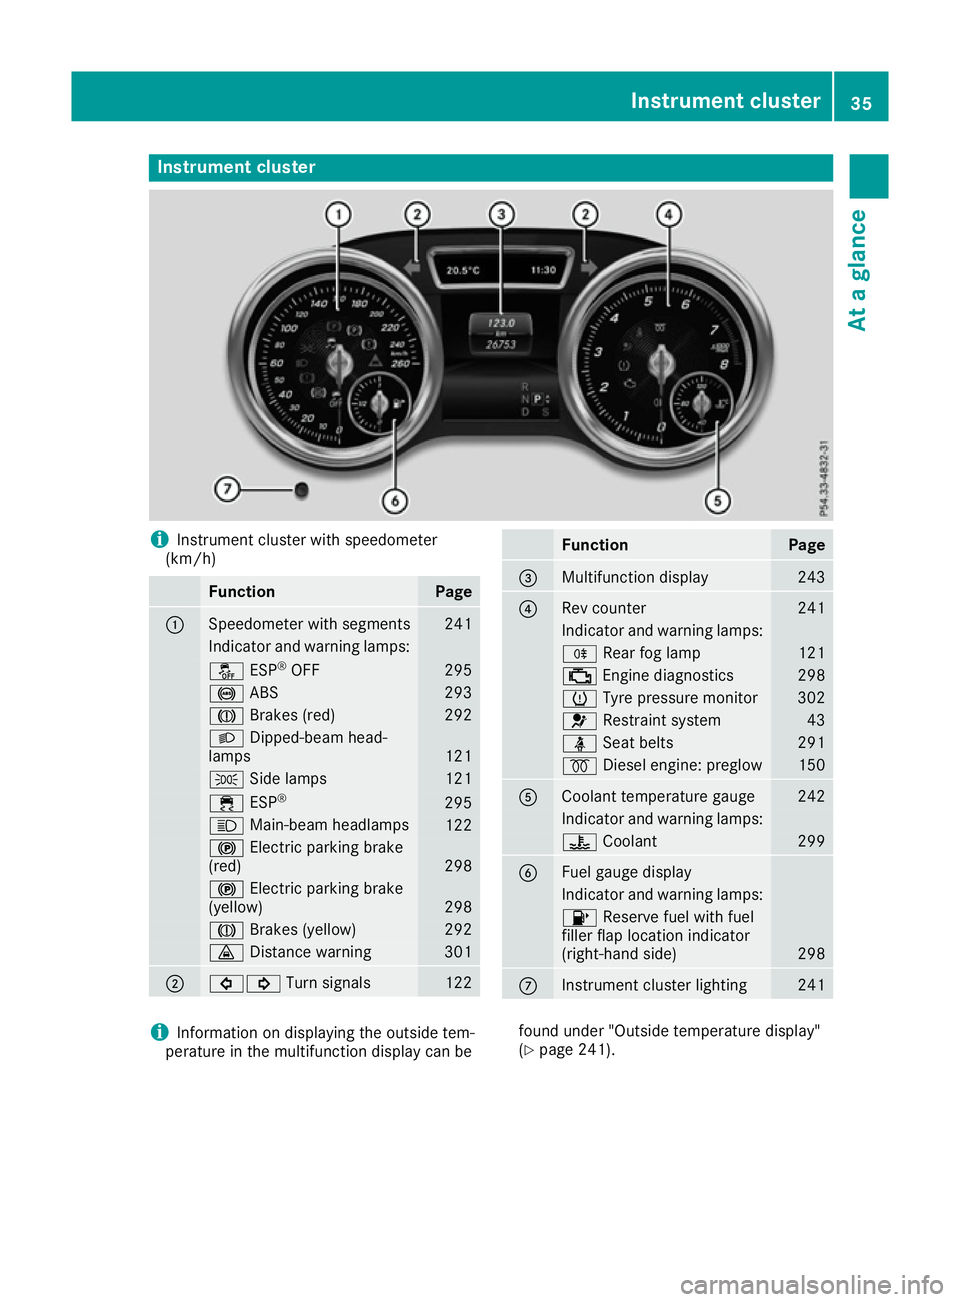
Instrument cluster
i
Instrument cluster with speedometer
(km/h) Function Page
:
Speedometer with segments 241
Indicator and warning lamps:
å
ESP®
OFF 295
!
ABS 293
J
Brakes (red) 292
L
Dipped-beam head-
lamps 121
T
Side lamps 121
÷
ESP® 295
K
Main-beam headlamps 122
!
Electric parking brake
(red) 298
!
Electric parking brake
(yellow) 298
J
Brakes (yellow) 292
·
Distance warning 301
;
#!
Turn signals 122 Function Page
=
Multifunction display 243
?
Rev counter 241
Indicator and warning lamps:
R
Rear fog lamp 121
;
Engine diagnostics 298
h
Tyre pressure monitor 302
6
Restraint system 43
ü
Seat belts 291
%
Diesel engine: preglow 150
A
Coolant temperature gauge 242
Indicator and warning lamps:
?
Coolant 299
B
Fuel gauge display
Indicator and warning lamps:
8
Reserve fuel with fuel
filler flap location indicator
(right-hand side) 298
C
Instrument cluster lighting 241
i
Information on displaying the outside tem-
perature in the multifunction display can be found under "Outside temperature display"
(Y
page 241). Instrument cluster
35At a glance
Page 60 of 397

uations, PRE-SAFE
®
PLUS takes pre-emptive
measures to protect the vehicle occupants.
Important safety notes The intervention of PRE-SAFE
®
PLUS cannot
prevent an imminent collision.
The driver is not warned before the intervention
of PRE-SAFE ®
PLUS.
PRE-SAFE ®
PLUS does not intervene:
R if the vehicle is reversing
R when the vehicle is towing a trailer and there
is a risk of a rear-end collision
When driving, or when parking or exiting a park-
ing space with assistance from Parking Pilot,
PRE-SAFE ®
PLUS will not apply the brakes.
Function PRE-SAFE
®
PLUS intervenes in certain situa-
tions if the radar sensor system detects an
imminent head-on or rear-end collision.
PRE-SAFE ®
PLUS takes the following measures
depending on the hazardous situation detected:
R if the radar sensor system detects that a
head-on collision is imminent, the seat belts
are pre-tensioned
R if the radar sensor system detects that a rear-
end collision is imminent:
- the rear hazard warning lamps are activa-
ted and flash at a higher frequency
- the brake pressure is increased if the driver
applies the brakes when the vehicle is sta- tionary
- the seat belts are pre-tensioned
The PRE-SAFE ®
PLUS braking application is can-
celled:
R if the accelerator pedal is depressed when a
gear is engaged
R if the risk of a collision passes or is no longer
detected
R if Distance Pilot DISTRONIC indicates an
intention to pull away
If the hazardous situation passes without result- ing in an accident, the original settings are
restored. Automatic measures after an acci-
dent
Immediately after an accident, the following
measures may be implemented, depending on
the type and severity of the impact:
R the hazard warning lamps are activated
R the emergency lighting is activated
R the vehicle doors are unlocked
R the front side windows are lowered
R vehicles with a memory function: the electri-
cally adjustable steering wheel is raised
R the engine is switched off and the fuel supply
is cut off
R vehicles with the Mercedes-Benz emergency
call system: automatic emergency call Children in the vehicle
Important safety notes
Accident statistics show that children secured
in the rear seats are safer than children secured in the front seats. For this reason, Mercedes-
Benz strongly advises that you fit a child
restraint system on a rear seat. Children are
generally better protected there.
If a child younger than twelve years old and
under 1.50 m in height is travelling in the vehi-
cle:
R always secure the child in a child restraint
system suitable for Mercedes-Benz vehicles.
The child restraint system must be appropri-
ate to the age, weight and size of the child.
R be sure to observe the instructions and safety
notes in this section in addition to the child
restraint system manufacturer's installation
instructions
R be sure to observe the instructions and safety
notes on the automatic front-passenger front
airbag deactivation system (Y page 50). Children in the vehicle
57Safety Z
Page 162 of 397
Driving tips
Changing gear The automatic transmission shifts to the indi-
vidual gears automatically when it is in trans-
mission position
D. Gearshifting is determined
by:
R the selected drive program
R the position of the accelerator pedal
R the road speed
Accelerator pedal position Your driving style influences how the automatic
transmission shifts gear:
R little throttle: early upshifts
R more throttle: late upshifts
Kickdown Use kickdown for maximum acceleration:
X Depress the accelerator pedal beyond the
pressure point.
The automatic transmission shifts to a lower
gear depending on the engine speed.
X Ease off the accelerator pedal once the
desired speed is reached.
The automatic transmission shifts back up.
Gliding mode (diesel engines only) Gliding mode is characterised by the following:
R the combustion engine is disconnected from
the drive train
R the engine speed is equal to the engine idling
speed
R the gear indicated after the transmission
position Ddisappears in the multifunction
display (Y page 158)
Gliding mode can be activated and transmission
position Dshown in green under the following
conditions:
R you select the "ECO" setting for the drive sys-
tem within the Individualdrive program. You
can find information about this in the Digital
Owner's Manual
R the speed is within a suitable range
R the type of road is suitable, e.g. no steep uphill
or downhill gradients R
the distance to the vehicle in front is sufficient
R you are no longer depressing the accelerator
pedal
Gliding mode is deactivated under the following
conditions:
R you depress the accelerator pedal
R you depress the brake pedal
R you use the DIRECT SELECT lever to switch
the transmission position (Y page 156)
R you use the DYNAMIC SELECT controller to
change the drive program (Y page 155)
R you activate manual gearshifting
(Y page 160)
R the distance to the vehicle in front is too short
R you leave the suitable speed range
Towing a trailer X
Drive in the middle of the engine speed range
on uphill gradients.
X Depending on the uphill or downhill gradient,
use the left-hand steering wheel gearshift
paddle (Y page 160) to select a lower gear,
even if cruise control, Distance Pilot
DISTRONIC or the speed limiter are activated. Drive programs
Slippery drive program The
Slippery drive program has the following
characteristics:
R reduced engine and transmission settings for
optimum propulsion on slippery or snow-cov-
ered roads.
R optimised ESP ®
stability control on slippery
or snow-covered roads.
R the vehicle has improved driving stability on
slippery or snow-covered roads, for example.
Comfort drive program The
Comfort drive program has the following
characteristics:
R comfort-orientated engine and transmission
settings.
R optimal fuel consumption resulting from the
automatic transmission shifting up sooner. Automatic transmission
159Driving and parking Z
Page 165 of 397
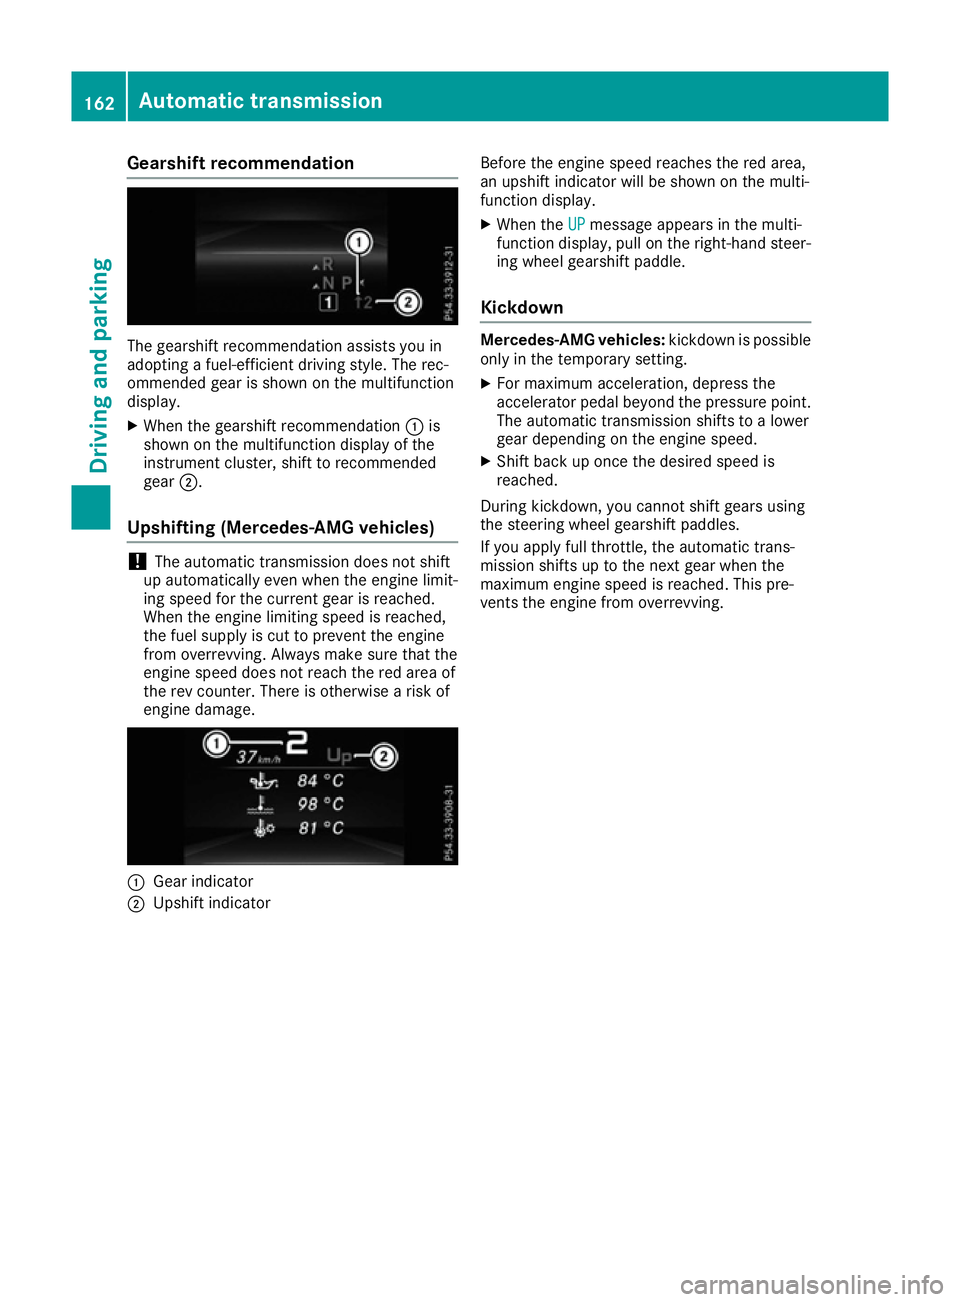
Gearshift recommendation
The gearshift recommendation assists you in
adopting a fuel-efficient driving style. The rec-
ommended gear is shown on the multifunction
display.
X When the gearshift recommendation :is
shown on the multifunction display of the
instrument cluster, shift to recommended
gear ;.
Upshifting (Mercedes-AMG vehicles) !
The automatic transmission does not shift
up automatically even when the engine limit-
ing speed for the current gear is reached.
When the engine limiting speed is reached,
the fuel supply is cut to prevent the engine
from overrevving. Always make sure that the
engine speed does not reach the red area of
the rev counter. There is otherwise a risk of
engine damage. :
Gear indicator
; Upshift indicator Before the engine speed reaches the red area,
an upshift indicator will be shown on the multi-
function display.
X When the UP
UP message appears in the multi-
function display, pull on the right-hand steer- ing wheel gearshift paddle.
Kickdown Mercedes-AMG vehicles:
kickdown is possible
only in the temporary setting.
X For maximum acceleration, depress the
accelerator pedal beyond the pressure point. The automatic transmission shifts to a lower
gear depending on the engine speed.
X Shift back up once the desired speed is
reached.
During kickdown, you cannot shift gears using
the steering wheel gearshift paddles.
If you apply full throttle, the automatic trans-
mission shifts up to the next gear when the
maximum engine speed is reached. This pre-
vents the engine from overrevving. 162
Automatic transmissionDriving and parking
Page 167 of 397
G
WARNING
Electrostatic charge can cause sparks and
thereby ignite fuel vapours. There is a risk of
fire and explosion.
Always touch the vehicle body before opening the fuel filler flap or touching the fuel pump
nozzle. This discharges any electrostatic
charge that may have built up. G
WARNING
Vehicles with a diesel engine:
If you mix diesel fuel with petrol, the flash
point of this fuel mixture is lower than that of pure diesel fuel. When the engine is running,
components in the exhaust system may over-
heat unnoticed. There is a risk of fire.
Never refuel with petrol. Never add petrol to
diesel fuel.
! Do not use petrol to refuel vehicles with a
diesel engine. Do not switch on the ignition if you accidentally refuel with the wrong fuel.
Otherwise, fuel can enter the fuel system.
Even small amounts of the wrong fuel could
result in damage to the fuel system and the
engine. The repair costs are high. Notify a
qualified specialist workshop and have the
fuel tank and fuel lines drained completely.
! Do not use diesel to refuel vehicles with a
petrol engine. Do not switch on the ignition if you accidentally refuel with the wrong fuel.
Otherwise, the fuel will enter the fuel system.
Even small amounts of the wrong fuel can
result in damage to the fuel system and the
engine. Notify a qualified specialist workshop
and have the fuel tank and fuel lines drained
completely.
! Overfilling the fuel tank could damage the
fuel system.
! Take care not to spill any fuel on painted
surfaces. You could otherwise damage the
paintwork.
! Use a filter when adding fuel from a fuel can.
The fuel lines and/or the fuel injection system could otherwise be blocked by particles fromthe fuel can. Do not get back into the vehicle during the refu-
elling process, Otherwise, electrostatic charge
could build up again.
If you overfill the fuel tank, some fuel may spray out when you remove the fuel pump nozzle.
Further information on fuel and fuel quality
(Y page 382). Refuelling
General information Pay attention to the important safety notes
(Y
page 163).
The fuel filler flap is unlocked or locked auto-
matically when you unlock or lock the vehicle
with the key or using KEYLESS-GO.
The position of the 8fuel filler cap is dis-
played in the instrument cluster. The arrow next
to the filling pump indicates the side of the vehi- cle.
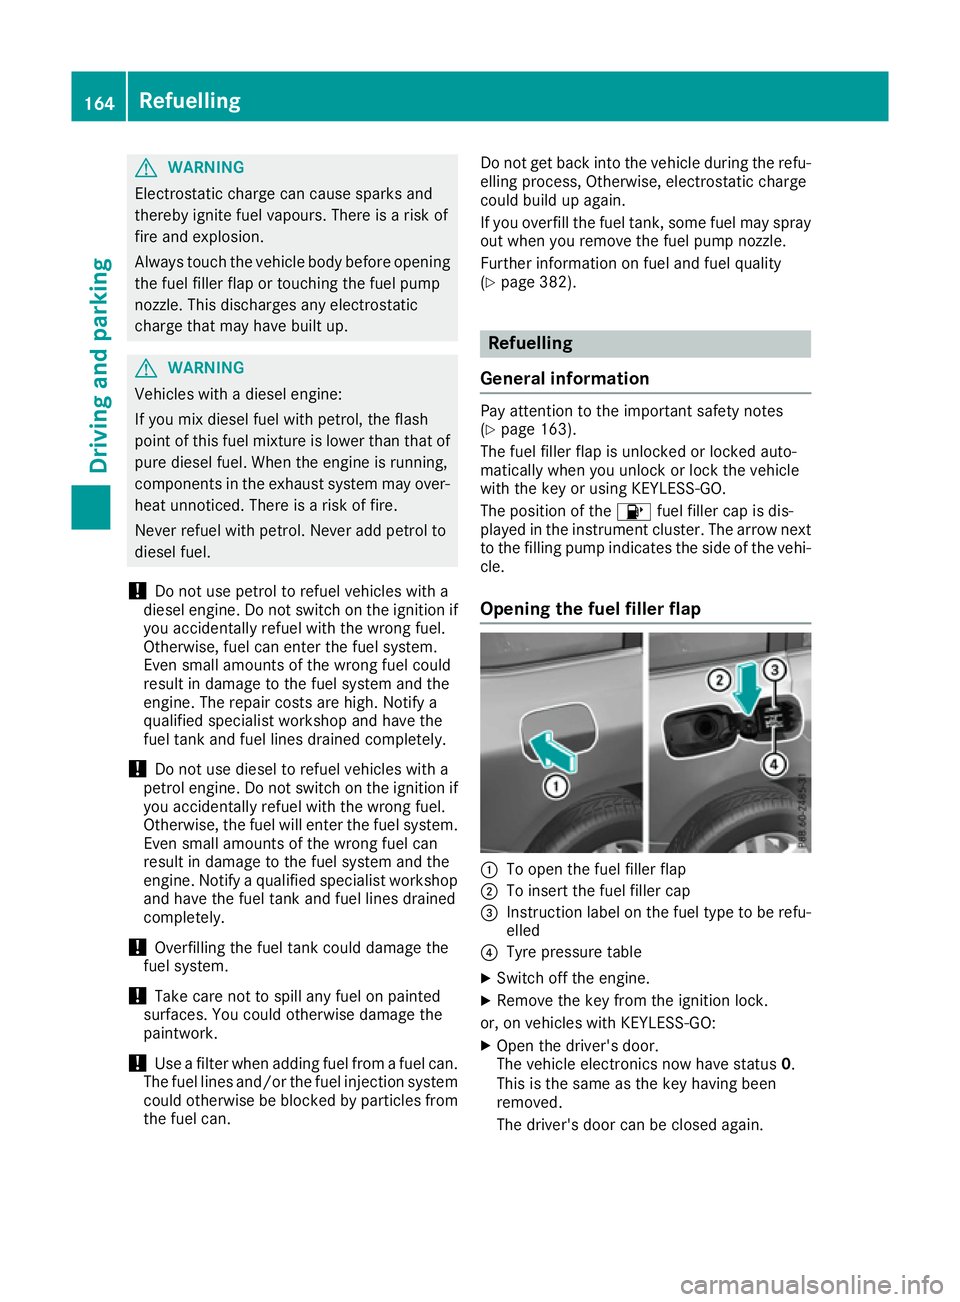
Opening the fuel filler flap :
To open the fuel filler flap
; To insert the fuel filler cap
= Instruction label on the fuel type to be refu-
elled
? Tyre pressure table
X Switch off the engine.
X Remove the key from the ignition lock.
or, on vehicles with KEYLESS‑ GO:
X Open the driver's door.
The vehicle electronics now have status 0.
This is the same as the key having been
removed.
The driver's door can be closed again. 164
RefuellingDriving and parking
Page 175 of 397
Driving tips
General notes
Important safety notes G
WARNING
If you switch off the ignition while driving,
safety-relevant functions are only available
with limitations, or not at all. This could affect, for example, the power steering and the brake
boosting effect. You will require considerably
more effort to steer and brake. There is a risk of an accident.
Do not switch off the ignition while driving.
Drive sensibly – save fuel Observe the following tips to save fuel:
X The tyres should always be inflated to the rec-
ommended tyre pressure.
X Remove unnecessary loads.
X Remove roof carriers when they are not nee-
ded.
X Warm up the engine at low engine speeds.
X Avoid frequent acceleration or braking.
X Have all maintenance work carried out as
indicated by the service intervals in the Ser-
vice Booklet or by the service interval display.
Fuel consumption also increases when driving in
cold weather, in stop-start traffic, on short jour- neys and in hilly terrain. ECO display
The ECO display shows you how economical
your driving style is. The ECO display assists you in achieving the most economical driving style
for the selected settings and prevailing condi-
tions. Consumption can be significantly influ-
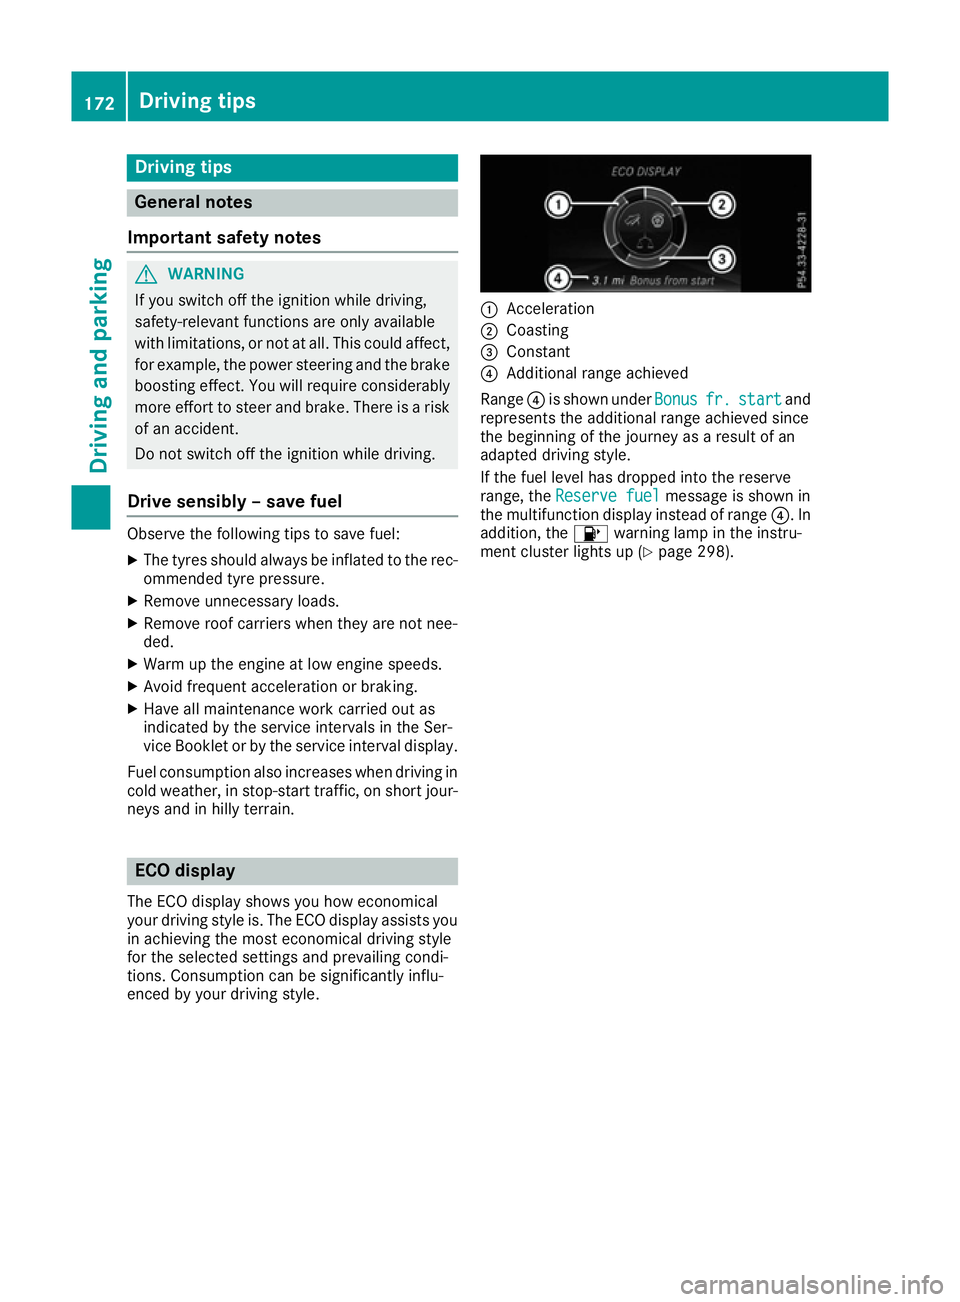
enced by your driving style. :
Acceleration
; Coasting
= Constant
? Additional range achieved
Range ?is shown under Bonus Bonusfr.
fr.start
start and
represents the additional range achieved since
the beginning of the journey as a result of an
adapted driving style.
If the fuel level has dropped into the reserve
range, the Reserve fuel Reserve fuel message is shown in
the multifunction display instead of range ?. In
addition, the 8warning lamp in the instru-
ment cluster lights up (Y page 298).172
Driving tipsDriving and pa
rking