2016 MERCEDES-BENZ GLS SUV height
[x] Cancel search: heightPage 22 of 397
Fitting/removing the cover (front
wheel arch) .................................... 127
General notes ................................ 126
Important safety notes .................. 126
Main-beam headlamp s................... 127
Overview of bulb types .................. 126
Turn signals (front) ......................... 128
Replacing the battery (auxiliary
heating remote control) .................... 143
Rescue card ......................................... 31
Reserve (fuel tank)
see Fuel
Reserve fuel
Display message ............................ 274
Warning lamp ................................. 298
Residual heat (climate control) ........ 140
Restraint system
Display message ............................ 267
Introduction ..................................... 42
Warning lamp ................................. 298
Warning lamp (function) ................... 43
Rev counter ........................................ 241
Reversing camera
Cleaning instructions ..................... 341
Display in the multimedia system .. 208
Function/note s............................. 207
Switching on/of f........................... 208
Reversing feature
Panorama sliding sunroo f................ 97
Roller sunblind s............................... 99
Side windows ................................... 93
Sliding sunroof ................................. 97
Tailgate ............................................ 90
Reversing lamp (display message) .. 270
Roller sunblind
Panorama sliding sunroo f................ 99
Roof carrier ........................................ 319
Roof lining and carpets (cleaning
instructions) ...................................... 344
Roof load (maximum) ........................ 387
Route (navigation)
see Route guidance (navigation)
Route guidance
See also Digital Owner's Manua l... 303
Route guidance (navigation) ............ 245 S
Safety Children in the vehicle ..................... 57
see Occupant safety
see Operating safety
Safety system
see Driving safety systems
SD card
Inserting ........................................ 311
Inserting/removing ........................ 311
Removing ....................................... 311
SD memory card
See also Digital Owner's Manua l... 303
Selecting ........................................ 247
Seat belt
Correct usage .................................. 45
Switching belt adjustment on/off
(on-board computer) ...................... 254
Seat belts
Adjusting the driver's and front-
passenger seat belt ......................... 46
Adjusting the height ......................... 46
Cleaning ......................................... 344
Display message ............................ 266
Fastening ......................................... 46
Important safety guidelines ............. 44
Introduction ..................................... 44
Rear seat belt status indicator ......... 47
Releasing ......................................... 46
Warning lamp ................................. 291
Warning lamp (function) ................... 46
Seats
Adjusting (electrically) ................... 104
Adjusting the 4-way lumbar sup-
port ................................................ 112
Adjusting the head restraint .......... 104
Calling up a stored setting (mem-
ory function) .................................. 119
Cleaning the cover ......................... 343
Correct driver's seat position ........ 102
Entry position (3rd row of seats) .... 109
Exit position (3rd row of seats) ...... 109
Folding down/up (3rd row of
seats) ............................................. 107
Folding the 2nd row of seats
forward electrically ........................ 111 Index
19
Page 48 of 397
protective function. Furthermore, an incor-
rectly worn seat belt can cause additional
injuries, e.g. in the event of an accident, heavy braking or sudden changes of direction. There is an increased risk of injury, possibly even
fatal.
Always secure persons less than 1.50 mtall in
additional suitable restraint systems.
If a child younger than twelve years old and
under 1.50 min height is travelling in the vehi-
cle:
R always secure the child in a child restraint
system suitable for this Mercedes-Benz vehi-
cle. The child restraint system must be appro- priate to the age, weight and size of the child.
R always observe the instructions and safety
notes on the "Automatic front-passenger
front airbag deactivation system"
(Y page 50)
R always observe the instructions and safety
notes on "Children in the vehicle"
(Y page 57) in addition to the child restraint
system manufacturer's installation and oper-
ating instructions. G
WARNING
Seat belts cannot protect as intended, if:
R they are damaged, have been modified, are
extremely dirty, bleached or dyed
R the seat belt buckle is damaged or
extremely dirty
R modifications have been made to the belt
tensioners, belt anchorages or inertia reels
Seat belts may sustain non-visible damage in an accident, e.g. due to glass splinters. Modi-
fied or damaged seat belts can tear or fail, for example in the event of an accident. Modified
seat belt tensioners may be deployed unin-
tentionally or not function as intended. There is an increased risk of injury, possibly even
fatal.
Never modify seat belts, seat belt tensioners,
seat belt anchorages and inertia reels. Ensure that seat belts are not damaged or worn and
are clean. After an accident, have the seat
belts checked immediately at a qualified spe-
cialist workshop. Mercedes-Benz recommends that you only use
seat belts which have been approved specifi-
cally for your vehicle by Mercedes-Benz. Other-
wise, your vehicle's general operating permit
could be invalidated.
Correct seat belt use Pay attention to the safety notes about the seat
belt (Y page 44).
All vehicle occupants must fasten their seat
belts correctly before you start driving. You
must also make sure that all vehicle occupants
have fastened their seat belts correctly during
the journey.
When fastening your seat belt, always make
sure that:
R the seat belt tongue is inserted into the belt
buckle that belongs to the seat.
R the seat belt is tightened across your body.
Avoid wearing bulky clothing, e.g. a winter
coat.
R the seat belt is not twisted.
Only then can the forces which occur be dis-
tributed over the area of the belt.
R the shoulder section of the belt is always
routed across the centre of your shoulder.
The shoulder section of the belt must not
come into contact with your neck or be routed under your arm. Adjust the seat belt to the
appropriate height as necessary.
R The lap belt must be taut and as low as pos-
sible over your lap.
The lap belt must always be routed across
your hip joints and not across your abdomen.
Pregnant women must take particular care
with this. If necessary, push the lap belt down to your hip joint and pull it tight using the
shoulder section of the belt.
R The seat belt is not routed over sharp, pointed
or fragile objects.
If such objects are located on or in your cloth- ing, e.g. pens, keys, spectacles, etc. stow
these in a suitable location.
R Only one person should use each seat belt at
any one time.
Babies and children must never travel sitting
on the lap of another vehicle occupant. In the Occupant safety
45Safety Z
Page 50 of 397
The
7 seat belt warning lamp goes out and
the warning tone stops as soon as the driver's
and the co-driver's seat belts have been fas-
tened.
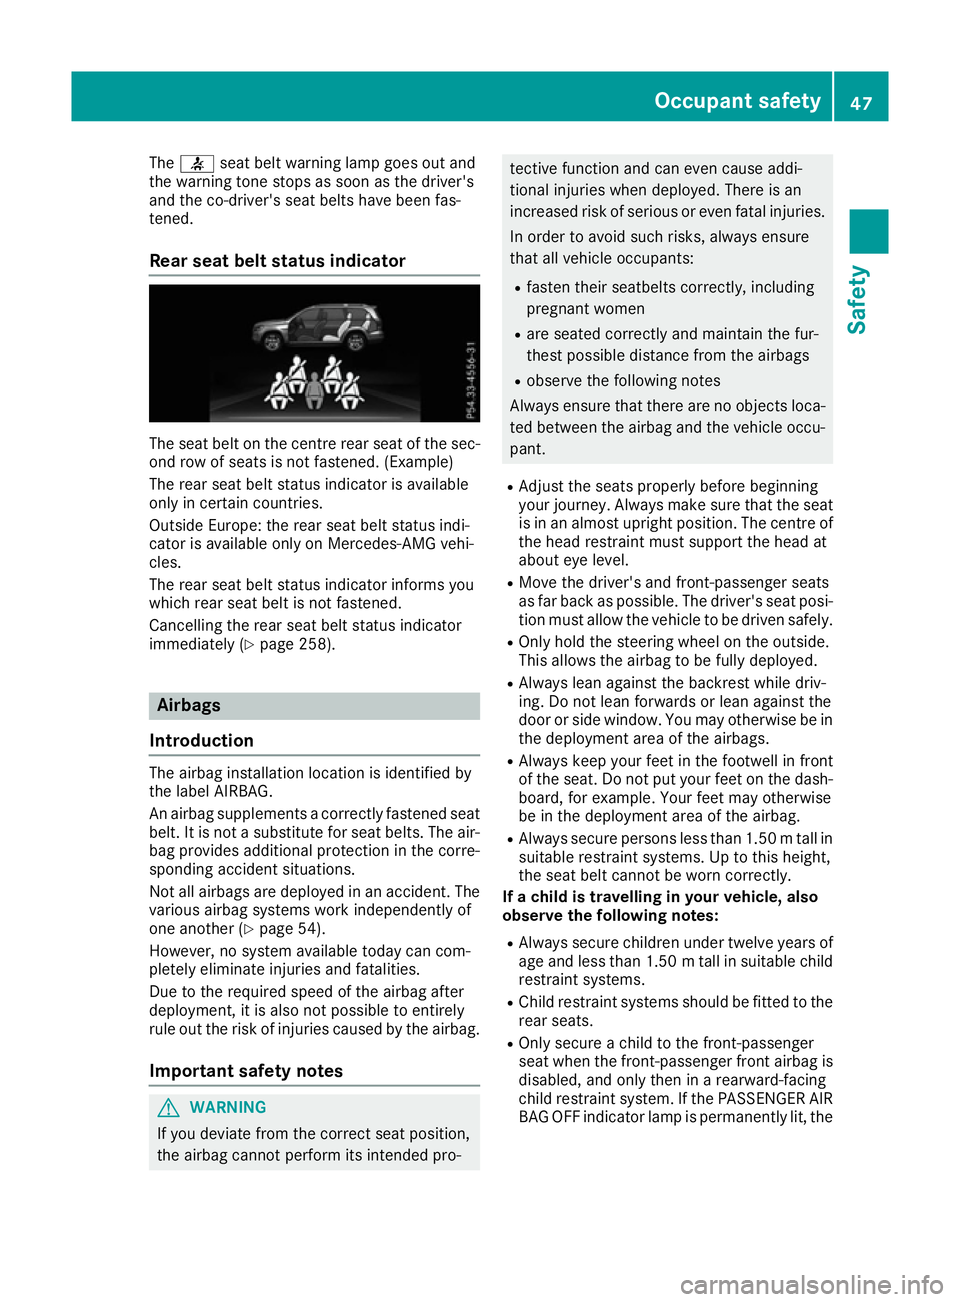
Rear seat belt status indicator The seat belt on the centre rear seat of the sec-
ond row of seats is not fastened. (Example)
The rear seat belt status indicator is available
only in certain countries.
Outside Europe: the rear seat belt status indi-
cator is available only on Mercedes-AMG vehi-
cles.
The rear seat belt status indicator informs you
which rear seat belt is not fastened.
Cancelling the rear seat belt status indicator
immediately (Y page 258). Airbags
Introduction The airbag installation location is identified by
the label AIRBAG.
An airbag supplements a correctly fastened seat belt. It is not a substitute for seat belts. The air-bag provides additional protection in the corre-
sponding accident situations.
Not all airbags are deployed in an accident. The
various airbag systems work independently of
one another (Y page 54).
However, no system available today can com-
pletely eliminate injuries and fatalities.
Due to the required speed of the airbag after
deployment, it is also not possible to entirely
rule out the risk of injuries caused by the airbag.
Important safety notes G
WARNING
If you deviate from the correct seat position,
the airbag cannot perform its intended pro- tective function and can even cause addi-
tional injuries when deployed. There is an
increased risk of serious or even fatal injuries.
In order to avoid such risks, always ensure
that all vehicle occupants:
R fasten their seatbelts correctly, including
pregnant women
R are seated correctly and maintain the fur-
thest possible distance from the airbags
R observe the following notes
Always ensure that there are no objects loca-
ted between the airbag and the vehicle occu-
pant.
R Adjust the seats properly before beginning
your journey. Always make sure that the seat
is in an almost upright position. The centre of
the head restraint must support the head at
about eye level.
R Move the driver's and front-passenger seats
as far back as possible. The driver's seat posi-
tion must allow the vehicle to be driven safely.
R Only hold the steering wheel on the outside.
This allows the airbag to be fully deployed.
R Always lean against the backrest while driv-
ing. Do not lean forwards or lean against the
door or side window. You may otherwise be in
the deployment area of the airbags.
R Always keep your feet in the footwell in front
of the seat. Do not put your feet on the dash-
board, for example. Your feet may otherwise
be in the deployment area of the airbag.
R Always secure persons less than 1.50 mtall in
suitable restraint systems. Up to this height,
the seat belt cannot be worn correctly.
If a child is travelling in your vehicle, also
observe the following notes:
R Always secure children under twelve years of
age and less than 1.50 mtall in suitable child
restraint systems.
R Child restraint systems should be fitted to the
rear seats.
R Only secure a child to the front-passenger
seat when the front-passenger front airbag is
disabled, and only then in a rearward-facing
child restraint system. If the PASSENGER AIR BAG OFF indicator lamp is permanently lit, the Occupant safety
47Safety Z
Page 60 of 397

uations, PRE-SAFE
®
PLUS takes pre-emptive
measures to protect the vehicle occupants.
Important safety notes The intervention of PRE-SAFE
®
PLUS cannot
prevent an imminent collision.
The driver is not warned before the intervention
of PRE-SAFE ®
PLUS.
PRE-SAFE ®
PLUS does not intervene:
R if the vehicle is reversing
R when the vehicle is towing a trailer and there
is a risk of a rear-end collision
When driving, or when parking or exiting a park-
ing space with assistance from Parking Pilot,
PRE-SAFE ®
PLUS will not apply the brakes.
Function PRE-SAFE
®
PLUS intervenes in certain situa-
tions if the radar sensor system detects an
imminent head-on or rear-end collision.
PRE-SAFE ®
PLUS takes the following measures
depending on the hazardous situation detected:
R if the radar sensor system detects that a
head-on collision is imminent, the seat belts
are pre-tensioned
R if the radar sensor system detects that a rear-
end collision is imminent:
- the rear hazard warning lamps are activa-
ted and flash at a higher frequency
- the brake pressure is increased if the driver
applies the brakes when the vehicle is sta- tionary
- the seat belts are pre-tensioned
The PRE-SAFE ®
PLUS braking application is can-
celled:
R if the accelerator pedal is depressed when a
gear is engaged
R if the risk of a collision passes or is no longer
detected
R if Distance Pilot DISTRONIC indicates an
intention to pull away
If the hazardous situation passes without result- ing in an accident, the original settings are
restored. Automatic measures after an acci-
dent
Immediately after an accident, the following
measures may be implemented, depending on
the type and severity of the impact:
R the hazard warning lamps are activated
R the emergency lighting is activated
R the vehicle doors are unlocked
R the front side windows are lowered
R vehicles with a memory function: the electri-
cally adjustable steering wheel is raised
R the engine is switched off and the fuel supply
is cut off
R vehicles with the Mercedes-Benz emergency
call system: automatic emergency call Children in the vehicle
Important safety notes
Accident statistics show that children secured
in the rear seats are safer than children secured in the front seats. For this reason, Mercedes-
Benz strongly advises that you fit a child
restraint system on a rear seat. Children are
generally better protected there.
If a child younger than twelve years old and
under 1.50 m in height is travelling in the vehi-
cle:
R always secure the child in a child restraint
system suitable for Mercedes-Benz vehicles.
The child restraint system must be appropri-
ate to the age, weight and size of the child.
R be sure to observe the instructions and safety
notes in this section in addition to the child
restraint system manufacturer's installation
instructions
R be sure to observe the instructions and safety
notes on the automatic front-passenger front
airbag deactivation system (Y page 50). Children in the vehicle
57Safety Z
Page 106 of 397
G
WARNING
You could lose control of the vehicle while
driving if you:
R adjust the driver's seat, steering wheel or
mirrors
R fasten the seat belt
There is a risk of an accident.
Adjust the driver's seat, head restraint, steer-
ing wheel and mirrors and fasten your seat
belt before starting the engine. G
WARNING
If you adjust the seat height carelessly, you or other vehicle occupants could be trapped andthereby injured. Children in particular could
accidentally press the electrical seat adjust-
ment buttons and become trapped. There is a
risk of injury.
While moving the seats, make sure that your
hands or other body parts do not get under the
lever assembly of the seat adjustment sys-
tem. G
WARNING
The head restraints cannot provide the inten-
ded protection unless they are fitted and
adjusted correctly. There is an increased risk of injury to the head and neck in the event of
an accident or sudden braking, for example.
Always drive with the head restraints fitted.
Ensure that the centre of the head restraints
support the back of each vehicle occupant's
head at eye level before driving off. G
WARNING
The seat belt does not offer the intended level of protection if you have not moved the back-
rest to an almost vertical position. When brak-
ing or in the event of an accident, you could
slide underneath the seat belt and sustain
abdomen or neck injuries, for example. This
poses an increased risk of injury or even fatal injury.
Adjust the seat properly before beginning
your journey. Always ensure that the backrest is in an almost vertical position and that the
shoulder section of your seatbelt is routed
across the centre of your shoulder.
! To avoid damage to the seats and the seat
heating, observe the following information:
R do not spill any liquids on the seats. If liquid
is spilled on the seats, dry them as soon as possible.
R if the seat covers are damp or wet, do not
switch on the seat heating. The seat heat-
ing should also not be used to dry the seats.
R clean the seat covers as recommended;
see "Interior care".
R do not transport heavy loads on the seats.
Do not place sharp objects on the seat
cushions, e.g. knives, nails or tools. The
seats should only be occupied by passen-
gers, if possible.
R when the seat heating is in operation, do
not cover the seats with insulating materi-
als, e.g. blankets, coats, bags, seat covers,
child seats or booster seats.
! Make sure that there are no objects in the
footwell under or behind the seats when mov- ing the seats back. There is a risk that the
seats and/or the objects could be damaged.
i The head restraints cannot be removed from
the front seats. The rear-compartment head
restraints, however, can be removed
(Y page 106).
For more information, contact a qualified spe-
cialist workshop.
i Further related subjects:
R Luggage compartment enlargement (fold-
ing down the rear bench seat)
(Y page 315) Seats
103Seats, steering wheel and mirrors Z
Page 107 of 397

Adjusting the seats electrically
:
Head restraint height
; Seat cushion angle
= Seat height
? Seat fore-and-aft adjustment
A Backrest angle
i Vehicles with memory function: if PRE-
SAFE ®
has been triggered, the front-
passenger seat will be moved to a better posi- tion if it was previously in an unfavourable
position.
i Vehicles with memory function: when the
seat is moved forwards or backwards, the
headrest is moved up or down automatically. Adjusting the head restraints
Important safety notes G
WARNING
You could lose control of the vehicle while
driving if you:
R adjust the driver's seat, steering wheel or
mirrors
R fasten the seat belt
There is a risk of an accident.
Adjust the driver's seat, head restraint, steer-
ing wheel and mirrors and fasten your seat
belt before starting the engine. G
WARNING
The head restraints cannot provide the inten-
ded protection unless they are fitted and
adjusted correctly. There is an increased risk of injury to the head and neck in the event of
an accident or sudden braking, for example.
Always drive with the head restraints fitted.
Ensure that the centre of the head restraints
support the back of each vehicle occupant's
head at eye level before driving off.
Do not interchange the head restraints of the
front and rear seats. Otherwise, you will not be
able to adjust the height and angle of the head
restraints to the correct position.
Adjust the head restraint fore-and-aft position
so that it is as close as possible to the back of
your head.
Observe the important safety guidelines for
seats (Y page 102).
Adjusting the head restraints manually Adjusting the head restraint height
X
To raise: pull the head restraint up to the
desired position.
X To lower: press release catch :in the direc-
tion of the arrow and push the head restraint down to the desired position. 104
SeatsSeats
, steering wheel and mirrors
Page 108 of 397

Adjusting the head restraint fore-and-aft
position This function allows you to adjust the distance
between the head restraint and the back of the
head.
X To move forwards: pull the head restraint
forwards in the direction of the arrow until it
engages.
There are a number of detents.
X To move backwards: press and hold release
button :and push the head restraint back-
wards.
X When the head restraint is in the desired posi-
tion, release the button and make sure that
the head restraint is engaged in position.
i Adjust the head restraint so that the back of
your head is as close to the head restraint as possible.
Adjusting the head restraints electri-
cally X
To adjust the head restraint height: slide
the switch for the head restraint adjustment
(Y page 104) up or down in the direction of the
arrow. Adjusting the luxury head restraints The first row of seats has luxury head restraints.
X To adjust the side bolsters: push or pull
right- and/or left-hand side bolster :into
the desired position.
X To adjust the fore-and-aft position of the
head restraint:
push or pull the head
restraint in the direction of arrow ;.
i Adjust the head restraint so that the back of
your head is as close to the head restraint as possible.
Rear seat head restraints Adjusting the rear seat head restraint
height
X
If the head restraint is fully lowered, it is nec-
essary to press release catch :.
X To raise: pull the head restraint up to the
desired height.
X To lower: press release catch :and push
the head restraint down until it is in the
desired position. Seats
105Seats, steering wheel and mirrors Z
Page 117 of 397
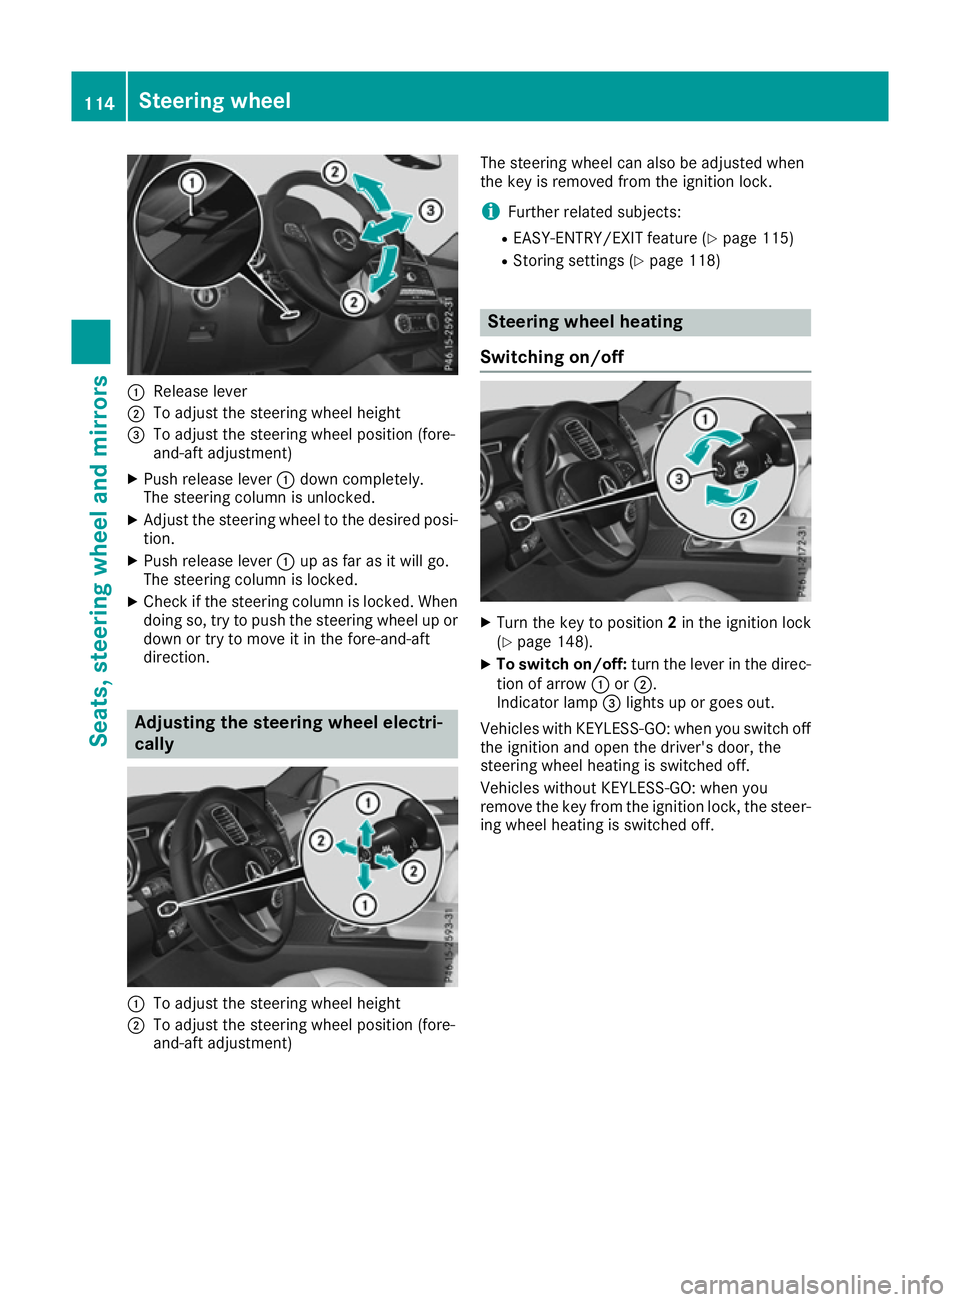
:
Release lever
; To adjust the steering wheel height
= To adjust the steering wheel position (fore-
and-aft adjustment)
X Push release lever :down completely.
The steering column is unlocked.
X Adjust the steering wheel to the desired posi-
tion.
X Push release lever :up as far as it will go.
The steering column is locked.
X Check if the steering column is locked. When
doing so, try to push the steering wheel up or
down or try to move it in the fore-and-aft
direction. Adjusting the steering wheel electri-
cally :
To adjust the steering wheel height
; To adjust the steering wheel position (fore-
and-aft adjustment) The steering wheel can also be adjusted when
the key is removed from the ignition lock.
i Further related subjects:
R EASY-ENTRY/EXIT feature (Y page 115)
R Storing settings (Y page 118) Steering wheel heating
Switching on/off X
Turn the key to position 2in the ignition lock
(Y page 148).
X To switch on/off: turn the lever in the direc-
tion of arrow :or;.
Indicator lamp =lights up or goes out.
Vehicles with KEYLESS-GO: when you switch off the ignition and open the driver's door, the
steering wheel heating is switched off.
Vehicles without KEYLESS-GO: when you
remove the key from the ignition lock, the steer-
ing wheel heating is switched off. 114
Steering wheelSeats
, steering wheel and mirrors