2016 MERCEDES-BENZ GLS SUV ignition
[x] Cancel search: ignitionPage 16 of 397
Programming (button in the rear-
view mirror) ................................... 326
Synchronising the rolling code .......3 27
Gear indicator (on-board com-
puter, Mercedes-AMG vehicles) ....... 255
Gearshift paddles
see Steering wheel gearshift paddles
Gearshift program
SETUP (on-board computer) .......... 256
Genuine Mercedes-Benz parts ........... 26
Glove compartment .......................... 313
Google™ Local Search
See also Digital Owner's Manual ... 303 H
Hazard warning lamps ......................122
Head restraints
Adjusting ....................................... 104
Adjusting (electrically) ................... 105
Adjusting (manually) ..................... .104
Adjusting (rear) .............................. 105
Fitting/removing (rear) .................. 106
Luxury ............................................ 105
Headlamp
Cleaning system (notes) ................ 387
Headlamp flasher .............................. 122
Headlamps
Misting up ...................................... 125
Topping up the cleaning system .... 336
see Automatic headlamp mode
Heating
see Climate control
High-pressure cleaners .................... 339
Hill start assist .................................. 151
HOLD function
Deactivating ................................... 196
Display message ............................ 278
Function/notes ............................ .195
Home address
See also Digital Owner's Manual ... 303
Horn ...................................................... 33 I
Ignition lock see Key positions
Immobiliser .......................................... 78 Indicator and warning lamp
Restraint system ............................ 298
Indicator and warning lamps
Coolant .......................................... 299
Engine diagnostics ......................... 298
Indicator lamps
Display message ............................ 270
see Warning and indicator lamps
Indicators
see Turn signals
Insect protection on the radiator .... 333
Instrument cluster
Overview .......................................... 35
Warning and indicator lamps ........... 35
Instrument cluster lighting .............. 241
Intelligent Light System
Activating/deactivating ................. 252
Display message ............................ 270
Overview ........................................ 123
Setting the dipped-beam head-
lamps for driving on the right/left .. 252
Interior lighting
Automatic control system .............. 125
Emergency lighting ........................ 126
General notes ................................ 125
Manual control ............................... 125
Overview ........................................ 125
Reading lamp ................................. 125
Interior motion sensor
Deactivating ..................................... 80
Function .......................................... .80
Priming ............................................ 80
Switching off .................................... 80
iPod ®
See also Digital Owner's Manual ... 303
ISOFIX child seat securing system ....59 J
Jack Declaration of conformity ................28
Storage location ............................ 345
Using ............................................. 371
Jump starting (engine) ...................... 354 Index
13
Page 17 of 397

K
Key Changing the battery ...................... .84
Checking the battery ...................... .84
Convenience closing feature ............ 95
Convenience opening feature .......... 95
Display message ............................ 289
Door central locking/unlocking ...... .81
Emergency key element ................... 83
Important safety note s.................... 81
KEYLESS-GO start function .............. 83
Loss ................................................. 85
Modifying the programming ............. 83
Overview .......................................... 81
Positions (ignition lock) ................. 148
Problem (malfunction) ..................... 85
Starting the engine ........................ 150
Key positions
Key ................................................ 148
KEYLESS GO .................................. 148
KEYLESS-GO
Activating ......................................... 82
Convenience closing ........................ 96
Deactivation ..................................... 82
Display message ............................ 289
Locking ............................................ 82
Removing the Start/Stop button ... 149
Start function ................................... 83
Start/Stop button .......................... 148
Starting the engine ........................ 150
Unlocking ......................................... 82
Kickdown
Driving tip s.................................... 159
Manual gearshifting ....................... 162
Kneebag ............................................... 49 L
Lamps see Warning and indicator lamps
Lane Keeping Assist
Activating/deactivating ................. 251
Display message ............................ 278
Function/information .................... 221
see Active Lane Keeping Assist
Lap time (RACETIMER) ...................... 256
Lashing eyelets ................................. 316 Level control
AIRMATIC ...................................... 198
Level control (display message) ...... 276
Level control (vehicle with the Off- Road Engineering package)
Basic settings ................................ 193
Function/note s............................. 192
Important safety notes .................. 192
Licence plate lamp (display mes-
sage) ................................................... 270
Light sensor (display message) ....... 270
Lighting
see Lights
Lights
Activating/deactivating the Intel-
ligent Light System ........................ 252
Active light function ....................... 123
Adaptive Highbeam Assist PLUS .... 124
Automatic headlamp mod e............ 121
Cornering light function ................. 123
Dipped-beam headlamp s............... 121
Driving abroad ............................... 120
Foglamps (extended range) ........... 123
Hazard warning lamps ................... 122
Headlamp flashe r........................... 122
Headlamp rang e............................ 122
Light switch ................................... 120
Main-beam headlamp s................... 122
Motorway mod e............................. 123
Off-road lights ................................ 123
Parking lamps ................................ 121
Rear foglamp ................................. 121
Side lamps ..................................... 121
Switching the daytime driving
lights on/off (on-board com-
puter) ............................................. 252
Turn signals ................................... 122
see Interior lighting
see Replacing bulbs
LIM indicator lamp
Cruise control ................................ 181
Distance Pilot DISTRONIC ............. 185
Variable limite r.............................. 183
Limiter
Deactivating, variabl e.................... 184
Function/note s............................. 182
LIM indicator lamp ......................... 183
Permanent ..................................... 184 14
Index
Page 36 of 397
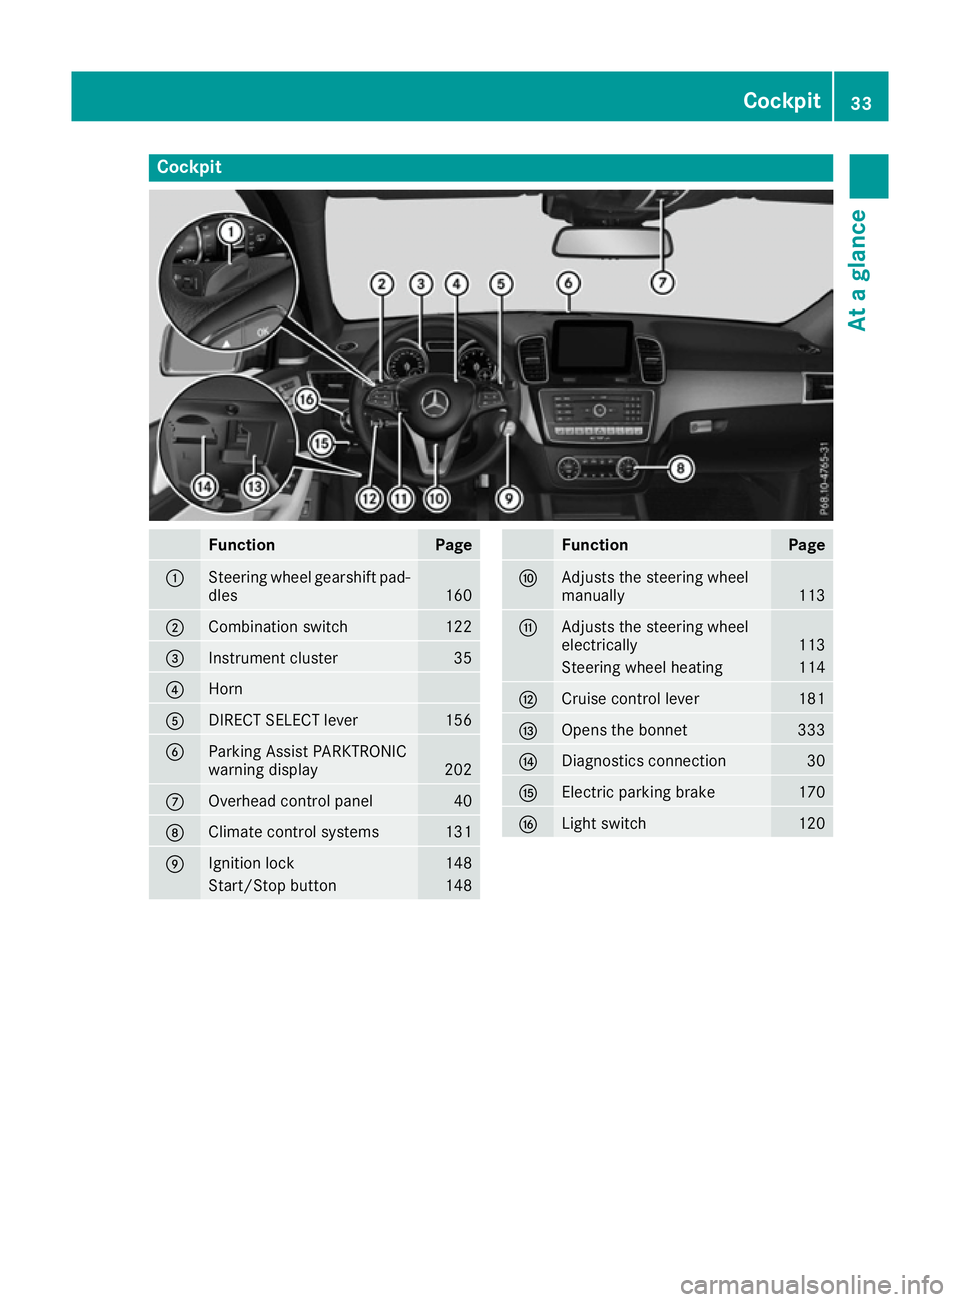
Cockpit
Function Page
:
Steering wheel gearshift pad-
dles 160
;
Combination switch 122
=
Instrument cluster 35
?
Horn
A
DIRECT SELECT lever 156
B
Parking Assist PARKTRONIC
warning display
202
C
Overhead control panel 40
D
Climate control systems 131
E
Ignition lock 148
Start/Stop button 148 Function Page
F
Adjusts the steering wheel
manually
113
G
Adjusts the steering wheel
electrically
113
Steering wheel heating 114
H
Cruise control lever 181
I
Opens the bonnet 333
J
Diagnostics connection 30
K
Electric parking brake 170
L
Light switch 120Cockpit
33At a glance
Page 37 of 397
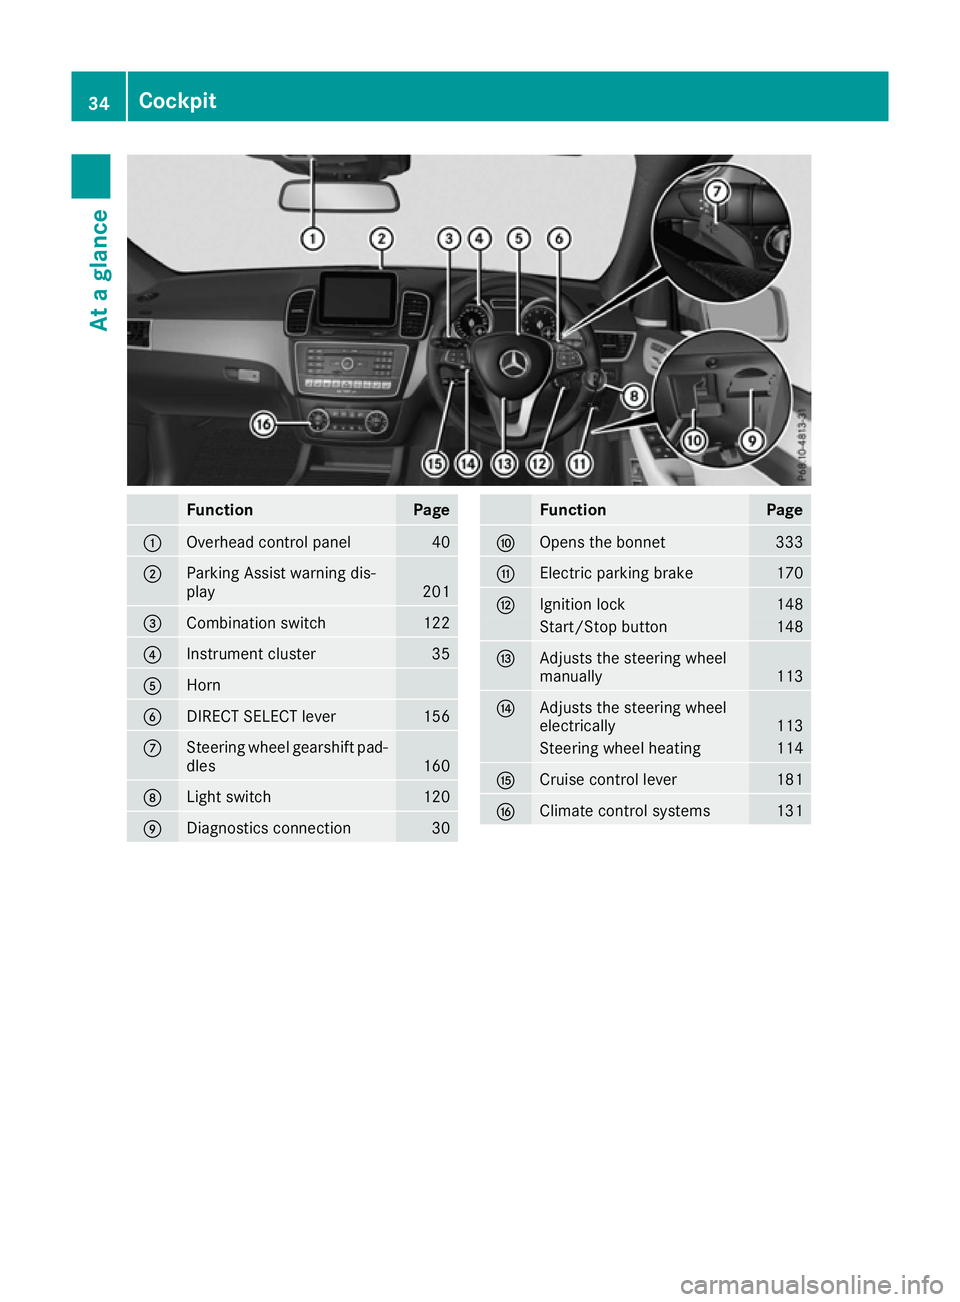
Function Page
:
Overhead control panel 40
;
Parking Assist warning dis-
play
201
=
Combination switch 122
?
Instrument cluster 35
A
Horn
B
DIRECT SELECT lever 156
C
Steering wheel gearshift pad-
dles 160
D
Light switch 120
E
Diagnostics connection 30 Function Page
F
Opens the bonnet 333
G
Electric parking brake 170
H
Ignition lock 148
Start/Stop button 148
I
Adjusts the steering wheel
manually
113
J
Adjusts the steering wheel
electrically
113
Steering wheel heating 114
K
Cruise control lever 181
L
Climate control systems 13134
CockpitAt a glance
Page 45 of 397

Panic alarm
X
To activate: press the!button :for
approximately one second.
A visual and audible alarm is triggered if the
alarm system is primed.
X To deactivate: press the!button :
again.
or
X Insert the key into the ignition lock.
or X Press the KEYLESS-GO Start/Stop button.
The KEYLESS-GO key must be in the vehicle.
The panic alarm function is only available in cer- tain countries. Occupant safety
Introduction to the restraint system
The restraint system can reduce the risk of vehi-
cle occupants coming into contact with parts of
the vehicle's interior in the event of an accident. Furthermore, the restraint system can also
reduce the forces to which vehicle occupants
are subjected during an accident.
The restraint system includes:
R Seat belt system
R Airbags
R Child restraint system
R Child seat securing system The various components of the restraint system
work complementary to one another. They can
only perform their intended protective function
if all vehicle occupants:
R have correctly fastened their seat belt
(Y page 45)
R have correctly adjusted their seat and head
restraint (Y page 102).
As the driver, you must also ensure that the
steering wheel is correctly adjusted. Observe
the information relating to the correct driver's
seat position (Y page 102).
Additionally, you must ensure that an airbag can
deploy freely (Y page 47).
The airbag is supplementary to a correctly fas-
tened seat belt. As an additional safety device,
the airbag increases the level of protection for
vehicle occupants in the event of an accident. If the protection provided by the seat belt is suf-
ficient, the airbags do not deploy. Furthermore,
in the event of an accident, only airbags which
provide greater protection in the given accident situation deploy. However, seat belts and air-
bags generally do not protect against objects
penetrating the vehicle from the outside.
Information on how the restraint system oper-
ates can be found in "Deployment of the seat
belt tensioner and airbags" (Y page 54).
See "Children in the vehicle" for information on
infants and children traveling with you in the
vehicle restraint systems for infants and chil-
dren(Y page 57). Important safety notes
G
WARNING
If the restraint system is modified, it may no
longer work as intended. The restraint system
may then not perform its intended protective function by failing in an accident or triggering
unexpectedly, for example. There is an
increased risk of injury, possibly even fatal.
Never modify parts of the restraint system. Do not attempt to modify the wiring as well as
electronic components or their software.
If the vehicle needs to be adapted to accommo- date a person with disabilities, please contact a
specialist workshop. 42
Occupant safetySafety
Page 46 of 397

Mercedes-Benz recommends that you use only
driving aids that have been approved specifi-
cally for your vehicle by Mercedes-Benz. Restraint system warning lamp
The functions of the restraint system are
checked after the ignition is switched on and at regular intervals while the engine is running.
Therefore, malfunctions can be detected in
good time.
The 6 restraint system warning lamp on the
instrument cluster lights up when the ignition is
switched on. It goes out no later than a few sec- onds after the vehicle is started. The compo-
nents of the restraint system are in operational
readiness.
A malfunction has occurred if the 6restraint
system warning lamp:
R does not light up after the ignition is switched
on
R does not go out after a few seconds with the
engine running
R lights up again while the engine is running G
WARNING
If the restraint system is malfunctioning,
restraint system components may be trig-
gered unintentionally or may not deploy as
intended during an accident. This may affect
the seat belt tensioner or airbag, for example. This poses an increased risk of injury or even
fatal injury.
Have the restraint system checked and
repaired immediately at a qualified specialist
workshop. PASSENGER AIR BAG indicator lamp
PASSENGER AIR BAG ON indicator lamp
:and
PASSENGER AIR BAG OFF indicator lamp ;are
part of the automatic deactivation system of the front-passenger front airbag.
The indicator lamps display the status of the
front-passenger front airbag.
R PASSENGER AIR BAG ON lights up for 60 sec-
onds, then both indicator lamps are off
(PASSENGER AIR BAG ON and OFF): the front-
passenger front airbag is able to deploy in the event of an accident.
R PASSENGER AIR BAG OFF lights up: the front-
passenger front airbag is disabled. It will then
not be deployed in the event of an accident.
If the PASSENGER AIR BAG ON indicator lamp is off, only the PASSENGER AIR BAG OFF indicator
lamp shows the status of the front-passenger
front airbag. The PASSENGER AIR BAG OFF indi-
cator lamp may be lit continuously or be off.
Depending on the person in the front-passenger seat, the front-passenger front airbag must be
either disabled or enabled; see the following
points. You must make sure of this both before
and during a journey.
R Children in a rearward-facing child
restraint system: the PASSENGER AIR BAG
OFF indicator lamp must be lit. The front-
passenger front airbag is disabled. It is imper-
ative to observe the notes on the "Automatic front-passenger front airbag deactivation sys-
tem" (Y page 50) and on "Children in the
vehicle" (Y page 57).
R Children in a forward-facing child
restraint system: depending on the installed
child restraint system and the age and size of the child, the front-passenger front airbag is
either disabled or enabled. Therefore, it is
imperative to observe the notes on the "Auto-
matic front-passenger front airbag deactiva- Occupant safety
43Safety Z
Page 49 of 397
event of an accident, they could be crushed
between the vehicle occupant and seat belt.
R Do not secure any objects with a seat belt if
the seat belt is being used by one of the vehi- cle's occupants.
You must also make sure that objects, e.g.
cushions, are never placed between a person
and the seat.
Seat belts are solely intended to secure and
restrain persons. To secure objects, luggage or
loads, always observe the "Loading guidelines"
(Y page 312).
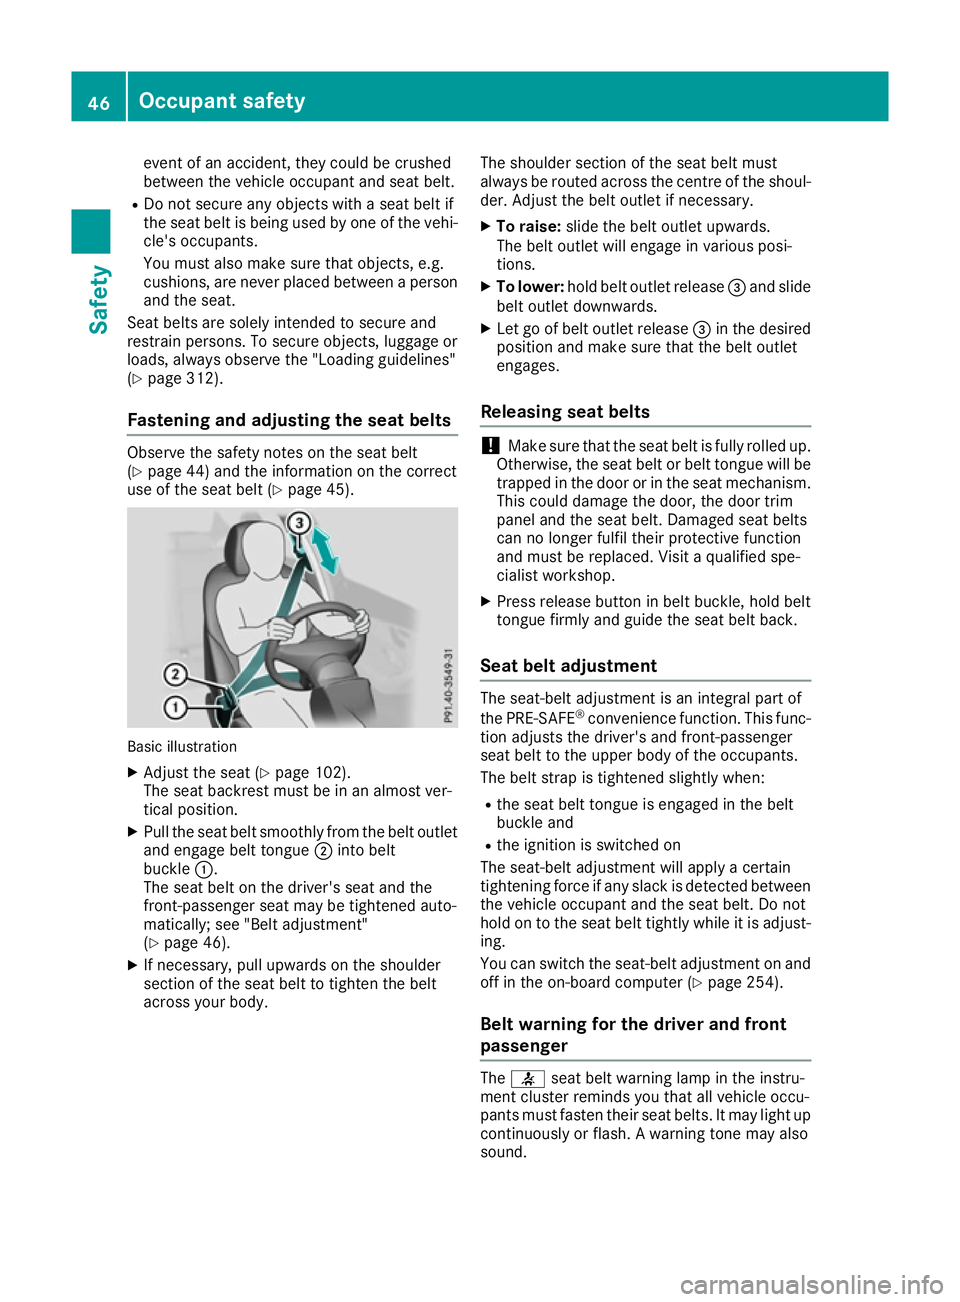
Fastening and adjusting the seat belts Observe the safety notes on the seat belt
(Y
page 44) and the information on the correct
use of the seat belt (Y page 45).Basic illustration
X Adjust the seat (Y page 102).
The seat backrest must be in an almost ver-
tical position.
X Pull the seat belt smoothly from the belt outlet
and engage belt tongue ;into belt
buckle :.
The seat belt on the driver's seat and the
front-passenger seat may be tightened auto-
matically; see "Belt adjustment"
(Y page 46).
X If necessary, pull upwards on the shoulder
section of the seat belt to tighten the belt
across your body. The shoulder section of the seat belt must
always be routed across the centre of the shoul-
der. Adjust the belt outlet if necessary.
X To raise: slide the belt outlet upwards.
The belt outlet will engage in various posi-
tions.
X To lower: hold belt outlet release =and slide
belt outlet downwards.
X Let go of belt outlet release =in the desired
position and make sure that the belt outlet
engages.
Releasing seat belts !
Make sure that the seat belt is fully rolled up.
Otherwise, the seat belt or belt tongue will be
trapped in the door or in the seat mechanism. This could damage the door, the door trim
panel and the seat belt. Damaged seat belts
can no longer fulfil their protective function
and must be replaced. Visit a qualified spe-
cialist workshop.
X Press release button in belt buckle, hold belt
tongue firmly and guide the seat belt back.
Seat belt adjustment The seat-belt adjustment is an integral part of
the PRE-SAFE
®
convenience function. This func-
tion adjusts the driver's and front-passenger
seat belt to the upper body of the occupants.
The belt strap is tightened slightly when:
R the seat belt tongue is engaged in the belt
buckle and
R the ignition is switched on
The seat-belt adjustment will apply a certain
tightening force if any slack is detected between
the vehicle occupant and the seat belt. Do not
hold on to the seat belt tightly while it is adjust-
ing.
You can switch the seat-belt adjustment on and
off in the on-board computer (Y page 254).
Belt warning for the driver and front
passenger The
7 seat belt warning lamp in the instru-
ment cluster reminds you that all vehicle occu-
pants must fasten their seat belts. It may light up continuously or flash. A warning tone may also
sound. 46
Occupant safetySafety
Page 53 of 397
If the system determines that it can offer addi-
tional protection to that provided by the seat
belt, a windowbag may be deployed in other
accident situations (Y page 54).Automatic front-passenger front air-
bag deactivation
Introduction In order to recognise a child restraint system on
the front-passenger seat, the automatic front-
passenger front airbag deactivation system cat- egorises the person in the front-passenger seat.Depending on that result, the front-passenger
front airbag is either enabled or disabled. If a
rearward-facing child restraint system is fitted
to the front-passenger seat, the PASSENGER
AIR BAG OFF indicator lamp must light up after
the system self-test and remain lit. The front-
passenger front airbag is disabled.
The system does not disable:
R the sidebag
R the windowbag
R the seat belt tensioner
In the following situation, the sidebag and the
seat belt tensioner are deactivated:
R the automatic front-passenger front airbag
deactivation system has not categorised the
person in the front-passenger seat as an adult or a person of corresponding stature and
R the seat belt tongue of the seat belt is not
inserted into the front-passenger seat belt
buckle
Make sure that your vehicle is equipped with the
automatic front-passenger front airbag deacti-
vation system (Y page 61). If this is not the
case, always install a child restraint system on a
suitable rear seat (Y page 62).
If it is absolutely necessary to install a child
restraint system on the front-passenger seat, be
sure to observe the correct positioning of the
child restraint system. Never place objects
under or behind the child restraint system, e.g. a
cushion. The entire base of the child restraint
system must always rest on the seat cushion of the front-passenger seat. The backrest of the
forward-facing child restraint system must, as
far as possible, be resting on the backrest of the
front-passenger seat. The child restraint system
must not touch the roof or be put under strain by the head restraint. Adjust the angle of the seat backrest and the head restraint position accord-
ingly. Only then is the correct function of the
automatic front-passenger front airbag deacti-
vation system guaranteed. Always observe the
information on suitable positioning of the child
restraint system (Y page 62) in addition to the
child restraint system manufacturer's installa-
tion instructions.
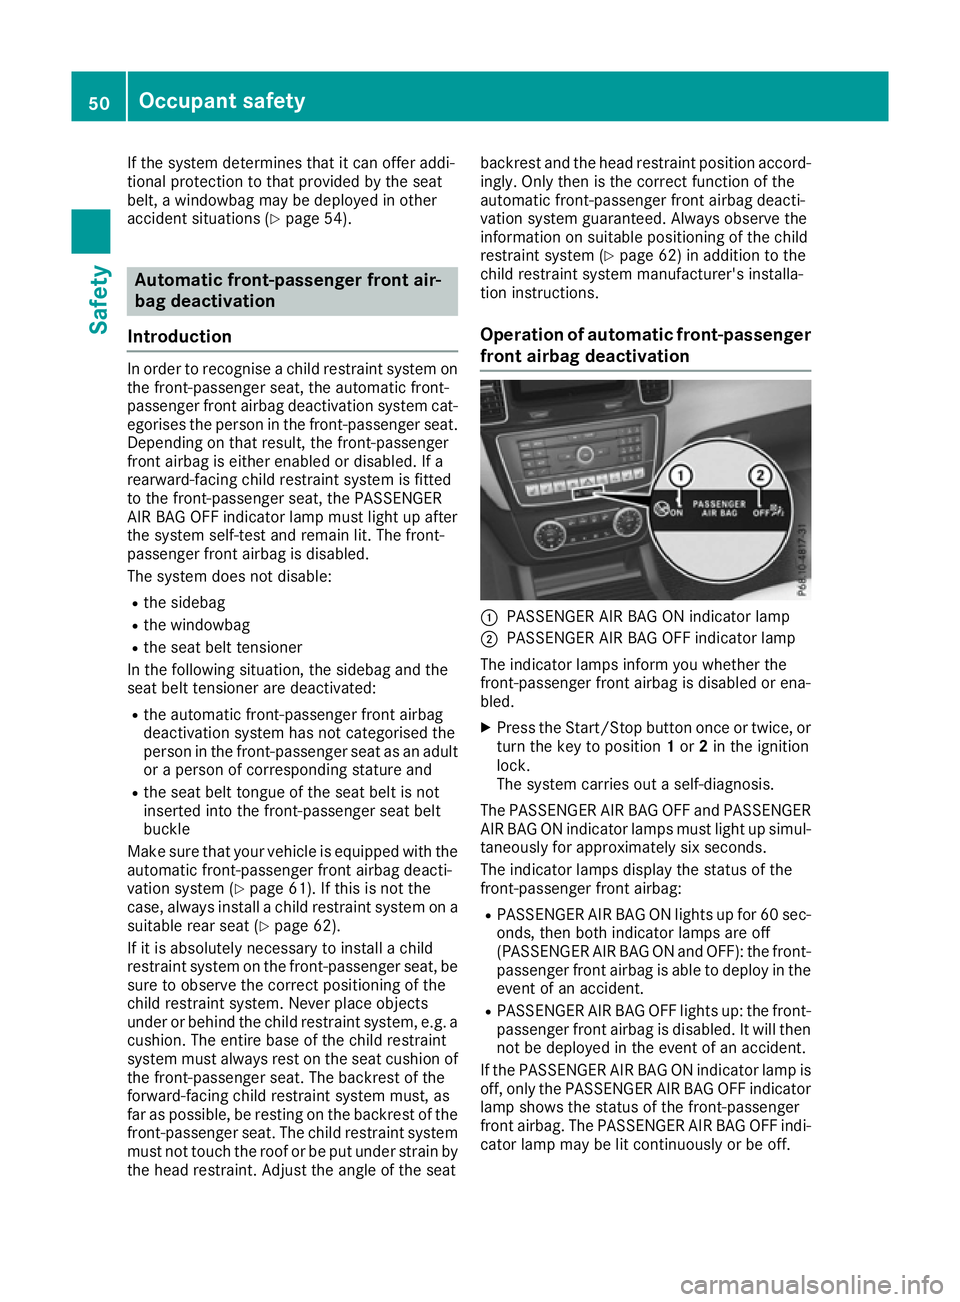
Operation of automatic front-passenger
front airbag deactivation :
PASSENGER AIR BAG ON indicator lamp
; PASSENGER AIR BAG OFF indicator lamp
The indicator lamps inform you whether the
front-passenger front airbag is disabled or ena-
bled.
X Press the Start/Stop button once or twice, or
turn the key to position 1or 2in the ignition
lock.
The system carries out a self-diagnosis.
The PASSENGER AIR BAG OFF and PASSENGER
AIR BAG ON indicator lamps must light up simul- taneously for approximately six seconds.
The indicator lamps display the status of the
front-passenger front airbag:
R PASSENGER AIR BAG ON lights up for 60 sec-
onds, then both indicator lamps are off
(PASSENGER AIR BAG ON and OFF): the front-
passenger front airbag is able to deploy in the
event of an accident.
R PASSENGER AIR BAG OFF lights up: the front-
passenger front airbag is disabled. It will then
not be deployed in the event of an accident.
If the PASSENGER AIR BAG ON indicator lamp is
off, only the PASSENGER AIR BAG OFF indicator lamp shows the status of the front-passenger
front airbag. The PASSENGER AIR BAG OFF indi-
cator lamp may be lit continuously or be off. 50
Occupant safetySafety