2016 MERCEDES-BENZ GLS SUV climate settings
[x] Cancel search: climate settingsPage 25 of 397
Telephone compartment ................3
13
Telephone module with Bluetooth ®
(SAP profile) Activating and connecting the
module .......................................... .308
Charging a mobile phone .............. .310
Connecting the mobile phone ....... .309
Connecting the module via a USB
cable .............................................. 308
Data modem mode ........................ 309
Installing the module ..................... 308
Introduction ................................... 307
Saving/deleting the PIN for the
SIM card ........................................ 310
Settings ......................................... 310
SIM card mode .............................. 309
Text messages ............................... 310
Transferring the phone book .......... 310
Temperature
Coolant (display in the instrument
cluster) .......................................... 242
Coolant (on-board computer,
Mercedes-AMG vehicles) .............. .255
Engine oil (on-board computer,
Mercedes-AMG vehicles) .............. .255
Outside temperature ..................... .241
Setting (climate control) ................ 136
Transmission oil (on-board com-
puter, Mercedes-AMG vehicles) ..... 255
TEMPOMAT
Function/notes ............................ .180
Text messages
Telephone module with Blue-
tooth ®
(SAP profile) ....................... 310
Through-loading ................................ 315
Time
see Separate Owner's manual
Timing (RACETIMER) ......................... 256
TIREFIT Kit
Declaration of conformity ................ 29
Important safety notes .................. 348
Storage location ............................ 346
Tyre pressure not reached ............. 350
Tyre pressure reached ................... 350
Using ............................................. 349
Tool
see Vehicle tool kit Top Tether
............................................ 60
Total distance recorder .................... 244
Tow-away protection
Activating ......................................... 79
Deactivating ..................................... 79
Function .......................................... .79
Tow-starting
Emergency engine starting ............ 359
Important safety notes .................. 356
Towing
Important safety notes .................. 356
Notes for 4MATIC vehicles ............ 358
Transporting the vehicle ................ 358
Towing a trailer
Active Blind Spot Assist ................. 224
Active Lane Keeping Assist ............ 227
Axle load, permissibl e.................... 390
ESP ®
(Electronic Stability Pro-
gram) ............................................... 74
Failure check for LEDs ................... 238
Parking Assist PARKTRONIC .......... 201
Pulling away with a traile r.............. 151
Swinging out the ball coupling ....... 235
Swinging the ball coupling in ......... 235
Trailer tow hitch display message .. 288
Towing away
Fitting the towing ey e.................... 357
Removing the towing eye ............... 357
With both axles on the ground ....... 358
Towing eye ......................................... 345
Traffic Sign Assist
Activating/deactivating the warn-ing function .................................... 250
Display message ............................ 278
Function/note s............................. 217
Important safety notes .................. 218
Instrument cluster display ............. 218
Trailer coupling
see Towing a trailer
Trailer towing
7-pin connecto r............................. 238
Blind Spot Assist ............................ 220
Cleaning the trailer tow hitch ......... 342
Coupling up a traile r...................... 236
Decoupling a trailer ....................... 237
Driving tips .................................... 234
Important safety notes .................. 233 22
Index
Page 134 of 397
Overview of climate control systems
General notes
Observe the settings recommended on the fol-
lowing pages. Otherwise, the windows could
mist up.
To prevent the windows from misting up:
R switch off climate control only briefly
R activate air-recirculation mode only briefly
R switch on "Cooling with air dehumidification"
R activate the "Windscreen demisting" function
briefly, if required
Climate control regulates the temperature and
the humidity in the vehicle interior and filters
undesirable substances out of the air.
the "Residual heat" function can be switched on
or off only with the ignition switched off
(Y page 140).
i Ventilate the vehicle for a brief period during
warm weather, e.g. using the convenience
opening feature (Y page 95).
This will speed up the cooling process and the desired interior temperature will be reached
more quickly. i
The integrated filter filters out most parti-
cles of dust and soot and completely filters
out pollen. It also reduces gaseous pollutants
and odours. A clogged filter reduces the
amount of air supplied to the vehicle interior.
For this reason, you should always observe
the interval for replacing the filter, which is
specified in the Service Booklet. As this
depends on environmental conditions, e.g.
heavy air pollution, the interval may be
shorter than stated in the Service Booklet.
i Vehicles with AIR-BALANCE package:
in
addition to ionisation, the vehicle has an air
filter with anti-allergenic properties that con-
tribute to improved air filtration.
i Under certain environmental conditions, the
residual heat function may be activated auto-
matically an hour after the key has been
removed in order to dry the automatic climate control. The vehicle is then ventilated for 30
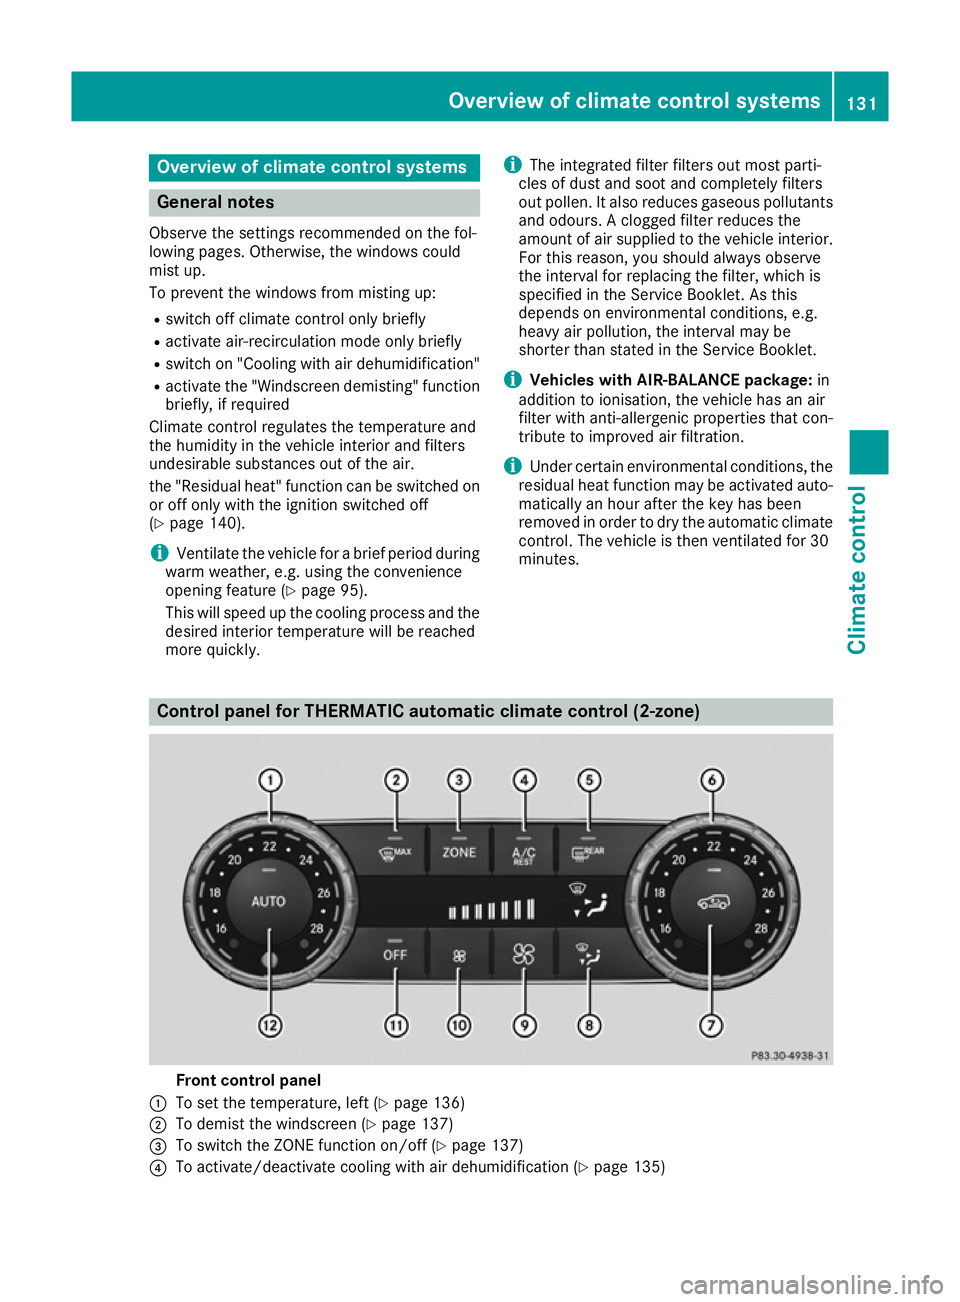
minutes. Control panel for THERMATIC automatic climate control (2-zone)
Front control panel
: To set the temperature, left (Y page 136)
; To demist the windscreen (Y page 137)
= To switch the ZONE function on/off (Y page 137)
? To activate/deactivate cooling with air dehumidification (Y page 135) Overview of climate control systems
131Climate control
Page 137 of 397
=
To switch the ZONE function on/off (Y page 137)
? To activate/deactivate cooling with air dehumidification (Y page 135)
To switch the residual heat on/off (Y page 140)
A To switch the rear window heating on/off (Y page 138)
B To set the temperature, right (Y page 136)
C To switch the rear climate control on/off
D To switch the climate control on/off (Y page 135)
E To set the air distribution (Y page 136)
F To increase the airflow (Y page 137)
G To reduce the airflow (Y page 137)
H Display
I To set the climate mode (Y page 136)
J To switch air-recirculation mode on/off (Y page 138)
K To set climate control to automatic mode (Y page 135)
Rear control panel
L To increase the airflow (Y page 137)
M To set the temperature (Y page 136)
N To control the rear-compartment climate control automatically (Y page 135)
O To direct the airflow through the rear air vents (Y page 136)
P To direct the airflow through the footwell vents (Y page 136)
Q To switch the rear climate control on/off (Y page 135)
R To reduce the airflow (Y page 137)Notes on using the automatic climate
control
Optimum use of the automatic climate
control The following contains notes and recommenda-
tions on how best to use THERMATIC automatic climate control or THERMOTRONIC.
R Activate climate control using the Ãand
Á buttons. The indicator lamps in the
à andÁ buttons light up.
R Vehicles with THERMOTRONIC:in auto-
matic mode, you can also use the ñbutton
to set a climate mode (FOCUS/MEDIUM/
DIFFUSE). The MEDIUM level is recommen-
ded.
R Set the temperature to 22 †.
R Use the "Windscreen demisting" function only
briefly until the windscreen is clear again.
R Use air-recirculation mode only briefly, e.g. if
there are unpleasant outside odours or when
in a tunnel. The windows could otherwise mist up as no fresh air is drawn into the vehicle in
air-recirculation mode. R
Vehicles with THERMOTRONIC:use the
ZONE function to adopt the temperature set-
tings on the driver's side for the front-
passenger side and the rear compartment as well. The indicator lamp above the ábut-
ton goes out.
R Vehicles with THERMOTRONIC:use the
"residual heat" function if you want to heat or
ventilate the vehicle interior when the ignitionis switched off. The residual heat function can
be activated or deactivated only with the igni- tion switched off.
R If you change the settings of the climate con-
trol system, the climate status display
appears for approximately three seconds at
the bottom of the screen in the multimedia
system display. You will see the current set-
tings of the various climate control functions.
During automatic engine switch-off, the climate
control operates only at a reduced capacity. If
you require the full climate control output, you
can switch off the ECO start/stop function by
pressing the ECO button (Y page 153).134
Overview of climate control systemsClimate control
Page 139 of 397

Automatic control
X
Turn the key to position 2in the ignition lock
(Y page 148).
X Set the desired temperature.
X To activate: press theÃbutton.
The indicator lamp in the Ãbutton lights
up. Automatic air distribution and airflow are
activated.
X To switch to manual mode:press the _
button.
THERMOTRONIC automatic climate control:
when automatic mode is activated, you can
select a climate mode (Y page 136).Setting the climate mode
In automatic mode you can select the following
climate modes:
FOCUS high airflow, slightly cooler setting
MEDIUM medium airflow, standard setting
DIFFUS Elow airflow, slightly warmer and
draught-free setting
X Turn the key to position 2in the ignition lock
(Y page 148).
X Press the Ãbutton.
X Press the ñbutton repeatedly until the
desired climate mode appears in the display. Setting the temperature
THERMATIC automatic climate control Different temperatures can be set for the driv-
er's and front-passenger sides.
X Turn the key to position 2in the ignition lock
(Y page 148).
X To increase or decrease: turn control:or
B anti-clockwise or clockwise (Y page 131).
Change the temperature setting only in small increments. Start at 22 †. THERMOTRONIC automatic climate
control You can select different temperature settings
for the driver's and front-passenger sides as well
as for the rear compartment.
X Turn the key to position 2in the ignition lock
(Y page 148).
X To increase or decrease temperature in
the front compartment: turn control:or
B anti-clockwise or clockwise (Y page 132).
Change the temperature setting only in small
increments. Start at 22 †.
X To increase or reduce the temperature in
the rear compartment using the front con-
trol panel:press the ábutton.
The indicator lamp in the ábutton goes
out.
The temperature setting for the driver's side
is adopted for the rear compartment and the
front-passenger side.
X Turn control :anti-clockwise or clockwise
(Y page 132).
Change the temperature setting only in small increments. Start at 22 †.
X To increase or decrease the rear compart-
ment temperature using the rear control
panel: turn control Manti-clockwise or
clockwise on the rear control panel
(Y page 132).
Change the temperature setting only in small
increments. Start at 22 †. Setting the air distribution
Air distribution settings Front control panel
P
Directs the airflow through the centre
vents
O Directs the airflow through the footwell
air vents
S Directs the airflow through the centre
and footwell vents
¯ Directs the airflow through the demister
vents
b Directs the airflow through the demister
and centre vents 136
Operating the climate control systemClimate control
Page 140 of 397
a
Directs the airflow through the footwell
and demister vents
_ Directs the airflow through the demister,
centre and footwell air vents
Rear control panel
M Directs the airflow through the centre
and side air vents in the rear
O Directs the airflow through the footwell
air vents
i Using the rear control panel, you can also
activate both air distribution positions simul-
taneously. In order to do this, press both air
distribution buttons. The air is then routed
through all rear air vents.
i Regardless of the air distribution setting,
airflow is always directed through the side air vents. The side air vents can only be closed
when the controls on the side air vents are
turned downwards.
Setting X
Turn the key to position 2in the ignition lock
(Y page 148).
X Press the _button repeatedly until the
desired symbol appears in the display. Setting the airflow
X Turn the key to position 2in the ignition lock
(Y page 148).
X To increase: press theKbutton.
X To reduce: press theIbutton.
i You can use THERMOTRONIC automatic cli-
mate control to set the airflow in the rear
compartment separately. Switching the ZONE function on/off
X To activate: press theábutton.
The indicator lamp above the ábutton
lights up.
THERMATIC automatic climate control: the
temperature setting for the driver's side is not
adopted for the front-passenger side.
THERMOTRONIC automatic climate control:
the temperature setting for the driver's side is not adopted for the front-passenger side and
the rear compartment.
X To deactivate: press theábutton.
The indicator lamp above the ábutton
goes out.
THERMATIC automatic climate control: the
temperature setting for the driver's side is
adopted for the front-passenger side.
THERMOTRONIC automatic climate control:
the temperature setting for the driver's side is adopted for the front-passenger side and therear compartment. Demisting the windscreen
General notes You can use this function to defrost the wind-
screen or to demist the inside of the windscreen
and the front side windows.
Switch off the windscreen demisting function as
soon as the windscreen is clear again.
Activating/deactivating X
Turn the key to position 2in the ignition lock
(Y page 148).
X To activate: press the¬button.
The indicator lamp in the ¬button lights
up.
The climate control system switches to the
following settings:
R high airflow
R high temperature
R air distribution to the windscreen and front
side windows
R air-recirculation mode off
X To deactivate: press the¬button.
The indicator lamp in the ¬button goes
out. The previous settings are reactivated.
Air-recirculation mode remains deactivated. Operating the climate control system
137Climate control
Page 308 of 397
X
Select a favourite.
X Add a favourite at the desired position.
If a favourite has already been added at this
position, it will be overwritten.
Adding your own favourite
X Select Vehicle VehicleQ Climate control Climate control.
X Press and hold the gbutton until the
favourites are displayed.
X Add a favourite at the desired position.
If a favourite has already been added at this
position, it will be overwritten. Navigation mode
Important safety notes G
WARNING
Operating the integrated information systems and communications equipment in the vehicle
while driving will distract you from traffic con-
ditions. You could then lose control of the
vehicle. There is a risk of an accident.
Only operate these devices if road traffic con-
ditions permit. If you are unsure about the
surrounding conditions, pull over to a safe
location and make entries only while the vehi-
cle is stationary.
You must observe the legal requirements for the country in which you are currently driving whenoperating the navigation system.
General notes Correct functioning of the navigation system
depends, amongst other things, on GPS recep-
tion. In certain situations, GPS reception may be
impaired, there may be interference or there
may be no reception at all, e.g. in tunnels or
multi-storey car parks.
Audio 20 is equipped with Garmin ®
MAP PILOT;
see the manufacturer's operating instructions.
The Garmin ®
MAP PILOT operating instructions
are stored on the SD card as a PDF file. The SD card box contains a quick guide.
The following descriptions apply to navigation
with COMAND Online. Further information can
be found in the Digital Owner's Manual. Selecting a route type and route options Multimedia system:
X Select Navi
Navi QNavigationNavigation.
The map displays the current vehicle position.
X Slide 6the controller.
X Select Options OptionsQ Route settings
Route settings .
Notes for route types:
R Eco route
Eco route
R Dynamic route
Dynamic route
Traffic reports on the route are taken into
account for the route guidance (not available
in all countries).
R Dynamic route only after request Dynamic route only after request
You can decide whether or not current traffic
reports should be taken into account for route
calculation (not available in all countries).
R Calculate alternative routes Calculate alternative routes
Different routes are being calculated. In order
to do so, instead of Start Start, select the menu
item Continue
Continue .
X To avoid/use route options: selectAvoid
Avoid
options
options.
X Select a route option.
Notes for route options:
R Use toll roads
Use toll roads
The route calculation includes roads which
require you to pay a usage fee (toll).
R Use vignette roads Use vignette roads (not available in all
countries)
The route calculation includes roads which
require you to pay a time-based fee (vignette).
A vignette allows temporary use of the route
network, e. g. 10 days or 1 year.
Entering an address Multimedia system:
X Select Navi NaviQNavigationNavigation.
The map displays the current vehicle position.
X Slide 6the controller.
X Select Destination DestinationQ Address entry Address entry.
Enter an address, e.g. as follows:
R town or postcode, street, house number
R country, town or postcode
R town or postcode, centre
R street, town or postcode, junction Operating system
305Multimedia system Z