2016 MERCEDES-BENZ GLS SUV service indicator
[x] Cancel search: service indicatorPage 8 of 397

Setting the side air vents ............... 145
Air-conditioning system
see Climate control
Airbag
Automatic front-passenger front
airbag deactivation .......................... 50
Introduction ..................................... 47
PASSENGER AIR BAG indicator
lamps ............................................... 43
Airbags
Display message ............................ 268
Front airbag (driver, front
passenger) ....................................... 48
Important safety guidelines ............. 47
Kneebag ........................................... 49
Sidebag ............................................ 49
Triggering ......................................... 54
Windowbag ...................................... 49
AIRMATIC package
ADS (Adaptive Damping System) ... 197
Function/note s............................. 196
Alarm
ATA (Anti-Theft Alarm system) ......... 78
Switching off (ATA) .......................... 78
Switching the function on/off
(ATA) ................................................ 78
Alarm system
see ATA (Anti-Theft Alarm system)
AMG
RIDE CONTROL sports suspen-
sion ................................................ 200
AMG menu (on-board computer) ..... 255
Anti-glare film .................................... 331
Anti-lock braking system
see ABS (Anti-lock Braking System)
Anti-Theft Alarm system
see ATA (Anti-Theft Alarm system)
Approach/departure angle .............. 179
Aquaplaning ....................................... 175
Ashtray ............................................... 323
Assistance display (on-board com-
puter) .................................................. 249
Assistance menu (on-board com-
puter) .................................................. 249
ASSYST PLUS
Displaying a service message ........ 337
Hiding a service message .............. 336 Resetting the service interval dis-
play ................................................ 337
Service message ............................ 336
Special service requirements ......... 337
ATA (Anti-Theft Alarm system)
Activating/deactivating ................... 78
Function ........................................... 78
Switching off the alarm .................... 78
ATTENTION ASSIST
Activating/deactivating ................. 250
Display message ............................ 275
Function/note s............................. 216
Audio 20
Switching on/of f........................... 303
Audio menu (on-board computer) .... 247
Authorised workshop
see Qualified specialist workshop
AUTO lights
Display message ............................ 270
see Lights
Automatic engine start (ECO start/
stop function) .................................... 152
Automatic engine switch-off (ECO
start/stop function) .......................... 152
Automatic front-passenger front
airbag deactivation
Display message ............................ 268
Automatic front-passenger front
airbag deactivation system
Operation ......................................... 50
Problems ......................................... 54
System self-test ............................... 53
Automatic headlamp mode .............. 121
Automatic transmission
Accelerator pedal position ............. 159
Changing gear ............................... 159
DIRECT SELECT lever ..................... 156
Display message ............................ 285
Drive program display .................... 158
Drive programs .............................. 159
Driving tips .................................... 159
DYNAMIC SELECT controlle r......... 155
Emergency running mode .............. 163
Engaging drive position .................. 158
Engaging neutral ............................ 157
Engaging park position automati-
cally ............................................... 157
Engaging reverse gear ................... 157 Index
5
Page 19 of 397

Installation .....................................3
79
Menu (on-board computer) ............ 248
Notes/placing in the bracket ......... 325
Transmission output (maximum) .... 379
Modifying the programming (key) ..... 83
MOExtended tyres .............................347
Motorway mode ................................ 123
MP3
Operating ....................................... 247
See also Digital Owner's Manual ... 303
see Separate operating instructions
Multifunction display
Function/notes ............................ .243
Permanent display ......................... 251
Multifunction steering wheel
Operating the on-board computer .. 242
Overview .......................................... 36
Multimedia system
see Separate operating instructions
Music files
See also Digital Owner's Manual ... 303 N
Navigation Menu (on-board computer) ............ 245
See also Digital Owner's Manual ... 303
see separate operating instructions
Notes on running in a new vehicle .. 147O
Occupant safety Airbags ............................................ 47
Automatic front-passenger front
airbag deactivatio n.......................... 50
Automatic measures after an acci-
dent ................................................. 57
Children in the vehicle ..................... 57
Important safety notes .................... 42
PASSENGER AIRBAG indicator
lamp ................................................. 43
Pets in the vehicle ........................... 68
PRE-SAFE ®
(anticipatory occu-
pant protection) ............................... 56
PRE-SAFE ®
PLUS (anticipatory
occupant protection PLUS) .............. 56
Restraint system introduction .......... 42 Restraint system warning lamp ........ 43
Seat belts ........................................ 44
Odometer
see Total distance recorder
see Trip meter
Off-road driving
Approach/departure angle ............ 389
Checklist after driving off-road ...... 178
Checklist before driving off-road .... 178
Fording depth ................................ 388
General information ....................... 177
Important safety notes .................. 176
Maximum gradient climbing abil-
ity .................................................. 389
Travelling uphill .............................. 179
Off-road lights .................................... 123
Off-Road program (vehicles with-
out Off-Road Engineering package)
Function/note s............................. 228
Off-road programs (vehicles with
Off-Road Engineering package)
Function/note s............................. 229
Off-road drive program .................. 229
Offroad Plus drive progra m............ 230
Off-road programs (vehicles with
the Off-Road Engineering package)
Displays in the COMAND display ... 232
Off-road system
4MATIC .......................................... 227
DSR ............................................... 227
LOW RANGE off-road gear ............. 230
Off-road 4ETS .................................. 72
Off-road ABS .................................... 69
Off-road ESP ®
.................................. 74
Off-road programs (vehicles with
Off-Road Engineering package) ...... 229
Oil
see Engine oil
On and Offroad menu (on-board
computer) .......................................... 255
On-board computer
AMG menu ..................................... 255
Assistance menu ........................... 249
Audio menu ................................... 247
Convenience submenu .................. 254
Display messages .......................... 258
Displaying a service message ........ 337
Distance Pilot DISTRONIC ............. 190 16
Index
Page 20 of 397

Factory setting submenu ............... 255
Heating submenu ........................... 253
Important safety notes .................. 241
Instrument cluster submenu .......... 251
Light submenu ............................... 252
Menu overview .............................. 244
Message memory .......................... 258
Navigation menu ............................ 245
On and Offroad menu .................... 255
Operating the TV ............................ 248
Operating video DVD ..................... 247
Operation ....................................... 242
RACETIMER ................................... 256
Service menu ................................ .251
Settings menu ............................... 251
Standard displa y............................ 244
Telephone menu ............................ 248
Trip menu ...................................... 244
Vehicle submenu ........................... 252
Operating instructions
Vehicle equipment ........................... 27
Operating safety
Declaration of conformity ................ 28
Important safety note ...................... 27
Operating system
see On-board computer
Outside temperature display ........... 241
Overhead control panel ...................... 40
Override feature
Rear side window s........................... 68
Owner's Manual
Overview .......................................... 27 P
Paint code .......................................... 380
Paintwork (cleaning instructions) ... 339
Panic alarm .......................................... 42
Panorama sliding sunroof
Convenience opening/closing
(air-recirculation mode) ................. 139
Important safety information ........... 97
Opening/closing the roller sun-
blind ............................................... 100
Operating ......................................... 99
Operating the roller sunblinds for
the sliding sunroof ........................... 99
Problem (malfunction) ................... 100 Rain closing feature ......................... 99
Reversing feature ............................. 97
Parking
Important safety notes .................. 168
Parking brake ................................ 170
Position of exterior mirror, front-
passenger side ............................... 118
Reversing camera .......................... 207
see PARKTRONIC
Parking aid
Parking Pilot .................................. 204
see 360° camera
see Exterior mirrors
see PARKTRONIC
Parking Assist PARKTRONIC
Deactivating/activating ................. 203
Driving system ............................... 201
Function/note s............................. 201
Important safety notes .................. 201
Problems (faults) ........................... 203
Sensor rang e................................. 201
Towing a trailer .............................. 201
Warning display ............................. 202
Parking brake
Applying automaticall y................... 170
Applying or releasing manually ...... 170
Display message ............................ 261
Electric parking brake .................... 170
Emergency braking ........................ 171
General information ....................... 170
Releasing automaticall y................. 171
Warning lamp ................................. 298
Parking lamps
Display message ............................ 270
Switching on/of f........................... 121
Parking Pilot
Display Message ............................ 279
Exiting a parking space .................. 206
Function/note s............................. 204
Important safety notes .................. 204
Parking .......................................... 205
PASSENGER AIR BAG
Display message ............................ 268
Indicator lamps ................................ 43
Problems (malfunctions) ................ 268
Pets in the vehicle ............................... 68
Phone book
See also Digital Owner's Manua l... 303 Index
17
Page 26 of 397

Lights display messag
e.................. 270
Power supply ................................. 238
Problem (fault) ............................... 239
Trailer load s................................... 390
Transmission
see Automatic transmission
Transmission position display ......... 158
Transporting the vehicle .................. 358
Travelling uphill
Brow of hill ..................................... 180
Driving downhill ............................. 180
Maximum gradient-climbing capa-
bility ............................................... 180
Trim pieces (cleaning instruc-
tions) .................................................. 343
Trip computer (on-board com-
puter) .................................................. 244
Trip meter
Calling up ....................................... 244
Resetting (on-board computer) ...... 245
Turn signals
Replacing bulbs (front) ................... 128
Switching on/of f........................... 122
TV
Operating (on-board computer) ..... 248
see Separate operating instructions
Two-way radio
Frequencies ................................... 379
Installation ..................................... 379
Transmission output (maximum) .... 379
Type identification plate
see Vehicle identification plate
Tyre inflation compressor
see TIREFIT kit
Tyre pressure
Calling up (on-board computer) ..... 367
Display message ............................ 283
Not reached (TIREFIT) .................... 350
Reached (TIREFIT) .......................... 350
Recommended ............................... 364
Tyre pressure loss warning
General notes ................................ 366
Important safety notes .................. 366
Restarting ...................................... 366
Tyre pressure monitor
Checking the tyre pressure elec-
tronically ........................................ 367
Function/note s............................. 367 General notes ................................ 367
Important safety notes .................. 367
Radio type approval for the tyre
pressure monitor ........................... 369
Restarting ...................................... 368
Warning lamp ................................. 302
Warning message .......................... 368
Tyres
Changing a whee l.......................... 369
Checking ........................................ 361
Direction of rotation ...................... 370
Display message ............................ 283
Important safety notes .................. 361
Information on driving .................... 361
M+S tyres ...................................... 363
MOExtended tyre s......................... 363
Replacing ....................................... 369
Service life ..................................... 362
Snow chains .................................. 364
Storing ........................................... 370
Summer tyres in winter ................. 363
Tyre size (data ).............................. 374
Tyre tread ...................................... 362
Wheel and tyre combinations ........ 374
see Flat tyre U
Unlocking Emergency unlocking ....................... 89
From inside the vehicle (central
unlocking button) ............................. 88
Upshift indicator (on-board com-
puter, Mercedes-AMG vehicles) ....... 255
USB devices
Connecting to the Media Inter-
face ............................................... 311 V
Vanity mirror (in sun visor) .............. 322
Vehicle
Correct use ...................................... 31
Data acquisition ............................... 31
Display message ............................ 285
Electronics ..................................... 379
Equipment ....................................... 27
Implied warranty .............................. 31
Individual settings .......................... 251 Index
23
Page 55 of 397

strap must be routed forwards and down-
wards from the vehicle belt sash guide. If nec-
essary, adjust the vehicle belt sash guide andthe front-passenger seat accordingly. Always
observe the information about suitable posi-
tioning of the child restraint system in this
Owner's Manual as well as the child restraint
system manufacturer's installation instruc-
tions.
Always observe the vehicle-specific information
for the correct positioning of the child restraint
system (Y page 62).
If the automatic front-passenger front airbag
deactivation system detects that:
R the front-passenger seat is unoccupied, the
PASSENGER AIR BAG OFF indicator lamp
lights up after the system self-test and
remains lit. This indicates that the front-
passenger front airbag is disabled.
R the front-passenger seat is occupied by a
child in a rearward-facing child restraint sys-
tem, the PASSENGER AIR BAG OFF indicator
lamp lights up after the system self-test and
remains lit. This indicates that the front-
passenger front airbag is disabled.
But in the case of a child in a rearward-facing
child restraint system, the PASSENGER AIR
BAG OFF indicator lamp can also go out after
the system self-test. This indicates that the
front-passenger front airbag is enabled. The
result of the classification is dependent on,
among other factors, the child restraint sys-
tem and the child's stature. It is recommen-
ded that you fit the child restraint system to a
suitable rear seat.
R the front-passenger seat is occupied by a
child in a forward-facing child restraint sys-
tem, either the PASSENGER AIR BAG OFF
indicator lamp lights up and remains lit after
the system self-test depending on the result
of the classification, or it goes out. The result of the classification is dependent on, among
other factors, the child restraint system and
the child's stature.
Move the front-passenger seat as far back as
possible. Always observe the information in
"Child restraint systems on the front-
passenger seat" (Y page 61) and in "Suita-
ble positioning of the child restraint system"
(Y page 62). Alternatively, you can fit the
child restraint system to a suitable rear seat. R
the front-passenger seat is occupied by a per-
son of smaller stature (e.g. a teenager or
small adult), the PASSENGER AIR BAG OFF
indicator lamp lights up and remains lit after
the system self-test depending on the result
of the classification or, alternatively, goes out.
- If the PASSENGER AIR BAG OFF indicator
lamp is off, move the front-passenger seat
as far back as possible. Alternatively, a per-
son with a small stature can sit on a rear
seat.
- If the PASSENGER AIR BAG OFF indicator
lamp is lit, a person with a smaller stature
should not use the front-passenger seat.
R the front-passenger seat is occupied by an
adult or a person with the stature of an adult,
the PASSENGER AIR BAG OFF indicator lamp
goes out after the system self-test. This indi-
cates that the front-passenger front airbag is enabled.
If children are travelling in the vehicle, be sure to
observe the notes on "Children in the vehicle"
(Y page 57).
If the automatic front-passenger front airbag
deactivation system is malfunctioning, the red
6 restraint system warning lamp on the
instrument cluster and the PASSENGER AIR
BAG OFF indicator lamp light up simultaneously.
The front-passenger front airbag is disabled in
this case and does not deploy during an acci-
dent. Have the automatic front-passenger front
airbag deactivation system checked and
repaired immediately at a qualified specialist
workshop. Mercedes-Benz recommends that
you use a Mercedes-Benz Service Centre for this purpose.
If the front-passenger seat, the seat cover or the
seat cushion are damaged, have the necessary
repair work carried out at a qualified specialist
workshop. Mercedes-Benz recommends that
you use a Mercedes-Benz Service Centre for this purpose.
For safety reasons, Mercedes-Benz recom-
mends that you use only a child restraint systemthat has been tested and approved by
Mercedes-Benz in combination with the auto-
matic front-passenger front airbag deactivation
system. 52
Occupant safetySafety
Page 356 of 397

occupants from suffering acid burns should the
battery be damaged in the event of an accident.
In order for the battery to achieve the maximum possible service life, it must always be suffi-
ciently charged.
Like other batteries, the vehicle battery may
discharge over time if you do not use the vehicle. In such cases, have the battery disconnected ata qualified specialist workshop. You can also
charge the battery with a charger recommended
by Mercedes-Benz. For more information,
please contact a qualified specialist workshop.
Have the battery charge checked more fre-
quently if you use the vehicle mainly for short
trips or if you leave it standing idle for a lengthy period. Consult a qualified specialist workshop
if you wish to leave your vehicle parked up for a
long period of time.
When you park the vehicle, remove the key if you do not require any electrical consumers. The
vehicle will then use very little energy, thus con- serving battery power.
If the power supply has been interrupted, e.g. if the battery was discharged, you will have to:
R set the clock (see the Digital Owner's Manual)
On vehicles with a multimedia system and
navigation system, the clock is set automati-
cally.
R reset the function for folding the exterior mir-
rors in/out automatically, by folding the mir-
rors out once (Y page 117). Charging the 12 V battery
G
WARNING
During charging and jump-starting, explosive
gases can escape from the battery. There is a risk of an explosion.
Particularly avoid fire, naked flames, creating
sparks and smoking. Ensure there is sufficient
ventilation while charging and jump-starting.
Do not lean over a battery. G
WARNING
Battery acid is caustic. There is a risk of injury. Avoid contact with the skin, eyes or clothing.
Do not breathe in any battery gases. Do not lean over the battery. Keep the batteries out
of the reach of children. Immediately rinse off
battery acid thoroughly with plenty of clean
water and seek medical attention at once. G
WARNING
A discharged battery can freeze at tempera-
tures below freezing point. When jump-start-
ing the vehicle or charging the battery, gases can escape from the battery. There is a risk of
an explosion.
Allow the frozen battery to thaw out before
charging it or jump-starting.
! Only use battery chargers with a maximum
charging voltage of 14.8 V.
! Only charge the battery using the jump-start
connection point.
The jump-starting connection point is in the
engine compartment (Y page 354).
X Open the bonnet.
X Connect the battery charger to the positive
terminal and earth point in the same order as
when connecting the donor battery in the
jump-starting procedure (Y page 354).
Keep away from fire and naked flames. Do not
lean over the battery. Never charge the battery
if it is still fitted to the vehicle, unless you are
using a battery charger that has been tested and approved by Mercedes-Benz. A battery charger
unit specially adapted for Mercedes-Benz vehi-
cles and tested and approved by Mercedes-
Benz is available as an accessory. This device
permits charging of the battery while it is instal-
led. Contact a Mercedes-Benz Service Centre
for information and availability. Read the battery charger's operating instructions before charg-
ing the battery.
If the indicator/warning lamps do not light up at
low temperatures, it is very likely that the dis-
charged battery has frozen. In this case you may
neither jump-start the vehicle nor charge the
battery. The service life of a battery that has
been thawed may be reduced. The starting char-
acteristics may be impaired, especially at low
temperatures. Have the thawed battery
checked at a qualified specialist workshop. Battery (vehicle)
353Breakdown assistance Z
Page 357 of 397

Jump-starting
For the jump-starting procedure, use only the jump-starting connection point, consisting of a pos- itive terminal and an earth point, in the engine compartment. G
WARNING
Battery acid is caustic. There is a risk of injury.
Avoid contact with the skin, eyes or clothing. Do not breathe in any battery gases. Do not lean over the battery. Keep the batteries out of the reach of children. Immediately rinse off battery acid
thoroughly with plenty of clean water and seek medical attention at once. G
WARNING
During charging and jump-starting, explosive gases can escape from the battery. There is a risk of an explosion.
Particularly avoid fire, naked flames, creating sparks and smoking. Ensure there is sufficient
ventilation while charging and jump-starting. Do not lean over a battery. G
WARNING
During the charging process, a battery produces hydrogen gas. If a short circuit occurs or sparks
are created, the hydrogen gas can ignite. There is a risk of an explosion.
R Make sure that the positive terminal of a connected battery does not come into contact with
vehicle parts.
R Never place metal objects or tools on a battery.
R It is important that you observe the described order of the battery terminals when connecting
and disconnecting a battery.
R When jump-starting, make sure that the battery poles with identical polarity are connected.
R It is particularly important to observe the described order when connecting and disconnecting
the jump leads.
R Never connect or disconnect the battery terminals while the engine is running. G
WARNING
A discharged battery can freeze at temperatures below freezing point. When jump-starting the
vehicle or charging the battery, gases can escape from the battery. There is a risk of an explosion.
Allow the frozen battery to thaw out before charging it or jump-starting.
! Vehicles with a petrol engine:
avoid repeated and lengthy starting attempts. Otherwise, the
non-combusted fuel may damage the catalytic converter.
If the indicator/warning lamps do not light up at low temperatures, it is very likely that the dis-
charged battery has frozen. In this case you may neither jump-start the vehicle nor charge the
battery. The service life of a battery that has been thawed may be reduced. The starting charac-
teristics may be impaired, especially at low temperatures. Have the thawed battery checked at a
qualified specialist workshop. 354
Jump-startingBreakdown assistance
Page 362 of 397

Tow-starting (emergency engine
starting)
! Do not tow-start vehicles with automatic
transmission. You could otherwise damage
the automatic transmission.
You can find information on "Jump-starting"
under (Y page 354). Electrical fuses
Important safety notes
G
WARNING
If you manipulate, bridge or replace a faulty
fuse with a fuse of a higher amperage, the
electric cables could be overloaded. This may result in a fire. There is a risk of an accident
and injury.
Always replace faulty fuses with specified new fuses of the correct amperage.
! Only use fuses marked with an "S" for the
fuse box in the engine compartment and
under the rear bench seat. Components or
systems could otherwise be damaged.
! Make sure that no moisture can enter the
fuse box when the cover is open.
! When closing the cover, make sure that it is
lying correctly on the fuse box. Moisture seep-
ing in or dirt could otherwise impair the oper- ation of the fuses.
The fuses in your vehicle disconnect faulty cir-
cuits. If a fuse blows, all the components in the circuit and their functions will fail.
Blown fuses must be replaced with fuses of the
same rating, which you can recognise by the
colour and fuse rating. The fuse ratings are listed in the fuse allocation chart.
The fuse allocation chart is located in the fuse
box under the rear bench seat (Y page 360).
If the newly inserted fuse also blows, have the
cause traced and rectified at a qualified special-
ist workshop, e.g. a Mercedes-Benz Service
Centre. Before replacing a fuse
Observe the important safety notes
(Y page 359)
X Switch off the engine.
X Switch off all electrical consumers.
X Remove the key from the ignition lock.
or, on vehicles with KEYLESS-GO start function
or KEYLESS ‑GO:
X Open the driver's door.
The vehicle electronics now have status 0.
This is the same as the key having been
removed.
The driver's door can be closed again.
X Safeguard the vehicle against rolling away
(Y page 168).
All indicator lamps in the instrument cluster
must be off.
The fuses are located in various fuse boxes:
R Fuse box on the front-passenger side of the
dashboard
R Fuse box in the engine compartment on the
right-hand side of the vehicle, when viewed in
the direction of travel
R Fuse box under the rear bench seat Dashboard fuse box
! Do not use a pointed object such as a screw-
driver to open the cover in the dashboard. You could damage the dashboard or the cover.
Mercedes-Benz recommends that you have this
work performed at a qualified specialist work-
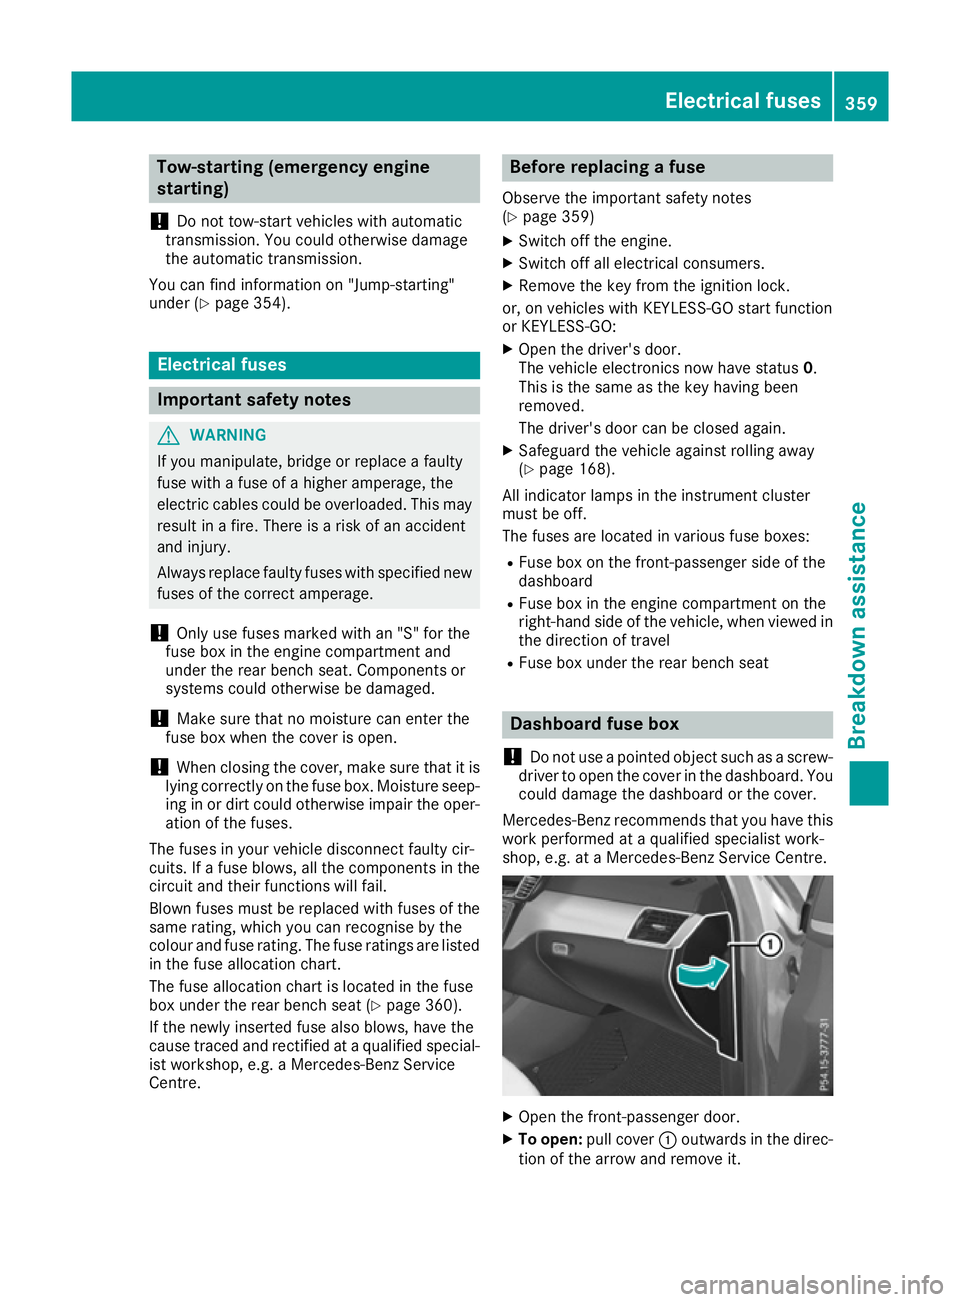
shop, e.g. at a Mercedes-Benz Service Centre. X
Open the front-passenger door.
X To open: pull cover :outwards in the direc-
tion of the arrow and remove it. Electrical fuses
359Breakdown assistance Z