2016 MERCEDES-BENZ GLS SUV oil reset
[x] Cancel search: oil resetPage 23 of 397

Folding the 2nd row of seats
forward manually ........................... 108
Folding the rear bench seat for-
wards/back ................................... 315
Important safety notes .................. 102
Overview ........................................ 102
Seat heating problem .................... 113
Seat ventilation problem ................ 113
Storing settings (memory func-
tion) ............................................... 118
Switching seat heating on/off ....... 112
Switching the seat ventilation on/
off .................................................. 113
Section
Sliding sunroof ................................ .97
Selector lever
Cleaning ......................................... 343
Sensors (cleaning instructions) .......341
Service
see ASSYST PLUS
Service Centre
see Qualified specialist workshop
Service menu (on-board com-
puter) ................................................. .251
Service message
see ASSYST PLUS
Service products
AdBlue ®
special additive s.............. 384
Brake fluid ..................................... 386
Coolant (engine) ............................ 386
Engine oil ....................................... 385
Fuel ................................................ 382
Important safety notes .................. 381
Washer fluid ................................... 387
Setting the air distribution ............... 136
Setting the airflow ............................ 137
Setting the date/time format
See also Digital Owner's Manua l... 303
Setting the language
See also Digital Owner's Manua l... 303
Setting the time
See also Digital Owner's Manua l... 303
Settings
Factory (on-board computer) ......... 255
On-board compute r....................... 251
SETUP (on-board computer) ............. 256Side lamps
Switching on/of f........................... 121
Side marker lamp Display mes-
sage .................................................... 270
Side windows
Convenience closing ........................ 95
Convenience opening ...................... 95
Convenience opening/closing
(air-recirculation mode) ................. 139
Hinged side windows ....................... 94
Important safety notes .................... 93
Opening/closing .............................. 94
Overview .......................................... 93
Problem (malfunction) ..................... 96
Resetting ......................................... 96
Reversing feature ............................. 93
Sidebag ................................................ 49
SIM card
Inserting ........................................ 309
Sliding sunroof
Important safety information ........... 97
Opening/closing .............................. 98
Problem (malfunction) ................... 100
Rain closing feature ......................... 98
Resetting ......................................... 98
see Panorama sliding sunroof
SMS
See also Digital Owner's Manua l... 303
Snow chains
Information .................................... 364
Socket
Luggage compartment ................... 324
Sockets
Centre console .............................. 324
General notes ................................ 324
Rear compartment ......................... 324
Sound
Switching on/of f........................... 304
Specialist workshop ............................ 30
Spectacles compartment ................. 314
Speed limiter
Display message ............................ 281
Important safety notes .................. 182
Selecting ........................................ 183
Variable, activating ........................ 183
Speed, controlling
see Cruise control 20
Index
Page 258 of 397

X
Press the :or9 button to select the
Belt adjustment
Belt adjustment function.
If the Belt
Belt adjustment
adjustment function is activated,
the vehicle seat belt is shown in orange in the
multifunction display.
X Press the abutton to save the setting.
For further information on belt adjustment, see
(Y page 46).
Switching the fold mirrors in when lock-
ing function on/off This function is only available when the vehicle is
equipped with the electrical fold-in function.
When you activate the Auto. fold-in mir‐
Auto. fold-in mir‐
rors rors function, the exterior mirrors are folded in
when the vehicle is locked. The exterior mirrors fold out automatically again as soon as you
unlock the vehicle.
X Press the =or; button on the steering
wheel to select the Settings
Settings menu.
X Press the :or9 button to select the
Convenience Convenience submenu.
X Press ato confirm.
X Press the :or9 button to select the
Auto. fold-in mirrors
Auto. fold-in mirrors function.
If the Auto. fold-in mirrors
Auto. fold-in mirrors function is
switched on, the multifunction display shows
the exterior mirror in orange.
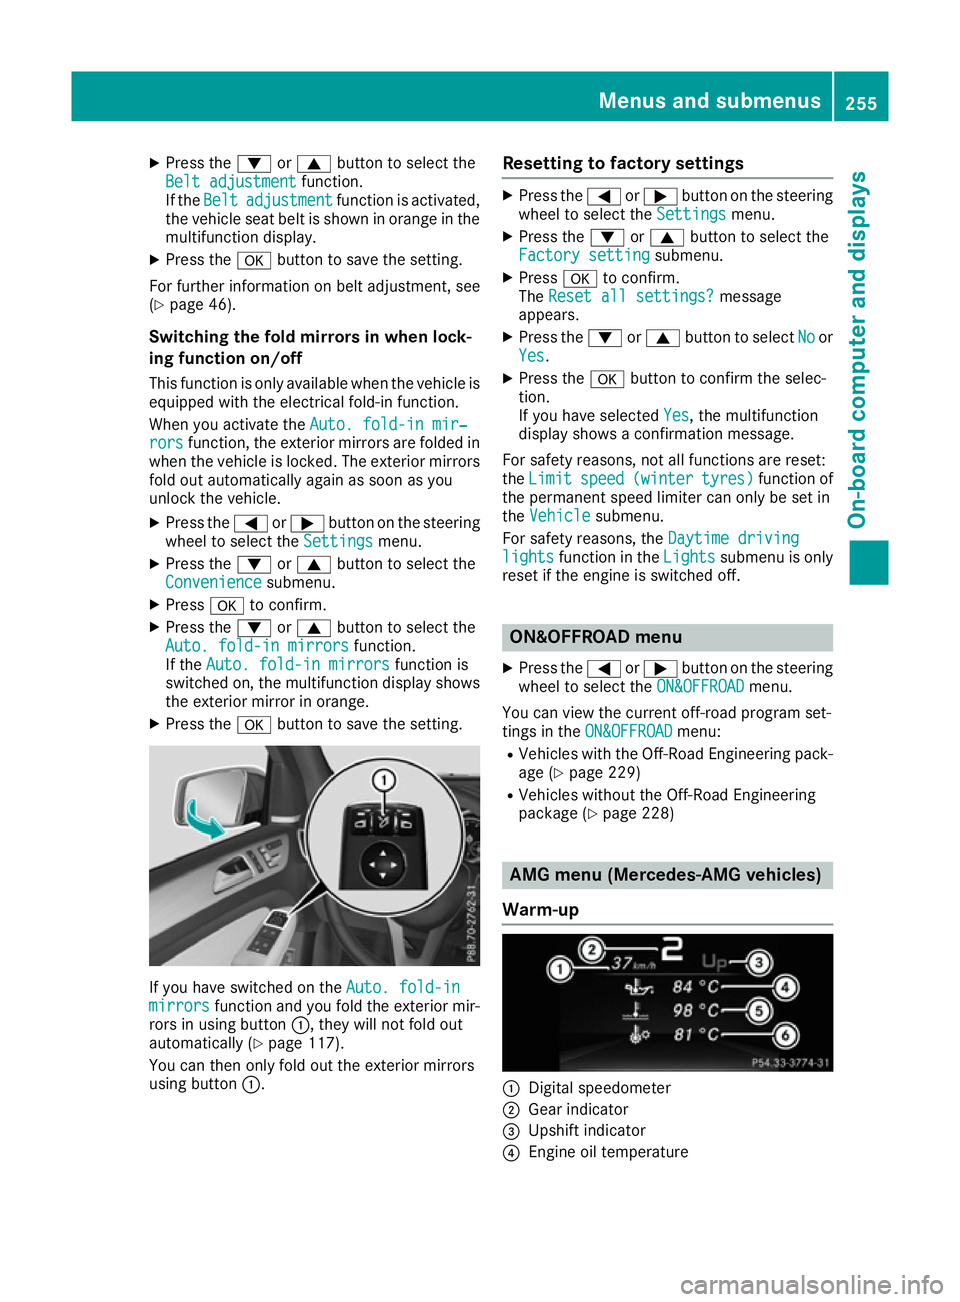
X Press the abutton to save the setting. If you have switched on the
Auto. fold-in
Auto. fold-in
mirrors
mirrors function and you fold the exterior mir-
rors in using button :, they will not fold out
automatically (Y page 117).
You can then only fold out the exterior mirrors
using button :. Resetting to factory settings X
Press the =or; button on the steering
wheel to select the Settings Settingsmenu.
X Press the :or9 button to select the
Factory setting
Factory setting submenu.
X Press ato confirm.
The Reset all settings?
Reset all settings? message
appears.
X Press the :or9 button to select No
Noor
Yes
Yes.
X Press the abutton to confirm the selec-
tion.
If you have selected Yes Yes, the multifunction
display shows a confirmation message.
For safety reasons, not all functions are reset:
the Limit Limit speed
speed(winter
(winter tyres)
tyres)function of
the permanent speed limiter can only be set in
the Vehicle
Vehicle submenu.
For safety reasons, the Daytime driving
Daytime driving
lights
lights function in the Lights
Lightssubmenu is only
reset if the engine is switched off. ON&OFFROAD menu
X Press the =or; button on the steering
wheel to select the ON&OFFROAD
ON&OFFROADmenu.
You can view the current off-road program set-
tings in the ON&OFFROAD ON&OFFROAD menu:
R Vehicles with the Off-Road Engineering pack-
age (Y page 229)
R Vehicles without the Off-Road Engineering
package (Y page 228) AMG menu (Mercedes-AMG vehicles)
Warm-up :
Digital speedometer
; Gear indicator
= Upshift indicator
? Engine oil temperature Menus and submenus
255On-board computer and displays Z
Page 340 of 397

Displaying service messages
X Switch the ignition on.
X Press the =or; button on the steering
wheel to select the Serv.
Serv.menu.
X Press the 9or: button to select the
ASSYST
ASSYST PLUS
PLUSsubmenu and confirm by press-
ing the abutton.
The service due date appears in the multi-
function display. Information about service
Resetting the ASSYST PLUS service
interval display !
If the ASSYST PLUS service interval display
has been inadvertently reset, this setting can
be corrected at a qualified specialist work-
shop.
Have service work carried out as described in the Service Booklet. This may otherwise lead
to increased wear and damage to the major
assemblies or the vehicle.
A qualified specialist workshop, e.g. a
Mercedes-Benz Service Centre, will reset the
ASSYST PLUS service interval display after the
service work has been carried out. You can also
obtain further information on maintenance
work, for example.
Special service requirements The prescribed service interval is based on nor-
mal operation of the vehicle. Service work will
need to be performed more often if the vehicle is
operated under arduous conditions or increased loads, for example:
R regular city driving with frequent intermediate
stops
R if the vehicle is primarily used to travel short
distances
R for frequent operation in mountainous terrain
or on poor road surfaces
R if the engine is often left idling for long periods
In these or similar operating conditions, have,
for example, the air filter, engine oil and oil filter changed more frequently. The tyres must be
checked more frequently if the vehicle is oper-
ated under increased loads. Further informationcan be obtained at a qualified specialist work-
shop, e.g. a Mercedes-Benz Service Centre. Driving abroad An extensive Mercedes-Benz Service network is
also available in other countries. You can obtain further information from any Mercedes-Benz
Service Centre. Care
General notes
H
Environmental note
Dispose of empty packaging and cleaning
cloths in an environmentally responsible man-
ner.
! For cleaning your vehicle, do not use any of
the following:
R dry, rough or hard cloths
R abrasive cleaning agents
R solvents
R cleaning agents containing solvents
Do not scrub.
Do not touch the surfaces or protective films
with hard objects, e.g. a ring or ice scraper.
You could otherwise scratch or damage the
surfaces and protective film.
! Do not park up your vehicle for a long period
of time immediately after cleaning, particu-
larly after cleaning the wheel rim with wheel
cleaner. Wheel cleaner may lead to increased corrosion of the brake discs and pads. You
should therefore drive for a few minutes after
cleaning. By heating up the brakes, the brake
discs and pads dry. The vehicle can then be
parked up for a long period of time.
Regular care of your vehicle is a condition for
retaining quality in the long term.
Use care products and cleaning agents recom-
mended and approved by Mercedes-Benz. Care
337Maintenance and care Z