2016 MERCEDES-BENZ GLS SUV rear entertainment
[x] Cancel search: rear entertainmentPage 21 of 397

Plastic trim (cleaning instruc-
tions)
.................................................. 343
Power closing ...................................... 88
Power windows
see Side windows
PRE-SAFE ®
(anticipatory occupant
protection)
Operation ......................................... 56
PRE-SAFE ®
(preventive occupant
safety system)
Display message ............................2 64
PRE-SAFE ®
PLUS (anticipatory
occupant protection PLUS)
Display message ............................ 265
Operation ......................................... 56
Protection against theft
ATA (Anti-Theft Alarm system) ......... 78
Immobiliser ...................................... 78
Interior motion sensor ..................... 80
Tow-away protection ........................ 79
Protection of the environment
General notes .................................. 26
Pulling away
Automatic transmission ................. 150
General notes ................................ 150
Hill start assist ............................... 151
Trailer ............................................ 151 Q
QR code Mercedes-Benz Guide App ................. 1
Rescue card ..................................... 31
Qualified specialist workshop ........... 30R
RACETIMER (on-board computer) .... 256
Radiator cover ................................... 333
Radio
Selecting a station ......................... 247
see separate operating instructions
Radio mode
See also Digital Owner's Manual ... 303
Radio-based vehicle components
Declaration of conformity ................ 28
Rain closing feature
Sliding sunroof ................................. 98 Rain closing feature (panorama
sliding sunroof)
................................... 99
Reading lamp ..................................... 125
Rear bench seat
Folding the bench seat forwards/back ............................................... 316
Rear compartment
Exit/entry position (3rd row of
seats) ............................................. 108
Setting the air vents ..................... .145
Setting the temperature ................ 136
Rear foglamp
Display message ............................ 270
Switching on/off ........................... 121
Rear seat
Adjusting ....................................... 107
Display message ............................ 287
Rear Seat Entertainment System
AUX jacks ...................................... 311
AUX jacks CD/DVD drive .............. 311
Rear window heating
Problem (fault) ............................... 138
Switching on/off ........................... 138
Rear window wiper
Replacing the wiper blade .............. 130
Switching on/off ........................... 129
Rear-compartment seat belt sta-
tus indicator ........................................ 47
Rear-view mirror
Anti-dazzle mode (automatic) ....... .117
Dipping (manual )........................... 116
Refuelling
Fuel gaug e....................................... 35
Important safety notes .................. 163
Notes for Mercedes‑AMG vehi-
cles ................................................ 383
Refuelling process ......................... 164
see Fuel
Remote control
Auxiliary heating/ventilation .......... 141
Changing the batteries (auxiliary
heating) ......................................... 143
Garage door opener ....................... 326
Programming (garage door
opener) .......................................... 326
Replacing bulbs
Dipped-beam headlamp s............... 127 18
Index
Page 314 of 397

Inserting/removing an SD card
Important safety notes
G
WARNING
SD cards are small parts. They can be swal-
lowed and cause choking. This poses an
increased risk of injury or even fatal injury.
Keep the SD card out of the reach of children. If a SD card is swallowed, seek medical atten-
tion immediately.
! If you are no longer using the SD card, you
should remove it and store it outside the vehi-
cle. High temperatures can damage the card.
Inserting an SD card
The SD card slot is on the control panel. X Insert the SD card into the SD card slot until
the SD card engages. The side with the con-
tacts must face downwards.
Removing an SD card X Press the SD card.
The SD card is ejected.
X Remove the SD card.
Connecting USB devices There are two USB ports in the stowage space
under the armrest.
X Connect the USB device to the USB port.
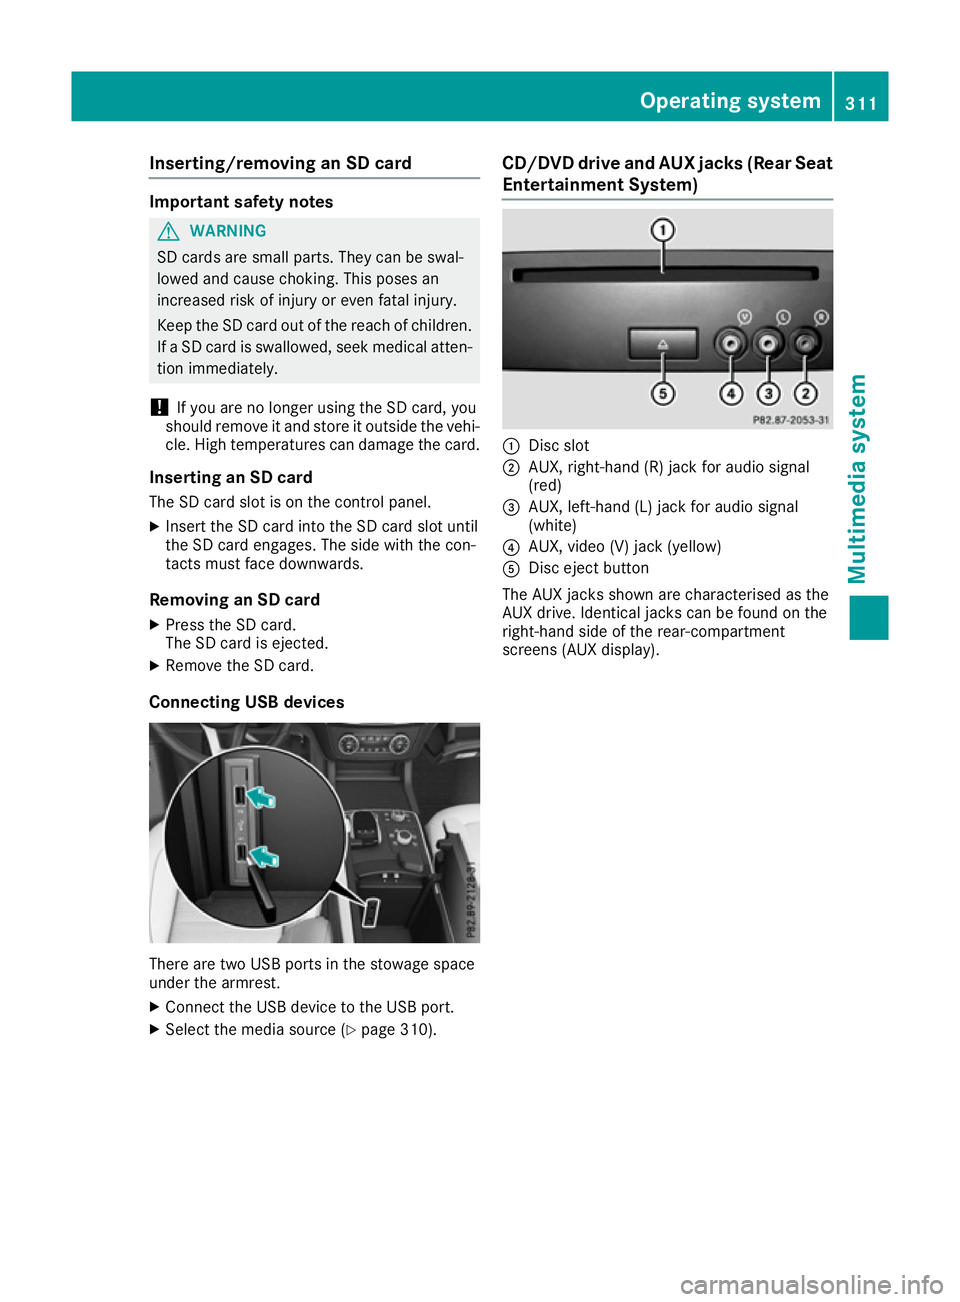
X Select the media source (Y page 310).CD/DVD drive and AUX jacks (Rear Seat
Entertainment System) :
Disc slot
; AUX, right-hand (R) jack for audio signal
(red)
= AUX, left-hand (L) jack for audio signal
(white)
? AUX, video (V) jack (yellow)
A Disc eject button
The AUX jacks shown are characterised as the
AUX drive. Identical jacks can be found on the
right-hand side of the rear-compartment
screens (AUX display). Operating system
311Multimedia system Z
Page 326 of 397

Ashtray
Front ashtray !
The holder under the ashtray is not heat
resistant. Before placing lit cigarettes in the
ashtray, make sure that the ashtray is prop-
erly engaged. Otherwise, the holder could be
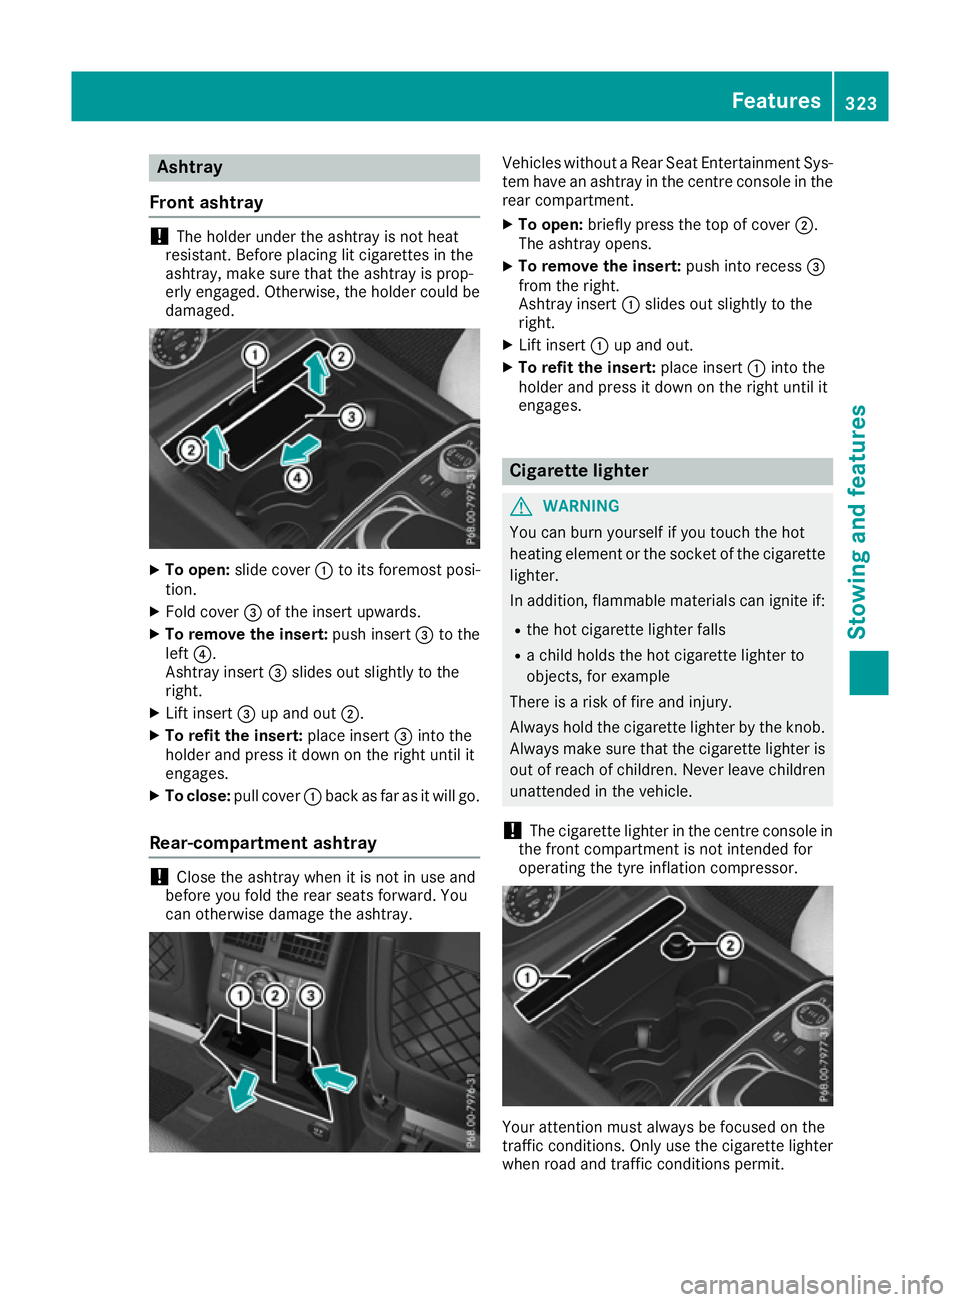
damaged. X
To open: slide cover :to its foremost posi-
tion.
X Fold cover =of the insert upwards.
X To remove the insert: push insert=to the
left ?.
Ashtray insert =slides out slightly to the
right.
X Lift insert =up and out ;.
X To refit the insert: place insert=into the
holder and press it down on the right until it
engages.
X To close: pull cover :back as far as it will go.
Rear-compartment ashtray !
Close the ashtray when it is not in use and
before you fold the rear seats forward. You
can otherwise damage the ashtray. Vehicles without a Rear Seat Entertainment Sys-
tem have an ashtray in the centre console in the rear compartment.
X To open: briefly press the top of cover ;.
The ashtray opens.
X To remove the insert: push into recess=
from the right.
Ashtray insert :slides out slightly to the
right.
X Lift insert :up and out.
X To refit the insert: place insert:into the
holder and press it down on the right until it
engages. Cigarette lighter
G
WARNING
You can burn yourself if you touch the hot
heating element or the socket of the cigarette lighter.
In addition, flammable materials can ignite if:
R the hot cigarette lighter falls
R a child holds the hot cigarette lighter to
objects, for example
There is a risk of fire and injury.
Always hold the cigarette lighter by the knob.
Always make sure that the cigarette lighter is
out of reach of children. Never leave children unattended in the vehicle.
! The cigarette lighter in the centre console in
the front compartment is not intended for
operating the tyre inflation compressor. Your attention must always be focused on the
traffic conditions. Only use the cigarette lighter
when road and traffic conditions permit. Features
323Stowing and featu res Z
Page 327 of 397

X
Turn the key to position 2in the ignition lock
(Y page 148).
X To open: slide cover :to its foremost posi-
tion.
X Press in cigarette lighter ;.
Cigarette lighter ;will pop out automatically
when the heating element is red-hot.
X To close: pull cover :back as far as it will go. 12 V sockets
General notes X
Turn the key to position 1in the ignition lock
(Y page 148).
With the exception of the socket in the front
centre console, all sockets can be used for
accessories with a maximum current draw of
240 W (20 A). The socket in the front centre
console can be used for accessories with a max-
imum current draw of 180 W (15 A). Accessories include such items as mobile phone chargers.
If you use the sockets for long periods when the engine is switched off, the battery may dis-
charge.
i An emergency cut-off ensures that the on-
board voltage does not drop too low. If the on-
board voltage is too low, the power to the
sockets is automatically cut. This ensures
that there is sufficient power to start the
engine.
Socket in the front centre console !
The socket is not intended for operating the
tyre inflation compressor.
X To open: slide the cover to its foremost posi-
tion.
X Lift up the cover of the socket.
X To close: pull the cover back as far as it will
go.
Socket in the rear-compartment centre
console On vehicles with the Rear Seat Entertainment
System, there are two sockets in the rear-com-
partment centre console.
X Lift up the cover of the socket. Socket in the luggage compartment
X
Lift up the cover of socket :. Mercedes-Benz emergency call sys-
tem
Information on these requirements can be found in the separate multimedia system operating
instructions. X
To open: press and hold cover :for at least
one second.
X To make an emergency call: press SOS but-
ton ;briefly.
The indicator lamp in SOS button ;flashes
until the emergency call is concluded.
X Wait for a voice connection to the Mercedes-
Benz emergency call centre.
X After the emergency call, close cover :.
You will see a message if:
R a connection to the Mercedes-Benz emer-
gency call centre cannot be made
R a call has not been automatically forwarded
to the public emergency call centre
In this case, dial the 112emergency number
on your mobile phone. 324
FeaturesStowing and features