2016 MERCEDES-BENZ GLS SUV radio
[x] Cancel search: radioPage 15 of 397
Folding in/out (automatically
)....... 117
Folding in/out (electrically) ........... 117
Out of position (troubleshooting) ... 117
Parking position ............................. 118
Resetting ....................................... 117
Storing settings (memory func-
tion) ............................................... 118 F
Fault message see Display messages
Favourites
Overview ........................................ 304
Filler cap
see Fuel filler flap
Fire extinguisher ............................... 345
First-aid kit ......................................... 345
Fitting a wheel
Fitting a wheel ............................... 372
Lowering the vehicle ...................... 373
Preparing the vehicle ..................... 370
Raising the vehicl e......................... 371
Removing a whee l.......................... 372
Securing the vehicle against roll-
ing away ........................................ 370
Flat tyre
MOExtended tyre s......................... 347
Preparing the vehicle ..................... 346
TIREFIT kit ...................................... 348
see Emergency spare wheel
Floormat ............................................. 331
Foglamps (extended range) .............. 123
Folding the rear bench seat for-
wards/back ....................................... 315
Fording
Off-road ......................................... 175
On flooded roads ........................... 175
Frequencies
Garage door opener ....................... 328
Mobile phone ................................. 379
Two-way radio ................................ 379
Front-passenger front airbag deac-
tivation
Display message ............................ 268
Front-passenger front airbag deac-
tivation system
Operation ......................................... 50 Problems ......................................... 54
System self-test ............................... 53
Fuel
Additives ........................................ 383
Consumption statistics .................. 244
Displaying the current consump-
tion ................................................ 245
Displaying the rang e...................... 245
Driving tips .................................... 172
Fuel gaug e....................................... 35
Grade (petrol) ................................ 382
Important safety notes .................. 382
Low outside temperature s............. 384
Notes for Mercedes‑AMG vehi-
cles ................................................ 383
Problem (malfunction) ................... 165
Quality (diesel )............................... 383
Refuelling ....................................... 163
Tank content/reserve fue l............. 382
Fuel filler flap
Opening ......................................... 164
Fuel filter (white display message) .. 274
Fuel level
Calling up the range (on-board
computer) ...................................... 245
Gaug e.............................................. 35
Fuel tank
Capacity ........................................ 382
Problem (malfunction) ................... 165
Fuses
Allocation chart ............................. 359
Before changing ............................. 359
Dashboard fuse box ....................... 359
Fuse box in the engine compart-
ment .............................................. 360
Fuse box under rear bench sea t.... 360
Important safety notes .................. 359 G
Garage door opener Clearing the memory ..................... 328
Frequencies ................................... 328
General notes ................................ 326
Important safety notes .................. 326
Opening/closing the garage doo r..3 27
Problems when programming ....... .327 12
Index
Page 21 of 397
Plastic trim (cleaning instruc-
tions)
.................................................. 343
Power closing ...................................... 88
Power windows
see Side windows
PRE-SAFE ®
(anticipatory occupant
protection)
Operation ......................................... 56
PRE-SAFE ®
(preventive occupant
safety system)
Display message ............................2 64
PRE-SAFE ®
PLUS (anticipatory
occupant protection PLUS)
Display message ............................ 265
Operation ......................................... 56
Protection against theft
ATA (Anti-Theft Alarm system) ......... 78
Immobiliser ...................................... 78
Interior motion sensor ..................... 80
Tow-away protection ........................ 79
Protection of the environment
General notes .................................. 26
Pulling away
Automatic transmission ................. 150
General notes ................................ 150
Hill start assist ............................... 151
Trailer ............................................ 151 Q
QR code Mercedes-Benz Guide App ................. 1
Rescue card ..................................... 31
Qualified specialist workshop ........... 30R
RACETIMER (on-board computer) .... 256
Radiator cover ................................... 333
Radio
Selecting a station ......................... 247
see separate operating instructions
Radio mode
See also Digital Owner's Manual ... 303
Radio-based vehicle components
Declaration of conformity ................ 28
Rain closing feature
Sliding sunroof ................................. 98 Rain closing feature (panorama
sliding sunroof)
................................... 99
Reading lamp ..................................... 125
Rear bench seat
Folding the bench seat forwards/back ............................................... 316
Rear compartment
Exit/entry position (3rd row of
seats) ............................................. 108
Setting the air vents ..................... .145
Setting the temperature ................ 136
Rear foglamp
Display message ............................ 270
Switching on/off ........................... 121
Rear seat
Adjusting ....................................... 107
Display message ............................ 287
Rear Seat Entertainment System
AUX jacks ...................................... 311
AUX jacks CD/DVD drive .............. 311
Rear window heating
Problem (fault) ............................... 138
Switching on/off ........................... 138
Rear window wiper
Replacing the wiper blade .............. 130
Switching on/off ........................... 129
Rear-compartment seat belt sta-
tus indicator ........................................ 47
Rear-view mirror
Anti-dazzle mode (automatic) ....... .117
Dipping (manual )........................... 116
Refuelling
Fuel gaug e....................................... 35
Important safety notes .................. 163
Notes for Mercedes‑AMG vehi-
cles ................................................ 383
Refuelling process ......................... 164
see Fuel
Remote control
Auxiliary heating/ventilation .......... 141
Changing the batteries (auxiliary
heating) ......................................... 143
Garage door opener ....................... 326
Programming (garage door
opener) .......................................... 326
Replacing bulbs
Dipped-beam headlamp s............... 127 18
Index
Page 26 of 397
Lights display messag
e.................. 270
Power supply ................................. 238
Problem (fault) ............................... 239
Trailer load s................................... 390
Transmission
see Automatic transmission
Transmission position display ......... 158
Transporting the vehicle .................. 358
Travelling uphill
Brow of hill ..................................... 180
Driving downhill ............................. 180
Maximum gradient-climbing capa-
bility ............................................... 180
Trim pieces (cleaning instruc-
tions) .................................................. 343
Trip computer (on-board com-
puter) .................................................. 244
Trip meter
Calling up ....................................... 244
Resetting (on-board computer) ...... 245
Turn signals
Replacing bulbs (front) ................... 128
Switching on/of f........................... 122
TV
Operating (on-board computer) ..... 248
see Separate operating instructions
Two-way radio
Frequencies ................................... 379
Installation ..................................... 379
Transmission output (maximum) .... 379
Type identification plate
see Vehicle identification plate
Tyre inflation compressor
see TIREFIT kit
Tyre pressure
Calling up (on-board computer) ..... 367
Display message ............................ 283
Not reached (TIREFIT) .................... 350
Reached (TIREFIT) .......................... 350
Recommended ............................... 364
Tyre pressure loss warning
General notes ................................ 366
Important safety notes .................. 366
Restarting ...................................... 366
Tyre pressure monitor
Checking the tyre pressure elec-
tronically ........................................ 367
Function/note s............................. 367 General notes ................................ 367
Important safety notes .................. 367
Radio type approval for the tyre
pressure monitor ........................... 369
Restarting ...................................... 368
Warning lamp ................................. 302
Warning message .......................... 368
Tyres
Changing a whee l.......................... 369
Checking ........................................ 361
Direction of rotation ...................... 370
Display message ............................ 283
Important safety notes .................. 361
Information on driving .................... 361
M+S tyres ...................................... 363
MOExtended tyre s......................... 363
Replacing ....................................... 369
Service life ..................................... 362
Snow chains .................................. 364
Storing ........................................... 370
Summer tyres in winter ................. 363
Tyre size (data ).............................. 374
Tyre tread ...................................... 362
Wheel and tyre combinations ........ 374
see Flat tyre U
Unlocking Emergency unlocking ....................... 89
From inside the vehicle (central
unlocking button) ............................. 88
Upshift indicator (on-board com-
puter, Mercedes-AMG vehicles) ....... 255
USB devices
Connecting to the Media Inter-
face ............................................... 311 V
Vanity mirror (in sun visor) .............. 322
Vehicle
Correct use ...................................... 31
Data acquisition ............................... 31
Display message ............................ 285
Electronics ..................................... 379
Equipment ....................................... 27
Implied warranty .............................. 31
Individual settings .......................... 251 Index
23
Page 31 of 397

Do not attempt to modify the wiring as well as
electronic components or their software.
Always have work on electrical and electronic
components carried out at a qualified special- ist workshop.
If you make any changes to the vehicle elec-
tronics, the general operating permit is ren-
dered invalid.
! There is a risk of damage to the vehicle if:
R the vehicle becomes stuck, e.g. on a high
kerb or an unpaved road
R you drive too fast over an obstacle, e.g. a
kerb, a speed bump or a pothole in the road
R a heavy object strikes the underbody or
parts of the chassis
In situations like this, the body, the under-
body, chassis parts, wheels or tyres could be damaged without the damage being visible.
Components damaged in this way can unex-
pectedly fail or, in the case of an accident, no
longer withstand the strain they are designed
to.
If the underbody panelling is damaged, com-
bustible materials such as leaves, grass or
twigs can gather between the underbody and
the underbody panelling. If these materials
come in contact with hot parts of the exhaust system, they can catch fire.
In such situations, have the vehicle checked
and repaired immediately at a qualified spe-
cialist workshop. If on continuing your jour-
ney you notice that driving safety is impaired,pull over and stop the vehicle immediately,
paying attention to road and traffic condi-
tions. In such cases, consult a qualified spe-
cialist workshop. Declarations of conformity
Wireless vehicle components The following information applies to all compo-
nents of the vehicle and the information sys-
tems and communication devices integrated
into the vehicle that receive and/or transmit
radio waves:
The components of this vehicle that receive
and/or transmit radio waves are compliant with the basic requirements and all other relevant
conditions of Directive 1999/5/EC. You can obtain further information from any Mercedes-
Benz Service Centre.
Electromagnetic compatibility The electromagnetic compatibility of the vehicle
components has been checked and certified
according to the currently valid version of Reg-
ulation ECE-R 10.
Jack Copy and translation of the original declaration
of conformity:
EC declaration of conformity
1. The signatory, as a representative Manufacturer:
BRANO a.s.
74741 Hradec nad Moravicí, Opav-
ská 1000,
Czech Republic
ID no.: 64-387-5933
VAT ID no.: CZ64-387-5933
declares, as our sole responsibility, that the
product:
2.
a) Description:
Jack
Type, number:
A) A 164 580 02 18, A 166 580 01 18
B) A 240 580 00 18
C) A 639 580 02 18
Year of manufacture: 2015
Fulfils all relevant conditions
Directive no. 2006/42/EC
b) Description and purpose of use: The jack is intended only for raising the
specified vehicle according to the operatinginstructions affixed to the jack.
3. Reference data of the harmonised stand- ards or specifications
A) ISO 4063, EN ISO 14341-A, DBL
7382.20, MBN 10435, AS 2693
B) ISO 4063, ISO 14341-A, DBL 7392.10,
MBN 10435
C) DBL 7392.10, DBL 8230.10
Technical documentation for the product is
held by the manufacturer. Authorised rep-
resentative for compilation of the technical
documentation: director of the technical
department at Brano a.s. 28
Introduction
Page 85 of 397

If you do not open the vehicle within approx-
imately 40 seconds of unlocking:
R the vehicle locks again
R protection against theft is reactivated
X To lock centrally: press the&button.
The key centrally locks and unlocks the follow-
ing components:
R the doors
R the tailgate
R the fuel filler flap
During unlocking, the turn signals flash once.
During locking, they flash three times.
You can also set an audible signal to confirm
that the vehicle has been locked. The audible
signal can be activated or deactivated using the on-board computer (Y page 253).
Only when all the components have been locked is the visual or audible locking confirmation
issued.
If activated in the multimedia system, the loca-
tor lighting also lights up in the dark (see sepa-
rate operating instructions).
X To open the tailgate automatically from
outside the vehicle:
press and hold theF
button until the tailgate opens.
Vehicles with KEYLESS-GO: X To close the tailgate automatically from
outside the vehicle: if the key is located in
the immediate vicinity of the vehicle, press
the F button on the key.
When the tailgate closes, you can then
release the button. KEYLESS-GO
General notes Bear in mind that the engine can be started by
any of the vehicle occupants if there is a KEY-
LESS-GO key in the vehicle (Y page 150).
Locking and unlocking centrally You can start, lock or unlock the vehicle using
KEYLESS-GO. To do this, you need to carry the
key with you. You can combine the KEYLESS-GO functions with the functions of a conventional
key. Unlock the vehicle by using KEYLESS-GO, for instance, and lock it using the
&button
on the key.
The driver's door and the door at which the han- dle is used must both be closed. The key must be
outside the vehicle. When locking or unlocking
with KEYLESS-GO, the distance between the key and the corresponding door handle must not be greater than 1 m.
KEYLESS-GO checks whether a valid key is in
the vehicle by periodically establishing a radio
connection between the vehicle and the key.
This happens:
R during engine start
R during driving
R when the external door handles are touched
R during convenience closing X
To unlock the vehicle: touch the inner sur-
face of the door handle.
X To lock the vehicle: touch sensor surface :
or ;.
Make sure that you do not touch the inner
surface of the door handle.
X Convenience closing feature: touch
recessed sensor surface ;for an extended
period.
Further information on the convenience closing
feature (Y page 95).
If you pull on the handle of the tailgate, only the luggage compartment of the vehicle is
unlocked.
Deactivating and activating If you do not intend to use a key for an extended
period of time, you can deactivate the KEYLESS-
GO function of the key. The key will then use very
little power, thereby conserving battery power.
For the purposes of activation or deactivation,
the vehicle does not have to be nearby. 82
KeyOpening and closing
Page 88 of 397
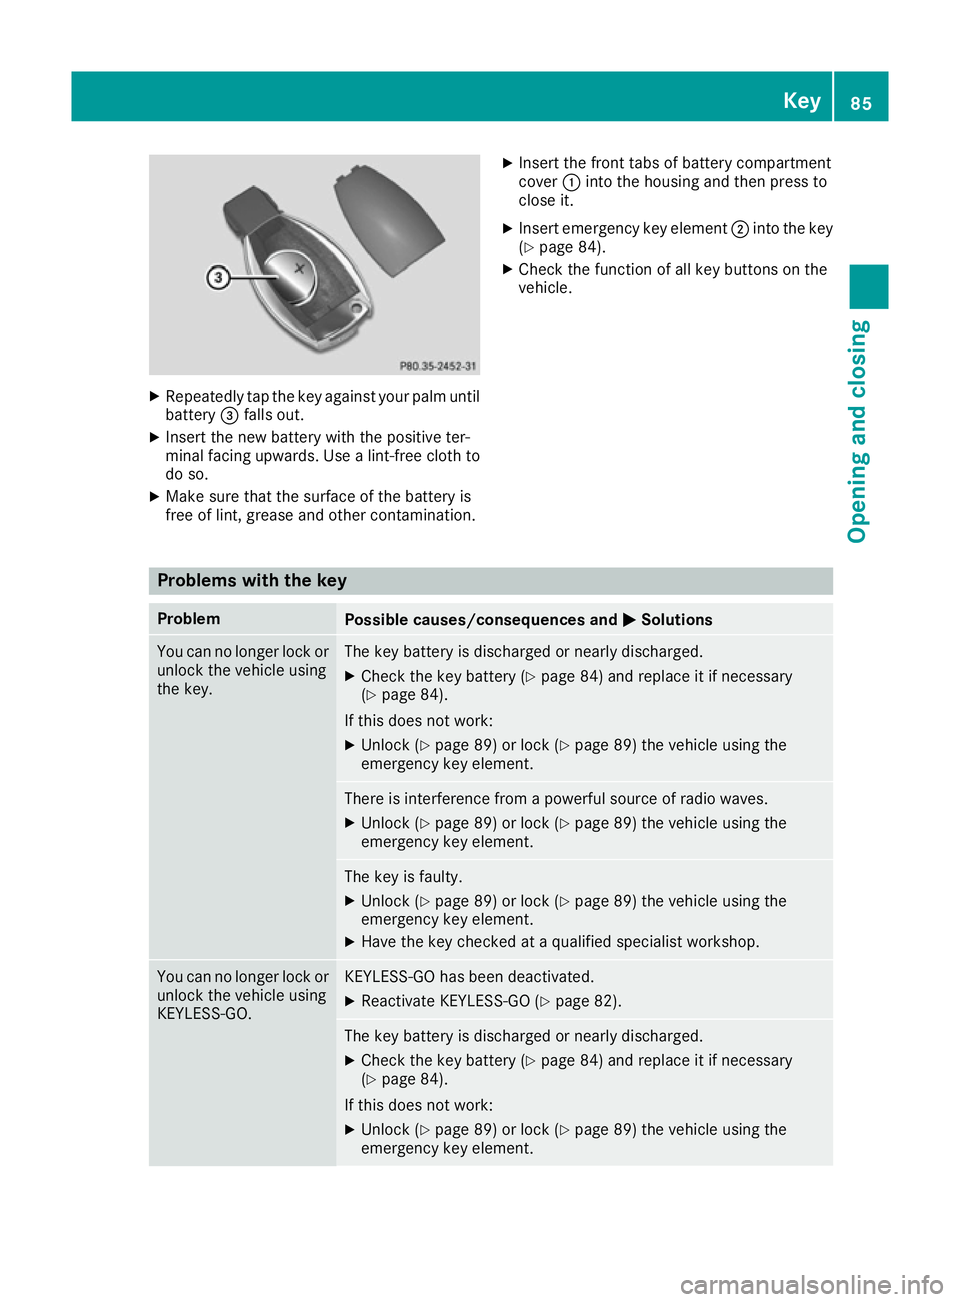
X
Repeatedly tap the key against your palm until
battery =falls out.
X Insert the new battery with the positive ter-
minal facing upwards. Use a lint-free cloth to
do so.
X Make sure that the surface of the battery is
free of lint, grease and other contamination. X
Insert the front tabs of battery compartment
cover :into the housing and then press to
close it.
X Insert emergency key element ;into the key
(Y page 84).
X Check the function of all key buttons on the
vehicle. Problems with the key
Problem
Possible causes/consequences and
M MSolutions You can no longer lock or
unlock the vehicle using
the key. The key battery is discharged or nearly discharged.
X Check the key battery (Y page 84) and replace it if necessary
(Y page 84).
If this does not work: X Unlock (Y page 89) or lock (Y page 89) the vehicle using the
emergency key element. There is interference from a powerful source of radio waves.
X Unlock (Y page 89) or lock (Y page 89) the vehicle using the
emergency key element. The key is faulty.
X Unlock (Y page 89) or lock (Y page 89) the vehicle using the
emergency key element.
X Have the key checked at a qualified specialist workshop. You can no longer lock or
unlock the vehicle using
KEYLESS-GO. KEYLESS-GO has been deactivated.
X Reactivate KEYLESS-GO (Y page 82). The key battery is discharged or nearly discharged.
X Check the key battery (Y page 84) and replace it if necessary
(Y page 84).
If this does not work: X Unlock (Y page 89) or lock (Y page 89) the vehicle using the
emergency key element. Key
85Opening and closing Z
Page 89 of 397
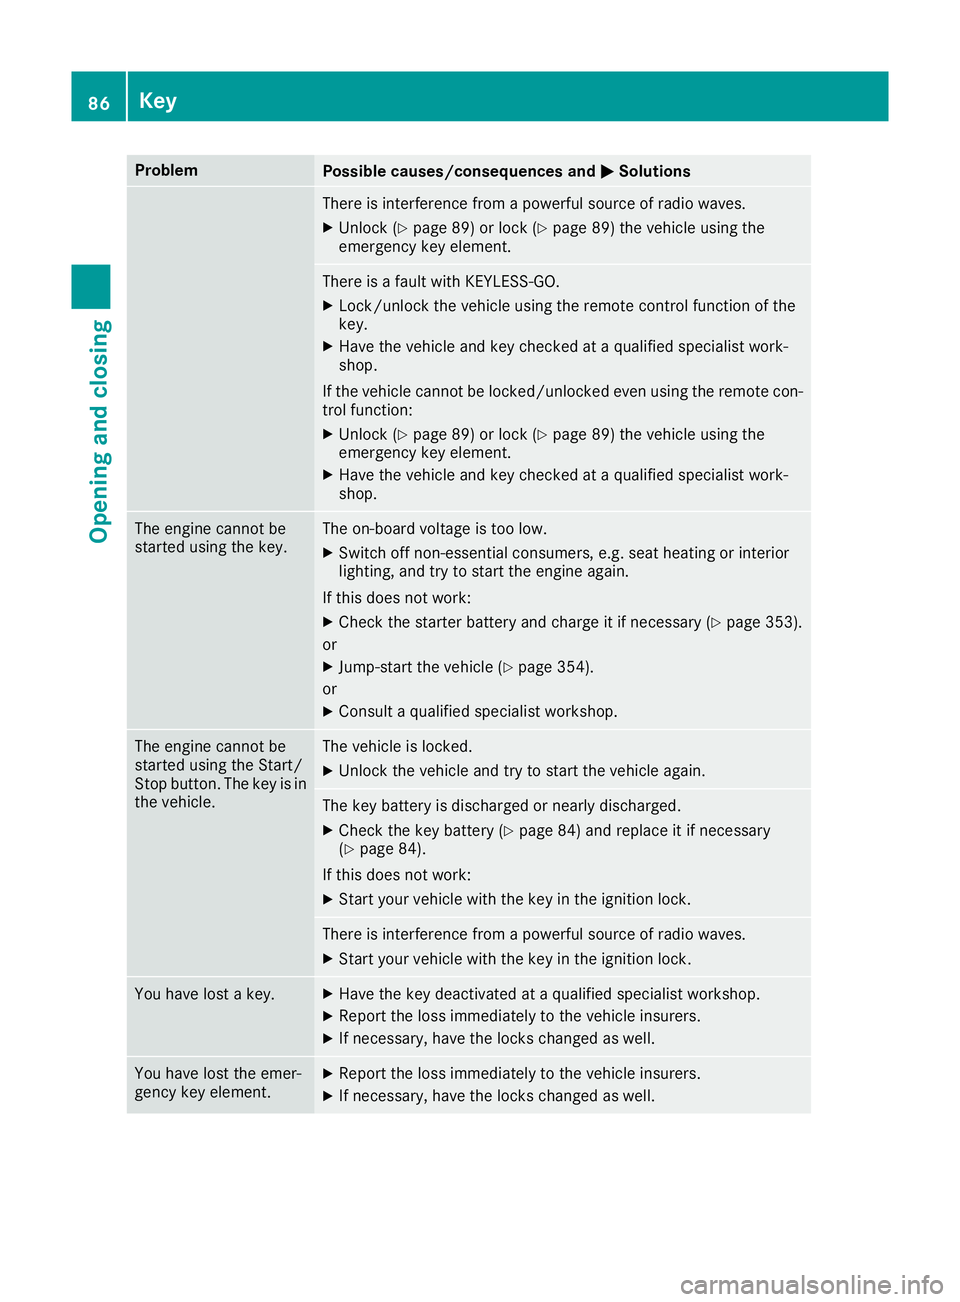
Problem
Possible causes/consequences and
M
MSolutions There is interference from a powerful source of radio waves.
X Unlock (Y page 89) or lock (Y page 89) the vehicle using the
emergency key element. There is a fault with KEYLESS-GO.
X Lock/unlock the vehicle using the remote control function of the
key.
X Have the vehicle and key checked at a qualified specialist work-
shop.
If the vehicle cannot be locked/unlocked even using the remote con-
trol function:
X Unlock (Y page 89) or lock (Y page 89) the vehicle using the
emergency key element.
X Have the vehicle and key checked at a qualified specialist work-
shop. The engine cannot be
started using the key. The on-board voltage is too low.
X Switch off non-essential consumers, e.g. seat heating or interior
lighting, and try to start the engine again.
If this does not work:
X Check the starter battery and charge it if necessary (Y page 353).
or X Jump-start the vehicle (Y page 354).
or X Consult a qualified specialist workshop. The engine cannot be
started using the Start/
Stop button. The key is in
the vehicle. The vehicle is locked.
X Unlock the vehicle and try to start the vehicle again. The key battery is discharged or nearly discharged.
X Check the key battery (Y page 84) and replace it if necessary
(Y page 84).
If this does not work: X Start your vehicle with the key in the ignition lock. There is interference from a powerful source of radio waves.
X Start your vehicle with the key in the ignition lock. You have lost a key. X
Have the key deactivated at a qualified specialist workshop.
X Report the loss immediately to the vehicle insurers.
X If necessary, have the locks changed as well. You have lost the emer-
gency key element. X
Report the loss immediately to the vehicle insurers.
X If necessary, have the locks changed as well. 86
KeyOpening and closing
Page 145 of 397
The remote control has a range of approximately
300 metres. This range is reduced by:
R sources of radio interference
R solid objects between the remote control and
the vehicle
R the remote control being in an unfavourable
position in relation to the vehicle
R transmitting from an enclosed space
If the remote control battery is low, the battery
symbol on the left of the display is shown as
empty. Replace the remote control battery and
observe the important safety notes when doing so (Y page 143).
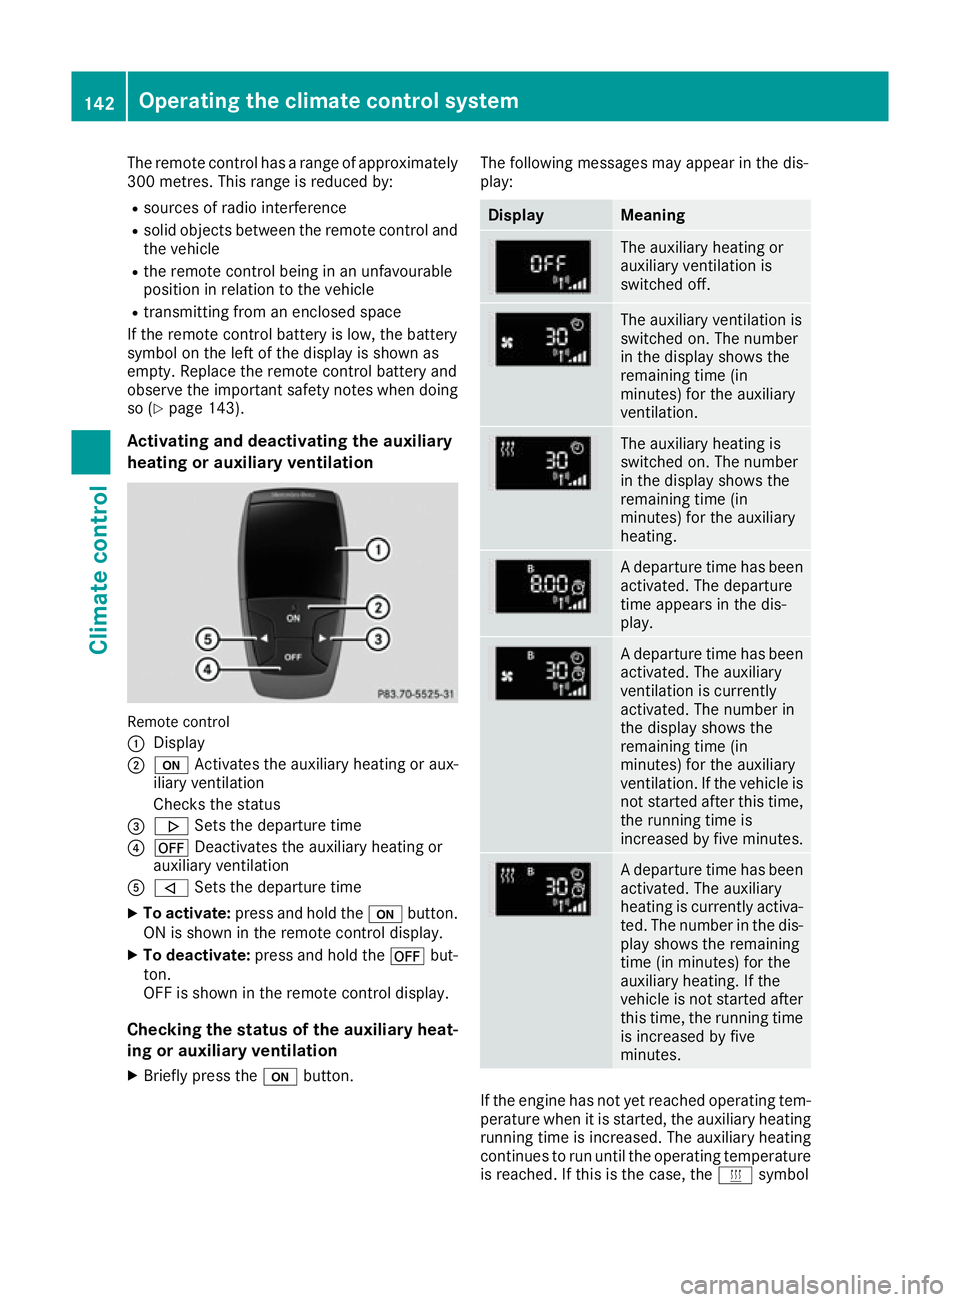
Activating and deactivating the auxiliary
heating or auxiliary ventilation Remote control
:
Display
; u Activates the auxiliary heating or aux-
iliary ventilation
Checks the status
= . Sets the departure time
? ^ Deactivates the auxiliary heating or
auxiliary ventilation
A , Sets the departure time
X To activate: press and hold the ubutton.
ON is shown in the remote control display.
X To deactivate: press and hold the ^but-
ton.
OFF is shown in the remote control display.
Checking the status of the auxiliary heat-
ing or auxiliary ventilation
X Briefly press the ubutton. The following messages may appear in the dis-
play: Display Meaning
The auxiliary heating or
auxiliary ventilation is
switched off.
The auxiliary ventilation is
switched on. The number
in the display shows the
remaining time (in
minutes) for the auxiliary
ventilation.
The auxiliary heating is
switched on. The number
in the display shows the
remaining time (in
minutes) for the auxiliary
heating.
A departure time has been
activated. The departure
time appears in the dis-
play. A departure time has been
activated. The auxiliary
ventilation is currently
activated. The number in
the display shows the
remaining time (in
minutes) for the auxiliary
ventilation. If the vehicle is
not started after this time, the running time is
increased by five minutes. A departure time has been
activated. The auxiliary
heating is currently activa-
ted. The number in the dis- play shows the remaining
time (in minutes) for the
auxiliary heating. If the
vehicle is not started after
this time, the running time is increased by five
minutes. If the engine has not yet reached operating tem-
perature when it is started, the auxiliary heating running time is increased. The auxiliary heating
continues to run until the operating temperature
is reached. If this is the case, the ysymbol 142
Operating the climate control systemClimate control