2016 MERCEDES-BENZ GLS SUV inflation pressure
[x] Cancel search: inflation pressurePage 26 of 397
Lights display messag
e.................. 270
Power supply ................................. 238
Problem (fault) ............................... 239
Trailer load s................................... 390
Transmission
see Automatic transmission
Transmission position display ......... 158
Transporting the vehicle .................. 358
Travelling uphill
Brow of hill ..................................... 180
Driving downhill ............................. 180
Maximum gradient-climbing capa-
bility ............................................... 180
Trim pieces (cleaning instruc-
tions) .................................................. 343
Trip computer (on-board com-
puter) .................................................. 244
Trip meter
Calling up ....................................... 244
Resetting (on-board computer) ...... 245
Turn signals
Replacing bulbs (front) ................... 128
Switching on/of f........................... 122
TV
Operating (on-board computer) ..... 248
see Separate operating instructions
Two-way radio
Frequencies ................................... 379
Installation ..................................... 379
Transmission output (maximum) .... 379
Type identification plate
see Vehicle identification plate
Tyre inflation compressor
see TIREFIT kit
Tyre pressure
Calling up (on-board computer) ..... 367
Display message ............................ 283
Not reached (TIREFIT) .................... 350
Reached (TIREFIT) .......................... 350
Recommended ............................... 364
Tyre pressure loss warning
General notes ................................ 366
Important safety notes .................. 366
Restarting ...................................... 366
Tyre pressure monitor
Checking the tyre pressure elec-
tronically ........................................ 367
Function/note s............................. 367 General notes ................................ 367
Important safety notes .................. 367
Radio type approval for the tyre
pressure monitor ........................... 369
Restarting ...................................... 368
Warning lamp ................................. 302
Warning message .......................... 368
Tyres
Changing a whee l.......................... 369
Checking ........................................ 361
Direction of rotation ...................... 370
Display message ............................ 283
Important safety notes .................. 361
Information on driving .................... 361
M+S tyres ...................................... 363
MOExtended tyre s......................... 363
Replacing ....................................... 369
Service life ..................................... 362
Snow chains .................................. 364
Storing ........................................... 370
Summer tyres in winter ................. 363
Tyre size (data ).............................. 374
Tyre tread ...................................... 362
Wheel and tyre combinations ........ 374
see Flat tyre U
Unlocking Emergency unlocking ....................... 89
From inside the vehicle (central
unlocking button) ............................. 88
Upshift indicator (on-board com-
puter, Mercedes-AMG vehicles) ....... 255
USB devices
Connecting to the Media Inter-
face ............................................... 311 V
Vanity mirror (in sun visor) .............. 322
Vehicle
Correct use ...................................... 31
Data acquisition ............................... 31
Display message ............................ 285
Electronics ..................................... 379
Equipment ....................................... 27
Implied warranty .............................. 31
Individual settings .......................... 251 Index
23
Page 350 of 397
X
Stop the vehicle as far away as possible from
traffic on solid, non-slippery and level ground.
X Switch on the hazard warning lamps.
X Safeguard the vehicle against rolling away
(Y page 168).
X If possible, bring the front wheels into the
straight-ahead position.
X Vehicles with the AIRMATIC package:
make sure that the normal vehicle level is
selected (Y page 198).
X Vehicles with the Off-Road Engineering
package:
make sure that the normal level is
selected (Y page 192).
X Switch off the engine.
X Vehicles without KEYLESS-GO: remove the
key from the ignition lock.
X Vehicles with KEYLESS-GO: open the driv-
er's door.
The on-board electronics now have status 0.
This is the same as the key having been
removed.
X Vehicles with KEYLESS-GO: remove the
Start/Stop button from the ignition lock
(Y page 148).
X Make sure that the passengers are not endan-
gered as they do so. Make sure that no one is
near the danger area while a wheel is being
changed. Anyone who is not directly assisting in the wheel change should, for example,
stand behind the barrier.
X Get out of the vehicle. Pay attention to traffic
conditions when doing so.
X Close the driver's door.
X Place the warning triangle at a suitable dis-
tance (Y page 345). Observe legal require-
ments.
X Unload heavy luggage.
i Only operate the tyre inflation compressor
using a 12 V socket, even if the ignition is
turned off (Y page 324).
An emergency cut-off ensures that the on-
board voltage does not drop too low. If the on-
board voltage is too low, the power to the
sockets is automatically cut. This ensures
that there is sufficient power to start the
engine. MOExtended tyres (tyres with run-flat
characteristics)
General notes With MOExtended tyres (tyres with run-flat char-
acteristics), you can continue to drive your vehi- cle even if there is a total loss of pressure in one
or more tyres. The affected tyre must not show
any clearly visible damage.
You can recognise MOExtended tyres by the
MOExtended marking which appears on the tyre wall. You will find this marking next to the tyre
size designation, the load-bearing capacity and
the speed index.
MOExtended tyres may only be used in conjunc-tion with an activated tyre pressure loss warning
system or tyre pressure monitor.
If a pressure loss warning message appears in the multifunction display:
R observe the instructions in the display mes-
sages (Y page 283)
R check the tyre for damage
R if driving on, observe the following notes
The driving distance possible in run-flat mode is
approximately 80 km when the vehicle is parti-
ally laden and approximately 30 km when the
vehicle is fully laden.
In addition to the vehicle load, the driving dis-
tance possible depends upon:
R vehicle speed
R road condition
R outside temperature
The driving distance possible in run-flat mode
may be reduced by extreme driving conditions/
manoeuvres, or it can be increased through a
moderate style of driving.
The driving distance possible in run-flat mode is counted from the moment the tyre pressure loss
warning appears in the multifunction display.
You must not exceed a maximum speed of
80 km/h.
i When replacing one or all tyres, observe the
following specifications for your vehicle's
tyres:
R size
R type and
R the "MOExtended" mark
If a tyre has gone flat and cannot be replaced
with an MOExtended tyre, a standard tyre Flat tyre
347Breakdown assistance
Page 351 of 397
may be used as a temporary measure. Make
sure that you use the proper size and type
(summer or winter tyres).
i Vehicles with MOExtended tyres are not
equipped with a TIREFIT kit at the factory. It is therefore recommended that you additionally
equip your vehicle with a TIREFIT kit if you fit
tyres that do not feature run-flat characteris-
tics, e.g. winter tyres. A TIREFIT kit can be
obtained from a qualified specialist work-
shop.
Important safety notes G
WARNING
When driving in emergency mode, the driving characteristics deteriorate, e.g. when corner-
ing, accelerating quickly and when braking.
There is a risk of accident.
Do not exceed the stated maximum speed.
Avoid abrupt steering and driving manoeu-
vres, and driving over obstacles (kerbs, pot-
holes, off-road). This applies in particular to a laden vehicle.
Stop driving in emergency mode if:
R you hear banging noises.
R the vehicle starts to shake.
R you see smoke and smell rubber.
R ESP ®
is intervening constantly.
R there are tears in the sidewalls of the tyre.
After driving in emergency mode, have the
wheel rims checked at a qualified specialist
workshop with regard to their further use. The
faulty tyre must be replaced. TIREFIT kit
Important safety notes TIREFIT is a tyre sealant.
You can use TIREFIT to seal punctures of up to
4 mm, particularly those in the tyre tread. You
can use TIREFIT at outside temperatures down
to
Ò20 †. G
WARNING
In the following situations, the tyre sealant is
unable to provide sufficient breakdown assis- tance, as it is unable to seal the tyre properly:
R there are cuts or punctures in the tyre
larger than those mentioned above.
R the wheel rim is damaged.
R you have driven at very low tyre pressures
or on a flat tyre.
There is a risk of an accident.
Do not drive any further. Contact a qualified
specialist workshop. G
WARNING
The tyre sealant is harmful and causes irrita-
tion. It must not come into contact with your
skin, eyes or clothing or be swallowed. Do not inhale TIREFIT fumes. Keep tyre sealant away
from children. There is a risk of injury.
If you come into contact with the tyre sealant,
observe the following:
R Rinse off the tyre sealant from your skin
immediately with water.
R If the tyre sealant comes into contact with
your eyes, immediately rinse them thor-
oughly with clean water.
R If tyre sealant is swallowed, immediately
rinse your mouth out thoroughly and drink
plenty of water. Do not induce vomiting,
and seek medical attention immediately.
R Immediately change out of clothing which
has come into contact with tyre sealant.
R If an allergic reaction occurs, seek medical
attention immediately.
! Do not operate the tyre inflation compres-
sor for longer than eight minutes at a time
without a break. It may otherwise overheat.
The tyre inflation compressor can be oper-
ated again once it has cooled down.
Comply with the manufacturer's safety instruc-
tions on the sticker on the tyre inflation com-
pressor. 348
Flat tyreBreakdown assistance
Page 352 of 397
Using the TIREFIT kit
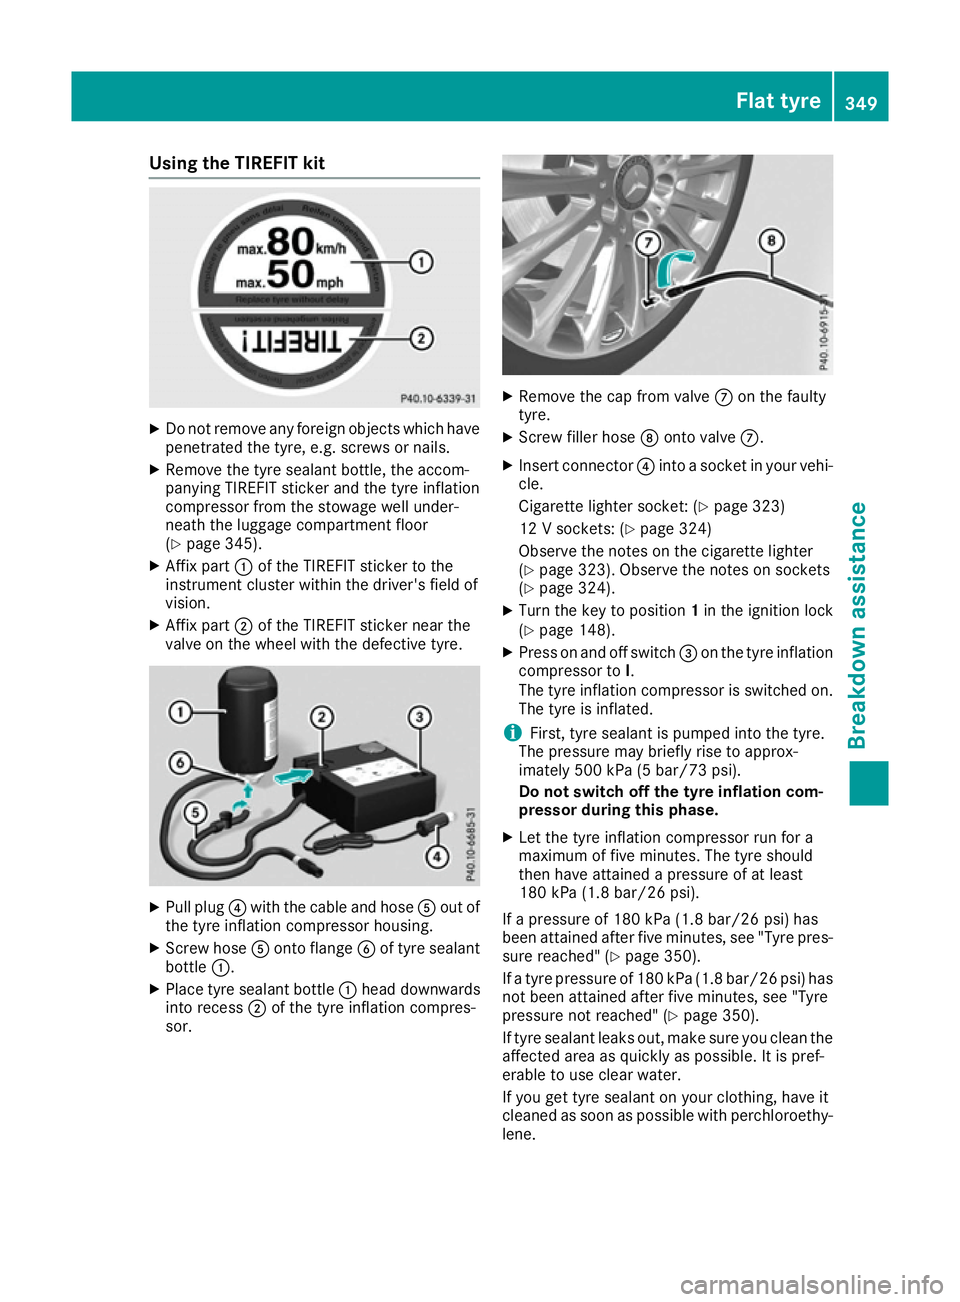
X
Do not remove any foreign objects which have
penetrated the tyre, e.g. screws or nails.
X Remove the tyre sealant bottle, the accom-
panying TIREFIT sticker and the tyre inflation
compressor from the stowage well under-
neath the luggage compartment floor
(Y page 345).
X Affix part :of the TIREFIT sticker to the
instrument cluster within the driver's field of
vision.
X Affix part ;of the TIREFIT sticker near the
valve on the wheel with the defective tyre. X
Pull plug ?with the cable and hose Aout of
the tyre inflation compressor housing.
X Screw hose Aonto flange Bof tyre sealant
bottle :.
X Place tyre sealant bottle :head downwards
into recess ;of the tyre inflation compres-
sor. X
Remove the cap from valve Con the faulty
tyre.
X Screw filler hose Donto valve C.
X Insert connector ?into a socket in your vehi-
cle.
Cigarette lighter socket: (Y page 323)
12 V sockets: (Y page 324)
Observe the notes on the cigarette lighter
(Y page 323). Observe the notes on sockets
(Y page 324).
X Turn the key to position 1in the ignition lock
(Y page 148).
X Press on and off switch =on the tyre inflation
compressor to I.
The tyre inflation compressor is switched on.
The tyre is inflated.
i First, tyre sealant is pumped into the tyre.
The pressure may briefly rise to approx-
imately 500 kPa (5 bar/73 psi).
Do not switch off the tyre inflation com-
pressor during this phase.
X Let the tyre inflation compressor run for a
maximum of five minutes. The tyre should
then have attained a pressure of at least
180 kPa (1.8 bar/26 psi).
If a pressure of 180 kPa (1.8 bar/26 psi) has
been attained after five minutes, see "Tyre pres-
sure reached" (Y page 350).
If a tyre pressure of 180 kPa (1.8 bar/26 psi) has not been attained after five minutes, see "Tyre
pressure not reached" (Y page 350).
If tyre sealant leaks out, make sure you clean the
affected area as quickly as possible. It is pref-
erable to use clear water.
If you get tyre sealant on your clothing, have it
cleaned as soon as possible with perchloroethy- lene. Flat tyre
349Breakdown assistance Z
Page 353 of 397
Tyre pressure not reached
If a pressure of 180 kPa (1.8 bar/26 psi) has not
been attained after five minutes:
X Switch off the tyre inflation compressor.
X Unscrew the filler hose from the valve of the
faulty tyre.
Please note that tyre sealant may leak out
when unscrewing the filler hose.
X Very slowly drive forwards or reverse approx-
imately 10 m.
X Pump up the tyre again.
After a maximum of five minutes the tyre
pressure must be at least 180 kPa (1.8 bar/
26 psi). G
WARNING
If the required tyre pressure is not reached
after the specified time, the tyre is too badly
damaged. The tyre sealant cannot repair the
tyre in this instance. Damaged tyres and a tyre pressure that is too low can significantly
impair the vehicle's braking and driving char-
acteristics. There is a risk of accident.
Do not continue driving. Contact a qualified
specialist workshop.
Tyre pressure reached G
WARNING
A tyre temporarily sealed with tyre sealant
impairs the driving characteristics and is not
suitable for higher speeds. There is a risk of
accident.
You should therefore adapt your driving style
accordingly and drive carefully. Do not exceed the specified maximum speed with a tyre that
has been repaired using tyre sealant.
The maximum permissible speed for a tyre
sealed with tyre sealant is 80 km/h. The upper
part of the TIREFIT sticker must be affixed to the
instrument cluster where it will be easily seen by
the driver.
! After use, excess tyre sealant may run out of
the filler hose. This could cause stains.
Therefore, place the filler hose in the plastic
bag which contained the TIREFIT kit. H
Environmental note
Have the used tyre sealant bottle disposed of professionally, e.g. at a qualified specialist
workshop.
If a tyre pressure of 180 kPa (1.8 bar/26 psi) has been attained after five minutes:
X Switch off the tyre inflation compressor.
X Unscrew the filler hose from the valve of the
faulty tyre.
X Stow the tyre sealant bottle, the tyre inflation
compressor and the warning triangle.
X Pull away immediately.
X Stop after driving for approximately ten
minutes and check the tyre pressure with the
tyre inflation compressor.
The tyre pressure must now be at least
130 kPa (1.3 bar/19 psi). G
WARNING
If the required tyre pressure is not reached
after driving for a short period, the tyre is too badly damaged. The tyre sealant cannot
repair the tyre in this instance. Damaged tyres and a tyre pressure that is too low can signif-
icantly impair the vehicle's braking and driv-
ing characteristics. There is a risk of accident.
Do not continue driving. Contact a qualified
specialist workshop.
i In your vehicle, you will find a sticker with
the Mercedes-Benz Service24h telephone
number, e.g. on the B-pillar on the driver's
side.
X Correct the tyre pressure if it is still at least
130 kPa (1.3 ba r/19 psi). See the tyre pres-
sure table on the fuel filler flap for values.
X To increase the tyre pressure: switch on
the tyre inflation compressor. 350
Flat tyreBreakdown assistance
Page 354 of 397
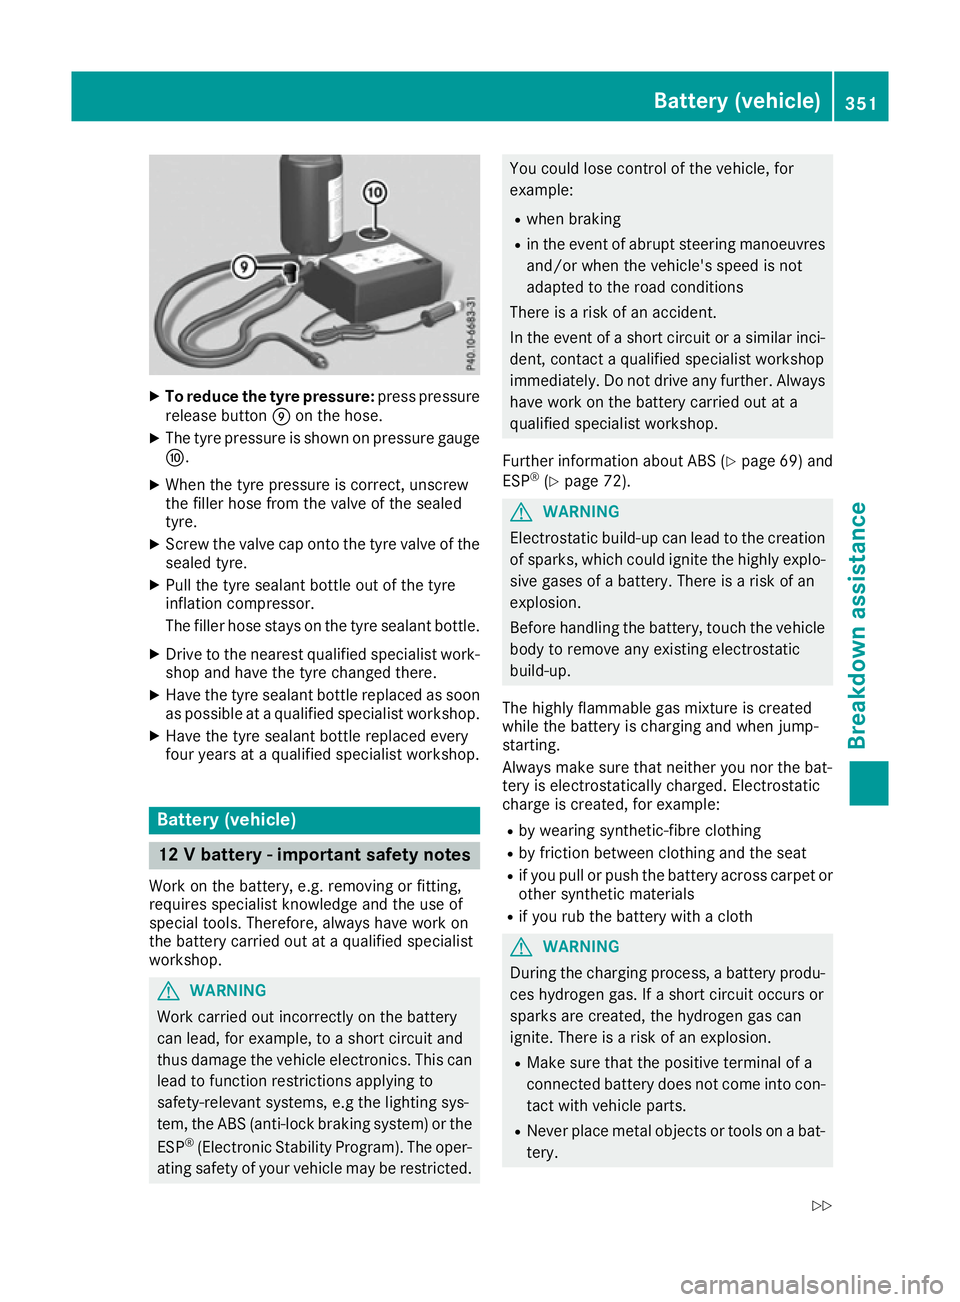
X
To reduce the tyre pressure: press pressure
release button Eon the hose.
X The tyre pressure is shown on pressure gauge
F.
X When the tyre pressure is correct, unscrew
the filler hose from the valve of the sealed
tyre.
X Screw the valve cap onto the tyre valve of the
sealed tyre.
X Pull the tyre sealant bottle out of the tyre
inflation compressor.
The filler hose stays on the tyre sealant bottle.
X Drive to the nearest qualified specialist work-
shop and have the tyre changed there.
X Have the tyre sealant bottle replaced as soon
as possible at a qualified specialist workshop.
X Have the tyre sealant bottle replaced every
four years at a qualified specialist workshop. Battery (vehicle)
12 V battery - important safety notes
Work on the battery, e.g. removing or fitting,
requires specialist knowledge and the use of
special tools. Therefore, always have work on
the battery carried out at a qualified specialist
workshop. G
WARNING
Work carried out incorrectly on the battery
can lead, for example, to a short circuit and
thus damage the vehicle electronics. This can lead to function restrictions applying to
safety-relevant systems, e.g the lighting sys-
tem, the ABS (anti-lock braking system) or the
ESP ®
(Electronic Stability Program). The oper-
ating safety of your vehicle may be restricted. You could lose control of the vehicle, for
example:
R when braking
R in the event of abrupt steering manoeuvres
and/or when the vehicle's speed is not
adapted to the road conditions
There is a risk of an accident.
In the event of a short circuit or a similar inci-
dent, contact a qualified specialist workshop
immediately. Do not drive any further. Always have work on the battery carried out at a
qualified specialist workshop.
Further information about ABS (Y page 69)and
ESP ®
(Y page 72). G
WARNING
Electrostatic build-up can lead to the creation of sparks, which could ignite the highly explo-
sive gases of a battery. There is a risk of an
explosion.
Before handling the battery, touch the vehicle body to remove any existing electrostatic
build-up.
The highly flammable gas mixture is created
while the battery is charging and when jump-
starting.
Always make sure that neither you nor the bat-
tery is electrostatically charged. Electrostatic
charge is created, for example: R by wearing synthetic-fibre clothing
R by friction between clothing and the seat
R if you pull or push the battery across carpet or
other synthetic materials
R if you rub the battery with a cloth G
WARNING
During the charging process, a battery produ- ces hydrogen gas. If a short circuit occurs or
sparks are created, the hydrogen gas can
ignite. There is a risk of an explosion.
R Make sure that the positive terminal of a
connected battery does not come into con-
tact with vehicle parts.
R Never place metal objects or tools on a bat-
tery. Battery (vehicle)
351Breakdown assis tance
Z
Page 364 of 397
Important safety notes
G
WARNING
If wheels and tyres of the wrong size are used, the wheel brakes or suspension components
may be damaged. There is a risk of an acci-
dent.
Always replace wheels and tyres with those
that fulfil the specifications of the original
part.
When replacing wheels, make sure to fit the
correct:
R designation
R type
When replacing tyres, make sure to fit the
correct:
R designation
R manufacturer
R type G
WARNING
A flat tyre severely impairs the driving, steer-
ing and braking characteristics of the vehicle.
There is a risk of accident.
Tyres without run-flat characteristics:
R do not drive with a flat tyre.
R immediately replace the flat tyre with your
emergency spare wheel or spare wheel, or
consult a qualified specialist workshop.
Tyres with run-flat characteristics:
R pay attention to the information and warn-
ing notices on MOExtended tyres (tyres
with run-flat characteristics).
Accessories that are not approved for your vehi-
cle by Mercedes-Benz or are not being used cor- rectly can impair operating safety.
Before purchasing and using non-approved
accessories, visit a qualified specialist work-
shop and enquire about:
R suitability
R legal stipulations
R factory recommendations Further information regarding wheels and tyres
can be found under "Wheel/tyre combinations"
(Y page 374).
You can ask for information regarding permitted
wheel/tyre combinations at a Mercedes-Benz
Service Centre.
Information on tyre pressure can be found:
R in the tyre pressure table in the fuel filler flap
R in the "Tyre pressure" section
Modification work on the brake system and
wheels is not permitted. The use of spacers or
brake dust shields is not permitted. This inva-
lidates the general operating permit for the vehi- cle.
i Further information on wheels and tyres can
be obtained at any qualified specialist work-
shop. Operation
Information on driving
Check the tyre pressures when the vehicle is
heavily laden and adjust prior to a trip.
While driving, pay attention to vibrations, noises
and unusual handling characteristics, e.g. pull-
ing to one side. This may indicate that the
wheels or tyres are damaged. If you suspect that a tyre is defective, reduce your speed immedi-
ately. Stop the vehicle as soon as possible to
check the wheels and tyres for damage. Hidden tyre damage could also be causing the unusual
handling characteristics. If you find no signs of
damage, have the tyres and wheels checked at a
qualified specialist workshop.
When parking your vehicle, make sure not to
squash the tyre sidewalls. If it is necessary to
drive over kerbs, speed humps or similar eleva- tions, try to do so slowly and at an obtuse angle.
Otherwise, the tyres, particularly the sidewalls,
may be damaged. Regular checking of wheels and tyres
G
WARNING
Damaged tyres can cause tyre inflation pres-
sure loss. As a result, you could lose control of your vehicle. There is a risk of accident. Operation
361Wheels and ty res
Z
Page 366 of 397
reduces the traction on wet roads (aquaplan-
ing).
R Replace the tyres after six years at the latest,
regardless of wear.
Observe the notes on the emergency spare
wheel (Y page 375). MOExtended tyres (tyres with run-flat
characteristics)
With MOExtended tyres (tyres with run-flat char-
acteristics), you can continue to drive your vehi- cle even if there is a total loss of pressure in one
or more tyres.
MOExtended tyres may only be used in conjunc- tion with an activated tyre pressure loss warning system or with an activated tyre pressure mon-
itor and on wheels specifically tested by
Mercedes-Benz.
Notes on driving with MOExtended tyres with a
flat tyre (Y page 347).
Vehicles with MOExtended tyres are not equip-
ped with a TIREFIT kit at the factory. It is there-
fore recommended that you additionally equip
your vehicle with a TIREFIT kit if you fit tyres that do not feature run-flat characteristics, e.g. win-
ter tyres. A TIREFIT kit can be obtained from a
qualified specialist workshop. Winter operation
General notes
Have your vehicle winterproofed at a qualified
specialist workshop at the onset of winter.
Observe the notes in the "Changing a wheel"
section (Y page 369). Driving with summer tyres
At temperatures below +7 †, summer tyres lose
elasticity and therefore traction and braking
power. Change the tyres on your vehicle to
M+S tyres. Using summer tyres at very cold
temperatures could cause tears to form,
thereby damaging the tyres permanently.
Mercedes-Benz cannot accept responsibility for
this type of damage. G
WARNING
Damaged tyres can cause tyre inflation pres-
sure loss. As a result, you could lose control of your vehicle. There is a risk of accident.
Check the tyres regularly for signs of damageand replace any damaged tyres immediately. M+S tyres
G
WARNING
M+S tyres with a tyre tread depth of less than 4 mm are not suitable for use in winter as they
do not provide sufficient traction. There is a
risk of accident.
M+S tyres with a tread depth of less than
4 mm must be replaced.
At temperatures below +7 †, use winter tyres or all-season tyres. Both types of tyre are identified
by the M+S marking.
Only winter tyres bearing the isnowflake
symbol in addition to the M+S marking provide
the best possible grip in wintry road conditions. Only these tyres will allow driving safety sys-
tems such as ABS and ESP ®
to function opti-
mally in winter. These tyres have been devel-
oped specifically for driving in snow.
Use M+S tyres of the same make and tread on all
wheels to maintain safe handling characteris-
tics.
Always observe the maximum permissible
speed specified for the M+S tyres you have fit-
ted.
If you fit M+S tyres that have a lower maximum
permissible speed than that of the maximum
design speed of the vehicle, affix a correspond- ing warning label in the driver's field of vision.
This can be obtained at a qualified specialist
workshop.
Under these circumstances, you should also
restrict the maximum design speed of the vehi- cle using the permanent limiter so that it does
not exceed the maximum permissible speed for
the M+S tyres (Y page 184). Winter operation
363Wheels and tyres Z