2016 MERCEDES-BENZ GLS SUV Media
[x] Cancel search: MediaPage 163 of 397
R
the vehicle pulling away more gently in
forward and reverse gears unless the accel-
erator pedal is depressed fully.
R the automatic transmission shifting up
sooner. This results in the vehicle being driven
at lower engine speeds and the wheels being less likely to spin.
Sport drive program The
Sport drive program has the following char-
acteristics:
R sporty engine and transmission settings.
R the automatic transmission shifting up later.
As a result of the later automatic transmission
shift points, the fuel consumption possibly
being higher.
R the suspension exhibits sporty damping (vehi-
cles with AIRMATIC).
Drive program Sport Plus (Mercedes-
AMG vehicles) The
Sport Plus drive program has the following
characteristics:
R the vehicle exhibits particularly sporty driving
characteristics.
R the vehicle pulling away in first gear.
R the automatic transmission shifting up later.
As a result of the later automatic transmission
shift points, the fuel consumption possibly
being higher.
R the suspension exhibits particularly firm
springing and damping settings (vehicles with
AIRMATIC).
R the ECO start/stop function is deactivated, it
can, however, be activated again using the
ECO button (Y page 153).
Individual drive program In the
Individual drive program, the following
properties of the drive program can be selected:
R the drive (engine and transmission manage-
ment)
R the transmission
R the suspension
R all vehicles (except Mercedes-AMG vehicles):
the steering
R all vehicles (except Mercedes-AMG vehicles):
availability of the ECO start/stop function To select the gears in the
Individualdrive pro-
gram permanently using the steering wheel pad- dles, select the permanent manual gearshift
program.
Information about configuring the Individual
drive program with the multimedia system can
be found in the Digital Owner's Manual. Manual gearshifting
General notes You can shift gears yourself using the steering
wheel gearshift paddles. The transmission must
be in position Dto do this.
Depending on which steering wheel gearshift
paddle is pulled, the automatic transmission
immediately shifts into the next gear up or
down, if permitted.
To use manual shifting, you have two options:
R temporary setting
R permanent setting
If you activate manual gearshifting, the multi-
function display will show the current gear
instead of transmission position D.
If manual gearshifting is deactivated, the gears
will be selected automatically.
Temporary setting X
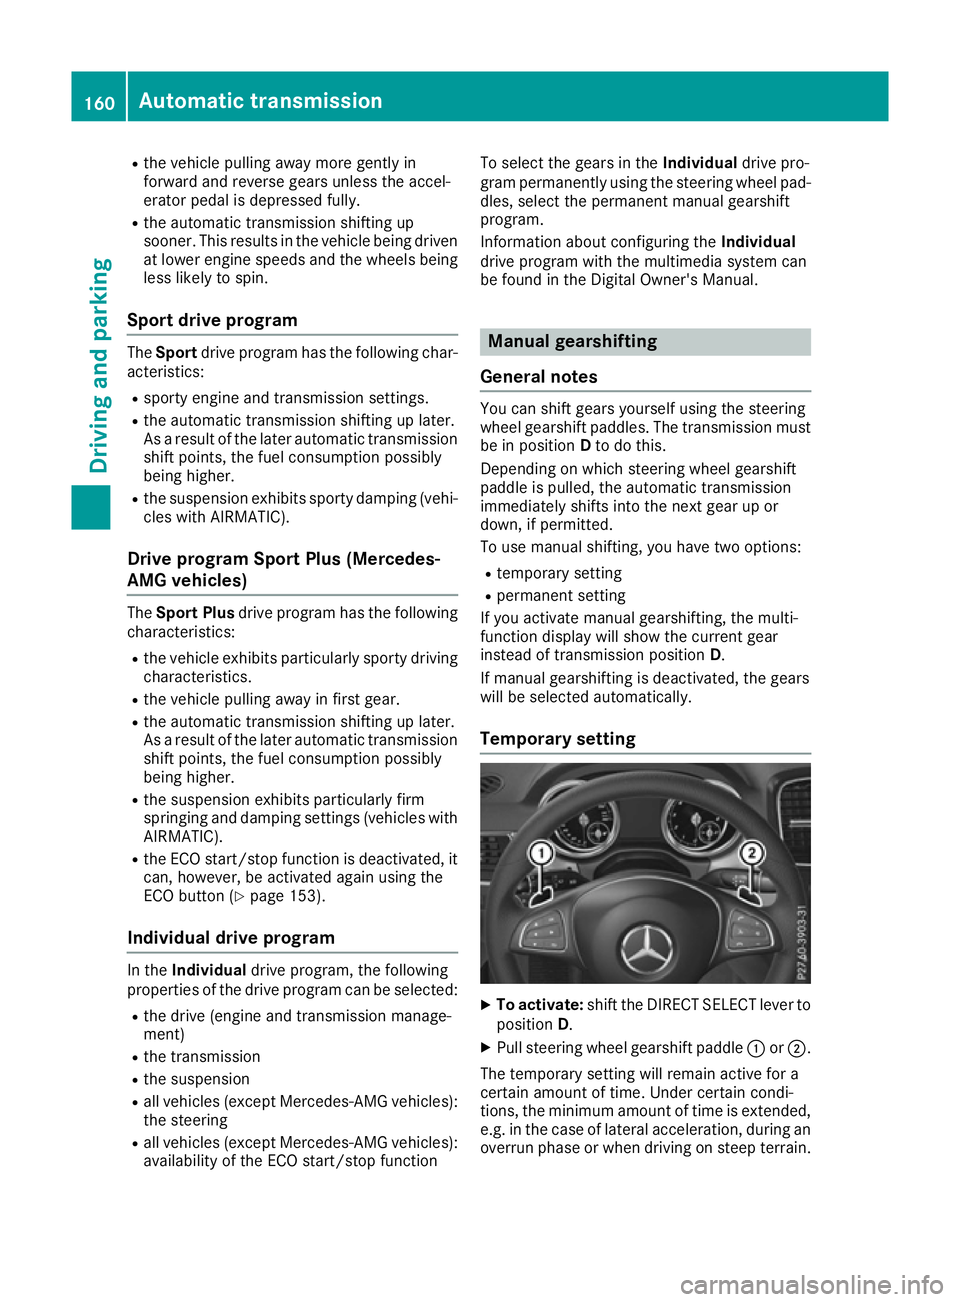
To activate: shift the DIRECT SELECT lever to
position D.
X Pull steering wheel gearshift paddle :or;.
The temporary setting will remain active for a
certain amount of time. Under certain condi-
tions, the minimum amount of time is extended, e.g. in the case of lateral acceleration, during an overrun phase or when driving on steep terrain. 160
Automatic transmissionDriving an
d parking
Page 166 of 397
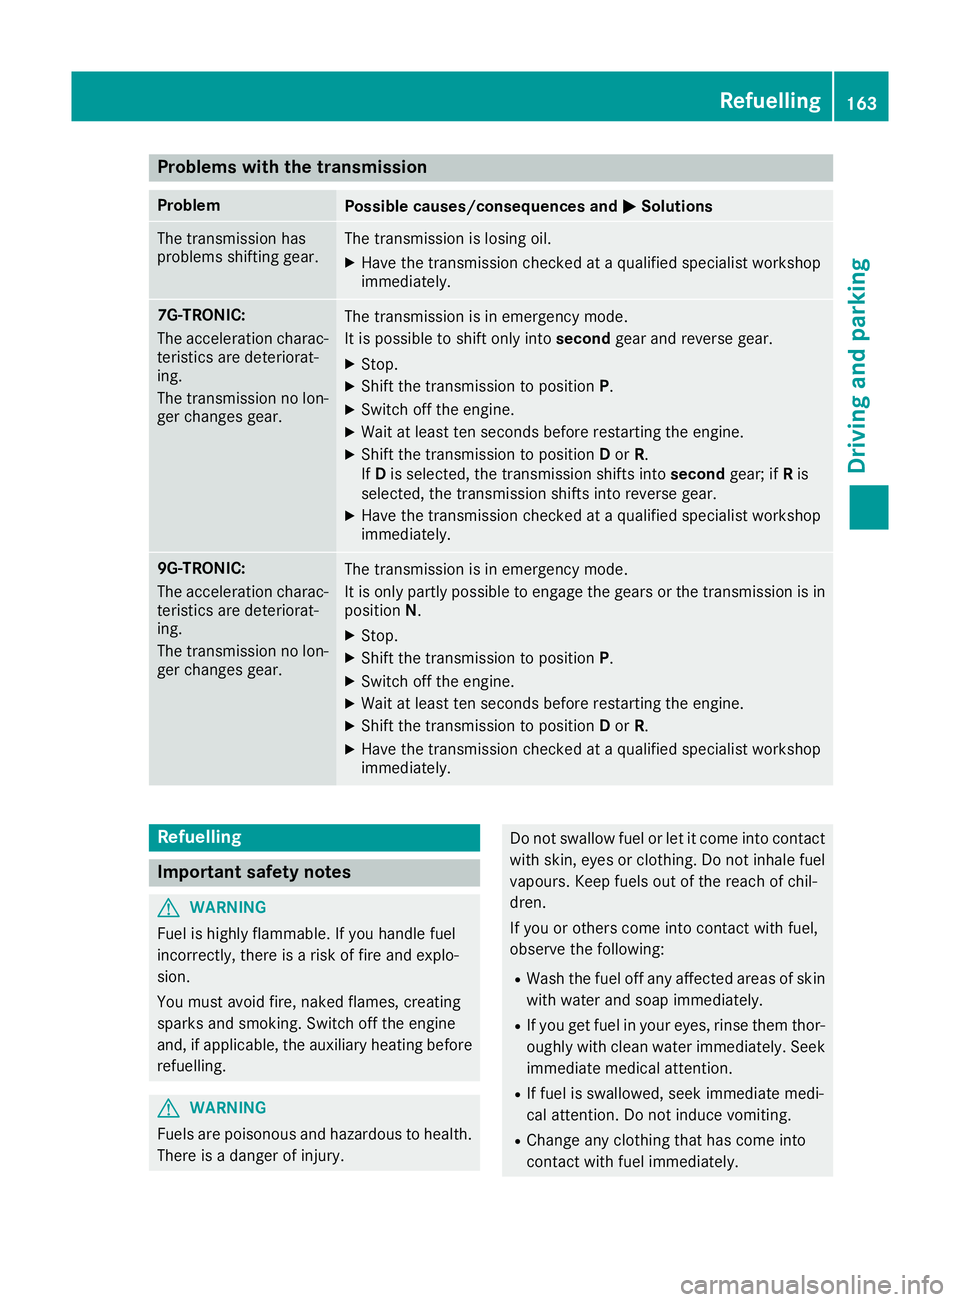
Problems with the transmission
Problem
Possible causes/consequences and
M
MSolutions The transmission has
problems shifting gear. The transmission is losing oil.
X Have the transmission checked at a qualified specialist workshop
immediately. 7G-TRONIC:
The acceleration charac-
teristics are deteriorat-
ing.
The transmission no lon-
ger changes gear. The transmission is in emergency mode.
It is possible to shift only into
secondgear and reverse gear.
X Stop.
X Shift the transmission to position P.
X Switch off the engine.
X Wait at least ten seconds before restarting the engine.
X Shift the transmission to position Dor R.
If D is selected, the transmission shifts into secondgear; ifRis
selected, the transmission shifts into reverse gear.
X Have the transmission checked at a qualified specialist workshop
immediately. 9G-TRONIC:
The acceleration charac-
teristics are deteriorat-
ing.
The transmission no lon-
ger changes gear. The transmission is in emergency mode.
It is only partly possible to engage the gears or the transmission is in
position N.
X Stop.
X Shift the transmission to position P.
X Switch off the engine.
X Wait at least ten seconds before restarting the engine.
X Shift the transmission to position Dor R.
X Have the transmission checked at a qualified specialist workshop
immediately. Refuelling
Important safety notes
G
WARNING
Fuel is highly flammable. If you handle fuel
incorrectly, there is a risk of fire and explo-
sion.
You must avoid fire, naked flames, creating
sparks and smoking. Switch off the engine
and, if applicable, the auxiliary heating before refuelling. G
WARNING
Fuels are poisonous and hazardous to health. There is a danger of injury. Do not swallow fuel or let it come into contact
with skin, eyes or clothing. Do not inhale fuel
vapours. Keep fuels out of the reach of chil-
dren.
If you or others come into contact with fuel,
observe the following:
R Wash the fuel off any affected areas of skin
with water and soap immediately.
R If you get fuel in your eyes, rinse them thor-
oughly with clean water immediately. Seek
immediate medical attention.
R If fuel is swallowed, seek immediate medi-
cal attention. Do not induce vomiting.
R Change any clothing that has come into
contact with fuel immediately. Refuelling
163Driving and parking Z
Page 169 of 397
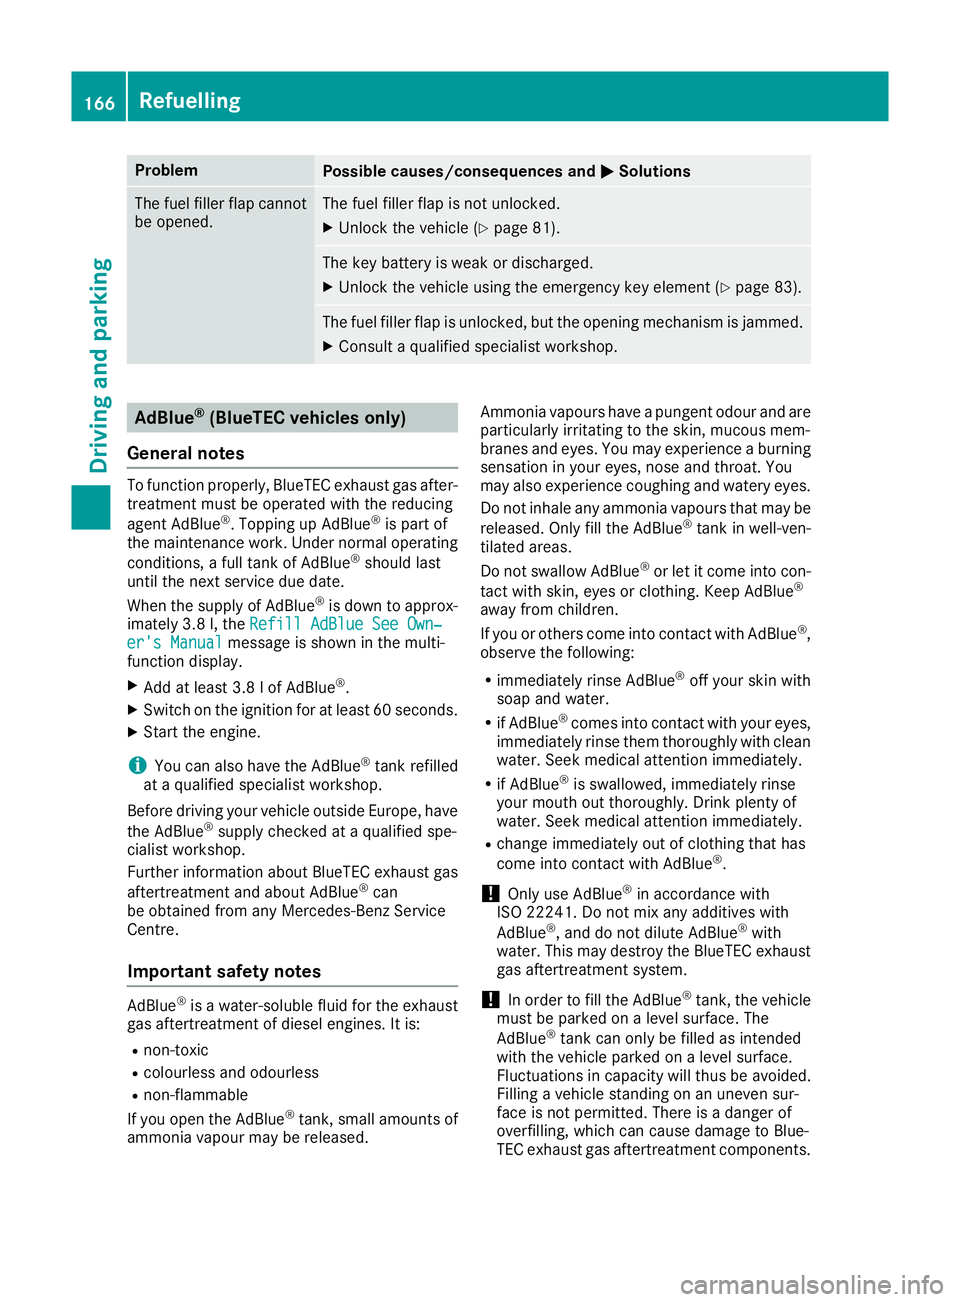
Problem
Possible causes/consequences and
M
MSolutions The fuel filler flap cannot
be opened. The fuel filler flap is not unlocked.
X Unlock the vehicle (Y page 81). The key battery is weak or discharged.
X Unlock the vehicle using the emergency key element (Y page 83).The fuel filler flap is unlocked, but the opening mechanism is jammed.
X Consult a qualified specialist workshop. AdBlue
®
(BlueTEC vehicles only)
General notes To function properly, BlueTEC exhaust gas after-
treatment must be operated with the reducing
agent AdBlue ®
. Topping up AdBlue ®
is part of
the maintenance work. Under normal operating
conditions, a full tank of AdBlue ®
should last
until the next service due date.
When the supply of AdBlue ®
is down to approx-
imately 3.8 l, the Refill AdBlue See Own‐ Refill AdBlue See Own‐
er's Manual er's Manual message is shown in the multi-
function display.
X Add at least 3.8 lof AdBlue ®
.
X Switch on the ignition for at least 60 seconds.
X Start the engine.
i You can also have the AdBlue ®
tank refilled
at a qualified specialist workshop.
Before driving your vehicle outside Europe, have
the AdBlue ®
supply checked at a qualified spe-
cialist workshop.
Further information about BlueTEC exhaust gas
aftertreatment and about AdBlue ®
can
be obtained from any Mercedes-Benz Service
Centre.
Important safety notes AdBlue
®
is a water-soluble fluid for the exhaust
gas aftertreatment of diesel engines. It is:
R non-toxic
R colourless and odourless
R non-flammable
If you open the AdBlue ®
tank, small amounts of
ammonia vapour may be released. Ammonia vapours have a pungent odour and are
particularly irritating to the skin, mucous mem-
branes and eyes. You may experience a burning sensation in your eyes, nose and throat. You
may also experience coughing and watery eyes.
Do not inhale any ammonia vapours that may be
released. Only fill the AdBlue ®
tank in well-ven-
tilated areas.
Do not swallow AdBlue ®
or let it come into con-
tact with skin, eyes or clothing. Keep AdBlue ®
away from children.
If you or others come into contact with AdBlue ®
,
observe the following:
R immediately rinse AdBlue ®
off your skin with
soap and water.
R if AdBlue ®
comes into contact with your eyes,
immediately rinse them thoroughly with clean water. Seek medical attention immediately.
R if AdBlue ®
is swallowed, immediately rinse
your mouth out thoroughly. Drink plenty of
water. Seek medical attention immediately.
R change immediately out of clothing that has
come into contact with AdBlue ®
.
! Only use AdBlue ®
in accordance with
ISO 22241. Do not mix any additives with
AdBlue ®
, and do not dilute AdBlue ®
with
water. This may destroy the BlueTEC exhaust
gas aftertreatment system.
! In order to fill the AdBlue ®
tank, the vehicle
must be parked on a level surface. The
AdBlue ®
tank can only be filled as intended
with the vehicle parked on a level surface.
Fluctuations in capacity will thus be avoided.
Filling a vehicle standing on an uneven sur-
face is not permitted. There is a danger of
overfilling, which can cause damage to Blue-
TEC exhaust gas aftertreatment components. 166
RefuellingDriving and parking
Page 170 of 397
!
Surfaces which have come into contact with
AdBlue ®
while refilling should be rinsed
immediately with water, or remove AdBlue ®
with a moist cloth and cold water. If AdBlue ®
has already crystallised, use a sponge and
cold water to clean the area. AdBlue ®
residue
crystallises after a certain amount of time and soils the affected surfaces.
! AdBlue ®
is not a fuel additive and must not
be added to the fuel tank. If AdBlue ®
is added
to the fuel tank, this can lead to engine dam-
age.
Have the AdBlue ®
tank refilled at a qualified
specialist workshop. However, you can also top
up the AdBlue ®
tank:
R at a filling station with an AdBlue ®
filling pump
R with AdBlue ®
refill bottles
R with an AdBlue ®
refill canister
When the pump nozzle switches off automati-
cally during filling at a filling pump, the AdBlue ®
tank has been completely filled. Do not fill the
AdBlue ®
tank any further. AdBlue ®
may leak
out.
To avoid transporting already opened refill con-
tainers in the vehicle, completely empty refill
bottles or canisters when filling the AdBlue ®
tank, if possible.
Further information on AdBlue ®
(Y page 384).
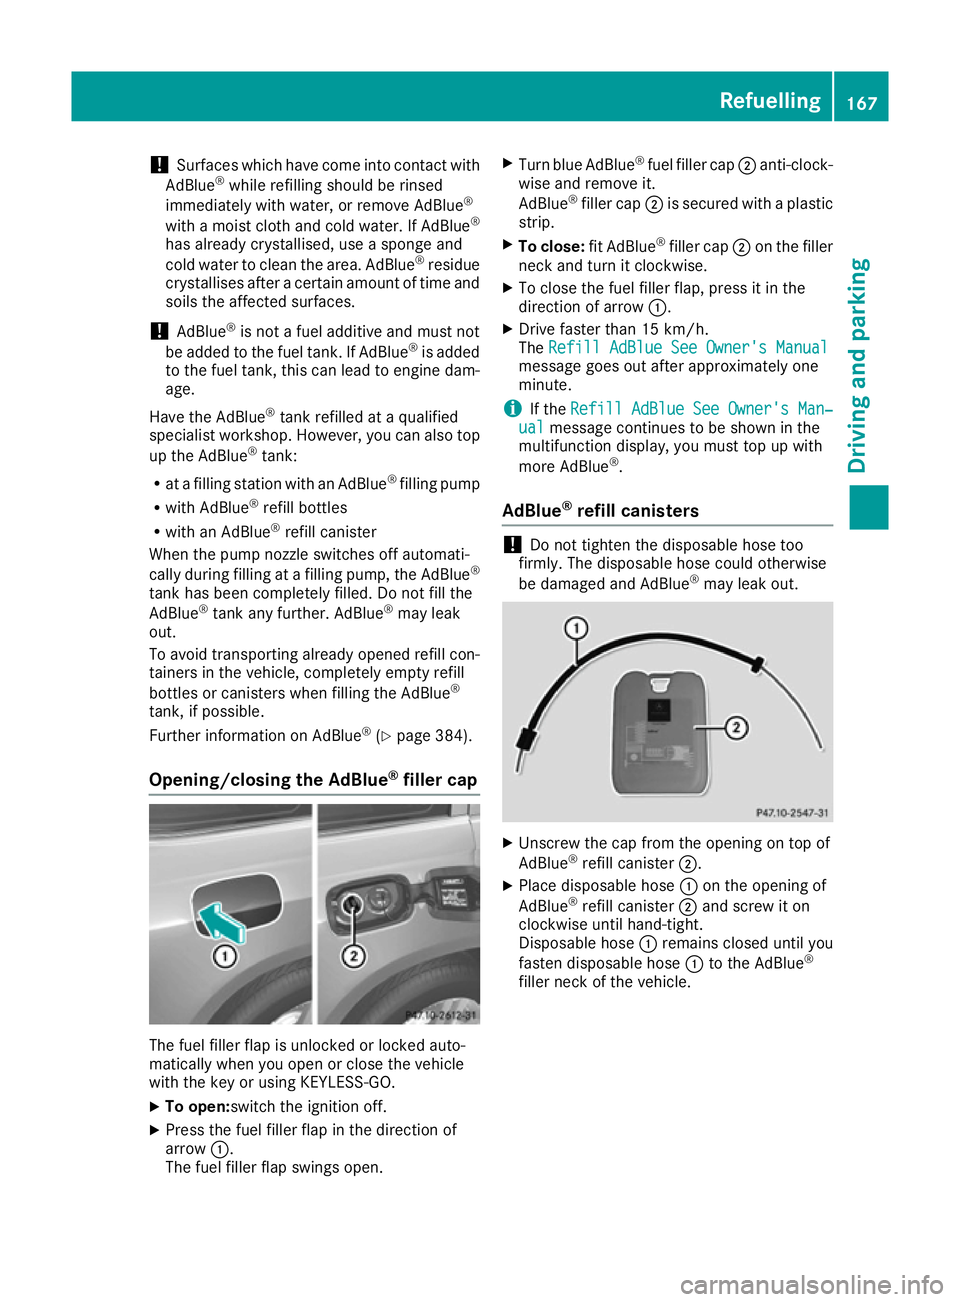
Opening/closing the AdBlue ®
filler cap The fuel filler flap is unlocked or locked auto-
matically when you open or close the vehicle
with the key or using KEYLESS-GO.
X To open:switch the ignition off.
X Press the fuel filler flap in the direction of
arrow :.
The fuel filler flap swings open. X
Turn blue AdBlue ®
fuel filler cap ;anti-clock-
wise and remove it.
AdBlue ®
filler cap ;is secured with a plastic
strip.
X To close: fit AdBlue®
filler cap ;on the filler
neck and turn it clockwise.
X To close the fuel filler flap, press it in the
direction of arrow :.
X Drive faster than 15 km/h.
The Refill AdBlue See Owner's Manual Refill AdBlue See Owner's Manual
message goes out after approximately one
minute.
i If the
Refill AdBlue See Owner's Man‐ Refill AdBlue See Owner's Man‐
ual
ual message continues to be shown in the
multifunction display, you must top up with
more AdBlue ®
.
AdBlue ®
refill canisters !
Do not tighten the disposable hose too
firmly. The disposable hose could otherwise
be damaged and AdBlue ®
may leak out. X
Unscrew the cap from the opening on top of
AdBlue ®
refill canister ;.
X Place disposable hose :on the opening of
AdBlue ®
refill canister ;and screw it on
clockwise until hand-tight.
Disposable hose :remains closed until you
fasten disposable hose :to the AdBlue ®
filler neck of the vehicle. Refuelling
167Driving and parking Z
Page 177 of 397
Use the left-hand gearshift paddle to shift to a
lower gear on long and steep downhill gradients.
Take particular note of this when driving a laden vehicle.
This also applies if you have activated cruise
control, the speed limiter or Distance Pilot
DISTRONIC.
This will use the braking effect of the engine, so
less braking will be required to maintain the
vehicle speed. This relieves the load on the
brake system and prevents the brakes from
overheating and wearing too quickly.
Heavy and light loads G
WARNING
The braking system can overheat if you leave your foot on the brake pedal while driving.
This increases the braking distance and could
even cause the braking system to fail. There is
a risk of an accident.
Never use the brake pedal as a footrest. Do
not simultaneously depress both the brake
pedal and the accelerator pedal while driving.
! Depressing the brake pedal constantly
results in excessive and premature wear to
the brake pads.
If heavy demands are made on the brakes, do
not park the vehicle immediately. Drive on for a
short while. This allows the airflow to cool the
brakes more quickly.
If the brakes have been used only moderately,
you should occasionally test their effectiveness.
To do this, brake more firmly from a higher
speed. This improves the grip of the brakes.
Wet road surfaces If you have driven for a long time in heavy rain
without braking, there may be a delayed reac-
tion from the brakes when braking for the first
time. This may also occur after a car wash or
after driving through deep water.
You will have to depress the brake pedal more
firmly. Maintain a greater distance to the vehicle in front.
After driving on a wet road or having the vehicle
washed, brake firmly while paying attention to
the traffic conditions. This will warm up the
brake discs, thereby drying them more quickly
and protecting them against corrosion. Limited braking performance on salt-
treated roads If you drive on salt-treated roads, a layer of salt
may form on the brake discs and pads. This can increase the braking distance considerably.
R Apply the brakes occasionally in order to pre-
vent any salt build-up. Ensure that you do not
endanger other road users when doing so.
R Carefully depress the brake pedal at the end
of the journey and when starting the next
journey.
R Maintain a much greater distance to the vehi-
cle in front.
New brake pads/linings Brake pads/linings and discs that are either new
or have been replaced only achieve optimum
braking effect after several hundred kilometres
of driving. Compensate for the reduced braking
effect by applying greater force to the brake
pedal.
For safety reasons, Mercedes-Benz recom-
mends that you only have brake pads/linings
fitted to your vehicle which have been approved
for Mercedes-Benz vehicles or which corre-
spond to an equivalent quality standard. Brake
pads/linings which have not been approved for Mercedes-Benz vehicles or which are not of an
equivalent quality could affect your vehicle's
operating safety.
High-performance brake system
(Mercedes-AMG vehicles) The high-performance brake system is designed
for high loads. This may lead to noise when
braking. This is dependent on:
R speed
R braking force
R environmental conditions, such as tempera-
ture and humidity
The wear of individual brake system compo-
nents such as the brake pads/linings or brake
discs depends on individual driving style and
operating conditions.
For this reason, it is impossible to state a mile-
age (service life) that will be valid under all cir-
cumstances. An aggressive driving style will
lead to high wear. You can obtain further infor-
mation about this from your Mercedes-Benz
Service Centre. 174
Driving tipsDriving and parking
Page 180 of 397
twigs can gather between the underbody and
the underbody panelling. If these materials
come in contact with hot parts of the exhaust
system, they can catch fire.
In such situations, have the vehicle checked
and repaired immediately at a qualified spe-
cialist workshop. If on continuing your jour-
ney you notice that driving safety is impaired, pull over and stop the vehicle immediately,
paying attention to road and traffic condi-
tions. In such cases, consult a qualified spe-
cialist workshop.
When driving off-road, substances such as sand,
mud and water or water mixed with oil may get
into the brakes. This may lead to a reduction in
braking performance or total brake failure as a
result of increased wear. The braking charac-
teristics will vary depending on the substances
that get into the brakes. Clean the brakes after
driving off-road. If you notice grinding noises or a reduction in braking performance, have the
brake system checked at a qualified specialist
workshop immediately. Adapt your driving style
to the altered braking characteristics.
Driving off-road increases the possibility of dam- age to the vehicle, which may cause assemblies
or systems to fail. Adapt your driving style to the conditions of the terrain. Drive carefully. Have
vehicle damage rectified immediately at a quali-
fied specialist workshop.
Do not shift into transmission position Nwhen
driving off-road. You could lose control of the
vehicle if you attempt to brake the vehicle using
the service brake. If the gradient is too steep for your vehicle, back up in reverse gear.
General notes H
Environmental note
Protection of the environment is of primary
importance. Treat nature with respect.
Observe all prohibiting signs.
Read this section before driving your vehicle off- road. Practise by driving over more gentle off-
road terrain first. The following driving systems are specially
adapted to off-road driving:
R the Offroad drive program (vehicles without
Off-Road Engineering package)
(Y page 228)
R Offroad andOffroad Plus drive programs
(vehicles with Off-Road Engineering package) (Y page 229)
R LOW RANGE offroad gear (vehicles with the
Off-Road Engineering package)
(Y page 230)
R Differential lock (vehicles with the Off-Road
Engineering package) (Y page 230)
R Off-road ABS (Y page 69)
R Off-road 4ETS (Y page 72)
R Off-road ESP ®
(Y page 74)
R AIRMATIC package (vehicle level)
(Y page 196)
R DSR (Downhill Speed Regulation)
(Y page 227)
Observe the following notes:
R Stop the vehicle before driving off-road. If
necessary, select the offroad program
(Y page 229) or shift to the LOW RANGE off-
road gear (Y page 230).
R Select a vehicle level suitable for the off-road
terrain. To avoid damaging the vehicle, ensure
sufficient ground clearance at all times.
R Make sure that items of luggage and loads are
stowed safely and are well secured
(Y page 316).
R Always keep the engine running and in gear
when driving on a downhill gradient. Activate
DSR (Y page 227).
R Drive slowly and evenly, if necessary at walk-
ing pace.
R Ensure that the wheels are in contact with the
ground at all times.
R Drive with extreme care on unknown off-road
routes where visibility is poor. For safety rea-
sons, get out of the vehicle first and survey
the off-road route.
R Look out for obstacles such as rocks, holes,
tree stumps and furrows.
R Take care when turning on an uphill or down-
hill slope or when driving across a slope. The
vehicle could otherwise tip over.
R Always keep the doors, the tailgate and the
sliding sunroof closed while the vehicle is in
motion. Driving
tips
177Driving an d parking Z
Page 181 of 397
R
Do not stray from marked routes or paths.
R Observe the notes on off-road fording
(Y page 175).
i Information about retrofitting special all-ter-
rain tyres is available from any qualified spe-
cialist workshop.
i Do not use the HOLD function when driving
off-road, on steep uphill or downhill gradients or on slippery or loose surfaces. The HOLD
function cannot hold the vehicle on such sur- faces.
Checklist before off-road driving X
Engine oil level: check the engine oil and top
it up if necessary.
When driving on steep gradients, the oil level must be sufficiently high to ensure a correct
oil supply in the vehicle.
X AdBlue ®
tank (BlueTEC vehicles): check the
level and top up if necessary (Y page 166).
X Tyre-change tool kit: check that the jack is
working and make sure that the wheel
wrench, a robust tow cable and a folding
spade are in the vehicle.
X Wheels and tyres: check the tyre tread
depth and tyre pressure.
X Check for damage and remove any foreign
objects, e.g. small stones, from the wheels/
tyres.
X Replace any missing valve caps.
X Replace dented or damaged wheels.
X Wheels: dented or bent wheels can lead to a
loss of tyre pressure and damage to the tyre
bead. Before driving off-road, check the
wheels and replace them if necessary.
Checklist after off-road driving !
If you detect damage to the vehicle after
driving off-road, have the vehicle checked
immediately at a qualified specialist work-
shop.
Driving over rough terrain places greater
demands on your vehicle than driving on normal
roads. After driving off-road, check the vehicle.
This allows you to detect damage promptly and reduce the risk of an accident to yourself and
other road users.
X If the Off-road orOff-road Plus drive pro-
gram is selected: select the Individual,Sport,
Comfort orSlippery drive program
(Y page 155).
X Deactivate the LOW RANGE offroad gear
(Y page 230).
X Deactivate DSR (Y page 227).
X Lower the vehicle level again to a level suita-
ble to the road conditions, e.g. to the normal
level.
X Clean the headlamps and rear lights and
check for damage.
X Clean the front and rear licence plates.
X Clean the wheels and tyres with a water jet
and remove any foreign objects.
X Clean the wheels, wheel arches and the vehi-
cle underside with a water jet; check for any
foreign objects and damage.
X Check whether twigs or other parts of plants
have become trapped. These increase the risk
of fire and can damage fuel pipes, brake
hoses or the rubber bellows of the axle joints
and propeller shafts.
X After the trip, examine without fail the entire
undercarriage, wheels, tyres, brakes, body-
work structure, steering, chassis and exhaust
system for damage.
X After driving for extended periods across
sand, mud, gravel, water or in similarly dirty
conditions, have the brake discs, wheels,
brake pads/linings and axle joints checked
and cleaned.
X If you detect strong vibrations after driving
off-road, check for foreign objects in the
wheels and drive train and remove them if
necessary. Foreign objects can disturb the
balance and cause vibrations.
Driving on sand Observe the following rules when driving on
sand:
R Select the Offroaddrive program (vehicles
without Off-Road Engineering package)
(Y page 228).
R Select the Offroaddrive program (vehicles
with Off-Road Engineering package)
(Y page 229).
R Select a higher vehicle level.
R Avoid high engine speeds.
R Use the left-hand steering wheel gearshift
paddle to shift to a lower gear appropriate to
the terrain. 178
Driving
tipsDriving an d parking
Page 183 of 397
Hill start assist will aid you when pulling away on
a hill. Further information on hill start assist
(Y page 151).
Do not shift into transmission position Nwhen
driving off-road. You could lose control of the
vehicle if you attempt to brake the vehicle using
the service brake. If the gradient is too steep for
your vehicle, back up in reverse gear.
Always observe the approach/departure angle
values (Y page 389).
Maximum gradient-climbing capability Always observe the maximum gradient climbing
ability values (Y page 389).
Hilltops When driving up an uphill gradient, slightly
reduce pressure on the accelerator immediately
before reaching the brow of the hill. Make use of the vehicle's own impetus to travel over the
brow.
This style of driving prevents:
R the vehicle from lifting off the ground on the
brow of a hill
R the vehicle from travelling too quickly down
the other side
Driving downhill R
Drive slowly.
R Do not drive at an angle down steep inclines.
Steer into the line of fall and drive with the
front wheels aligned straight. Otherwise, the
vehicle could slip sideways, tip and overturn.
R Before tackling steep downhill gradients, use
the left-hand steering wheel gearshift paddle
to shift to a lower gear.
R Activate DSR. If this is not sufficient, brake
gently. When doing so, make sure that the
vehicle is facing in the direction of the line of fall.
R Check that the brakes are working normally
after a long downhill stretch.
i Off-road ABS is activated when the off-road
program is selected.
At speeds below 30 km/h the front wheels
lock cyclically during braking. The digging-in
effect achieved in the process reduces the
stopping distance when driving off-road. The steerability of the vehicle is considerably
reduced if the wheels lock. Driving systems
Intelligent Drive
Mercedes-Benz Intelligent Drive stands for inno- vative driver assistance and safety systems
which enhance comfort and support the driver in
critical situations. With these intelligent co-ordi- nated systems Mercedes-Benz has set a mile-
stone on the path towards autonomous driving.
Mercedes-Benz Intelligent Drive embraces all
elements of active and passive safety in one well thought-out system – for the safety of the vehi-
cle occupants and that of other road users.
Further information on driving safety systems
(Y page 68). Cruise control
General notes Cruise control maintains a constant road speed
for you. It brakes automatically in order to avoid
exceeding the set speed. You must select a
lower gear in good time on long and steep down-
hill gradients, especially if the vehicle is laden or towing a trailer. By doing so, you will make use of
the braking effect of the engine. This relieves the load on the brake system and prevents the
brakes from overheating and wearing too
quickly.
Use cruise control only if road and traffic con-
ditions are appropriate for maintaining a steady
speed for a prolonged period. You can store any road speed above 30 km/h.
Important safety notes If you fail to adapt your driving style, cruise con-
trol can neither reduce the risk of an accident
nor override the laws of physics. Cruise control
cannot take into account road, weather or traffic
conditions. Cruise control is only an aid. You are
responsible for the distance to the vehicle in
front, for vehicle speed, for braking in good time and for staying in lane. 180
Driving systemsDriving and parking