2016 MERCEDES-BENZ GLS SUV Media
[x] Cancel search: MediaPage 222 of 397
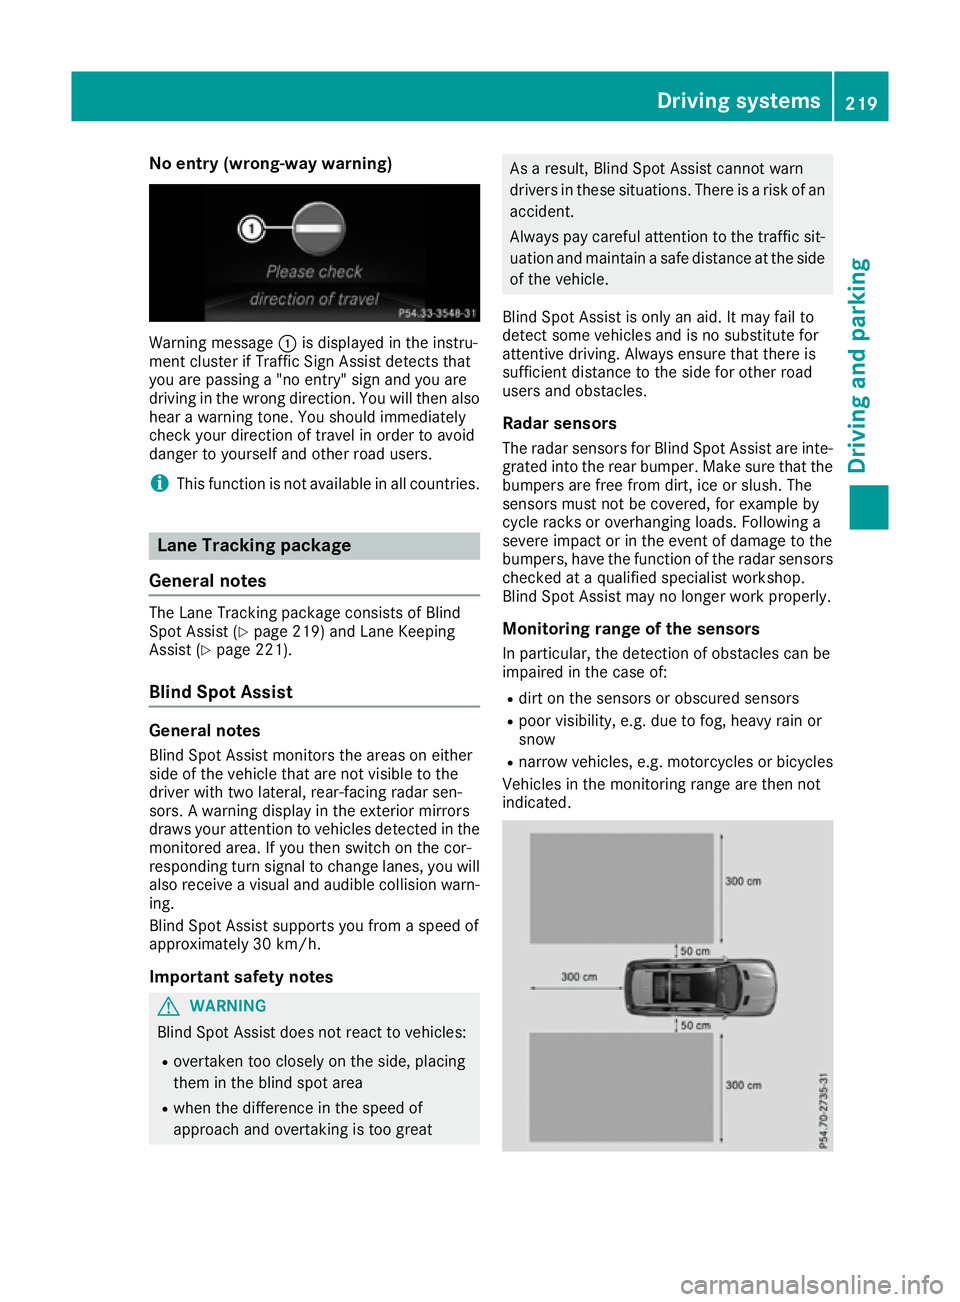
No entry (wrong-way warning)
Warning message
:is displayed in the instru-
ment cluster if Traffic Sign Assist detects that
you are passing a "no entry" sign and you are
driving in the wrong direction. You will then also
hear a warning tone. You should immediately
check your direction of travel in order to avoid
danger to yourself and other road users.
i This function is not available in all countries. Lane Tracking package
General notes The Lane Tracking package consists of Blind
Spot Assist (Y
page 219) and Lane Keeping
Assist (Y page 221).
Blind Spot Assist General notes
Blind Spot Assist monitors the areas on either
side of the vehicle that are not visible to the
driver with two lateral, rear-facing radar sen-
sors. A warning display in the exterior mirrors
draws your attention to vehicles detected in the
monitored area. If you then switch on the cor-
responding turn signal to change lanes, you will also receive a visual and audible collision warn-
ing.
Blind Spot Assist supports you from a speed of
approximately 30 km/h.
Important safety notes G
WARNING
Blind Spot Assist does not react to vehicles:
R overtaken too closely on the side, placing
them in the blind spot area
R when the difference in the speed of
approach and overtaking is too great As a result, Blind Spot Assist cannot warn
drivers in these situations. There is a risk of an
accident.
Always pay careful attention to the traffic sit- uation and maintain a safe distance at the side
of the vehicle.
Blind Spot Assist is only an aid. It may fail to
detect some vehicles and is no substitute for
attentive driving. Always ensure that there is
sufficient distance to the side for other road
users and obstacles. Radar sensors
The radar sensors for Blind Spot Assist are inte- grated into the rear bumper. Make sure that the
bumpers are free from dirt, ice or slush. The
sensors must not be covered, for example by
cycle racks or overhanging loads. Following a
severe impact or in the event of damage to the
bumpers, have the function of the radar sensors
checked at a qualified specialist workshop.
Blind Spot Assist may no longer work properly.
Monitoring range of the sensors In particular, the detection of obstacles can be
impaired in the case of:
R dirt on the sensors or obscured sensors
R poor visibility, e.g. due to fog, heavy rain or
snow
R narrow vehicles, e.g. motorcycles or bicycles
Vehicles in the monitoring range are then not
indicated. Driving systems
219Driving and parking Z
Page 239 of 397
Until the ball coupling engages in a securely
locked position under the bumper:
R indicator lamp ;flashes
R the multifunction display shows the display
message Trailer coupling extend‐
Trailer coupling extend‐
ing...
ing...
The ball coupling swivels back into the out-of-
use position when:
R you drive off before the Trailer
Trailer coupling
coupling
extending...
extending... display message has disap-
peared from the multifunction display
R the ball coupling encounters an obstacle in
the swivel range
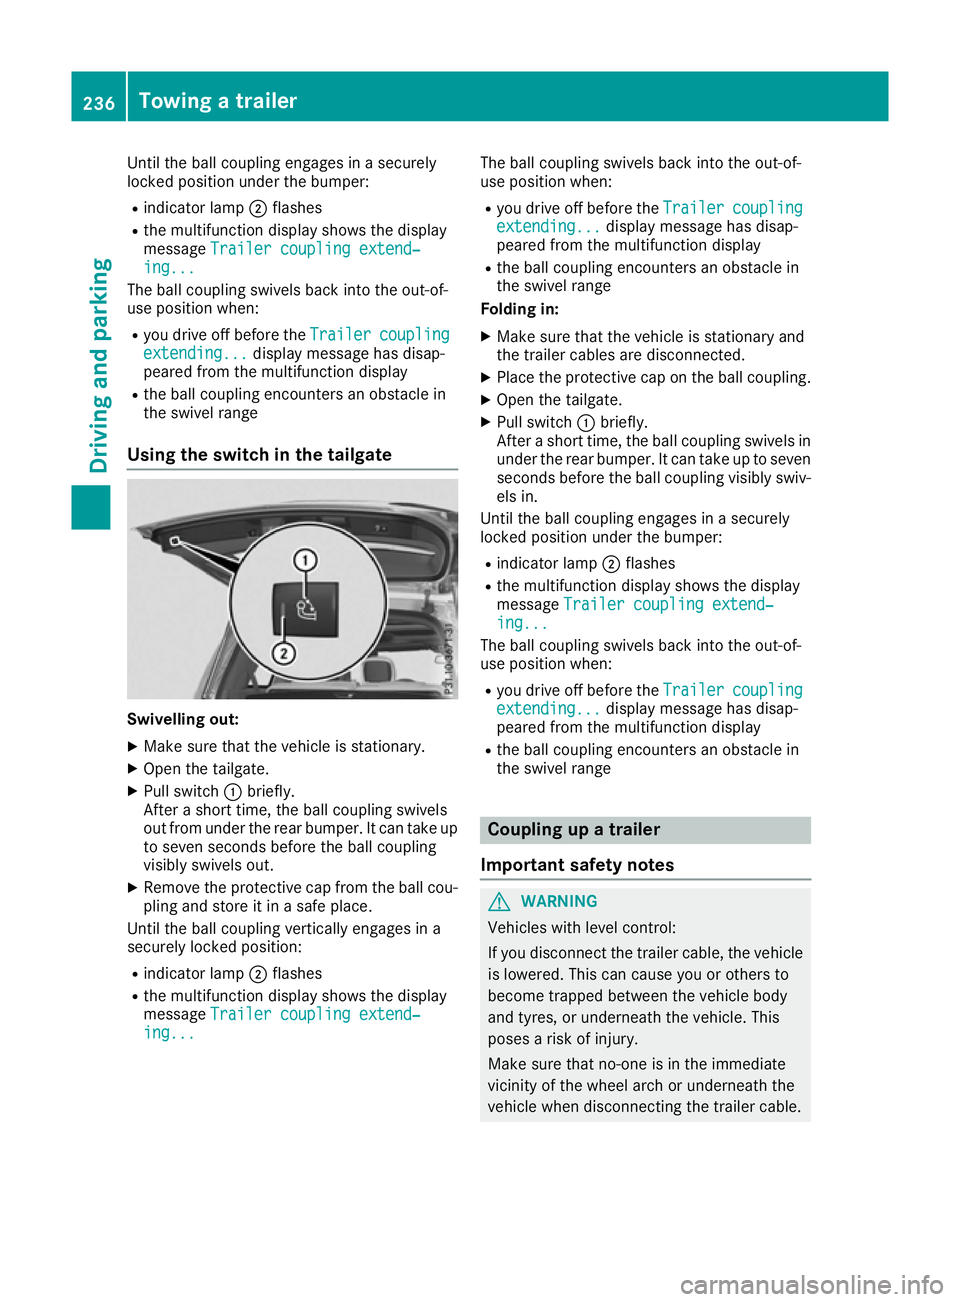
Using the switch in the tailgate Swivelling out:
X Make sure that the vehicle is stationary.
X Open the tailgate.
X Pull switch :briefly.
After a short time, the ball coupling swivels
out from under the rear bumper. It can take up to seven seconds before the ball coupling
visibly swivels out.
X Remove the protective cap from the ball cou-
pling and store it in a safe place.
Until the ball coupling vertically engages in a
securely locked position:
R indicator lamp ;flashes
R the multifunction display shows the display
message Trailer coupling extend‐
Trailer coupling extend‐
ing... ing... The ball coupling swivels back into the out-of-
use position when:
R you drive off before the Trailer
Trailercoupling
coupling
extending...
extending... display message has disap-
peared from the multifunction display
R the ball coupling encounters an obstacle in
the swivel range
Folding in:
X Make sure that the vehicle is stationary and
the trailer cables are disconnected.
X Place the protective cap on the ball coupling.
X Open the tailgate.
X Pull switch :briefly.
After a short time, the ball coupling swivels in under the rear bumper. It can take up to sevenseconds before the ball coupling visibly swiv-
els in.
Until the ball coupling engages in a securely
locked position under the bumper:
R indicator lamp ;flashes
R the multifunction display shows the display
message Trailer coupling extend‐ Trailer coupling extend‐
ing...
ing...
The ball coupling swivels back into the out-of-
use position when:
R you drive off before the Trailer
Trailercoupling
coupling
extending...
extending... display message has disap-
peared from the multifunction display
R the ball coupling encounters an obstacle in
the swivel range Coupling up a trailer
Important safety notes G
WARNING
Vehicles with level control:
If you disconnect the trailer cable, the vehicle is lowered. This can cause you or others to
become trapped between the vehicle body
and tyres, or underneath the vehicle. This
poses a risk of injury.
Make sure that no-one is in the immediate
vicinity of the wheel arch or underneath the
vehicle when disconnecting the trailer cable. 236
Towing a trailerDriving and parking
Page 240 of 397
Vehicles with the AIRMATIC package
!
Before beginning the journey, make sure
that the trailer support wheel is completely
raised. Otherwise, the trailer or the vehicle
could be damaged by the lowered trailer sup- port wheel during the journey.
X Shift the transmission to position P.
X Apply the electric parking brake.
X Start the engine.
X Vehicles with the Off-Road Engineering
package:
set the vehicle level to normal level
(Y page 192).
X Vehicles without the Off-Road Engineer-
ing package: select theComfortdrive pro-
gram using the DYNAMIC SELECT controller
(Y page 197).
X Switch off the engine.
X Close the doors and tailgate.
X Position the trailer horizontally behind the
vehicle.
X Couple up the trailer.
X Establish the electrical connection between
the vehicle and the trailer.
X Check that the trailer lighting system is work-
ing.
X Push the combination switch upwards and
downwards and check whether the corre-
sponding turn signal indicator on the trailer is
flashing.
A connected trailer is only detected when the
electrical connection is established correctly
and when the lighting system is working prop-
erly. The function of other systems also depends on this, for example:
R ESP ®
R Parking Assist PARKTRONIC
R Parking Pilot
R Active Blind Spot Assist
R Active Lane Keeping Assist
i Vehicles with the AIRMATIC package:
if
you couple up a trailer, the vehicle initially
remains at the selected level of the drive pro- gram set. Observe the following when cou-
pling up a trailer:
R If the normal level was not selected previ-
ously, the vehicle automatically adopts the normal level starting from a speed of 30 km/h. Even at higher speeds, it does not
drop below the normal level.
R Vehicle levels below the normal level are
not available.
R The raised level is available up to a speed of
30 km/h.
R This also applies when using accessories
that are plugged into the socket of the
trailer tow hitch (e.g. a bicycle rack).
R Before driving with a trailer, please observe
the information on the trailer support
wheel. Uncoupling a trailer
Important safety notes G
WARNING
If you uncouple a trailer with an engaged over- run brake, you could trap your hand between
the vehicle and the trailer drawbar. This poses a risk of injury.
Do not uncouple a trailer with an engaged
overrun brake. G
WARNING
Vehicles with level control:
If you disconnect the trailer cable, the vehicle is lowered. This can cause you or others to
become trapped between the vehicle body
and tyres, or underneath the vehicle. This
poses a risk of injury.
Make sure that no-one is in the immediate
vicinity of the wheel arch or underneath the
vehicle when disconnecting the trailer cable.
! Do not disconnect a trailer with an engaged
overrun brake. Otherwise, your vehicle could
be damaged by the rebounding of the overrun
brake.
! Remove the adapter cable before folding in
the ball coupling. You could otherwise dam-
age the rear bumper and the adapter cable.
Vehicles with the AIRMATIC package X
Shift the transmission to position P.
X Apply the electric parking brake. Towing a trailer
237Driving and parking Z
Page 245 of 397
Bear in mind that the outside temperature dis-
play indicates the measured air temperature
and not the road surface temperature.
The outside temperature display is in the multi-
function display (Y page 243).
A change in the outside temperature is shown in
the multifunction display after a delay. Coolant temperature display
G
WARNING
If you open the bonnet while the engine is
overheating or while there is a fire in the
engine compartment, you could come into
contact with hot gases or other leaking ser-
vice products. There is a danger of injury.
Allow an overheating engine to cool down
before opening the bonnet. If there is a fire in the engine compartment, leave the bonnet
closed and notify the fire brigade.
The coolant temperature gauge is in the instru-
ment cluster on the right-hand side (Y page 35).
Under normal operating conditions and with the specified coolant level, the coolant temperature
may rise to 120 †.
At high outside temperatures and when driving
in mountainous terrain, the coolant temperature may rise to the end of the scale. Operating the on-board computer
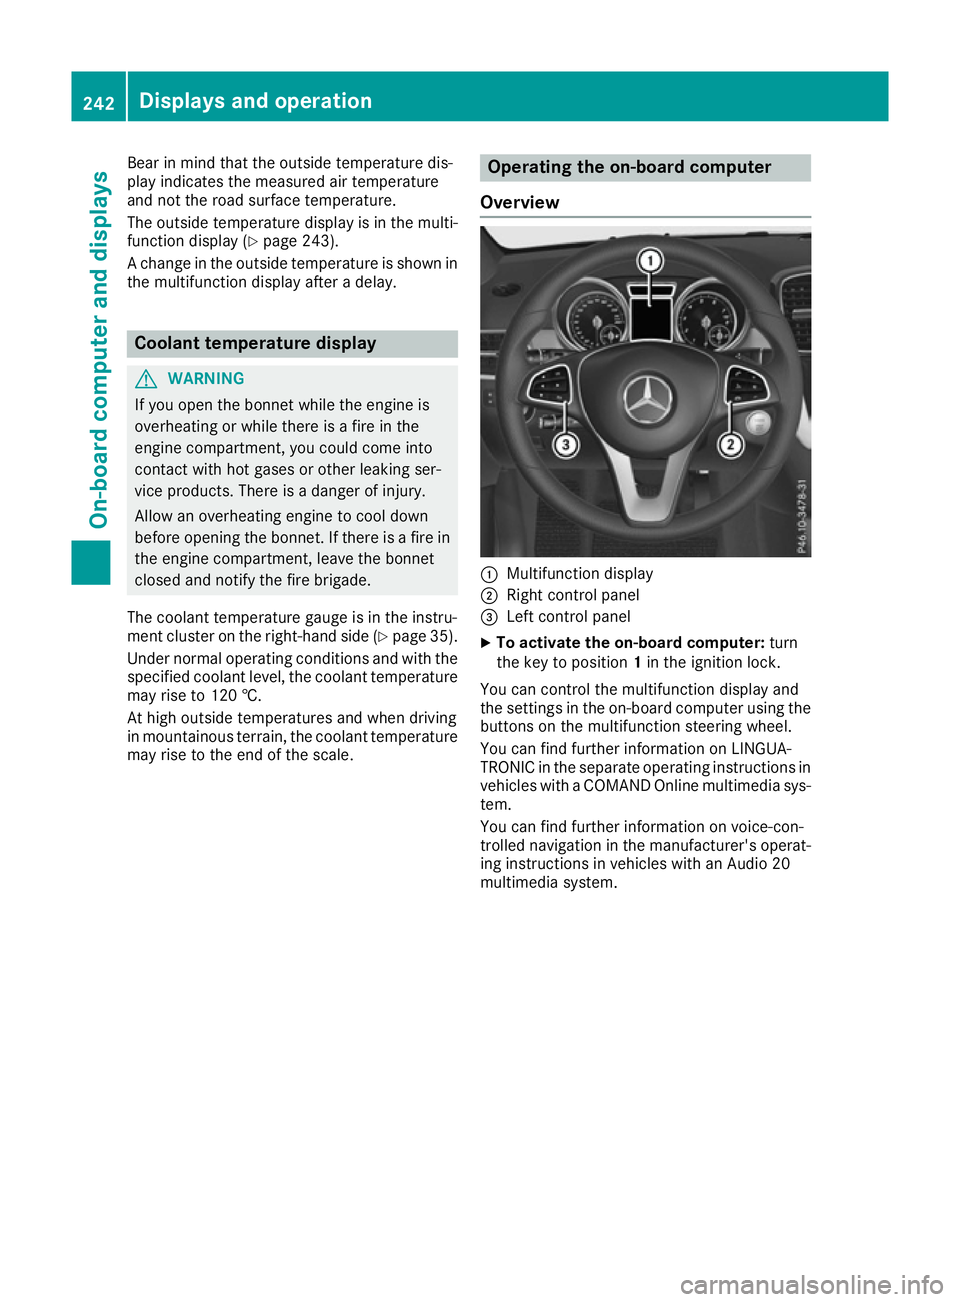
Overview :
Multifunction display
; Right control panel
= Left control panel
X To activate the on-board computer: turn
the key to position 1in the ignition lock.
You can control the multifunction display and
the settings in the on-board computer using the buttons on the multifunction steering wheel.
You can find further information on LINGUA-
TRONIC in the separate operating instructions in vehicles with a COMAND Online multimedia sys-
tem.
You can find further information on voice-con-
trolled navigation in the manufacturer's operat-
ing instructions in vehicles with an Audio 20
multimedia system. 242
Displays and operationOn-board computer and displays
Page 247 of 397
i
Set the time using the multimedia system
(see the Digital Owner's Manual).
Possible displays on the multifunction dis-
play:
R ZGearshift recommendation, when shifting
manually (Y page 160)
R j Parking Pilot (Y page 204)
R ¯ Cruise control (Y page 180)
R LIM
LIM Limiter (Y page 182)
R _ Adaptive Highbeam Assist Plus
(Y page 124)
R è ECO start/stop function (Y page 151)
R ë HOLD function (Y page 195)
R a Distance Pilot DISTRONIC Steering Pilot
(Y page 250)
R 120 km/h!
120 km/h! Maximum permissible speed
exceeded (only for certain countries)
R DSR DSR Downhill Speed Regulation
(Y page 227) Menus and submenus
Menu overview
Press the =or; button on the steering
wheel to call up the menu bar and select a menu.
Operating the on-board computer (Y page 242).
Depending on the equipment fitted in the vehi-
cle, you can call up the following menus:
R Trip
Trip menu (Y page 244)
R Navi
Navi menu (navigation instructions)
(Y page 245)
R Audio
Audio menu (Y page 247)
R Tel
Tel menu (telephone) (Y page 248)
R Assist.
Assist. menu (assistance) (Y page 249)
R Serv.
Serv. menu (Y page 251)
R Settings
Settings menu (settings) (Y page 251)
R ON&OFFROAD
ON&OFFROAD menu (Ypage 255)
R AMG
AMG menu (Mercedes-AMG vehicles)
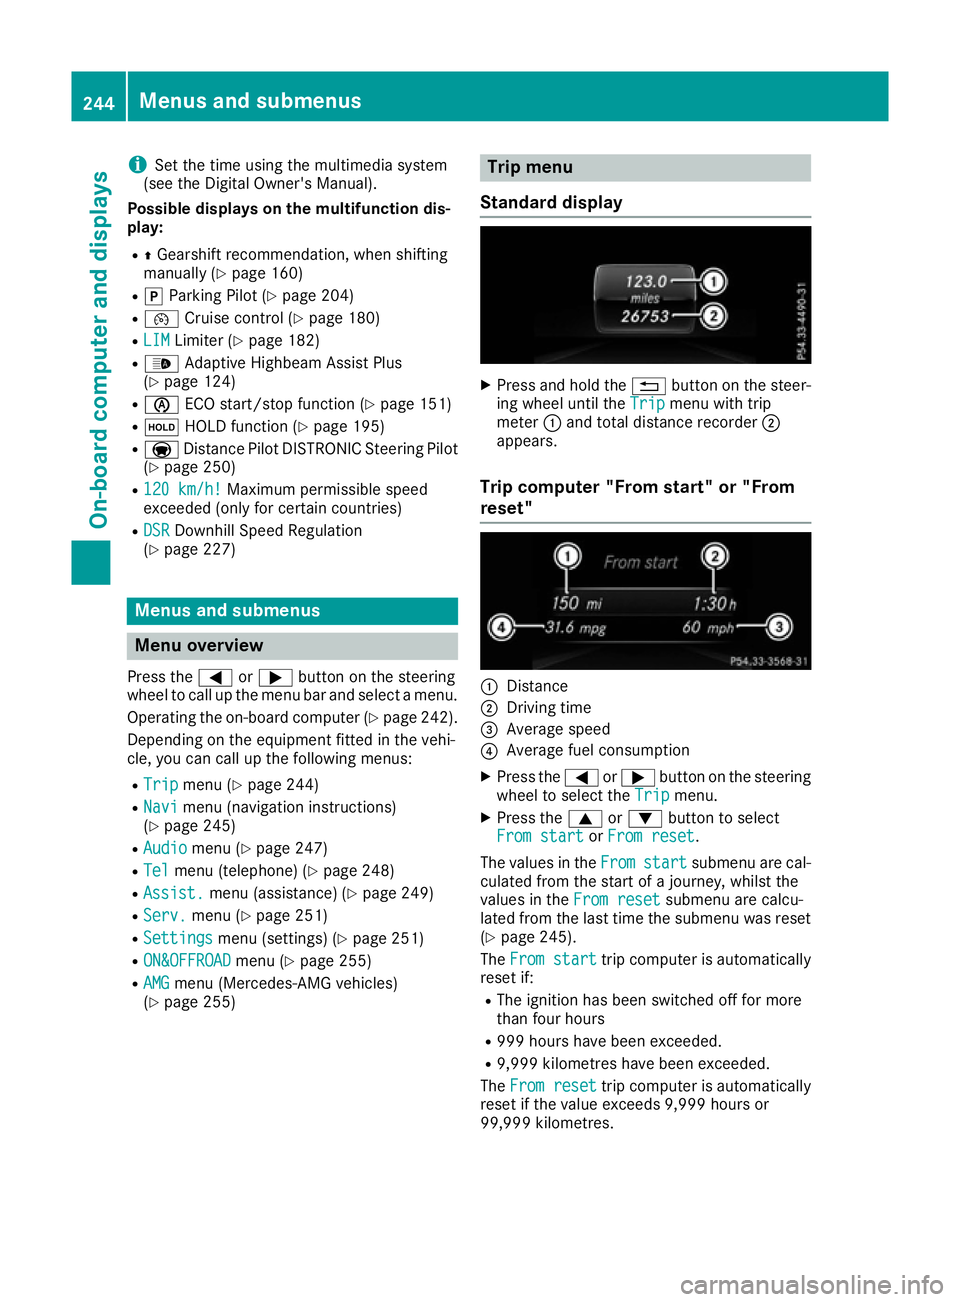
(Y page 255) Trip menu
Standard display X
Press and hold the %button on the steer-
ing wheel until the Trip
Tripmenu with trip
meter :and total distance recorder ;
appears.
Trip computer "From start" or "From
reset" :
Distance
; Driving time
= Average speed
? Average fuel consumption
X Press the =or; button on the steering
wheel to select the Trip Tripmenu.
X Press the 9or: button to select
From start
From start orFrom reset
From reset.
The values in the From
Fromstart
start submenu are cal-
culated from the start of a journey, whilst the
values in the From reset
From resetsubmenu are calcu-
lated from the last time the submenu was reset
(Y page 245).
The From start
From start trip computer is automatically
reset if:
R The ignition has been switched off for more
than four hours
R 999 hours have been exceeded.
R 9,999 kilometres have been exceeded.
The From reset From reset trip computer is automatically
reset if the value exceeds 9,999 hours or
99,999 kilometres. 244
Menus and submenusOn-board computer and displays
Page 248 of 397

ECO display
The ECO display is not available for Mercedes-
AMG vehicles.
X Press the =or; button on the steering
wheel to select the Trip Tripmenu.
X Press the 9or: button to select ECO
ECO
DISPLAY
DISPLAY.
If the ignition remains switched off for longer
than four hours, the ECO display will be auto-
matically reset.
Further information on the ECO display
(Y page 172).
Displaying the range and current fuel
consumption Mercedes-AMG vehicles: the menu only dis-
plays approximate range
:.
X Press the =or; button on the steering
wheel to select the Trip Tripmenu.
Digital speedometer X
Press the =or; button on the steering
wheel to select the Trip
Tripmenu.
X Press the 9or: button to select the
digital speedometer.
A gearshift recommendation Zcan also be
displayed.
Observe the information on gearshift recom-
mendation Zwhen shifting manually
(Y page 160).
Mercedes-AMG vehicles: a gearshift recom-
mendation is shown in the status bar of the
multifunction display and not in the digital
speedometer display.
Resetting values X
Press the =or; button on the steering
wheel to select the Trip Tripmenu.
X Press the 9or: button to select the
function that you wish to reset. X
Press ato confirm your selection.
X Press :to select Yes
Yes and press ato
confirm.
You can reset the values of the following func-
tions: R Trip meter
R "From start" trip computer
R "From reset" trip computer
R ECO display
If you reset the values in the "ECO display", the
values in the "From start" trip computer are also
reset. If you reset the values in the "From start" trip computer, the values in the "ECO display"
are also reset. Navigation menu
Displaying navigation instructions In the
Navi Navimenu, the multifunction display
shows navigation instructions.
Observe the additional information on naviga-
tion in the separate multimedia system operat-
ing instructions.
X Switch on the multimedia system (see sepa-
rate operating instructions).
X Press the =or; button on the steering
wheel to select the Navi Navimenu.
Route guidance not active :
Direction of travel
; Current road Menus and submenus
245On-board computer and displays Z
Page 249 of 397
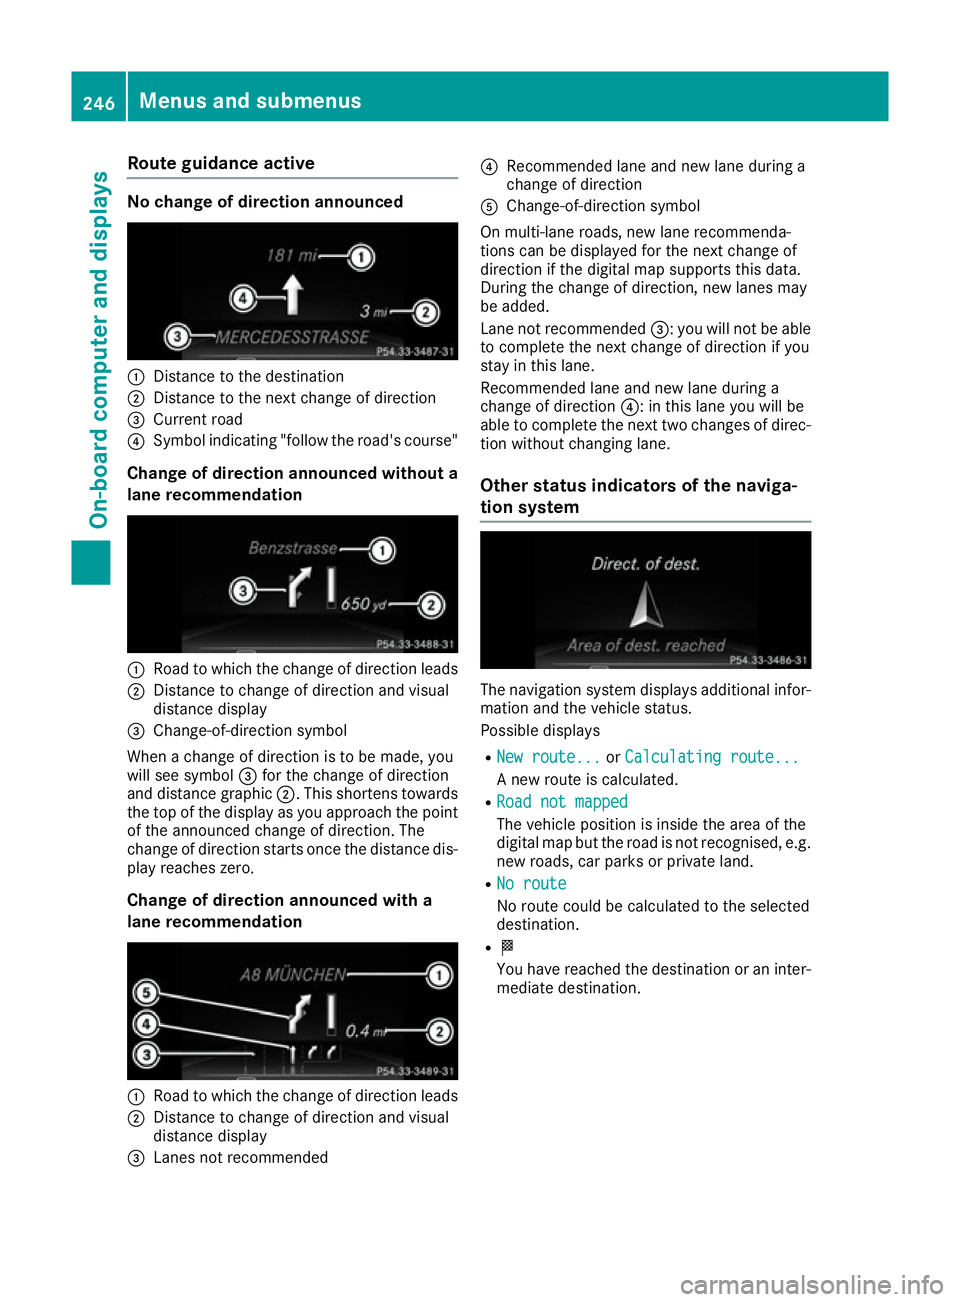
Route guidance active
No change of direction announced
:
Distance to the destination
; Distance to the next change of direction
= Current road
? Symbol indicating "follow the road's course"
Change of direction announced without a lane recommendation :
Road to which the change of direction leads
; Distance to change of direction and visual
distance display
= Change-of-direction symbol
When a change of direction is to be made, you
will see symbol =for the change of direction
and distance graphic ;. This shortens towards
the top of the display as you approach the point of the announced change of direction. The
change of direction starts once the distance dis-
play reaches zero.
Change of direction announced with a
lane recommendation :
Road to which the change of direction leads
; Distance to change of direction and visual
distance display
= Lanes not recommended ?
Recommended lane and new lane during a
change of direction
A Change-of-direction symbol
On multi-lane roads, new lane recommenda-
tions can be displayed for the next change of
direction if the digital map supports this data.
During the change of direction, new lanes may
be added.
Lane not recommended =: you will not be able
to complete the next change of direction if you
stay in this lane.
Recommended lane and new lane during a
change of direction ?: in this lane you will be
able to complete the next two changes of direc-
tion without changing lane.
Other status indicators of the naviga-
tion system The navigation system displays additional infor-
mation and the vehicle status.
Possible displays
R New route... New route... orCalculating route...
Calculating route...
A new route is calculated.
R Road not mapped Road not mapped
The vehicle position is inside the area of the
digital map but the road is not recognised, e.g. new roads, car parks or private land.
R No route No route
No route could be calculated to the selected
destination.
R O
You have reached the destination or an inter-
mediate destination. 246
Menus and submenusOn-board computer and displays
Page 250 of 397
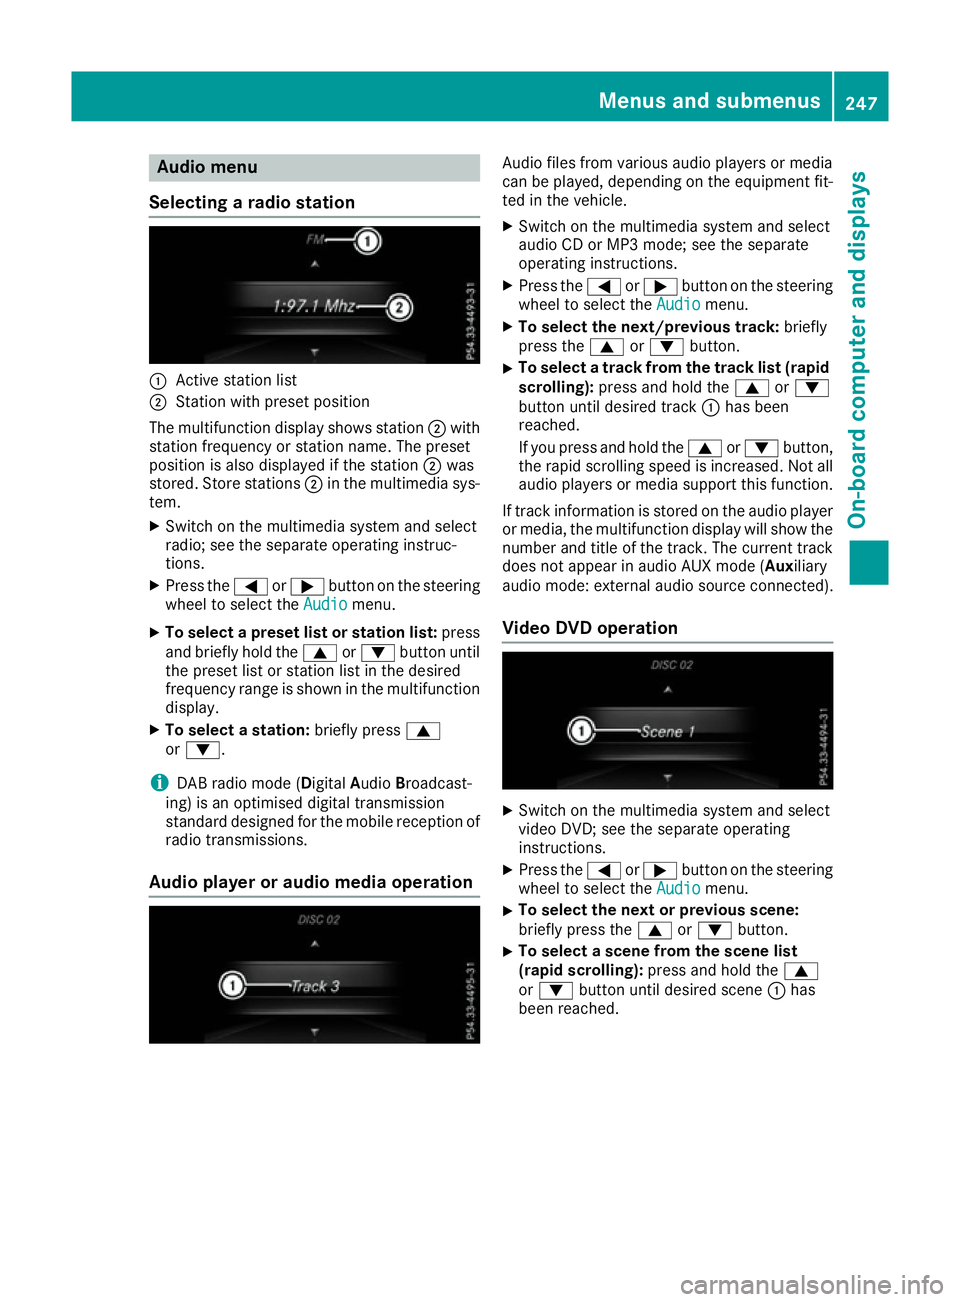
Audio menu
Selecting a radio station :
Active station list
; Station with preset position
The multifunction display shows station ;with
station frequency or station name. The preset
position is also displayed if the station ;was
stored. Store stations ;in the multimedia sys-
tem.
X Switch on the multimedia system and select
radio; see the separate operating instruc-
tions.
X Press the =or; button on the steering
wheel to select the Audio
Audio menu.
X To select a preset list or station list: press
and briefly hold the 9or: button until
the preset list or station list in the desired
frequency range is shown in the multifunction
display.
X To select a station: briefly press9
or :.
i DAB radio mode (
DigitalAudioBroadcast-
ing) is an optimised digital transmission
standard designed for the mobile reception of
radio transmissions.
Audio player or audio media operation Audio files from various audio players or media
can be played, depending on the equipment fit-
ted in the vehicle.
X Switch on the multimedia system and select
audio CD or MP3 mode; see the separate
operating instructions.
X Press the =or; button on the steering
wheel to select the Audio Audiomenu.
X To select the next/previous track: briefly
press the 9or: button.
X To select a track from the track list (rapid
scrolling): press and hold the 9or:
button until desired track :has been
reached.
If you press and hold the 9or: button,
the rapid scrolling speed is increased. Not all audio players or media support this function.
If track information is stored on the audio player or media, the multifunction display will show the
number and title of the track. The current track does not appear in audio AUX mode ( Auxiliary
audio mode: external audio source connected).
Video DVD operation X
Switch on the multimedia system and select
video DVD; see the separate operating
instructions.
X Press the =or; button on the steering
wheel to select the Audio Audiomenu.
X To select the next or previous scene:
briefly press the
9or: button.
X To select a scene from the scene list
(rapid scrolling): press and hold the 9
or : button until desired scene :has
been reached. Menus and sub
menus
247On-board computer and displays Z