2016 MERCEDES-BENZ GLS SUV Media
[x] Cancel search: MediaPage 142 of 397
Outside air is added after about 30 minutes.
X To deactivate: press thedbutton.
The indicator lamp in the dbutton goes
out.
i Air-recirculation mode is deactivated auto-
matically:
R after approximately five minutes at outside
temperatures below approximately 5 †
R after approximately five minutes if cooling
with air dehumidification is deactivated
R after approximately 30 minutes at outside
temperatures above approximately 5 † if
the "Cooling with air dehumidification"
function is activated Convenience opening/closing using
the air-recirculation button
G
WARNING
When the convenience closing feature is oper- ating, parts of the body could become trapped
in the closing area of the side window and the
sliding sunroof. There is a risk of injury.
Observe the complete closing procedure
when the convenience closing feature is oper-
ating. When closing make sure that no parts of the body are in the closing area. G
WARNING
During convenience opening parts of the body could be drawn in or become trapped
between the side window and window frame.
There is a risk of injury.
When opening, make sure that nobody is
touching the side window. If someone
becomes trapped, immediately press
the W switch in the door to stop the move-
ment of the side windows. To continue closing
the side window, pull on the Wswitch.
X Convenience closing feature: press and
hold the dbutton until the side windows
close.
Vehicles with sliding sunroof or pano-
rama sliding sunroof: the sliding sunroof or
panorama sliding sunroof closes simultane-
ously. The indicator lamp in the
dbutton lights
up. Air-recirculation mode is activated.
If parts of the body are in the closing area during
convenience closing, proceed as follows:
X Press the Wbutton to stop the side win-
dows.
The side windows stop.
X To then open the side windows, press the
W button again.
X Only vehicles with sliding sunroof or pan-
orama sliding sunroof: press the2
switch to stop the sliding sunroof or pano-
rama sliding sunroof.
The sliding sunroof or panorama sliding sun-
roof stops.
X To then open the sliding sunroof or panorama
sliding sunroof, pull back on the 2button.
i If the sliding sunroof is raised and closes,
press the 2switch, to stop the sliding
sunroof. Do not pull back on the 2switch
afterwards. The sliding sunroof closes before
it opens.
i Notes on the automatic reversing function
for:
R the side windows (Y page 93)
R the panorama sliding sunroof (Y page 97)
R the sliding sunroof (Y page 97)
X Convenience opening feature: press and
hold the dbutton until the side windows
open.
Vehicles with sliding sunroof or pano-
rama sliding sunroof: the sliding sunroof or
panorama sliding sunroof opens simultane-
ously.
The indicator lamp in the dbutton goes
out. Air-recirculation mode is deactivated.
i If you open the side windows or the sliding
sunroof or the panorama sliding sunroof man-
ually after closing them with the convenience closing feature, they will remain in this posi-
tion when opened using the convenience
opening feature. Operating the climate control system
139Climate control Z
Page 143 of 397
Switching the residual heat on/off
General notes It is possible to make use of the residual heat of
the engine to continue heating the stationary
vehicle for up to 30 minutesafter the engine has
been switched off. The heating time depends on
the set interior temperature.
Switching on/off X
To switch on: press theÌorÁ button.
The indicator lamp in the ÌorÁ button
lights up.
i The blower will run at a low speed regardless
of the airflow setting.
i If you activate the residual heat function at
high temperatures, only the ventilation will be
activated. The blower runs at medium speed.
X To switch off: press theÌorÁ but-
ton.
The indicator lamp in the ÌorÁ button
goes out.
Residual heat is deactivated automatically:
R after approximately 30 minutes
R when the ignition is switched on
R if the battery voltage drops
R when the auxiliary heating is switched on Ionisation
Ionisation is used to purify and freshen the air in
the vehicle interior, which is conducive to a
pleasant climate.
The ionisation of the interior air is odourless and cannot, directly, be perceived in the vehicle inte-
rior.
You can switch ionisation on and off via the mul- timedia system (see the separate operating
instructions).
Ionisation can only be operated when the auto-
matic climate control is switched on. The side air vent on the driver's side must be open. Auxiliary heating
Important safety notes G
DANGER
If the exhaust pipe is blocked or sufficient
ventilation is not possible, toxic exhaust
fumes can enter the vehicle, especially car-
bon monoxide. This is the case, e.g. in
enclosed spaces, or if the vehicle is stuck in
snow. There is a risk of fatal injuries.
You should switch off the auxiliary heating in
enclosed spaces which do not have an extrac- tion system, e.g. a garage. If the vehicle is
stuck in snow and you must leave the auxiliary
heating running, keep the exhaust pipe and
the area around the vehicle clear of snow. To guarantee a sufficient supply of fresh air, open
a window on the side of the vehicle away from the wind. G
WARNING
When the auxiliary heating is switched on,
parts of the vehicle can become very hot.
Flammable materials such as leaves, grass or twigs may ignite if they come into contact
with:
R hot parts of the exhaust system
R the exhaust gas itself
There is a risk of fire.
When the auxiliary heating is switched on,
make sure that:
R no flammable materials come into contact
with hot vehicle components
R the exhaust gas can escape from the
exhaust pipe unhindered
R the exhaust gas does not come into contact
with flammable materials.
The auxiliary heating is fitted under the front
wing on the left-hand side of the vehicle. The
emissions outlet is found behind the left front
wheel. ! Operating the auxiliary heating/ventilation
draws on the vehicle battery. After you have
heated or ventilated the vehicle a maximum of two times, drive for a longer distance. 140
Operating the climate control systemClimate control
Page 146 of 397
appears in the remote control display and the
running time is zero minutes.
Setting the departure time Make sure that the time set in the vehicle is
correct before setting the departure time (see
the separate operating instructions). Otherwise, the auxiliary heating may switch on at the wrong
time and at an unsuitable location. When setting
the departure time, also observe the important
safety notes (Y page 140).
X Briefly press the ubutton.
X Press the ,or. button repeatedly
until the time to be changed appears in the
display.
X Press the uand^ buttons simultane-
ously.
The Îsymbol in the remote control display
flashes.
X Press the ,or. button to set the
desired departure time.
i The longer you press the
,or. but-
ton, the faster the time changes.
X Press the uand^ buttons simultane-
ously.
The new departure time is stored.
Activating the set departure time
X Briefly press the ubutton.
X Press the ,or. button repeatedly
until the desired departure time appears in
the display.
X Press the ubutton.
The Ísymbol, the departure time and,
depending on the selected departure time,
the letter A, BorCappear in the display.
Deactivating the set departure time
X Briefly press the ubutton.
The status of the auxiliary heating is shown in the display.
X Press the .button.
The first departure time stored appears in the
display.
X Press the ^button.
OFF is shown in the remote control display. Replacing the remote control battery Important safety notes
G
WARNING
Batteries contain toxic and corrosive substan- ces. If batteries are swallowed, it can result in
severe health problems. There is a risk of fatal injury.
Keep batteries out of the reach of children. If
a battery is swallowed, seek medical attention immediately. H
Environmental note Batteries contain pollutants.
It is illegal to dispose of them
with the household rubbish.
They must be collected sep-
arately and disposed of in anenvironmentally responsible
recycling system. Dispose of batteries in an
environmentally responsible
manner. Take discharged
batteries to a qualified spe-
cialist workshop or to a col-
lection point for used batter-
ies.
Replacing the battery If the battery needs to be replaced, the battery
symbol on the left of the display is shown as
empty. A CR2450 lithium battery is required
when replacing the battery.
X Press a pointed object into recess :.
X Slide battery cover ;backwards in the direc-
tion of the arrow. Operating the climate control system
143Climate control Z
Page 147 of 397
X
Insert new battery =with the lettering facing
upwards.
X Slide battery cover ;in the opposite direc-
tion to the arrow on the remote control until it engages.
Problems with the auxiliary heating/ventilation Problem
Possible causes/consequences and
M
MSolutions FAIL¨ The signal transmission between the transmitter and the vehicle is
faulty.
X
Change your position in relation to the vehicle, moving closer if
necessary. FAIL The auxiliary heating/ventilation cannot be switched on or has
switched itself off.
The starter battery is not sufficiently charged.
X Charge the starter battery. The fuel tank content is below the reserve fuel level.
X Refuel at the nearest filling station. The auxiliary heating/ventilation is malfunctioning.
X Have the auxiliary heating/ventilation checked at a qualified spe-
cialist workshop. Adjusting the air vents
Important safety notes
G
WARNING
Very hot or very cold air can flow from the air vents. This could result in burns or frostbite in the immediate vicinity of the air vents. There
is a risk of injury.
Make sure that all vehicle occupants always
maintain a sufficient distance to the air out-
lets. If necessary, redirect the airflow to
another area of the vehicle interior.
In order to ensure the direct flow of fresh air
through the air vents into the vehicle interior,
please observe the following notes:
R keep the air inlet grille on the bonnet and in
the engine compartment on the front-
passenger side free of blockages, such as ice,
snow or leaves.
R never cover the vents or ventilation grilles in
the vehicle interior i
For virtually draught-free ventilation, adjust
the sliders of the air vents to the centre posi- tion. Adjusting the centre air vents
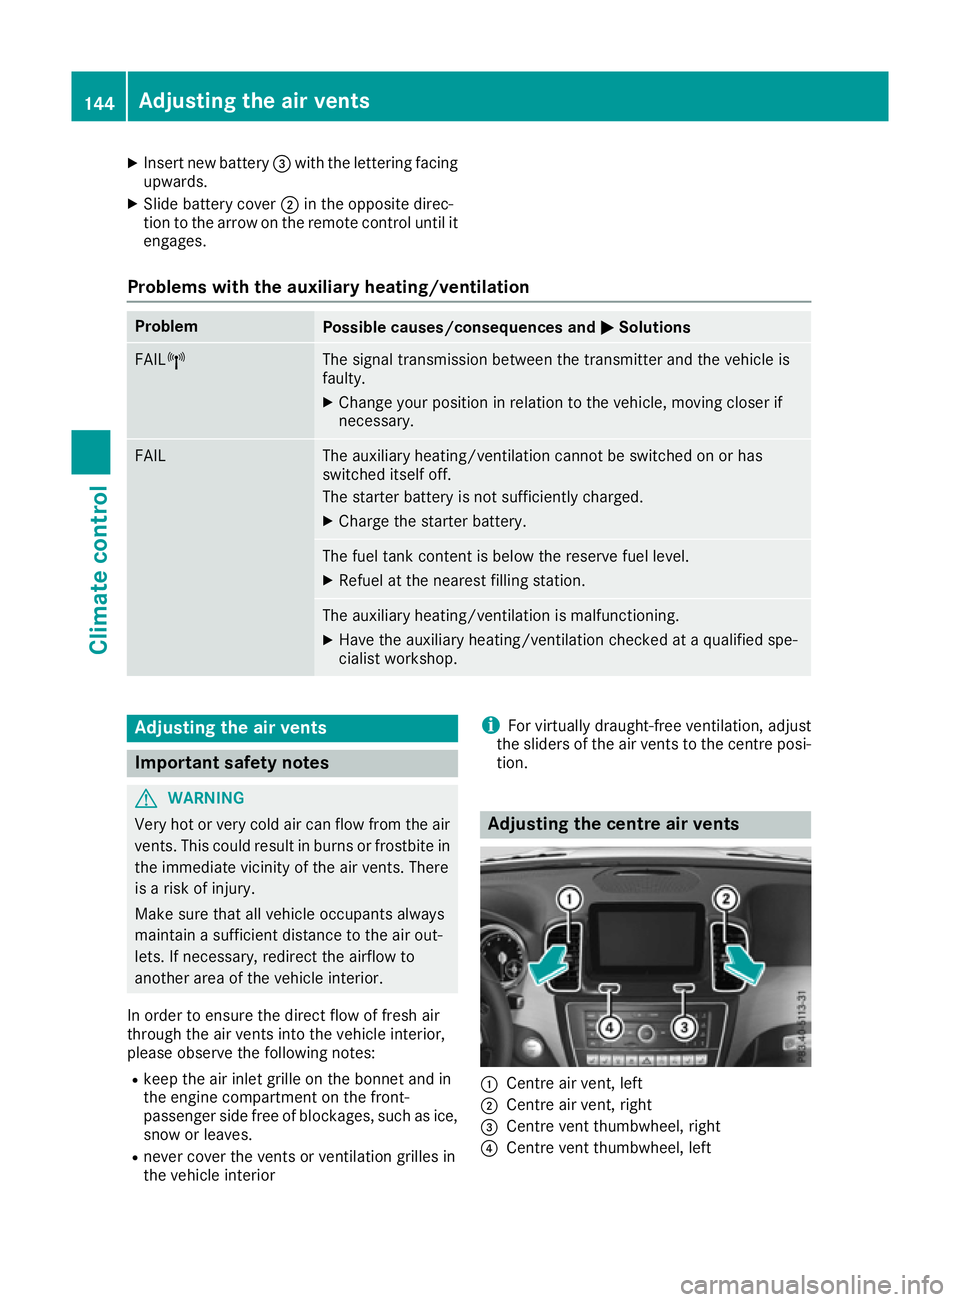
:
Centre air vent, left
; Centre air vent, right
= Centre vent thumbwheel, right
? Centre vent thumbwheel, left 144
Adjusting the air ventsClimate control
Page 151 of 397
!
Do not warm up the engine when the vehicle
is stationary. Drive off immediately. Avoid
high engine speeds and driving at full throttle
until the engine has reached its operating
temperature.
Only shift the automatic transmission to the
desired drive position when the vehicle is sta- tionary.
Where possible, avoid spinning the drive
wheels when pulling away on slippery roads.
You could otherwise damage the drive train.
! Mercedes-AMG vehicles:
at low engine oil
temperatures (below +20 †), the maximum
engine speed is restricted in order to protect
the engine. To protect the engine and main-
tain smooth engine operation, avoid driving at full throttle when the engine is cold. Key positions
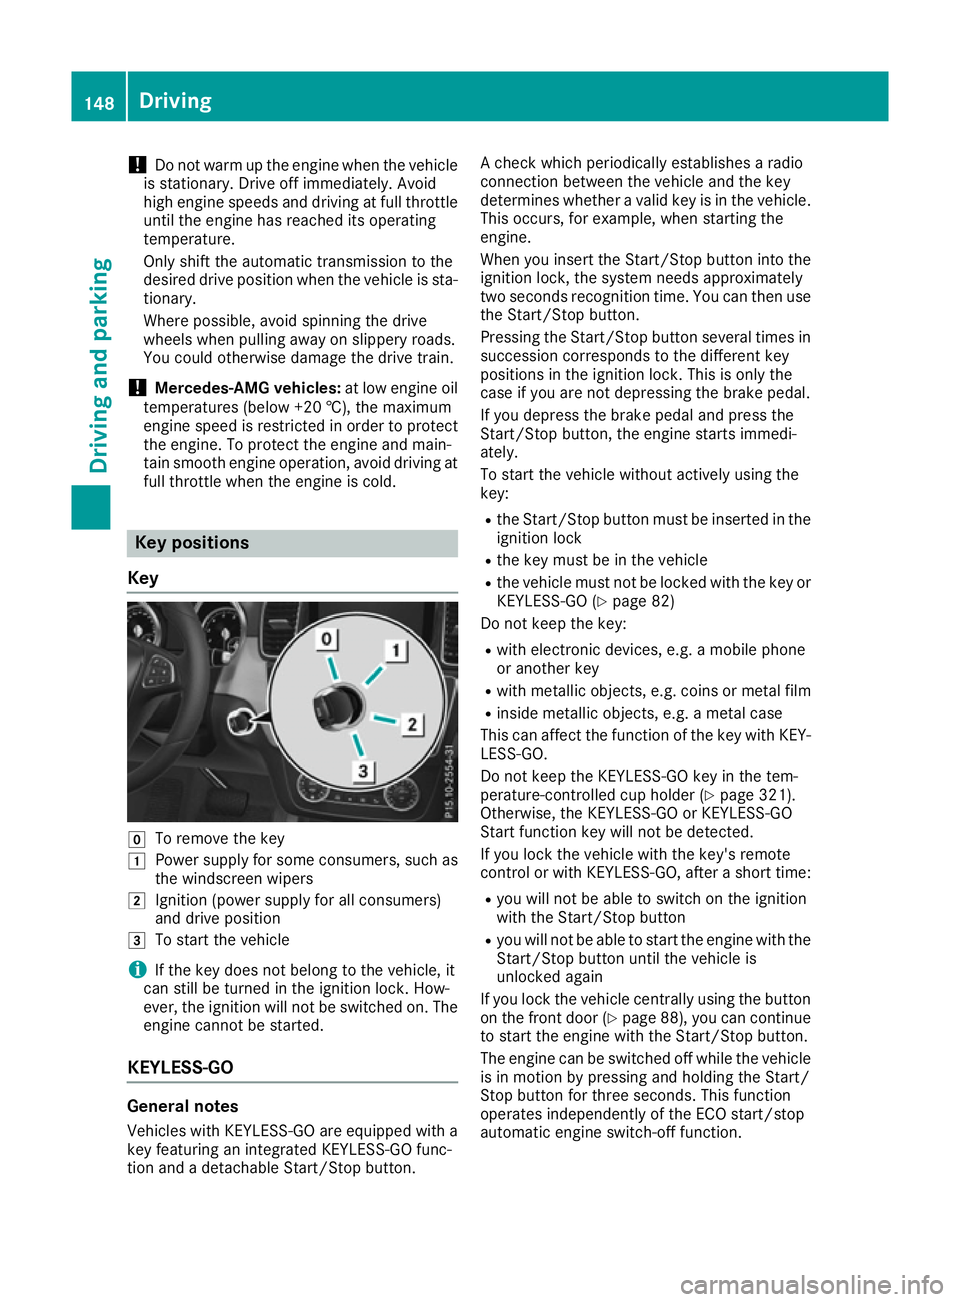
Key g
To remove the key
1 Power supply for some consumers, such as
the windscreen wipers
2 Ignition (power supply for all consumers)
and drive position
3 To start the vehicle
i If the key does not belong to the vehicle, it
can still be turned in the ignition lock. How-
ever, the ignition will not be switched on. The
engine cannot be started.
KEYLESS-GO General notes
Vehicles with KEYLESS-GO are equipped with a
key featuring an integrated KEYLESS-GO func-
tion and a detachable Start/Stop button. A check which periodically establishes a radio
connection between the vehicle and the key
determines whether a valid key is in the vehicle.
This occurs, for example, when starting the
engine.
When you insert the Start/Stop button into the
ignition lock, the system needs approximately
two seconds recognition time. You can then use the Start/Stop button.
Pressing the Start/Stop button several times in
succession corresponds to the different key
positions in the ignition lock. This is only the
case if you are not depressing the brake pedal.
If you depress the brake pedal and press the
Start/Stop button, the engine starts immedi-
ately.
To start the vehicle without actively using the
key:
R the Start/Stop button must be inserted in the
ignition lock
R the key must be in the vehicle
R the vehicle must not be locked with the key or
KEYLESS-GO (Y page 82)
Do not keep the key:
R with electronic devices, e.g. a mobile phone
or another key
R with metallic objects, e.g. coins or metal film
R inside metallic objects, e.g. a metal case
This can affect the function of the key with KEY- LESS-GO.
Do not keep the KEYLESS-GO key in the tem-
perature-controlled cup holder (Y page 321).
Otherwise, the KEYLESS-GO or KEYLESS-GO
Start function key will not be detected.
If you lock the vehicle with the key's remote
control or with KEYLESS-GO, after a short time:
R you will not be able to switch on the ignition
with the Start/Stop button
R you will not be able to start the engine with the
Start/Stop button until the vehicle is
unlocked again
If you lock the vehicle centrally using the button
on the front door (Y page 88), you can continue
to start the engine with the Start/Stop button.
The engine can be switched off while the vehicle is in motion by pressing and holding the Start/
Stop button for three seconds. This function
operates independently of the ECO start/stop
automatic engine switch-off function. 148
DrivingDriving and parking
Page 157 of 397
Problems with the engine
Problem
Possible causes/consequences and
M
MSolutions The engine does not
start. The starter motor
can be heard. R
There is a malfunction in the engine electronics.
R There is a malfunction in the fuel supply.
Before attempting to start the engine again:
X Turn the key back to position 0in the ignition lock.
or X Press the Start/Stop button repeatedly until all indicator lamps in
the instrument cluster go out.
X Try to start the engine again (Y page 149). Avoid excessively long
and frequent attempts to start the engine, as this will drain the
battery.
If the engine does not start after several attempts:
X Consult a qualified specialist workshop. The engine does not
start. The starter motor
can be heard. The
reserve fuel warning
lamp is lit and the fuel
gauge display shows
0. The fuel tank is empty.
X Refuel the vehicle. The engine does not
start. You cannot hear
the starter motor. The on-board voltage is too low because the battery is too weak or
discharged.
X Jump-start the vehicle (Y page 354).
If the engine does not start despite attempts to jump-start it:
X Consult a qualified specialist workshop. The starter motor was exposed to a thermal load that was too high.
X Allow the starter motor to cool down for approximately two minutes.
X Try to start the engine again.
If the engine still does not start: X Consult a qualified specialist workshop. Vehicles with a petrol
engine:
The engine is not running
smoothly and is misfir-
ing. There is a malfunction in the engine electronics or in a mechanical
component of the engine management system.
X Only depress the accelerator pedal slightly.
Otherwise, non-combusted fuel may get into the catalytic converter
and damage it.
X Have the cause rectified immediately at a qualified specialist work-
shop. 154
DrivingDriving and parking
Page 158 of 397
Problem
Possible causes/consequences and
M
MSolutions The coolant temperature
display is showing more
than 120 †. The coolant warning lamp may also
be on and a warning tone
may sound. The coolant level is too low. The coolant is too hot and the engine is no
longer being cooled sufficiently.
X Stop as soon as possible and allow the engine and the coolant to
cool down.
X Check the coolant level (Y page 335). Observe the warning notes
as you do so and top up the coolant if necessary. If the coolant level is correct, the radiator fan may be faulty. The cool-
ant is too hot and the engine is no longer being cooled sufficiently.
X If the coolant temperature is below 120 †, you can continue driving
to the nearest qualified specialist workshop.
X Avoid heavy loads on the engine as you do so, e.g. driving in moun-
tainous terrain and stop-start traffic. DYNAMIC SELECT controller
Use the DYNAMIC SELECT controller to change the drive program. Depending on the drive pro-
gram selected, the following vehicle character-
istics will change:
R the drive (engine and transmission manage-
ment)
R the transmission
R the suspension
R the steering
R the availability of the ECO start/stop function
If the ignition is switched off for less than four
hours, the previously selected drive program is
activated when the engine is next started. If the
ignition is switched off for more than four hours,
the Comfort drive program is activated when
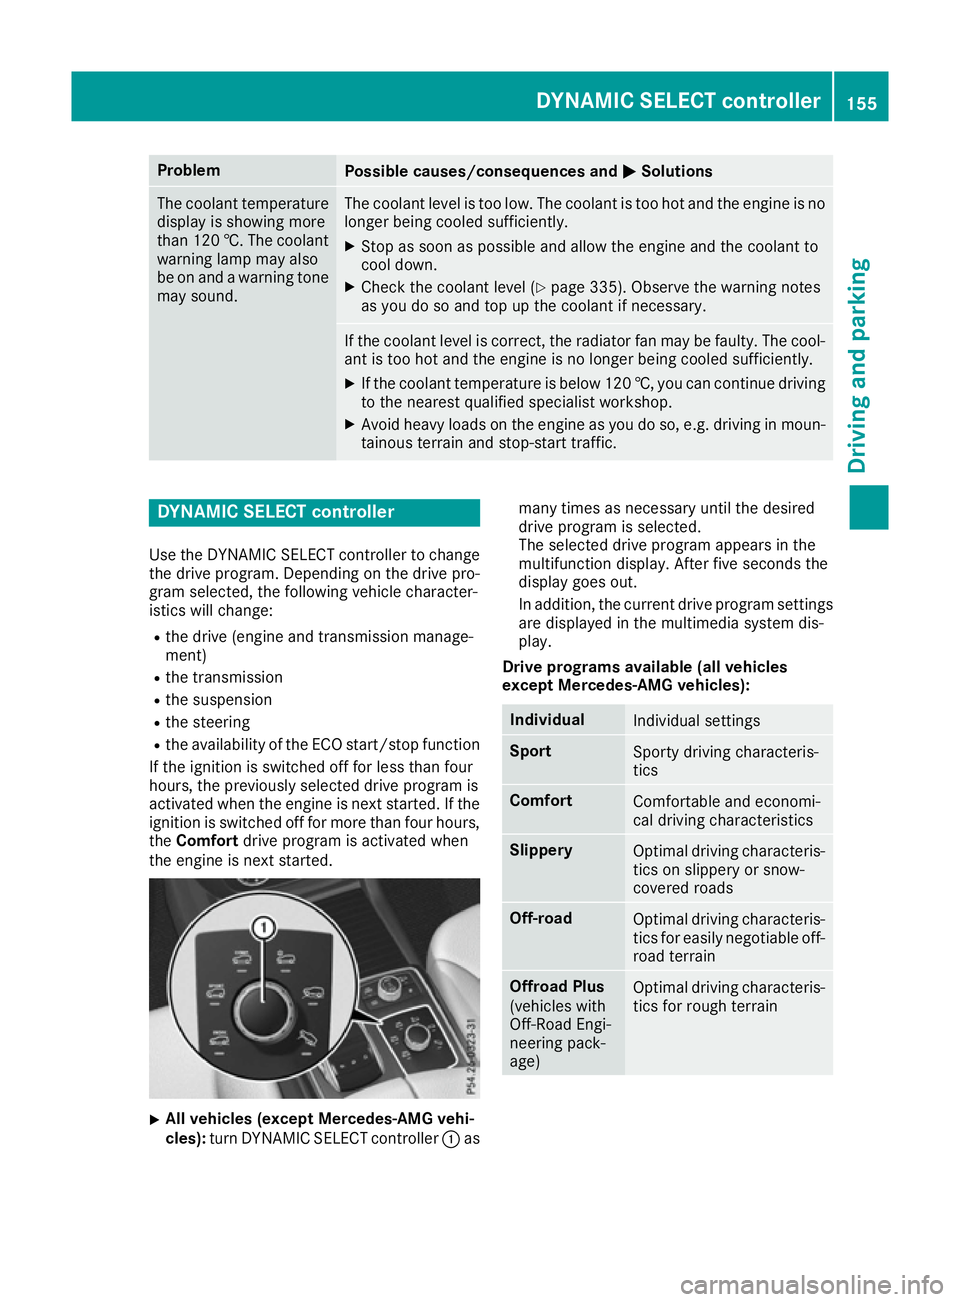
the engine is next started. X
All vehicles (except Mercedes-AMG vehi-
cles):
turn DYNAMIC SELECT controller :as many times as necessary until the desired
drive program is selected.
The selected drive program appears in the
multifunction display. After five seconds the
display goes out.
In addition, the current drive program settings
are displayed in the multimedia system dis-
play.
Drive programs available (all vehicles
except Mercedes-AMG vehicles): Individual
Individual settings
Sport
Sporty driving characteris-
tics
Comfort
Comfortable and economi-
cal driving characteristics
Slippery
Optimal driving characteris-
tics on slippery or snow-
covered roads Off-road
Optimal driving characteris-
tics for easily negotiable off-
road terrain Offroad Plus
(vehicles with
Off-Road Engi-
neering pack-
age)
Optimal driving characteris-
tics for rough terrain DYNAMIC SELECT controller
155Driving and parking Z
Page 159 of 397
Further information on:
R the Individual, Sport,Comfort andSlippery
drive programs (Y page 159)
R the Offroad drive program (vehicles without
Off-Road Engineering package)
(Y page 228)
R the Offroad andOffroad Plus drive pro-
grams (vehicles with Off-Road Engineering
package) (Y page 229) X
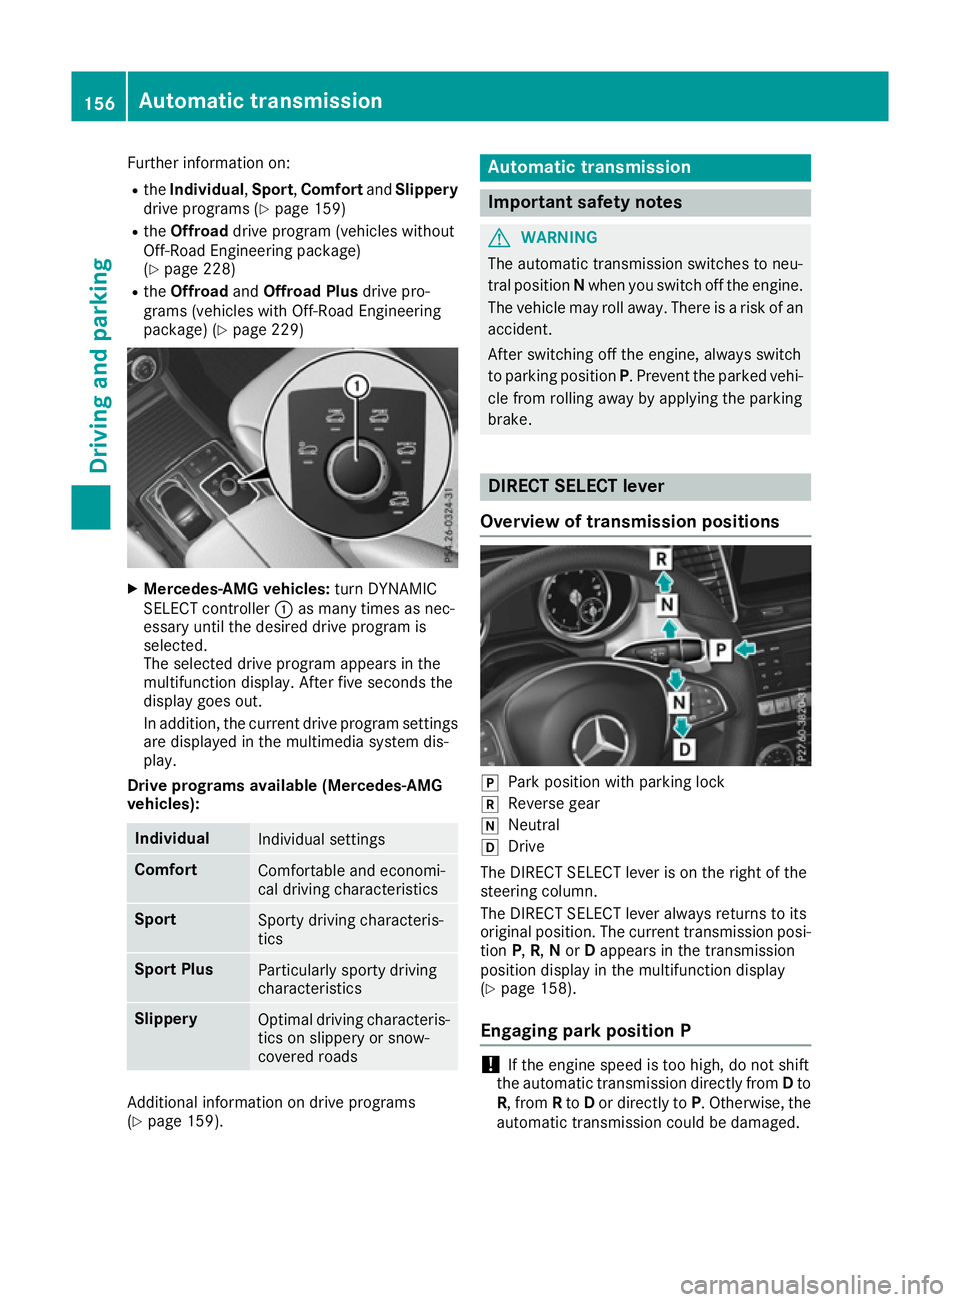
Mercedes-AMG vehicles: turn DYNAMIC
SELECT controller :as many times as nec-
essary until the desired drive program is
selected.
The selected drive program appears in the
multifunction display. After five seconds the
display goes out.
In addition, the current drive program settings are displayed in the multimedia system dis-
play.
Drive programs available (Mercedes-AMG
vehicles): Individual
Individual settings
Comfort
Comfortable and economi-
cal driving characteristics
Sport
Sporty driving characteris-
tics
Sport Plus
Particularly sporty driving
characteristics
Slippery
Optimal driving characteris-
tics on slippery or snow-
covered roads Additional information on drive programs
(Y page 159). Automatic transmission
Important safety notes
G
WARNING
The automatic transmission switches to neu-
tral position Nwhen you switch off the engine.
The vehicle may roll away. There is a risk of an
accident.
After switching off the engine, always switch
to parking position P. Prevent the parked vehi-
cle from rolling away by applying the parking
brake. DIRECT SELECT lever
Overview of transmission positions j
Park position with parking lock
k Reverse gear
i Neutral
h Drive
The DIRECT SELECT lever is on the right of the
steering column.
The DIRECT SELECT lever always returns to its
original position. The current transmission posi-
tion P,R, Nor Dappears in the transmission
position display in the multifunction display
(Y page 158).
Engaging park position P !
If the engine speed is too high, do not shift
the automatic transmission directly from Dto
R, from Rto Dor directly to P. Otherwise, the
automatic transmission could be damaged. 156
Automatic transmissionDriving and parking