Page 105 of 294

Night vision assist
Night vision assist with
pedestrian and wild
an imal highlighting
Description
Applies to vehicles: with night visio n assist
The night vision assist con detect, highlight and,
if necessary, worn about pedestrians and large
wild animals.
Night vision assistant with pedestrian and wild
animal detection assists you in darkness by using
an infrared camera to monitor the area in front of
your vehicle, within the limits of the system . It
can display objects up to approximately 1000 feet (300 meters) away . The heat image
detected by the camera is shown in the instru
ment cluster display . Warm areas appear lighter
and cold areas appear darker .
Highlighting detected pedestrians and wild
animals
Applies to vehicles: with night vision ass ist
Fig. 109 Inst rume nt cluster: Yellow pedestrian highlight ·
ing
Fig. 110 Instrument cluster: symbol when infrared image rl 1.0 is not vis ible U"I
M I.Cl rl
N ig ht vis io n a ssis t
Within the limits of the system, night vision as
sistant can detect pedestrians and wild animals
that are within the detection range between ap
proximately 32 feet (10 meters) and 295 feet
(90 meters) in front of the vehicle. When it is
dark outside and the headlights are switched on,
detected pedestrians and w ild an imals are
marked in yellow
c::> fig. 109 within the limits of
the system
c::> page 104 . Wild animal detection is
not active in bu ilt -up areas. The system only de
tects large wild animals such as deer.
(D Tips
If another display such as nav igat ion replaces
the image from the night vision assist the~-,
symbol appears in a tab
c::> fig. 110 . You can
access night vision assist using the buttons in
the multifunction steering wheel
c::> page 24.
Pedestrian and wild animal warning
Applies to vehicles: with night vision assist
Fig. 111 Instrument cluster: @Pedestrian warning, @
w ild animal warning
F ig. 1 12 In strument cluster: @Pedestrian warning/ @
wild animal warning, when the image from the night vision
ass ist is not selected in the instrument duster display ....
103
Page 106 of 294

Night vision assist
Display in the instrument cluster/head-up
display*
If there are pedestrians or wild animals in an
area in front of your vehicle that is classified as
critical, the system will direct your attention to
this :
- Pedestrians or wild animals are highlighted in
red and the corresponding symbol. or.
turns on
¢fig. 111.
-There is also a tone.
The area class ified as crit ica l is based on the vehi
cle speed and the steering wheel angle . Pedes
trian and wild animal warning encourages you to
pay more attention.
If the n ight vision assist image is replaced by an
other display (such as the on-board computer),
the red indicator light . or. will appear if
there is a pedestrian or wild animal warning
¢ fig. 112 .
If the head-up display* is switched on and the
night vision assist content is activated, • or.
will appear in the head-up display*.
Marking light*
To direct the driver's at tention to a pedest rian,
the head lights can flash on the pedestrian three
times in a row when there is a pedestrian warn
ing .
This happens at speeds above approx imately
35 mph (60 km/h) when you are traveling out
side of well-lit areas and when flashing the head lights will not create glare for a vehicle detected
in the oncoming lane . The marker light* is con
trolled by the high beam assist*
c;, page 45, High
beam assist.
The marking light is not used for wi ld animals.
104
General information
Applies to vehicles: with night vision assist
Fig. 113 Front of the vehicle: night vision camera
The following situations may affect the function
of the night vision assist system:
- Poor visibility such as snow, rain, fog or heavy
spray
- Dirty lens on the night vision assist camera
Make sure the night vision assist camera
¢fig. 113 is not covered by sticke rs, deposits or
any other obstructions because that can affect
the camera function. For information on clean
ing, refer to
c;, page 203.
Pedestrian and wild anima l detect ion depends on
the difference in temperature between the per
son/wild animal and the background area . Pedes
trians/wild animals may not be detected if the
difference is too small. Pedestrian and wild ani mal marking and the marker light* are deactivat
ed at temperatures above approximately 77 °F
(25 °() and when it is light outside . When the
night vision assistant image is selected in the in
strument cluster display, the
II symbol appears
i n the upper right.
.&_ WARNING
Pay attention to traffic and the area around
your vehicle when night vision assist is switch
ed on . As the driver, you are always responsi
ble for assessing the traffic situat ion.
- Night vision assist can only warn about peo
ple and wild animals located within the visu
al range of the infrared camera. The visual
range corresponds to the image in the in
strument cluster display .
-
Page 107 of 294

.... N
0 CJ '
M I.Cl ......
-Night vision assist may not detect people or
wild animals and mark them if
- they are not in an upright position, for ex
ample if they are sitting or lying down
and/or
- the silhouette in the display appears in
complete or interrupted, for example be
cause the person is partially covered by a
vehicle or an animal by tall grass. This could increase the risk of an accident.
- Never try to swerve around animals if doing
so will endanger you or other road users, be
cause this increases the risk of an accident.
(D Tips
- Even though the system evaluates the
shape and heat given off by all detected ob
j ects, there are limits to the system. There
may be false warnings.
- For technical reasons, the image pauses in
split second intervals.
Switching on/off
Applies to vehicles: with night vision ass ist
Fig. 114 Area around the light switc h: nigh t vis ion assist
b u tto n
Requirement : Switch the ignition on and turn the
light switch to the
AUTO position or .
.,. Press th e
lliJ button ~ fig. 114. The heat image
from the night vision camera appears in the in
strument cluster display .
.,. Press the
lliJ button aga in to switch night vision
assist off .
If condit ions are bright enough, night vision as
sist can be sw itched on without moving the light
switch to the
AUTO position. Pedestrian and wild
Night vision assist
animal highlighting and warnings are only active
when it is dark outside and the headlights are
switched on .
Adjusting the contrast
Applies to vehicles: wit h night vision assist
.,. Select: the I CARI function button > (Car)* Sys
tems
contro l button > Driver assistance >
Night vision assist contrast .
When the night vision assist is sw itched on and
the image is visible in the instrument cluster dis
play, you can adjust the contrast in the image
from
Min to Max .
Driver messages
Applies to vehicles: with night vision assist
Night vision assist: System fault
The system cannot guarantee correct function
and is switched off . See an authorized Audi deal
er or authorized Audi Service Facility for assis
tance.
Night vision assist: Currently unavailable
The system cannot guarantee correct function
temporarily and is switched off.
Night vision assist: Only available at night with
lights turned on
Night vision assist only works when it is dark out
side and the headlights are on.
Night vision assist: Pedestrian marking current
ly unavailable
The pedestrian and wild animal highlighting was
switched off by the system .
105
Page 108 of 294

Automatic transmission
Automatic transmission S tronic, tiptronic
Introduction
The automatic transmission is controlled elec
tronically. The transmission upshifts or down
shifts automatically depending on which drive
program is selected.
When a
moderate driving style is used, the
transmission selects the most economical driving
mode. The transmission upshifts at a lower RPM
and downshifts at a higher RPM to improve fuel
efficiency.
The transmission switches to a sporty mode after
a kick-down or when the driver uses a
sporty
driving style
characterized by quick accelerator
pedal movements, heavy acceleration, frequent
changes in speed and traveling at the maximum
speed.
If desired , th e driver can also select the gears
manually (tiptronic mode) 9 page 110.
Various automatic transmissions may be instal
led, depending on the model:
S tronic transmission
The S tronic is a dual-clutch transmission. Power
is transferred using two clutches that work inde
pendently from one another. They replace the
torque converter used in conventional automatic
transmissions and allow the vehicle to accelerate
without a noticeable interruption in traction.
tiptronic transmission
In the tiptronic transmission, power is transfer
red by a torque converter.
106
Selector lever positions
Fig. 115 Display in the instrument cluster: selector lever
position
The selector lever position engaged appears next
to the selector lever as well as in the instrument
cluster display.
P -Park
In this selector lever position the transmission is
mechanically locked. Engage P only when the ve
hicle is
completely stopped¢&. in Driving the
automatic transmission on page 108.
To shift in or out of position P, you must first
press and hold the brake pedal and then press
the release button in the selector lever handle
while moving the selector lever to or from P. You
can shift out of this position only with the igni
tion on.
R -Reverse
Select R only when the vehicle is at a full stop
and the engine is running at idle speed¢&. in
Driving the automatic transmission on
page 108.
Before you move the selector lever to R, press
both the button in the handle of the selector lev
er
and the brake pedal at the same time.
When the ignition is on, the backup lights illumi
nate when the selector lever is moved into R.
N -Neutral
The transmission is in neutral in this position.
Shift to this position for standing with the brakes
applied
9 A in Driving the automatic transmis
sion on page 108.
...
Page 109 of 294
, you must always app ly the foot
brake before and while moving th")
.... N
0 CJ '
M I.Cl ......
When the vehicle is stationary or at speeds below 1 mph (2 km/h), you must always app ly the foot
brake before and while moving the lever out of N.
DIS -Normal position for driving forward
In the D/S position, the transmission can be op
e rated either in the no rmal mode Dor in the
sport mode S. To select the sport mode S, pull
the selector lever back briefly. Pu lling the lever
back again will select the normal mode D . The in
strument cluster display shows the selected driv
ing mode .
In the
normal mode D, the transmission auto
matica lly selects the suitable gear ratio. It de
pends on engine load, vehicle speed and driving
style .
Select the
sport mode S for sporty driving. The
vehicle makes full use of the engine's power.
Shifting may become noticeable when accelerat
ing.
When the vehicle is stationary or at speeds below 1 mph (2 km/h), you must always app ly the foot
brake before and while moving the lever to D/S
out of N.
A WARNING
Read and follow all WARNINGS¢&. in Driv
ing the automatic transmission on
page 108.
(D Note
Coasting downhill w ith the transm iss ion in N
and the engine not running will result in dam
age to the automatic transmission and poss i
bly the catalytic converter.
@ Tips
-Audi drive select: you can adjust the sporty sh ift characteristics in the
Dynamic driving
mode.Sw ill appea r in the instrument clus
ter display instead of D.
- If you accidentally select N while driving,
take your foot off the accelerator pedal im
mediately and wait for the engine to slow
down to idle before selecting 0/5.
Automatic transmission
-If there is a power failure, the selector lever
wi ll not move out of the P position. The
emergency re lease can be used if t his hap
pens
¢ page 112.
Selector lever lock
The selector lever lock prevents you from select
ing a gear accidentally, causing the vehicle to
roll.
)
Fig . 11 6 Selector lever lock
To release the se lector lever lock:
" Switch the ignition on.
" Press the brake pedal
while pressing the inter-
lock button .
Automatic shift lock (ASL)
The selector lever is locked in the P and N posi
tions when the ignition is switched on. The re
move it from t hese positions, the driver must
press the brake pedal and press the lock button
at the same time. The following message ap
pears in the instrument cluster display when the
selector lever is in the P or N position to remind
the driver:
Brake pedal must be applied to shift from P
The Automatic Shift Lock only functions when the
vehicle is stat ionary or at speeds below 1 mph
(2 km/h) . At speeds above about 1 mph (2 km/h)
the Automatic Shift Lock is automatically deacti
vated in the N position .
The selector lever is not locked when shift ing
quickly through N, for example from R to D. This
makes it possible to free the vehicle when it is
stuck by "rocking" it. Th e selector lever lock en-
gages if the leve r stays in the N position longer ...
107
Page 110 of 294

Automatic transmissio n
than 2 seconds when the brake pedal is not
pressed.
Lock button
The lock button in the selecto r lever hand le pre
ve nts yo u from moving the selector lever un in
tentionally while in some se lector lever positions .
The positions that require the lock button to be
pr essed are marked in co lor in the i llustration
¢ fig. 116 .
Driving the automatic transmission
Starting the engine
~ T he selector lever must be in P or N.
Starting off
~ Press and hold the brake pedal.
~ Press and hold the release button in the selec
tor lever handle, se lect the des ired selector lev
er position such as D/S and r ele ase the button.
~ Wait briefly until the transmission has shifted
(you w ill feel a slight movement).
~ Remove your foot from the brake pedal and ac
celerate .
Stopping t emporar ily
~ Keep the vehicle stationary using the braking
pedal , for example at traffic lights .
~ Do not press the accelerator pedal when doing
th is .
~ To prevent the vehicle from rolling when you
start driving, set the park ing brake when stop
ping on steep inclines¢,& .
~ The pa rk ing brake w ill release automatically
and the vehi cle will start moving once you press
the accelerator pedal.
Stopping /parking
If the se lector lever is not in the P posit ion when
you open the d river's door, the vehicle could roll.
The message
Tran smission : Car ma y roll! Shift
to park!
appears .
~ Press and hold the brake pedal unt il the vehicle
has come to a complete stop.
~ Apply the pa rking brake ¢ page 77, Parking .
~ Select the P selector leve r position ¢ ,& .
108
Stopping on an incline
~ Always press the brake pedal to ho ld the vehi
cle in p lace and prevent it from "rolling back"
¢
,& . Do not try to prevent the vehicle from
"rolling back" when a gear is engaged by in
creas ing the engine speed ¢(D .
Starting on an inclin e
~ Activate the pa rk ing br ake.
~ With the driving gear selected, press the accel
erator pedal carefully. The parking brake will
re lease a utomatically if your seat belt is fas
tened.
Under certain circumstances, such as driving in
the mountains, it may be useful to switch tempo rarily to the manual sh ift program in order to ad
j ust the gears to the dr iv ing cond it ions by hand
Q ,&. .
On s lopes, activate the parking brake first and
then move the selector lever to the P position.
This prevents too much stress from being placed
on the locking mechanism.
A WARNING
- The vehicle can also roll when the eng ine is
stopped .
- Unintended vehicle movement can cause se
rious injury .
- Never leave your veh icle with the engine
r u nning while in gear. If you must leave
your veh icle when the eng ine is r unning, ac
tivate t he pa rking bra ke a nd move the selec
to r lever to P.
- P owe r is still transmitted to the wheels
when the engine is runn ing a t idle . To p re
ve nt the vehicle from "creeping ", yo u m ust
keep your foot on the b rake when the en
gine is running and the se lector lever is in D/
5 or R or "tiptronic" mode is se lected .
- D o not press the acce le ra tor peda l when
changing the se lector lever posit ion while
the vehicle is stationary and the engine is
r u nning.
- Never sh ift into R or P whi le driving.
Page 111 of 294

-Before driving down a steep slope, reduce
your speed and shift into a lower gear with
"tiptronic" .
- Do not ride the brakes or press the brake
pedal too often or too long when driving
down a hill. Constant braking causes the
brakes to overheat and substantially re
duces braking performance, increases brak
ing distance or causes complete failure of
the brake system .
- To prevent the vehicle from rolling back
when stopping on inclines, always hold it in
place with the brake pedal or parking brake.
- Never hold the vehicle on an incline with a
slipping clutch. The clutch opens automati
cally when it becomes too hot from the
overload. An indicator lamp
l!] illuminates
and a driver message appears
¢ page 111
when the clutch is overloaded.
- If the engine must remain running, never
have any driving position engaged when
checking under the hood. Make sure these
lector lever has securely engaged and is
locked in P with the parking brake set
¢ page 216 . Otherwise, any increase in en
gine speed may set the vehicle in motion,
even with the parking brake applied .
(D Note
-When stopping on an incline, do not try to
hold the vehicle in place by pressing the ac
celerator pedal while a driving gear is se
lected . This can cause the transmission to
overheat and can damage it. Activate the
parking brake or press the brake pedal to
prevent the vehicle from rolling.
- Allowing the vehicle to roll when the engine
is stopped and the selector lever is in
N will
damage the transmission because it is not
lubricated under those circumstances.
(D} Tips
For safety reasons, the parking brake is re
leased automatically only when the driver's
safety belt is engaged in the buckle.
Automatic transmission
Hill descent control
Hill des cent control assists the driver when driv
ing down hills .
Hill descent control is activated when the sele c
tor lever is in the D or S posi tion and you press
the brake pedal. The transmission automatically selects a gear that is suitable for the incline. Hill
descent control tries to maintain the speed ach
ieved at the time of braking, within physical and
technical limitations . If may still be necessary to
adjust the speed with the brake pedal.
Hill descent control switches off once the hill lev
els out or you press the accelerator pedal.
On vehicles with a cruise control system*
¢ page 82, hill descent control is also activated
when the speed is set.
,&. WARNING
Hill descent control cannot overcome physical
limitations, so it may not be able
to maintain
a constant speed under all conditions. Always
be ready to apply the brakes.
109
Page 112 of 294

r
Fig. 117 Center console: shifting the gears manually
Fig. 118")
Automatic transmission
Manual shift program
Using the manual shift program you can man
ually select gears .
)
r
Fig. 117 Center console: shifting the gears manually
Fig. 118 Steering whee l: Shift paddles•
Gear selection with selector lever
The tiptronic mode can be selected eith er with
the vehicle stationary or on the
move.
• Push the selector lever to the right from D/S.
An M appears in the instrument cluster display
as soon as the transmission has shifted.
• To upshift, push the selector lever forward to
the plus position
G) ¢ fig. 117 .
• To downshift, push the lever to the minus posi-
tion
0 .
Gear selection with shift paddles*
The shift paddles are activated when the selector
lever is in D/S or the tiptronic manual shift pro
gram.
• To upshift , touch the shift padd le on the right
G)¢fig. 118.
• To downshift, touch the shift paddle on the left
0.
The transmission automatically shifts up or down
before critical engine speed is reached .
110
The transmission only allows manual shifting
when the engine speed is within the permitted
range.
(D Tips
- When you shift into the next lower gear, the
transmiss ion will downshift on ly when there
is no possibility of over-rewing the engine .
- When the kick-down comes on, the trans
mission will shift down to a lower gear, de
pending on vehicle and engine speeds.
- Tiptronic is inoperative when the transmis
sion is in the fail-safe mode.
Kick-down
Kick-down enables maximum acceleration.
When you press the accelerator pedal down be
yond the resistan ce point, the automatic tra ns
mission downshifts into a lower gear, depending
on vehicle speed and engine RPM. It shifts up in
to the next higher gear once the maximum speci
fied engine RPM is reached.
A WARNING
Please note that the whee ls could spin on
slick or slippery roads when kick-down is ac
tive.
Launch control program
App lies to vehicles: with S t ronic
The launch control program provides the best
possible acceleration when starting from a stop .
Requirement: The engine must be at operating
temperature and the steering wheel must not be
turned.
• Deactivate the Start-Stop-System *¢
page 81 .
The LED in the !CA.l "'! button turns on.
• With the engine running, press the
~,~-0-F F~I but
ton briefly¢
page 188. The II indicator light
turns on and the message
Stabilization control
(ESC): Off. Warning! Reduced stability
ap
pears in the instrument cluster display.
• Pull the selector leve r back out of the D/S posi
tion briefly to select the S position or se lect the .,..
 1
1 2
2 3
3 4
4 5
5 6
6 7
7 8
8 9
9 10
10 11
11 12
12 13
13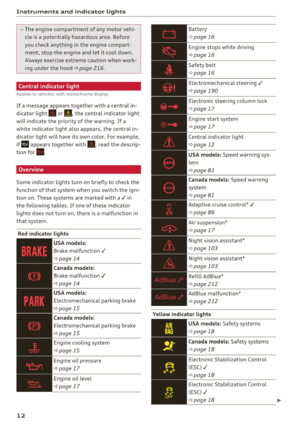 14
14 15
15 16
16 17
17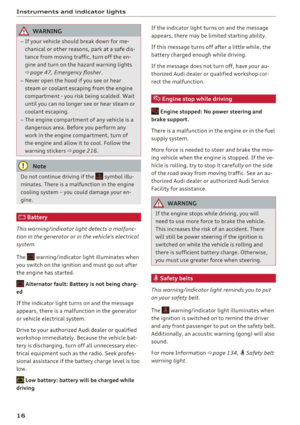 18
18 19
19 20
20 21
21 22
22 23
23 24
24 25
25 26
26 27
27 28
28 29
29 30
30 31
31 32
32 33
33 34
34 35
35 36
36 37
37 38
38 39
39 40
40 41
41 42
42 43
43 44
44 45
45 46
46 47
47 48
48 49
49 50
50 51
51 52
52 53
53 54
54 55
55 56
56 57
57 58
58 59
59 60
60 61
61 62
62 63
63 64
64 65
65 66
66 67
67 68
68 69
69 70
70 71
71 72
72 73
73 74
74 75
75 76
76 77
77 78
78 79
79 80
80 81
81 82
82 83
83 84
84 85
85 86
86 87
87 88
88 89
89 90
90 91
91 92
92 93
93 94
94 95
95 96
96 97
97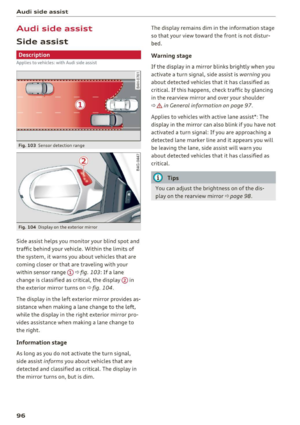 98
98 99
99 100
100 101
101 102
102 103
103 104
104 105
105 106
106 107
107 108
108 109
109 110
110 111
111 112
112 113
113 114
114 115
115 116
116 117
117 118
118 119
119 120
120 121
121 122
122 123
123 124
124 125
125 126
126 127
127 128
128 129
129 130
130 131
131 132
132 133
133 134
134 135
135 136
136 137
137 138
138 139
139 140
140 141
141 142
142 143
143 144
144 145
145 146
146 147
147 148
148 149
149 150
150 151
151 152
152 153
153 154
154 155
155 156
156 157
157 158
158 159
159 160
160 161
161 162
162 163
163 164
164 165
165 166
166 167
167 168
168 169
169 170
170 171
171 172
172 173
173 174
174 175
175 176
176 177
177 178
178 179
179 180
180 181
181 182
182 183
183 184
184 185
185 186
186 187
187 188
188 189
189 190
190 191
191 192
192 193
193 194
194 195
195 196
196 197
197 198
198 199
199 200
200 201
201 202
202 203
203 204
204 205
205 206
206 207
207 208
208 209
209 210
210 211
211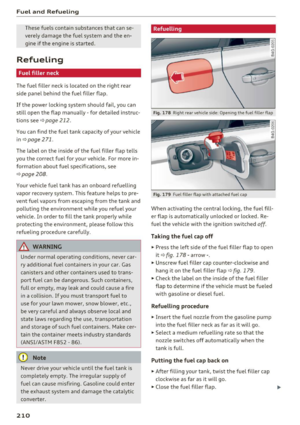 212
212 213
213 214
214 215
215 216
216 217
217 218
218 219
219 220
220 221
221 222
222 223
223 224
224 225
225 226
226 227
227 228
228 229
229 230
230 231
231 232
232 233
233 234
234 235
235 236
236 237
237 238
238 239
239 240
240 241
241 242
242 243
243 244
244 245
245 246
246 247
247 248
248 249
249 250
250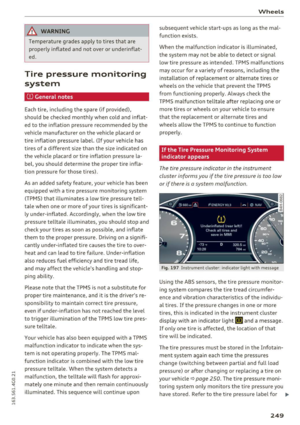 251
251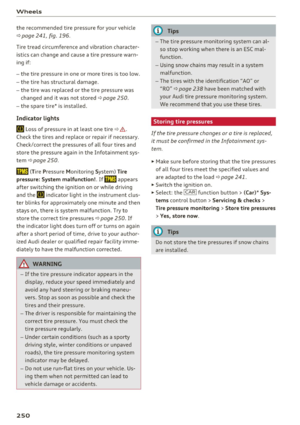 252
252 253
253 254
254 255
255 256
256 257
257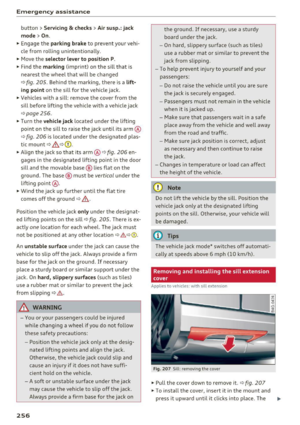 258
258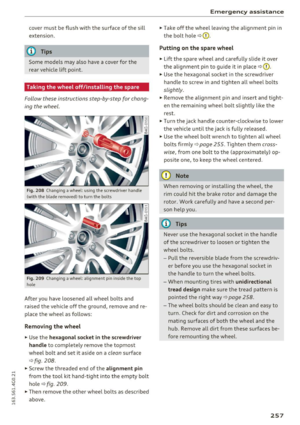 259
259 260
260 261
261 262
262 263
263 264
264 265
265 266
266 267
267 268
268 269
269 270
270 271
271 272
272 273
273 274
274 275
275 276
276 277
277 278
278 279
279 280
280 281
281 282
282 283
283 284
284 285
285 286
286 287
287 288
288 289
289 290
290 291
291 292
292 293
293