Page 249 of 294

~ Check and correc t the seating of the snow
chains if necessary after driving a few feet. Fol
l ow the instructions from the manufacturer .
~ Note the maximum permitted speed when driv
ing with snow chains. Do not exceed 30 mph
(SO km/h) .
Snow chains not only improve the
driving in win
ter road cond itions, but also the
braking.
Use of snow chains is on ly permitted with certain
rim/tire combinations due to tec hnical reasons .
Check with an authorized Audi dealer or author ized repair facility to see if you may use snow
cha ins.
You must remove the chains when driving on roads that are
free of snow. When roads are free
of snow, snow chains can impair handling and
damage the t ires, and the chains w ill quickly be
destroyed .
A WARNING
Using incorrect snow chains o r installing snow
chains incorrect ly can result in loss of vehicle
c ont rol, w hic h in cr eases the risk of a n acci
de nt.
- Snow cha ins can damage the rims/wheel
covers* if the cha ins come into d irect con
tact wi th them . Remove the whee l cove rs*
first. Use coated snow cha ins.
- Usi ng snow chai ns tha t add more than 0.4
i nch (10.5 mm) of he igh t ca n severely dam
age the wheel ho usings and othe r vehicle
components .
- Do no t install and use s now chains if there is
a mal funct ion in the adaptive air suspen
sion*, because the vehicle height wi ll be
very low. If you d rive with snow chains any
way, the wheel ho usings and othe r vehicle
components can be severely damaged.
Low aspect ratio tires
Your Aud i is factory -equipped with low aspect ra
tio tires . These t ires have been tho rough ly tested
and been se lected specifically for yo ur model fo r
Wheel s
their superb performance, road fee l and handling
u nder a variety of driving conditions . Ask your au
thorized Audi dea le r fo r more detai ls.
T he low aspect rat io o f th ese tires is indicated by
a n umeral of
55 or le ss in the tire's size des igna
tion . The numera l represents the ratio of the
t ir e's s idewall height in relation to its tread w idth
expressed in percentage. Conventiona l tires have
a he ight/width ratio of 60 or more.
The performance of low-aspect- ratio tires is par
ticularly sen sitive to imprope r inflat ion pres
s ure. It is the refore important that low aspect
rat io tires are inflated to the speci fied pre ssure
and that the inflation pressure i s regularly
checked and m aintain ed. Tir e pr essures should
be checked at least once a month and always
b efor e a long trip
~ page 241.
What you can do to avo id tire and rim
damage
Low aspect ratio tires can be damaged more eas i
ly by impact w ith po tholes, curbs, gullies or
ridges on the road, particularly if the tire is un
deri nflated.
In orde r to m in imize the occurrence of impact
damage to t he tires of yo ur vehicle , we recom
me nd that you observe the following pre ca u
t ions:
- Always ma intain recommended inflat ion pres
sures. Check yo ur tir e pressure every 2,000
m iles (3 ,00 0 k m) and add air if necessary.
- Dr ive ca refully on roads w it h potholes, deep
gullies o r ridges. T he impact from dr iving
t hrough or over such obstacles can damage
your tires. Impac t wi th a curb may a lso ca use
damage to your tires.
- Afte r any impac t, immed iate ly inspect yo ur
t ires or have them inspected by the nearest au
thorized A udi dealer. Rep lace a damaged tire as
soon as possible.
- Inspect your tires every 2,000 m iles (3,000 km)
for damage and wear. Damage is not a lways
easy to see. Damage can lead to loss of air and
underinflation, wh ich could eventually cause
tire fa ilure. If you believe that a tire may have
been damaged, replace the tire as soon as pos -
sible . .,.
247
Page 250 of 294

Wheels
- These tires may wear more q uickly than othe rs.
- Please also remembe r th at, w hile these tires
deliver responsive handling, they may r ide less
comfortably and make more noise than ot her
cho ices.
Reduced performance in wint er/ cold season
condit ion s
All tires are designed for certain purposes. The low aspect ratio, ultra high pe rformance tires
or iginally insta lled on yo ur vehicle are intended
for maximum d ry and wet road performance and
handling. They are not suitable for cold, snowy or
icy weathe r cond itions .
If you drive under those
circumstances, you should equ ip your ve hicle
with all-season or winter tires, wh ich offe r bette r
traction under those condit ions. We sugges t you
use the recommended snow or all-season tires
specified for yo ur vehicle, or their eq uivalen t.
Refer to¢
page 246 for more deta iled info rma·
tion reg arding w in ter ti res.
Uniform tire quality grading
- Tread we ar
- Tra ction AA A B C
- Temperature ABC
Qua lity grades can be found where app licab le on
the t ire side wall betwee n tread s hou lder and
maximum sect io n w idth ¢
page 231, fig . 193.
For e xample: Tread wear 200 , T raction AA, Tern·
pe rature A.
All passenger car tires must conform to Federa l
Safety Requirements in addition to these grades .
Tread wear
T he
tread wear grade is a compara tive ra ting
b a se d on the wea r rate of the t ire when tes ted
under contro lled conditions on a specified gov ·
ernment test co urse.
F or examp le, a tir e graded 150 would wear one
a nd one ha lf ( 11/2) times as well on t he gove rn·
men t course as a tire graded 100 .
T he rela tive perfo rmance of t ires depends upon
the a ct u a l c ondi tions of their use, howeve r, and
may depart s ignific ant ly from the norm d ue to
248
variations in driving habits, service p ract ices an d
differences in road characteristics and climate.
Traction
The
traction grades , from hig hest to lowest , a re
AA , A, B and
C. Those grades rep resent the tire's
a bility to stop o n wet p avement as measure d un
der controlled conditions on specified govern ·
ment test s urfaces of asphalt an d concrete. A tire
marked C may have poor traction perfo rmance
¢ ,& .
Temperature
The
temp eratur e grades are A ( the highest), B,
and C, representing the tire 's resistance to the
generatio n of heat and its ability to dissipate
heat when tested under contro lled conditions on
a specified indoor laboratory test wheel.
Sustained high temperature can cause the mate·
rial of the tire to degenerate and reduce tire life,
and excessive temperature can lead to s udden
tire failure¢ ,&.
The grade C cor responds to a level of perform ·
ance which all passenger car tires must meet un·
der the Federal Motor Vehicle Safety Standard
No . 109 . Grades Band A represent hig her levels
of performance on the laboratory test wheel than
t h e m inim um requ ired by law .
A WARNING
-
The tract io n grade assigned to this t ire is
based on st raig ht-a head braking tr action
tes ts, and do es not in clude acceler ation, cor·
n erin g, hy droplaning or pe ak traction ch arac
teristics.
A WARNING
T he tem pera ture grade fo r thi s tire is esta b·
lishe d for a tire that is properly inflated and
not ove rloaded . Excessive speed, underinfla ·
tion, o r excessive load ing, either separately or
in comb inat ion, can cause heat bu ildup and
-
possible tire failure . ..,
Page 251 of 294

.... N
0 CJ '
M I.Cl ......
_& WARNING
Temperature grades apply to tires that are properly inflated and not over or underinflat
ed .
Tire pressure monitoring
system
CD General notes
Each t ire, including the spare (if provided),
should be checked monthly when cold and inflat
ed to the inflation pressure recommended by the
veh icle manufac turer on the vehicle placard or
tire inflation pressure label. (If your vehicle has
tires of a different size than the size indicated on
the vehicle placard or tire inf lation pressure la
be l, you should determine the proper tire infla
tion pressure for those tires).
As an added safety feature, your veh icle has been
equipped with a tire pressure monitoring system
(TPMS) that illuminates a low tire press ure te ll
tale when one or more of your tires is significant l y under-inflated. Accordingly, when the low tire
pressure tellta le illuminates, you should stop and
check your tires as soon as possible, and inflate
them to the proper pressure. Driving on a s ignifi
cantly under-inflated tire causes the tire to over
heat and can lead to t ire failure. Unde r-inflation
also reduces fuel efficiency and tire tread life,
and may affect the vehicle's handling and stop
ping ability .
Please note that the TPMS is not a substitute for
proper tire maintenance, and i t is the driver's re
sponsib ility to ma inta in correct tire pressure,
even if under -inflation has not reached the level
to trigger illum inat ion of the TPMS low tire pres
sure telltale.
Your veh icle has also bee n eq uipp ed w ith a TPMS
mal function indicator to indicate when the sys
tem is not operating properly. The TPMS mal
function indicator is combined w ith the low tire
pressure tellta le. When the system detects a
malfunction, the telltale will flash for approxi
mately one minute and then remain cont inuously
illuminated . This sequence will continue upon
Wheels
subsequent vehicle start-ups as long as the mal
function exists .
When the malfunction indicator is illuminated ,
the system may not be able to detect or signal
low tire pressure as intended. TPMS malfunctions
may occur for a variety of reasons, including the
i nsta llation of replacement or alternate tires or
whee ls on the vehicle that prevent the TPMS
from functioning properly. Always check the
TPMS ma lfunction telltale after replac ing one or
more tires or wheels on your vehicle to ensure
that the replacement or a lternate tires and
whee ls allow the TPMS to continue to function
properly.
If the Tire Pressure Monitoring System
indicator appears
The tire pressure indicator in the instrument
cluster informs you if the tire pressure is too low
or if there is a system mo/function .
Fig. 197 Instrume nt cluste r: indicator light with message
Us ing the ABS sensors, the tir e pressure monitor
ing system compares the tire tread circumfer
ence and vibration characteristics of the individu
al tires. If the press ure changes in one or more
tires , this is indicated in the instrument cluster
display with an indicator light
ti] and a message.
If only one tire is affected, the location of that
tire will be indicated.
T he tire press ures must be stored in the Infotain
ment system again each time the pressures
change (switching between partial and full load
pressure) or after changing or replacing a tire on
your vehicle¢
page 250. The tire pressure moni
toring system only monitors the tire pressure you have stored. Refer to the tire pressure label for ..,.
249
Page 252 of 294

Wheels
the recommended tire pressure for your vehicle
¢ page 241, fig. 196.
Tire tread circumference and vibration character
istics can change and cause a tire pressure warn
ing if:
- the tire pressure in one or more tires is too low.
- the tire has structural damage .
- the tire was replaced or the tire pressure was
changed and it was not stored¢
page 250.
-the spare tire* is installed.
Indicator lights
IE Loss of pressure in at least one tire¢&. .
Check the tires and replace or repair if necessary.
Check/correct the pressures of all four tires and
store the pressure again in the Infotainment sys
tem ¢
page 250 .
mm (Tire Pressure Monitoring System) Tire
pressure: System malfunction!.
Ifmm appears
after switching the ignition on or while driving
and the
IE indicator light in the instrument clus
ter blinks for approximately one minute and then
stays on , there is system malfunction . Try to
store the correct tire pressures¢
page 250. If
the indicator light does turn off or turns on again
after a short period of time, drive to your author
ized Audi dealer or qualified repair facility imme
diate ly to have the malfunction corrected.
A WARNING
- If the ti re pressure indicator appears in the
display, reduce your speed immediately and
avoid any hard steering or braking maneu
vers. Stop as soon as possible and check the
t ir es and their pressure .
- The driver is responsible for maintaining the
correct tire pressure. You must check the
t ir e pressure regularly.
- Under certain conditions (such as a sporty
dr iv ing style, winter cond itions or unpaved
roads), the tire pressure mon itoring system
indicator may be delayed.
- Do not use run-flat tires on your vehicle. Us
ing them when not permitted can lead to
vehicle damage or accidents.
250
(D Tips
-The tire pressure monitoring system can al
so stop working when there is an ESC mal
function.
- Using snow chains may result in a system
malfunction.
- The tires with the identification "AO" or
"RO" ¢
page 2 38 have been matched with
your Audi tire pressure monitoring system.
We recommend that you use these tires.
Storing tire pressures
If the tire pressure changes or a tire is replaced,
it mus t be confirmed in the Infotainmen t sys
tem.
... Make sure before storing that the tire pressures
of all four tires meet the specified values and
are adapted to the load ¢
page 241.
... Switch the ignition on .
... Select: the
I CARI function button > (Car)* Sys
tems
contro l button > Servicing & checks >
Tire pressure monitoring > Store tire pressures
> Yes, store now.
(D Tips
Do not sto re the tire pressures if snow chains
a re installed.
Page 253 of 294

.... N
0 CJ '
M I.Cl ......
Emergency assistance
Trunk escape handle
In case of an emergency, the rear lid can be
opened from the inside using the trunk escape
handle.
Fig. 198 T runk escape handle: View from inside the closed
tru nk
T o o pen r ear lid
.,. Pull the handle down towards the bumper
<=> fig . 198.
The trunk escape handle inside the rear lid is
made of f luorescent material to glow in the dark.
&_ WARNING
The trunk escape handle is to be used only in
an emergency.
@ Tips
The emergency release lever should never be
used as a handle for closing the rear lid .
Warning triangle
Applies to vehicles: With warning triangle
Fig. 199 Luggage compartment lid: warn ing triangle
Em ergen cy a ssis tanc e
The warning triangle placed in the vehicle at the
factory is located in the luggage compartment.
" To remove the warn ing triangle, press the re -
tainer in the direction of the arrow and fold the
holder down.
T he luggage compartment lid is only designed to
hold the warning triangle offered by the original
accessories program.
Vehicle tool kit
Vehicle tool kit and jack
The vehicle tool kit is located in the luggage
compartment under the cargo floor cover.
F ig. 200 Luggage compa rt m ent : cargo floor cover fo lded
upwa rd/ spa re t ire
Fig. 201 T runk lid : Ve hicle too l kit
.,. Lift the cargo floor by the plastic handle
<=>fig. 200.
a,
-N 9 (!) .. CD
" Hook the handle into the luggage compartment
weather strip.
" Turn the handwheel counter-clockwise
<=> fig. 200 and remove the spare tire to reach
the vehicle tool kit .
.,. Unhook the cargo floor before closing the rear
lid .
T he onboard tool kit includes:
25 1
Page 254 of 294

Emergency assistance
-Hooks to remove the whee l covers*
- Plastic hook to remove wheel bolt covers*
- Whee l bolt wrench
- Al ignment pin for changing wheels
- Screwdriver with revers ible blade
- Towing eye
- Jack
Before storing the jack, make sure it is wound
back down as far as it wi ll go.
A WARNING
Improper use of the vehicle jack can cause se
rious persona l injuries.
- Never use the screw driver hex head to
tighten whee l bolts, since the bolts cannot
atta in the necessary tighten ing torque if you
use the hex head, potentially caus ing an ac
cident.
- The factory-supplied jack is intended on ly
for your vehicle model. Under no circum
stances should it be used to lift heavy
vehicles or other loads; you r isk injuring
yourself.
- Never start the eng ine when the vehicle is
raised, which could cause an accident.
- Support the veh icle securely with appropri
ate stands if work is to be performed under
neath the vehicle; otherwise, there is a po
tent ial r isk for injury .
- Never use the jack supplied with your Audi
on another vehicle, particularly on a heavier
one. The jack is only suitable for use on the
vehicle it came with.
(D Tips
- Some of the on board items listed above are
provided on certain models only or are op
tiona l extras.
- Before you can ra ise your veh icle using the
j ack, you must act ivate the jacking mode
c:::;,page255.
252
· Space-saving spare tire (compact spare
tire)
The spare tire/wheel is located in the luggage
compartment under the cargo floor cover. It is
intended for short -term use only.
Taking out the spare tire
" Lift the cargo floor by the plastic handle
c:::;,page 251, fig. 200 .
" Hook the handle into the luggage compartment
weather strip.
"Tur n the large sc rew
c:::;, page 251, fig. 200
counter-clockwise .
" Take out the spare tire.
" Always store the vehicle tool kit, the jack* and
the replaced tire in the luggage compartment
c:::;,page 131.
"Unhook the cargo floor before closing the rear
lid .
Using the spare tire (compact spare tire)
The compact spare tire is on ly intended for emer
gencies until you can reach a repair shop. Replace
it as quickly as poss ible with a standard wheel
and t ire.
There are some restrictions on the use of the compact spare tire. The compact spare tire has
been designed spec ifically for your type of vehi
cle . It must not be swapped with a compact
spare tire from another type of veh icle .
Snow chains
For technical reasons, the use of snow chains on
the compact spare tire is
not permitted .
If you do have to drive with snow chains and a
front tire fails, mount the spare whee l with tire
instead
of a rear tire. Install the snow chains on
the rear tire and use it to replace the defect ive
front tire .
A WARNING
-Never use the spare tire if it is damaged or if
it is worn down to the tread wear indicators .
- If the spare tire is more than 6 years old,
use it only in an emergency and with ex
treme caution and careful driving.
Page 255 of 294

-The spare tire is intended on ly for tempora
ry and short-term use. It shou ld be replaced
as soon as possible with the normal wheel
and t ire.
- After mounting the compact spare tire, the
tire pressure must be checked as soon as
poss ible. The t ire pressure of the compact
spare tire m ust be 4.2 bar; otherwise, you
risk having an accident.
- Do not drive faster than SO mph (80 km/h).
You risk hav ing an accident .
-Avoid full-throttle accelerat ion, heavy brak
ing, and fast cornering . You risk having an
acc ident.
- Never drive us ing more than one spare
wheel and tire . You risk having an acc ident.
- Normal summer or winter tires must not be
mounted on the compact spare wheel rim .
- For technical reasons, the use of tire chains
on the spare tire is not perm itted. If it is
necessary to drive with t ire chains, the spare
wheel m ust be mounted on the front axle i n
the even t of a flat in a rea r tire. The new ly
avail able front wheel m ust then be insta lled
in place of the rear wheel with the flat tire .
Installing the tire chain before mounting
the wheel and tire is recommended .
- Loose items in the passenger compartment
can cause ser ious personal injury during
hard braking or in an acc ident. Never store
the inflatable spare t ire or jack and too ls in
the passenger compartment.
Replacing wheels
Before changing a wheel
Observe the following precautions for your own
and your passenger's safety when changing a
wheel.
• After you experience a tire failure , pull the car
well away from moving t raff ic and try to reach
level ground before you stop¢ A-
• All passengers sho uld leave the car and move
to a safe location (fo r instance, be hind the
guardrail) ¢
A.
• Engage the parking b rake to prevent yo ur vehi
cle from roll ing unintentionally ¢
A-
Em ergenc y ass is tanc e
• Move selecto r lever t o po sit ion P ¢ A .
• If you are towing a trai ler, unhitch the trailer
from yo ur vehicle .
• Take the
jack and the spare tire out of the lug
gage compartment
¢page 251, ¢page 252.
A WARNING
You or your passengers could be injured while
changing a whee l if you do no t follow these
safety precaut ions:
- If you have a flat tire, move a safe distance
off the road. Turn off the eng ine, turn the
emergency f lashers on a nd use other wa rn
ing devices to alert other motorists.
- Make sure that passenge rs wait i n a safe
p la ce away from the vehicle and well away
fr om the road and t raff ic.
- To help preven t the veh icle from moving
suddenly and possib ly slipping off the ja ck,
always fu lly set the park ing brake and bloc k
the wheel diagonally opposite the wheel be ing changed. When one front whee l is lifted
off the ground, placing the Automatic
Transmission in P (Park) wi ll
not prevent the
veh icle from moving.
- Before you change a wheel, be sure the
ground is level and firm. If necessary, use a
sturdy board under the jack.
- Always store the vehicle tool kit, the jack
and the replaced tire in the luggage com
partment
¢ page 131.
(!) Tips
Before changing the wheel, you must activate
the jacking mode, so that the automat ic con
tro ls for the Adaptive Air Suspension* do not
make it more difficult to lift the vehicle with
the jack ¢
page 255.
Changing a wheel
When you change a wheel , follow the sequence
described below step -by -step and in exactly that
order .
l. Activate the vehicle jack mode*¢ page 255. .,.
253
Page 256 of 294

Emergency assistance
2. Remove the decorative wheel cover*. For
mo re deta ils see also
c::> page 254, Decora
tiv e wheel cov ers
or c::> page 2 54, Wheels
with wheel bolt caps.
3. Loosen the wheel bolts c::> page 255 .
4. Locate the proper mounting point for the
jack and align the jack below tha t poi nt
~ pag e 255 .
5. Raise the car w ith the ja ck¢ page 255 .
6. Remove t he wheel with the flat tire an d t hen
install
the spare ¢ page 257.
7. Tighten all wheel bo lts light ly .
8. Lower the veh icle with the jack .
9. Use the whee l bolt wrench and firmly tighten
a ll whee l bolts ¢
page 255 .
10. Replace the decorative wheel cover* .
11. Deactivate the vehicle jack mode * in the
M MI: !CARI function button> ( Car )* systems
control b utton > Servicing & checks > Air
susp.: jack mode > Off .
The vehicle jack mode * switches off automatical
ly a t sp eed s above
6 mph (10 km/h) .
_&. WARNING
Always read and fo llow all WARNIN GS and in
f o rm atio n ¢
A in Raisi ng the vehicle on
p age 256
an d ¢page 258.
After changing a wheel
A wheel change is not complete without th e do
ing the following.
• Always store the veh icle tool kit, the jack* and
the replaced t ire in the luggage compartment
¢ page 131.
• Che ck the tire pressure on the sp are whee l im
med iate ly after mo unt ing it.
• As soon as possible, have t he
tightening tor
ques
on all whee l bo lts checked with a torque
wrench . The correct tightening torque is
90 ft
lb
(120 N m).
• Have the flat tire
replaced as soon as possible.
(D Tips
- If you notice t hat the w hee l bolts are cor
r oded and diffic ult to t urn w hile cha nging a
254
tir e, they s hou ld be re pla ce d b efo re yo u
check the t ightening torque .
- Drive at red uce d spee d unt il yo u ha ve the
t ightenin g torques checked .
- Aft er ch angin g a whee l, the tire pres sure i n
all fou r tires must be che cke d/cor rec ted and
t h e tire pressure mo nito ring ind icator must
be stored in the
MM I ¢ page 25 0.
, Decorative wheel covers
Applies to vehicles: with decorative w heel covers
The decorative wheel co vers must be removed
first to access the wheel bolts .
Fig. 202 Cha ng ing a w heel : Re mov ing t he w heel cover
Removing
• Insert the hook (p rovided w ith the vehicle tool
kit) i n the hole in the wheel hub cover.
• Pull off th e
decorative wheel cover ¢ fig. 202 .
Wheels with wheel bolt caps
Applies to vehicles: wit h wheel bolts with caps
The caps must be removed first from the wheel
bolts before the bolts can b e unscrewed .
Fig. 203 Cha ngi ng a w hee l: re m ovin g the w heel bo lt ca ps ..,
 1
1 2
2 3
3 4
4 5
5 6
6 7
7 8
8 9
9 10
10 11
11 12
12 13
13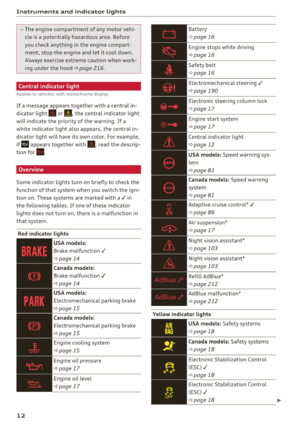 14
14 15
15 16
16 17
17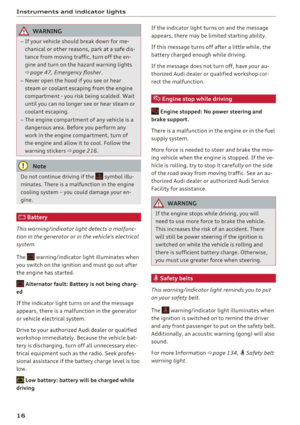 18
18 19
19 20
20 21
21 22
22 23
23 24
24 25
25 26
26 27
27 28
28 29
29 30
30 31
31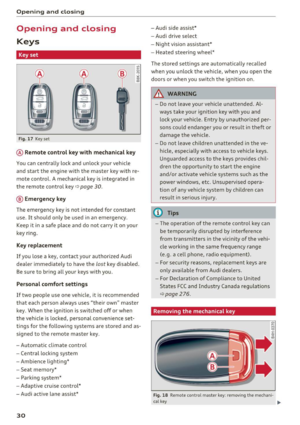 32
32 33
33 34
34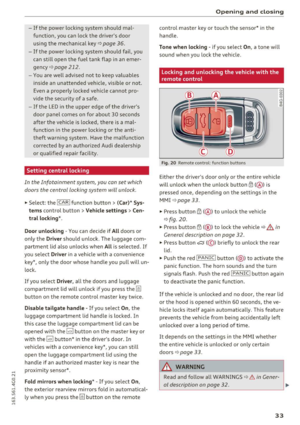 35
35 36
36 37
37 38
38 39
39 40
40 41
41 42
42 43
43 44
44 45
45 46
46 47
47 48
48 49
49 50
50 51
51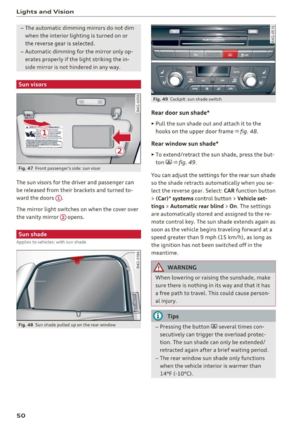 52
52 53
53 54
54 55
55 56
56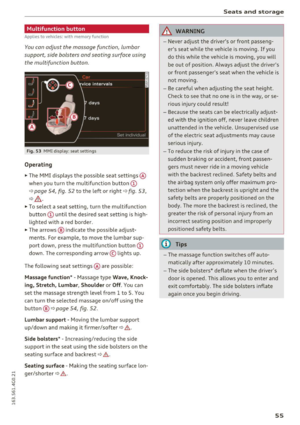 57
57 58
58 59
59 60
60 61
61 62
62 63
63 64
64 65
65 66
66 67
67 68
68 69
69 70
70 71
71 72
72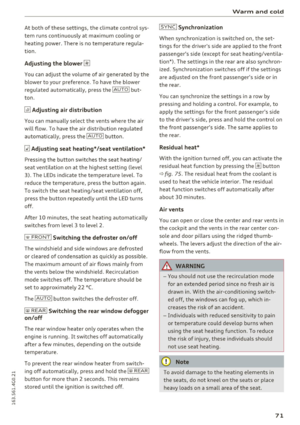 73
73 74
74 75
75 76
76 77
77 78
78 79
79 80
80 81
81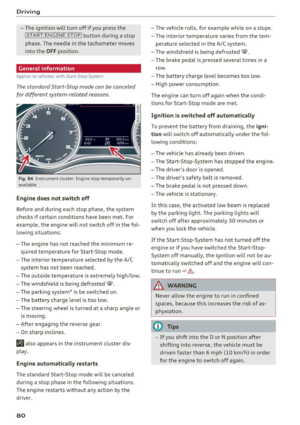 82
82 83
83 84
84 85
85 86
86 87
87 88
88 89
89 90
90 91
91 92
92 93
93 94
94 95
95 96
96 97
97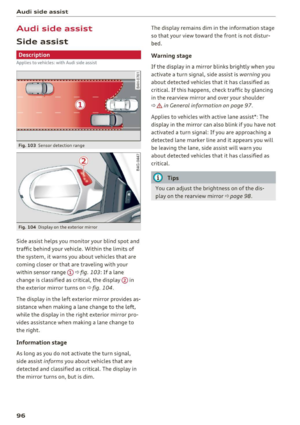 98
98 99
99 100
100 101
101 102
102 103
103 104
104 105
105 106
106 107
107 108
108 109
109 110
110 111
111 112
112 113
113 114
114 115
115 116
116 117
117 118
118 119
119 120
120 121
121 122
122 123
123 124
124 125
125 126
126 127
127 128
128 129
129 130
130 131
131 132
132 133
133 134
134 135
135 136
136 137
137 138
138 139
139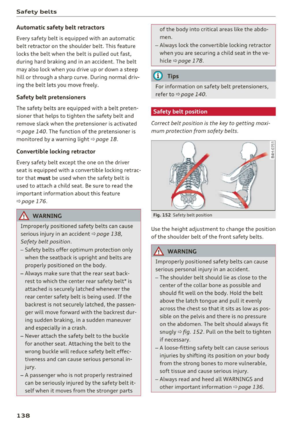 140
140 141
141 142
142 143
143 144
144 145
145 146
146 147
147 148
148 149
149 150
150 151
151 152
152 153
153 154
154 155
155 156
156 157
157 158
158 159
159 160
160 161
161 162
162 163
163 164
164 165
165 166
166 167
167 168
168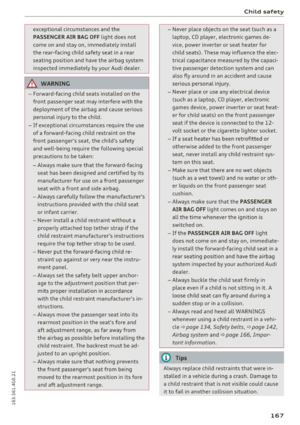 169
169 170
170 171
171 172
172 173
173 174
174 175
175 176
176 177
177 178
178 179
179 180
180 181
181 182
182 183
183 184
184 185
185 186
186 187
187 188
188 189
189 190
190 191
191 192
192 193
193 194
194 195
195 196
196 197
197 198
198 199
199 200
200 201
201 202
202 203
203 204
204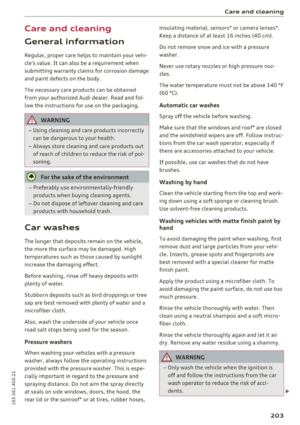 205
205 206
206 207
207 208
208 209
209 210
210 211
211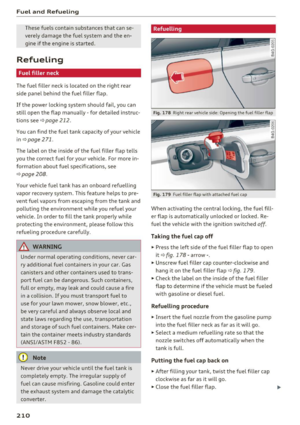 212
212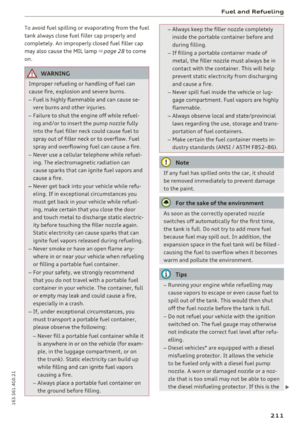 213
213 214
214 215
215 216
216 217
217 218
218 219
219 220
220 221
221 222
222 223
223 224
224 225
225 226
226 227
227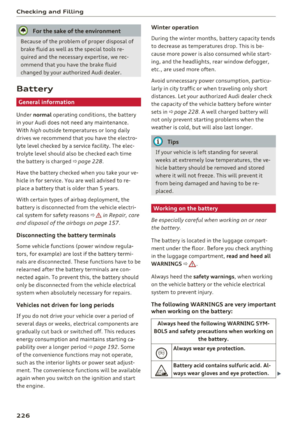 228
228 229
229 230
230 231
231 232
232 233
233 234
234 235
235 236
236 237
237 238
238 239
239 240
240 241
241 242
242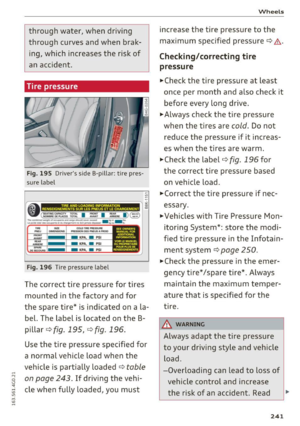 243
243 244
244 245
245 246
246 247
247 248
248 249
249 250
250 251
251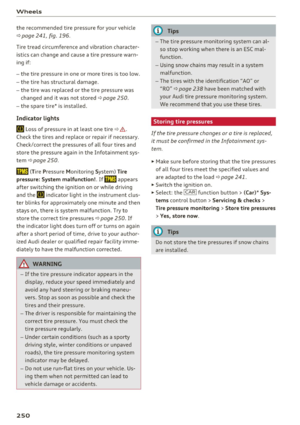 252
252 253
253 254
254 255
255 256
256 257
257 258
258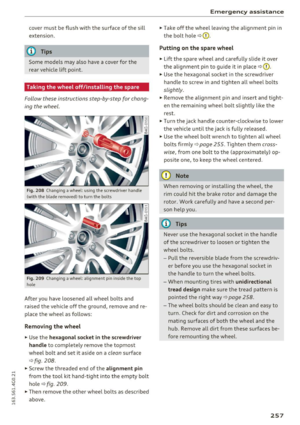 259
259 260
260 261
261 262
262 263
263 264
264 265
265 266
266 267
267 268
268 269
269 270
270 271
271 272
272 273
273 274
274 275
275 276
276 277
277 278
278 279
279 280
280 281
281 282
282 283
283 284
284 285
285 286
286 287
287 288
288 289
289 290
290 291
291 292
292 293
293