Page 49 of 215

LUGGAGE
COMPARTMENT
22) 23)
OPENING THE TAILGATE
WITH THE REMOTE
CONTROL
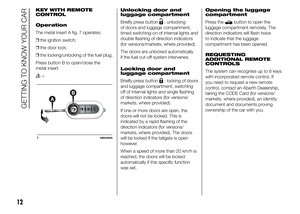
Press button
on the key with the
remote control.
The direction indicators will blink twice
when the tailgate is opened.
Tailgate opening is eased by the action
of the side gas struts.
On some versions, opening the tailgate
will switch the luggage compartment
light on: the light will switch off
automatically when the tailgate is
closed.
The light will stay on for about 15
minutes after turning the key to STOP:
if during this time, a door or the tailgate
is opened, the light will switch on again
for 15 minutes.
9)
24)
ELECTRIC HANDLE
(SOFT TOUCH)
The tailgate (if unlocked) can be opened
from the outside by using the electric
opening handle B fig. 48 located under
the large handle.
The tailgate can be opened at any time
if the doors are unlocked.
To open it, enable the handle, opening
one of the front doors or unlocking
the doors with the remote control or
using the key without remote control.
The activation of the
symbol on the
display indicates that the tailgate is
not shut properly.CLOSING
To close, lower the tailgate by pressing
near the lock until you hear it click.
In the inner part of the tailgate a strap B
fig. 49 makes it easier to hold and
close the tailgate.
48AB0A004549AB0A0046
45
Page 50 of 215

EMERGENCY TAILGATE
OPENING
To open the tailgate from the passenger
compartment if the car battery is flat
or the electric tailgate lock is faulty,
proceed as follows (see "Extending the
luggage compartment" in this chapter):
❒extract the rear head restraints
❒fold the backrests over
❒to unlock the tailgate mechanically,
working from the inside of the
luggage compartment, use lever A
fig. 50.EXTENDING THE
LUGGAGE
COMPARTMENT
The separate rear seats allow partial
fig. 51 or total fig. 52 luggage
extension.REMOVING THE PARCEL
SHELF
To remove the parcel shelf, release it
from its two side pins and pull it out.
PARTIAL EXTENSION
(50/50)
(for versions/markets, where provided)
Proceed as follows:
❒lift out rear seat head restraints
(where provided) with backrest
released and tilted toward the
passenger compartment or with the
tailgate open
❒check that the seat belt is fully
extended and not twisted
❒operate lever A or B fig. 53 to release
the left hand or right hand part of the
backrest respectively and guide it
onto the cushion.
50AB0A0047
51AB0A0049
52AB0A0050
53AB0A0048
46
GETTING TO KNOW YOUR CAR
compartment
Page 51 of 215

IMPORTANT To return the backrest to
its correct position, we recommend
operating from the outside through the
doors.
TOTAL EXTENSION
Tilting the rear seat completely forwards
allows maximum loading volume.
Proceed as follows:
❒remove the rear seat head restraints
(where provided)
❒check that the seat belts are correctly
extended and not twisted
❒operate the levers A and B fig. 53 to
release the backrests and guide
them onto the cushion.
IMPORTANT To return the backrest to
its correct position, we recommend
operating from the outside through the
doors.REPOSITIONING THE
REAR SEAT
Raise the backrests and push them
back until the locking click of both
retainers is heard.
Position the seat belt buckles upwards
and set the cushion to the position of
normal use.
IMPORTANT When returning the
backrest to its normal position, make
sure that it is correctly fastened and
that you hear the lock click.
Make sure the backrest is properly
secured at both sides to prevent it
moving forward in the event of sharp
braking that may cause injuries to
passengers.
WARNING
22) Never exceed the maximum
allowed load in the luggage
compartment (see "Technical
specifications" chapter). Also
make sure that the objects you
place in the luggage compartment
have been properly secured, to
avoid them from being thrown
forward consequent to sudden
braking and injuring your
passengers.
23) If you are travelling in areas with
few filling stations and you want
to transport fuel in a spare tank,
comply with the law by using only
an approved, suitably secured
tank. Anyway, by doing so, you
increase the risk of fire in the
event of an accident with your
vehicle.
24) Do not travel with the tailgate
open: exhaust gas may enter
the passenger compartment.
47
Page 52 of 215
IMPORTANT
9) Take care not to knock objects on
the roof rack when opening the
tailgate.
BONNET
OPENING
Proceed as follows:
❒pull lever A fig. 54 in the direction
indicated by the arrow;
❒move the lever B fig. 55 to the right
as shown in the figure;
❒lift the bonnet and, at the same time,
release the supporting rod C fig. 56
from its catch D, then insert the
end of the rod into housing E in the
bonnet (larger hole) and push to
safety position (smaller hole),
as shown in the figure.
25) 26) 27)
10)
54AB0A0051
55AB0A0052
56AB0A0053
48
GETTING TO KNOW YOUR CAR
Page 53 of 215

CLOSING
Proceed as follows:
❒hold the bonnet up with one hand
and with the other remove rod C
fig. 56 from housing E and fit it back
into its catch D
❒lower the bonnet to approximately 20
centimetres above the engine
compartment and let it come down.
Make sure that the bonnet is
completely closed and not just
secured in safety position. If it is not
perfectly closed, do not try to press
the bonnet down but open it and
repeat the procedure.
28)
WARNING
25) Incorrect positioning of the
supporting rod may cause the
bonnet to drop suddenly. Only
perform these operations when
the car is stationary.
26) When the engine is warm, work
carefully inside the engine
compartment to avoid getting
burnt. Do not place your hands
near the engine fan as it may be
activated even when the key is
removed. Wait for the engine
to cool down.
27) Pay attention to scarves, ties and
other loose-fitting garments. If
they accidentally come into
contact with moving parts, they
may get caught up and dragged
with serious risks for those
wearing them.28) For safety reasons, the bonnet
must always be properly closed
while driving. Make sure that the
bonnet is perfectly closed and
that the lock is engaged. If you
notice when driving that the
bonnet has not been properly
locked, stop immediately
and close the bonnet correctly.
IMPORTANT
10) Before opening the bonnet,
make sure that windscreen wiper
arm is not raised, but is rather
positioned against the
windscreen.
49
Page 54 of 215
ROOF RACK/SKI
RACK
FASTENERS
The fasteners are located in the area
indicated in fig. 57.
To use the front fasteners, remove the
cap A fig. 57, accessible with the door
open.
The rear fixing areas B can be found
according to measurements shown in
fig. 58.
29) 30)
Lineaccessori Abarth provides a
specific roof rack/ski rack for the
tailgate.IMPORTANT Follow the instructions
contained in the assembly kit carefully.
Assembly must be performed by
qualified personnel.
WARNING
29) Strictly adhere to the laws in
force concerning maximum
clearance. Never exceed the
maximum permitted loads; see
chapter "Technical
specifications".
30) Evenly distribute the load and
take into account, when driving,
the increased responsiveness
of the car to side wind. Check that
the attachment fixing screws are
tight after a few kilometres.
57AB0A0054
130 mm30 mm
58AB0A0055
50
GETTING TO KNOW YOUR CAR
Page 55 of 215

HEADLIGHTS
LIGHT BEAM ALIGNMENT
The correct alignment of the headlights
is important for the comfort and safety
of not only the driver but all other road
users. This is also covered by a specific
rule of the highway code.
The headlights must be correctly aimed
to guarantee the best visibility
conditions for all drivers while travelling
with headlights on.
Contact an Abarth Dealership to have
them properly adjusted.
Check light beam alignment every time
the load or its distribution changes.
IMPORTANT When the gas discharge
(Xenon) headlights (for versions/
markets, where provided) are switched
on, normally parabolas and light beam
move vertically for about 2 seconds
until headlight alignment has stabilised.HEADLIGHT ALIGNMENT
CORRECTOR
This device works with the ignition key
in the MAR-ON position and the dipped
headlights on.
Headlight alignment
adjustment
When the car is loaded, it slopes
backwards. This means the light beam
rises.
In this case, restore the correct
alignment by operating buttons+and–
fig. 59.The adjustment positions are shown on
the display.
Position 0 - one or two people in the
front seats.
Position1-4passengers.
Position2-4passengers + load in the
luggage compartment.
Position 3 - driver + maximum
permitted load stowed in the luggage
compartment.
IMPORTANT Gas discharge headlights
(Xenon headlights) are automatically
adjusted. Headlight alignment
adjustment is electronic and therefore
cannot be manually adjusted using
the+and–buttons.
FOG LIGHTS ALIGNMENT
(for versions/markets, where provided)
Contact an Abarth Dealership to have
the fog lights properly adjusted.
59AB0A0002
51
Page 56 of 215

ADJUSTING THE
HEADLIGHTS ABROAD
Dipped headlights are adjusted for
driving in the country where the vehicle
was originally purchased. When
travelling in countries with opposite
driving direction, to avoid dazzling the
drivers on the other side of the road,
you need to cover areas of the
headlight according to the Highway
Code of the country you are travelling
in.ESC SYSTEM
IN BRIEF
The ESC system improves the
directional control and stability of the
car in various driving conditions.
The ESC system corrects the car’s
understeer and oversteer, distributing
the brake force on the appropriate
wheels. The torque supplied by
the engine can also be reduced in
order to maintain control of the car.
The system is capable of recognising
potentially dangerous situations in
terms of the stability and intervenes
automatically on the brakes in a
differentiated manner for the four
wheels in order to provide a stabilising
torque.The ESC system also includes the
following subsystems:
❒EBD
❒ABS
❒ASR
❒HILL HOLDER
❒HBA
❒MSR
❒TTC
SYSTEM ACTIVATION
The ESC system switches on
automatically when the engine is
started and cannot be switched off.
SYSTEM INTERVENTION
It is signalled by the blinking of the ESC
warning light on the instrument panel,
to inform the driver that the car is in
critical stability and grip conditions.
52
GETTING TO KNOW YOUR CAR