Page 73 of 215
 ECO INDEX
The eco Index allows the driver to
monitor their driving style in order to
achieve more efficient driving in terms
of fuel economy and emissions
reduction.
The assessment of the driving styl")
ECO INDEX
The eco Index allows the driver to
monitor their driving style in order to
achieve more efficient driving in terms
of fuel economy and emissions
reduction.
The assessment of the driving style is
shown on the display through a digital
graduated scale A fig. 69.
The scale ranges from a min. value of 0
up to a max. value of 5 and indicates
the eco-sustainability of the driving style
(0 = low, 5 = high).NOTES
The values measured are not directly
connected to instant fuel consumption
but are intended to suggest how the
driver can alter their driving style in
order to reduce consumption.
Different journeys may have different
values even though the driver maintains
the same driving style, since they are
affected by factors such as traffic
conditions, length of journey and engine
cold starting.
An "eco" drive is a more "fluid" drive,
even if traffic conditions often inhibit
this. A more "aggressive" drive, on the
other hand, implies frequent
acceleration/deceleration with resulting
increased fuel consumption and
harmful emissions.
GEAR SHIFT INDICATOR
The GSI (Gear Shift Indicator) system
advises the driver to change gear
through a special indication on the
display.
Through the GSI, the driver is informed
that the gear change will allow a
reduction in fuel consumption.When the SHIFT (SHIFT UP) iconis
shown on the display, the GSI is
advising the driver to engage a higher
gear, while the SHIFT (SHIFT DOWN)
icon advises the driver to engage
a lower gear.
The indication on the instrument panel
remains until the driver shifts gear or the
driving conditions return to a situation
where gearshifting is not required to
optimise consumption.
CONTROL BUTTONS
+To scroll through the screen and the
options upwards or to increase the
value displayed.
MENUPress briefly to access the
menu and/or go to next
screen or to confirm the
desired selection. Hold
down to go back to the
standard screen.
–To scroll through the screen and the
options downwards or to decrease
the value displayed.
69AB0A0134
69
Page 74 of 215
 NoteButtons+and–activate different
functions according to the following
situations:
❒within the menu, they allow you to
scroll up or down through the
options;
❒during setting operations, they
in")
NoteButtons+and–activate different
functions according to the following
situations:
❒within the menu, they allow you to
scroll up or down through the
options;
❒during setting operations, they
increase or decrease values.
NoteWhen one of the front doors is
opened, the display is activated
showing the time and mileage for a few
seconds.SETUP MENU
The menu comprises a series of
options which can be selected using
buttons+and–to access the different
selection and setting operations (Setup)
indicated below.
Some options have a submenu.
The menu can be activated by briefly
pressing the MENU button
. Single
presses on buttons+or–will scroll
through the setup menu options.
Operating modes are different
according to the characteristics of the
option selected.
The menu comprises the following
functions:
❒MENU
❒LIGHTING
❒SPEED WARNING
❒HEADLIGHT SENSOR
❒TRIP B ACTIVATION
❒SET TIME
❒SET DATE
❒SEE RADIO
❒AUTOCLOSE
❒UNITS OF MEASUREMENT
❒LANGUAGE
❒WARNINGS VOLUME❒BUTTON VOLUME
❒SEAT BELT BUZZER
❒SERVICE
❒PASSENGER AIRBAG
❒DAYTIME RUNNING LIGHTS
❒TYRE RESET
❒EXIT MENU
Selecting an option from the main
menu without a submenu:
❒briefly press the MENU button
to
select the main menu option to be
set;
❒press buttons+or–(with single
presses) to select the new setting;
❒briefly press the MENU button
to
store the new setting and to go back
to the same main menu option
selected previously.
Selecting an option from the main
menu with a submenu:
❒briefly press the MENU button
to
display the first submenu option;
❒press buttons+or–(with single
presses) to scroll through all the
submenu options;
❒briefly press the MENU button
to
select the displayed submenu option
and to open the relevant setup menu;
70AB0A0002
70
KNOWING THE INSTRUMENT PANEL
Page 75 of 215
 ❒press buttons+or–(with single
presses) to select the new setting for
this submenu option;
❒briefly press the MENU button
to
store the new setting and to go back
to the same submenu option
selec")
❒press buttons+or–(with single
presses) to select the new setting for
this submenu option;
❒briefly press the MENU button
to
store the new setting and to go back
to the same submenu option
selected previously.
MENU ITEMS
Menu
This option allows you to access the
Setup menu.
Press the+or–button to select the
various Menu items.
Hold down the MENU button
to
return to the standard screen.
Lighting (Car interior
lighting adjustment)
On some versions, the instrument panel
is provided with a light sensor capable
of detecting environmental light
conditions and adjusting the brightness
of the panel accordingly.
The brightness of the instrument panel
may therefore change while travelling
following an event causing a switch
from "day" to "night" conditions (or vice
versa) in the passenger compartment
(e.g. in a tunnel, on avenues in
shadows, under flyovers, etc.). The
lighting can be adjusted in night mode
only with dipped headlights on. If the
headlights are not on, it can be
adjusted in day mode.This function is available, with the
dipped headlights on and in night-time
conditions, to adjust the brightness
of the instrument panel, control
buttons, radio and automatic climate
control displays.
On some versions, during the daytime
and with dipped headlights on, the
instrument panel, control buttons, radio
and automatic climate control displays
are set to maximum brightness.
To adjust the brightness, proceed as
follows:
❒press the MENU button
briefly to
make the display flash the previously
stored level;
❒press button+or–to adjust the
brightness level;
❒press the MENU button
briefly to
return to the menu screen or hold the
button down to return to the
standard screen without storing.
71
Page 76 of 215
 Speed warning (Speed
limit)
With this function it is possible to set
the car speed limit (km/h or mph); when
this limit is exceeded the driver is
alerted.
To set the desired speed limit, proceed
as fo")
Speed warning (Speed
limit)
With this function it is possible to set
the car speed limit (km/h or mph); when
this limit is exceeded the driver is
alerted.
To set the desired speed limit, proceed
as follows:
❒briefly press the MENU button
:
the display will show the words
(Speed Buzzer);
❒press button+or–to select speed
limit activation ("On") or deactivation
("Off");
❒if the function is on, press+or–to
select the required speed limit and
then press MENU
to confirm.
NoteSetting is possible between 30
and 200 km/h, or 20 and 125 mph,
according to the previously set unit.
See the "Units of measurement
adjustment (Units of measurement)"
paragraph described below. The setting
will increase/decrease by five units
each time button+/–is pressed. Hold
down the button+/–to increase/
decrease the setting rapidly. Complete
the adjustment with single presses of
the button when you approach the
desired value.Press the MENU button
briefly to
return to the menu screen or hold
the button down to return to the
standard screen without storing.
To cancel the setting, proceed as
follows:
❒press the MENU button
briefly:
("On") will flash on the display;
❒press button–: ("Off") will flash on
the display;
❒press the MENU button
briefly to
return to the menu screen or hold the
button down to return to the
standard screen without storing.Headlight sensor
(Automatic
headlight/dusk sensor
sensitivity adjustment)
(for versions/markets, where provided)
This function is used to turn the
headlights on or off according to
external lighting conditions.
The dusk sensor sensitivity can be
adjusted according to 3 levels (level 1=
minimum sensitivity, level 2= average
sensitivity, level 3 = maximum
sensitivity); the greater the sensitivity
set, the lower the variation in outside
light required to activate the lights (e.g.
with setting at level 3, the headlights
switch on earlier at sunset compared to
levels 1 and 2).
Proceed as follows to set:
❒press the MENU button
briefly.
The level set previously flashes on
the display;
❒press+or–to set the value;
❒press the MENU button
briefly to
return to the menu screen or hold the
button down to return to the
standard screen without storing.
72
KNOWING THE INSTRUMENT PANEL
Page 77 of 215
 Trip B activation
This function may be used to activate
(\"On\") or deactivate (\"Off\") the Trip B
(partial trip) display.
For further information see \"Trip
Computer\" in this chap")
Trip B activation
This function may be used to activate
("On") or deactivate ("Off") the Trip B
(partial trip) display.
For further information see "Trip
Computer" in this chapter.
Proceed as follows to switch the
function on/off:
❒press the MENU button
briefly,
the display will flash "On" or "Off"
depending on the previous setting;
❒press button+or–to select;
❒press the MENU button
briefly to
return to the menu screen or hold the
button down to return to the
standard screen without storing.
Set Time (Setting the
clock)
This function enables the clock to be
set through two submenus: "Time" and
"Format".
To adjust, proceed as follows:
❒briefly press the MENU button
:
the display will show the two
submenus "Time" and "Format";
❒press button+or–to switch
between the two submenus;
❒once you have selected a submenu,
press the MENU button
briefly;❒when you select the "Time"
submenu, pressing the button
briefly the display shows
the
❒press+or–to set the value;
❒briefly press the MENU button
:
"minutes" will appear on the display;
❒press+or–to set the value.
NoteThe setting will increase or
decrease by one unit each time the
button+or–is pressed. Hold down
the button to increase/decrease the
setting rapidly and automatically.
Complete the adjustment with single
presses of the button when you
approach the desired value.
❒When you select the "Format"
submenu, pressing the MENU button
briefly the mode is displayed;
❒press button+or–to select "24h" or
"12h" mode. When you have made
the adjustment, press SAVE to return
to the submenu screen or hold the
button down to return to the main
menu screen without storing.
❒hold the MENU button
down
again to return to the standard
screen or to the main menu
according to where you are in the
menu.Set Date (Setting the
date)
This function may be used to update
the date (year/month/day).
To adjust, proceed as follows:
❒briefly press the MENU button
:
"year" will be displayed;
❒press+or–to set the value;
❒briefly press the MENU button
:
"month" is displayed;
❒press+or–to set the value;
❒briefly press the MENU button
:
"day" is displayed
❒press+or–to set the value;
NoteThe setting will increase or
decrease by one unit each time the
button+or–is pressed. Hold down
the button to increase/decrease the
setting rapidly and automatically.
Complete the adjustment with single
presses of the button when you
approach the desired value.
Press SAVE to return to the menu
screen or hold the button down to
return to the standard screen without
storing.
73
MENU
"hours";
Page 78 of 215
 See radio (audio
information repetition)
With this function the display shows
information about the radio.
❒Radio: selected radio station
frequency or RDS message,
automatic tuning activation or
Aut")
See radio (audio
information repetition)
With this function the display shows
information about the radio.
❒Radio: selected radio station
frequency or RDS message,
automatic tuning activation or
AutoSTore;
❒Audio CD, MP3 CDs: track number.
To show the radio information on the
display ("On") or clear it ("Off"), proceed
as follows:
❒press the MENU button
briefly,
the display will flash "On" or "Off"
depending on the previous setting;
❒press button+or–to select;
❒press the MENU button
briefly to
return to the menu screen or hold the
button down to return to the
standard screen without storing.Autoclose (Automatic
central locking with car
running)
(for versions/markets, where provided)
When activated (On), this function locks
the doors automatically when the
vehicle speed exceeds 20 km/h.
Proceed as follows to activate or
deactivate this function:
❒press the MENU button
briefly to
display a submenu;
❒press the MENU button
briefly,
the display will flash "On" or "Off"
depending on the previous setting;
❒press button+or–to select;
❒press the MENU button
briefly to
return to the submenu screen or hold
the button down to return to the
main menu screen without saving;
❒hold the MENU button
down
again to return to the standard
screen or to the main menu
according to where you are in the
menu.Units of measurement
(Setting)
With this function it is possible to set
the units of measurement through two
submenus: "Distance" and
"Consumption".
To set the required unit of measurement
proceed as follows:
❒briefly press the MENU button
:
the display will show the two
submenus;
❒press button+or–to switch
between the two submenus;
❒once you have selected a submenu,
press the MENU button
briefly;
❒when you select "Distances", briefly
pressing the MENU button
makes the display show "km" or
"mi" depending on the previous
setting;
❒press button+or–to select;
❒when you select "Consumption",
briefly pressing the MENU button
makes "km/l", "l/100km" or
"mpg" appear on the display
depending on the previous setting;
If the set distance unit of measurement
is "km", the fuel consumption unit will
be displayed in km/l or l/100 km.
74
KNOWING THE INSTRUMENT PANEL
Page 79 of 215
 If the set distance unit of measurement
is \"mi\" the fuel consumption unit will
be displayed in \"mpg\".
❒Press button+or–to select.
When you have made the adjustment,
press the MENU")
If the set distance unit of measurement
is "mi" the fuel consumption unit will
be displayed in "mpg".
❒Press button+or–to select.
When you have made the adjustment,
press the MENU button
briefly
to return to the submenu screen or hold
the button down to return to the main
menu screen without storing.
❒Hold the MENU button
down
again to return to the standard
screen or to the main menu
according to where you are in the
menu.
Language (Language
selection)
Display messages can be shown in
different languages: Italian, English,
German, Portuguese, Spanish, French,
Dutch, Polish, Turkish and Russian.
To set the desired language, proceed
as follows:
❒briefly press the MENU button
:
the previously set "language" will
flash on the display;
❒press button+or–to select;
❒press the MENU button
briefly to
return to the menu screen or hold the
button down to return to the
standard screen without storing.Warnings volume
(Adjusting the
failure/warning acoustic
signal volume)
With this function the volume of the
acoustic signal which accompanies the
display of failure/warning can be
adjusted according to 8 levels.
To set the desired volume, proceed as
follows:
❒briefly press the MENU button
:
the previously set volume level will
flash on the display;
❒press+or–to set the value;
❒press the MENU button
briefly to
return to the menu screen or hold the
button down to return to the
standard screen without storing.
Button volume
(Adjustment)
This function may be used to adjust (to
8 levels) the volume of the acoustic
signal made when the
MENU,+
and–buttons are pressed.
To set the desired volume, proceed as
follows:
❒briefly press the MENU button
:
the previously set volume level will
flash on the display;
❒press+or–to set the value;❒press the MENU button
briefly to
return to the menu screen or hold the
button down to return to the
standard screen without storing.
Seat belt buzzer
(Reactivation of buzzer
for SBR signal)
This function can be only displayed
after an Abarth Dealership has
deactivated the SBR system (see
paragraph "SBR system" in the "Safety
devices" chapter).
To reactivate this function, proceed as
follows:
❒press the MENU button
briefly
and the display will flash "Off". Press
the+or–button to display "On";
❒press the MENU button
briefly to
return to the submenu screen or hold
the button down to return to the
main menu screen without saving.
75
Page 80 of 215
 Service (Scheduled
servicing)
Using this function you can display
information about the mileage intervals
for vehicle servicing.
To consult this information, proceed as
follows:
❒press the
button: t")
Service (Scheduled
servicing)
Using this function you can display
information about the mileage intervals
for vehicle servicing.
To consult this information, proceed as
follows:
❒press the
button: the display
shows when servicing is due in
km/mi or days (where provided)
according to the previous setting (see
paragraph "Units of measurement");
❒press the
button to return to the
menu screen; press the button again
to return to the standard screen.
IMPORTANT The "Scheduled Servicing
Plan" includes car maintenance at
fixed intervals (refer to the "Maintenance
and care" chapter).This is displayed automatically, with
ignition key at MAR, 2000 km (or
equivalent value in miles) before
servicing or, where provided, 30 days
before servicing. It is also displayed
each time the key is turned to MAR or,
for versions/markets, where provided,
every 200 km (or equivalent value in
miles). Below this threshold servicing
indications are more frequent.
The display will be in km or miles
according to the unit of measurement
set. When the next scheduled servicing
is approaching, the word "Service"
will appear on the display, followed by
the number of kilometres/miles or
days (where provided) left, when the
ignition key is turned to MAR. Go to an
Abarth Dealership, where the
operations of the "Scheduled Servicing
Plan" will be performed and the
message will be reset.
When the service interval is reached
and for about 1000 km/600 mi or
30 days, a service due message is
displayed.Passenger airbag (front
passenger side airbag
and side bag for pelvis,
chest and shoulder
protection - Side bag -
activation/deactivation)
This function is used to activate/
deactivate the front passenger's airbag.
Proceed as follows:
❒press the MENU button
and
then, after displaying the message
("Bag pass: Off") (to deactivate)
or ("Bag pass: On") (to activate) by
means of buttons+and–press the
MENU button
again;
❒a confirmation request message will
appear on the display;
❒press buttons+or–to select (Yes)
(confirming activation/deactivation)
or (No) (to abort);
❒press the MENU button
briefly, a
message confirming the selection will
be displayed and you will return to
the menu screen or hold the button
down to return to the standard
screen without storing.
76
KNOWING THE INSTRUMENT PANEL
 1
1 2
2 3
3 4
4 5
5 6
6 7
7 8
8 9
9 10
10 11
11 12
12 13
13 14
14 15
15 16
16 17
17 18
18 19
19 20
20 21
21 22
22 23
23 24
24 25
25 26
26 27
27 28
28 29
29 30
30 31
31 32
32 33
33 34
34 35
35 36
36 37
37 38
38 39
39 40
40 41
41 42
42 43
43 44
44 45
45 46
46 47
47 48
48 49
49 50
50 51
51 52
52 53
53 54
54 55
55 56
56 57
57 58
58 59
59 60
60 61
61 62
62 63
63 64
64 65
65 66
66 67
67 68
68 69
69 70
70 71
71 72
72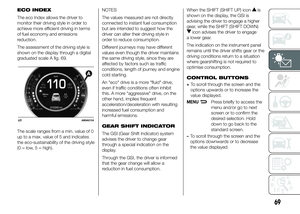 73
73 74
74 75
75 76
76 77
77 78
78 79
79 80
80 81
81 82
82 83
83 84
84 85
85 86
86 87
87 88
88 89
89 90
90 91
91 92
92 93
93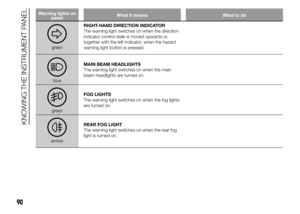 94
94 95
95 96
96 97
97 98
98 99
99 100
100 101
101 102
102 103
103 104
104 105
105 106
106 107
107 108
108 109
109 110
110 111
111 112
112 113
113 114
114 115
115 116
116 117
117 118
118 119
119 120
120 121
121 122
122 123
123 124
124 125
125 126
126 127
127 128
128 129
129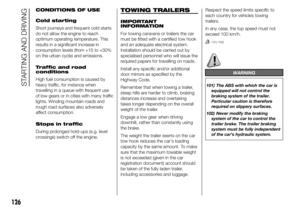 130
130 131
131 132
132 133
133 134
134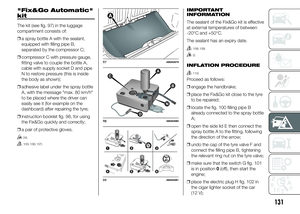 135
135 136
136 137
137 138
138 139
139 140
140 141
141 142
142 143
143 144
144 145
145 146
146 147
147 148
148 149
149 150
150 151
151 152
152 153
153 154
154 155
155 156
156 157
157 158
158 159
159 160
160 161
161 162
162 163
163 164
164 165
165 166
166 167
167 168
168 169
169 170
170 171
171 172
172 173
173 174
174 175
175 176
176 177
177 178
178 179
179 180
180 181
181 182
182 183
183 184
184 185
185 186
186 187
187 188
188 189
189 190
190 191
191 192
192 193
193 194
194 195
195 196
196 197
197 198
198 199
199 200
200 201
201 202
202 203
203 204
204 205
205 206
206 207
207 208
208 209
209 210
210 211
211 212
212 213
213 214
214