Page 65 of 220

COMING HOME / LEAVING HOMERead and observe
on page 59 first.
The function COMING HOME ensures that the vehicle's environment is illumi-
nated after switching off the ignition and opening the driver's door.
The function LEAVING HOME ensures that the vehicle's environment is illumi-
nated after unlocking the vehicle with the radio remote control unit.
The function switches the light on only if there is poorer visibility and the light
switch is in the position
.
Enabling / disabling and setting functions
The functions and setting of the lighting duration can be activated or deactiva-
ted in the Infotainment system » Owner´s Manual Infotainment , chap-
ter CARVehicle settings .
CAUTION
■
Poorer visibility is detected by a sensor mounted below the windscreen in
the holder of the inside mirror or in the control panel. Do not attach any stick-
ers or similar objects in front of the sensor in order to avoid impairing the func-
tion or its reliability.■
If this option is always enabled, then the battery is heavily loaded.
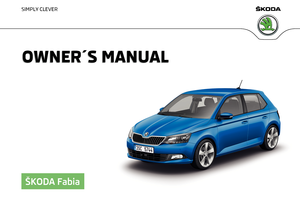
Hazard warning light system
Fig. 51
Hazard warning light system
button
Read and observe on page 59 first.
The hazard warning lights make other road users aware of your vehicle.
The function switches on all indicators.
Switching on/off
›
Press the button
» Fig. 51 .
When you turn it on the warning light flashes in the button and at the same
time the warning lights in the instrument cluster.
The hazard warning light system can also be operated if the ignition is switch-
ed off.
The hazard warning light system will switch on automatically if one of the air-
bags is deployed.
When the hazard warning system is on and the indicator light is switched on
(e.g. when turning), the hazard warning lights are switched off temporarily and
only the turn signal flashes on the relevant side of the vehicle.
Parking lights
Read and observe
on page 59 first.
The side light is provided for lighting of the parked vehicle.
Switching on the side light on one side
›
Switch off the ignition.
›
Press the control lever to position
A
or
B
as far as the stop
» Fig. 48 on
page 61 .
The parking lights on the right or left side of the vehicle are turned on.
Switching on the parking lights on both sides
›
With the ignition switched on turn the light switch to position .
›
Switch off the ignition.
›
Lock the vehicle.
After pulling out the ignition key and opening the driver's door, an audible
warning sounds.
After a few seconds or after closing the driver's door, the audible alarm is
turned off, but the parking lights will remain switched on.
CAUTION
■ Turning on the parking light means the battery is heavily loaded.■The parking light cannot be turned off automatic due to the low battery
charge level.■
If the two-sided parking lights are switched on when the ignition is off, then
there is no automatic switching off of the parking light.
63Lights and visibility
Page 66 of 220
, your headlights may dazzle oncoming traffic. To prevent oncoming")
Driving abroadRead and observe
on page 59 first.
When driving in countries with opposing traffic system (traffic on the
left/right), your headlights may dazzle oncoming traffic. To prevent oncoming
traffic from being dazzled, the headlights must be adjusted by a specialist ga-
rage.
Interior lights
Introduction
This chapter contains information on the following subjects:
Front interior light
64
Rear interior light
64
The inner lighting also works if the ignition is switched off.
The light turns off automatically 10 minutes after switching off the ignition or
opening a door unless otherwise specified.
Front interior light
Fig. 52
Operation of the front light: Version 1 / version 2
Positions of the sliding light switch A » Fig. 52
Switching on
Switching off
Automatic operation
Switch for turning the reading lights on/off B
» Fig. 52
Reading lamp left
Reading lamp right
Automatic operation of the lamp - position
The system is turned on when any of the following is present.
▶ The vehicle is unlocked.
▶ One of the doors is opened.
▶ The ignition key is removed.
The system is turned off when any of the following is present.
▶ The vehicle is locked.
▶ The ignition is switched on.
▶ About 30 seconds after all the doors have been closed.
Rear interior light
Fig. 53
Interior lights at the rear
Positions of the lens of the rear light » Fig. 53
Switching on
Automatic operation (centre position) 1)
Switching off
1)
In this position, apply the same rules to the rear interior light as for the front interior light » page 64.
64Operation
Page 67 of 220

Visibility
Introduction
This chapter contains information on the following subjects:
Rear window heater
65
Sun visors in the front
65
Sun screen of the panoramic roof
66WARNINGMake sure that the view outside is not covered by ice, snow, mist or other
objects.
Rear window heater
Fig. 54
Button for rear window heater
Read and observe on page 65 first.
The heater for quick defrosting and ventilation of the rear window.
The heating can be activated with the ignition on.
The heating is turned on after the engine has started.
Button for the heating in the centre console » Fig. 54
Activate/deactivate the heated rear window
When the heater is activated, a lamp lights up inside the button.
The heater automatically switches off after approximately 10 minutes.
If the engine is switched off when the heating is on and turned back on again
within 10 minutes, the heating is continued.
NoteIf the on-board voltage decreases, the heating switches off automatically
» page 159 , Automatic load deactivation .
Sun visors in the front
Fig. 55
Fold down visor / flip up visor / make-up mirror and parking per-
mit holder
Read and observe
on page 65 first.
Operation and description of the sun shade » Fig. 55
Fold down the cover
Swivel cover towards the door
Parking ticket band (depending on equipment)
Make-up mirror with cover (the cover can be pushed in the direction of the
arrow)
WARNINGWhen objects are attached to the sun visor, the visor can not be pivoted to
the side windows. This might result in injuries to the occupants if the head
airbag is deployed.
Note
A vanity mirror can be installed in either the driver's or the front passenger's
sun visor.12AB65Lights and visibility
Page 68 of 220

Sun screen of the panoramic roofFig. 56
Open sun screen
Read and observe on page 65 first.
The sunshade of the panoramic roof can be opened manually in the direction
of arrow or closed in the opposite direction of the arrow » Fig. 56.
WARNINGWhen operating the sun blind, proceed with caution to avoid causing crush-
ing injuries – risk of injury!
Windscreen wipers and washers
Introduction
This chapter contains information on the following subjects:
Windscreen wipers and washers
67
Headlight cleaning system
67
The windscreen wipers only operate if the ignition is switched on and the bon-
net is closed.
Winter setting of the windscreen wiper
If the windscreen wipers are in rest position, they cannot be folded out from
the windscreen. For this reason we recommend adjusting the windscreen wip-
ers in winter so that they can be folded out from the windscreen easily.
▶ Switch on the windscreen wipers.
▶ Switch off the ignition.
The windscreen wipers remain in the position in which they were when
switching off the ignition.
The service position can also be used as a winter position » page 179, Replac-
ing the windscreen wiper blades .WARNING■
Properly maintained windscreen wiper blades are essential for clear visi-
bility and safe driving » page 179, Replacing windscreen wiper blades .■
Do not use the windscreen washer system at low temperatures without
heating the windscreen beforehand. The window washer fluid could other-
wise freeze on the windscreen and restrict the view to the front.
CAUTION
■ In cold temperatures and during the winter, check before switching on the
ignition that the wiper blades are not frozen to the windscreen. If the wind-
screen wipers are switched on when the blades are frozen to the windscreen,
this may damage both the blades and windscreen wiper motor!■
Carefully release frozen wiper blades off the windscreen.
■
Remove snow and ice from the windscreen wipers before driving.
■
If the windscreen wipers are handled carelessly, there is a risk of damage to
the windscreen.
■
Do not switch on the ignition if the front wiper arms are retracted. The wiper
arms could damage the paint of the bonnet.
Note
The windscreen washer nozzles of the windscreen are heated automatically
after starting the engine.66Operation
Page 69 of 220

Windscreen wipers and washersFig. 57
Operating the wiper and washer: front/rear
Read and observe
and on page 66 first.
Lever positions Wipers off
Depending on equipment fitted:
▶ Periodic windscreen wiping
▶ Automatic windscreen wiping in rain
Slow windscreen wiping
Rapid windscreen wiping
Flick windscreen wiping, service position of the wiper arms (spring-loa-
ded position)
Spraying and wiping the windscreen (sprung position)
Wiping the rear window pane
Spraying and wiping the rear window (sprung position)
Depending on equipment fitted:
▶ To set the wiper interval for the windscreen
▶ Sensitivity setting of the automatic wiping with rain
By setting the switch in the direction of the arrow wipers sweep more of-
ten.
Spraying and wiping the windshield
After releasing the operating lever, the wipers will make from 1 to 3 wiper
strokes.
Spraying and wiping the rear window
After releasing the operating lever, the wipers will make from 2 to 3 wiper
strokes.
01234567AThe operating lever remains in position 6.
Activating / deactivating of the automatic windscreen wiping with rain
Automatic windscreen wiping in rain can be activated or deactivated in the In-
fotainment » Owner´s Manual Infotainment , chapter CAR - Vehicle settings .WARNINGAutomatic wiping during rain is only a support. The driver is still responsible
for setting the function of the windscreen wipers manually depending on
the visibility conditions.
Note
■ If the operating lever is in the position 2 or 3 and the speed of the vehicle
drops below 4 km / h, the wiping speed is reduced. The original wiping speed is
restored step by step when the speed of the vehicle exceeds 8 km/h.■
The rear window is wiped once automatically if the windscreen wipers are on
when reverse gear is selected. The function can be enabled or disabled in the
Infotainment » Owner´s Manual Infotainment , chapter CAR - vehicle settings .
Headlight cleaning system
Read and observe
and on page 66 first.
To clean the headlights, the headlamp is also sprayed after every ten squirts.The headlight washer system works under the following conditions. The ignition is switched on.
The low beam is switched on.
The outside temperature is about -12° C to +39° C.
To ensure the correct functioning of the system, even in winter, this needs to be regularly cleared of snow and ice, e.g. free with a de-icing spray.
Rear mirror
Introduction
This chapter contains information on the following subjects:
Interior mirror dimming
68
Exterior mirrors
68
67Lights and visibility
Page 70 of 220
 or aspherical exterior mirrors increase the field
of vision. They do, however, make objects appear smaller in the mirror.
These mirrors are therefore only of limited")
WARNING■Convex (curved outward) or aspherical exterior mirrors increase the field
of vision. They do, however, make objects appear smaller in the mirror.
These mirrors are therefore only of limited use for estimating distances to
the following vehicles.■
Whenever possible use the interior mirror for estimating the distances to
the following vehicles.
Interior mirror dimming
Fig. 58
Interior mirror: manual dimming/auto-dimming/light sensor
Read and observe
on page 68 first.
Mirror with manual dimming » Fig. 58
Basic position of the mirror
Mirror dimming
Mirror with automatic dimming » Fig. 58
Light sensor
Light sensor on the back of the mirror
Mirror with automatic dimming
When the engine is switched off the mirror dims automatically depending on
the light falling on the sensors.
When the interior lights are switched on or the reverse gear is engaged, the
mirror always moves back into the basic position (not dimmed).
Do not attach external devices (e.g. navigation systems) on to the windscreen
or in the vicinity of the interior mirror »
.
12ABWARNING■
The illuminated display of an external navigation device can lead to op-
erational faults to the automatic dimming interior mirror – risk of accident.■
Automatic mirror dimming operates only properly if the light striking the
sensors is not affected by other objects.
WARNINGThe mirrors with automatic dimming contain an electrolyte liquid which can
escape if mirror glass is broken.■
The leaking electrolytic fluid can irritate the skin, eyes and respiratory
system.
■
If your eyes or skin come into contact with the electrolytic fluid, immedi-
ately wash the affected area for several minutes plenty of water. If neces-
sary get medical assistance.
Exterior mirrors
Fig. 59
Exterior mirror controls: Mechanical/electrical
Read and observe
on page 68 first.
Adjust the position
The mirror can be adjusted to the desired position by moving the knob in the
direction of the arrow » Fig. 59.
The movement of the mirror surface follows the movement of the rotary knob.
68Operation
Page 71 of 220
 into the following
positions » Fig. 59 -
.
Adjust the left mirror
Adjust the right mirror
Switch off mirror")
Electrically-adjustable mirrors
The knob can be moved (depending on vehicle equipment) into the following
positions » Fig. 59 -
.
Adjust the left mirror
Adjust the right mirror
Switch off mirror control
Mirror heater
The mirror heating only works when the engine is running.
Folding in the exterior mirrors
The whole exterior mirror can be manually folded towards the side windows.
To restore it to its original position, fold back from the side window until it au-
dibly clicks into place.WARNINGDo not touch the exterior mirror surfaces if the exterior mirror heater is
switched on - risk of burns.
Note
If the electrical mirror setting fails at any time, the mirrors can be adjusted by
hand by pressing on the edge of the mirror surface.Seats and headrests
Seats and headrests
Introduction
This chapter contains information on the following subjects:
Adjusting the front seats
69
Headrests - adjusting height
70
Headrests - removing and installing
70WARNING■ Only adjust the driver's seat when the vehicle is stationary – risk of acci-
dent.■
Caution when adjusting the seat! You may suffer crushing injuries as a re-
sult of adjusting the seat without paying proper attention.
■
Do not transport any objects on the front passenger seat other than ob-
jects intended for this purpose (e.g. child safety seat) – risk of accident.
Note
After a certain time, play can develop within the adjustment mechanism for
the backrest angle.
Adjusting the front seats
Fig. 60
Control elements on the seat
Read and observe on page 69 first.
The seats can be adjusted by the respective operating element being pulled,
pressed or rotated in the direction of the arrow.
69Seats and headrests
Page 72 of 220

Adjusting the seat height
Adjusting the tilt of the back")
Control elements on the seat » Fig. 60
Adjusting the seat in the longitudinal direction (after releasing, the control
lever must lock audibly)
Adjusting the seat height
Adjusting the tilt of the backrest (do not lean on the backrest when ad-
justing)
Headrests - adjusting height
Fig. 61
Headrests: move up/move down
Read and observe
on page 69 first.
Adjustment of the head rest heights is the same in the front and rear.
Shift upwards
›
Push the headrest in the direction of arrow
1
» Fig. 61 .
Move down
›
Press the locking button
A
in the direction of the arrow
2
and hold
» Fig. 61 .
›
Push the headrest in the direction of arrow
3
.
WARNINGThe following guidelines for adjusting the headrests must be observed
» page 8 , Correct and safe seated position .
Note
■
The middle rear headrest is only adjustable in two positions.■In sports seats, the headrests are integrated into the seat backrests and can-
not be adjusted in height.ABCHeadrests - removing and installingFig. 62
Headrest: Removing/installing
Read and observe
on page 69 first.
The removal and installation of headrests is the same in the front and rear.
Before removing and fitting the headrests, fold the corresponding seat back-
rest forward slightly » page 72.
Removing
›
Pull the headrest out of the seat backrest as far as the stop.
›
Press the locking button
A
in the direction of arrow
1,
and pull out the
headrest in the direction of arrow
2
» Fig. 62 .
Fitting
›
Slide in the support in the direction of arrow
3
until the locking button en-
gages » Fig. 62 .
WARNINGThe following guidelines for adjusting the headrests must be observed
» page 8 , Correct and safe seated position .
CAUTION
Store the headrests that were removed in such a way that they are not dam-
aged or soiled.
Note
In the sports seats, the headrests are integrated into the seat backrests and
can not be removed.70Operation
 1
1 2
2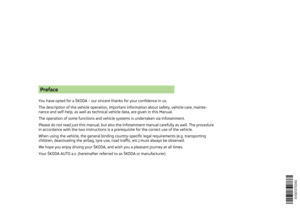 3
3 4
4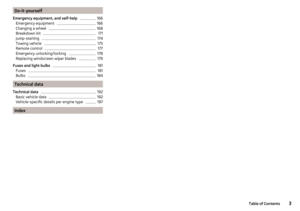 5
5 6
6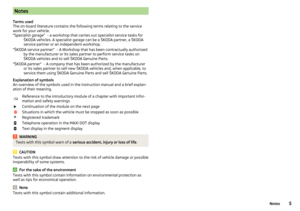 7
7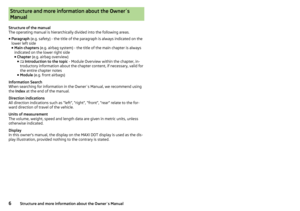 8
8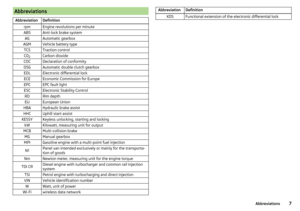 9
9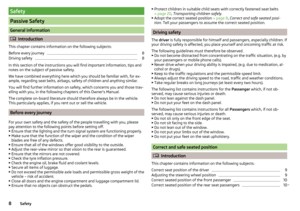 10
10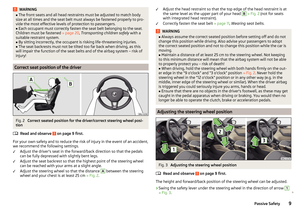 11
11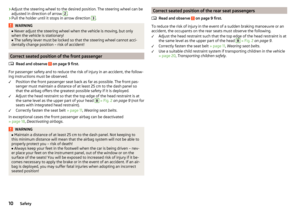 12
12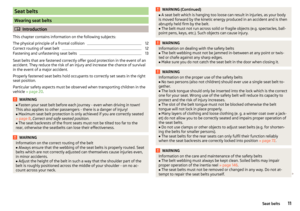 13
13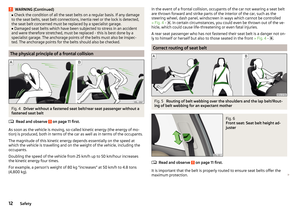 14
14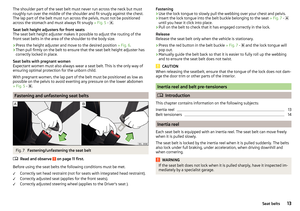 15
15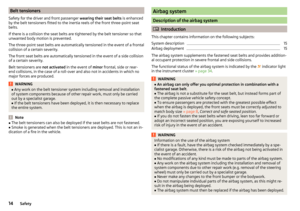 16
16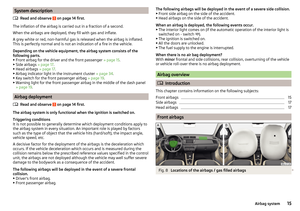 17
17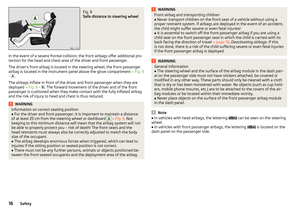 18
18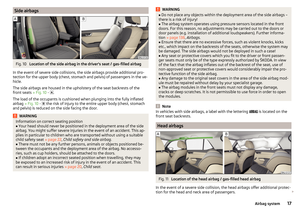 19
19 20
20 21
21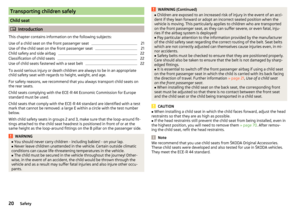 22
22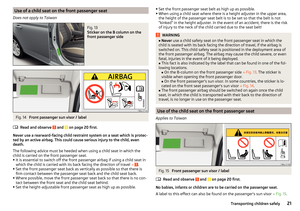 23
23 24
24 25
25 26
26 27
27 28
28 29
29 30
30 31
31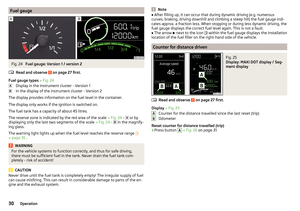 32
32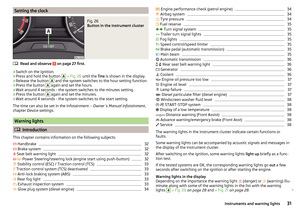 33
33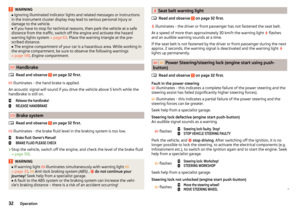 34
34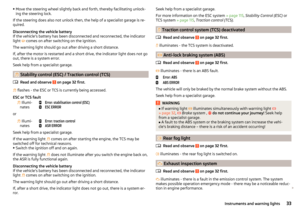 35
35 36
36 37
37 38
38 39
39 40
40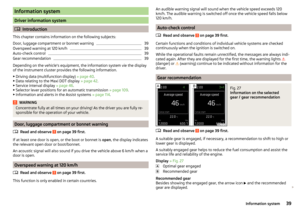 41
41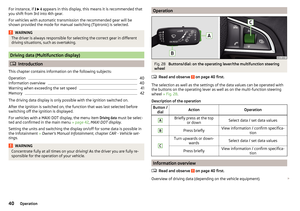 42
42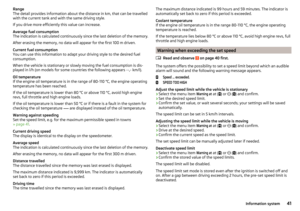 43
43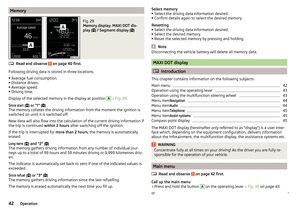 44
44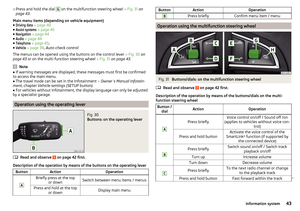 45
45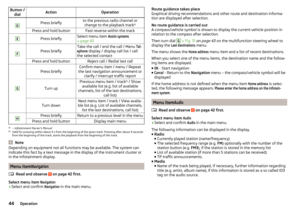 46
46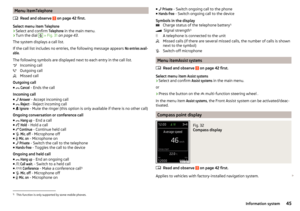 47
47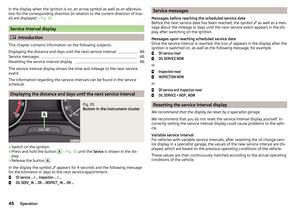 48
48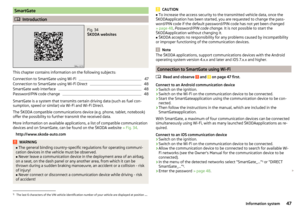 49
49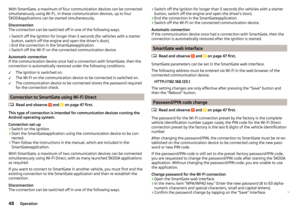 50
50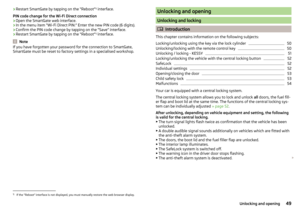 51
51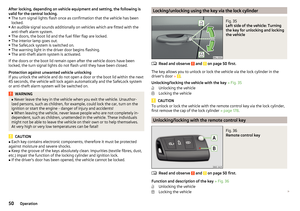 52
52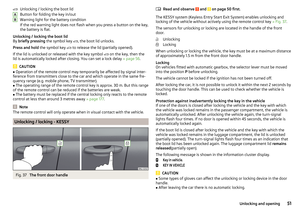 53
53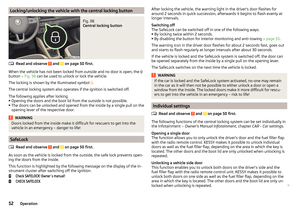 54
54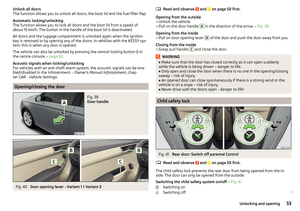 55
55 56
56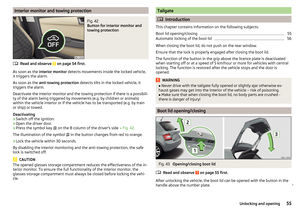 57
57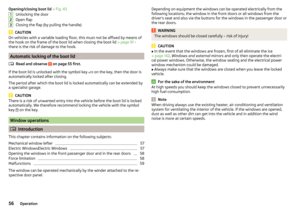 58
58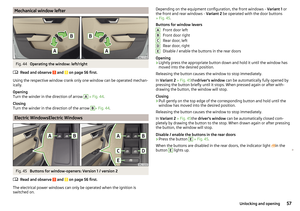 59
59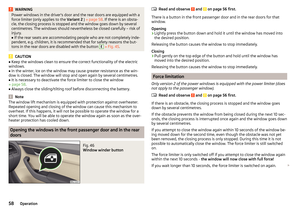 60
60 61
61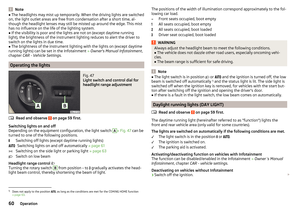 62
62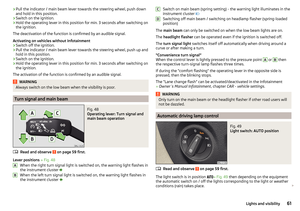 63
63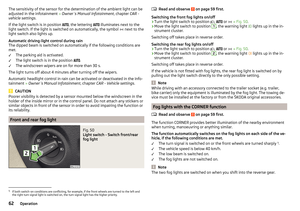 64
64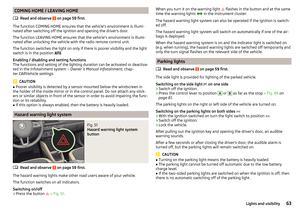 65
65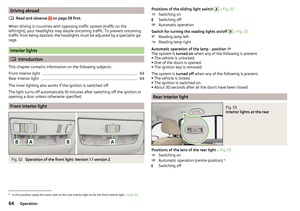 66
66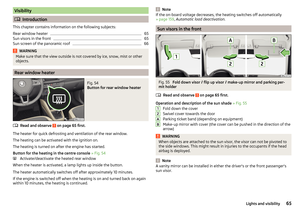 67
67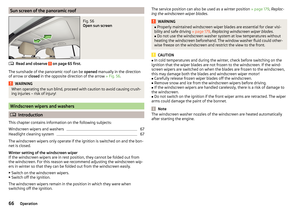 68
68 69
69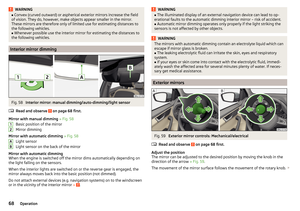 70
70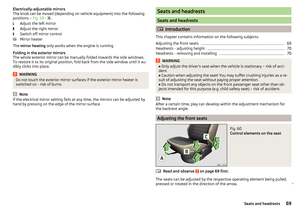 71
71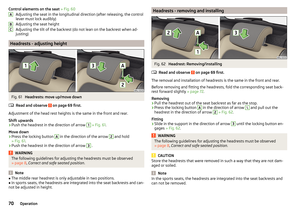 72
72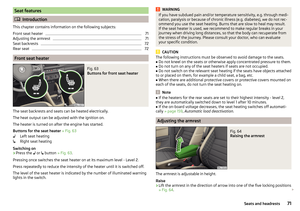 73
73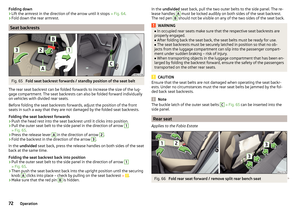 74
74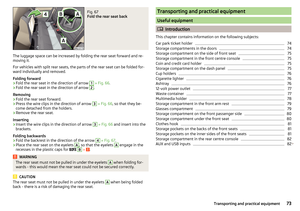 75
75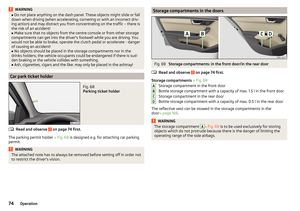 76
76 77
77 78
78 79
79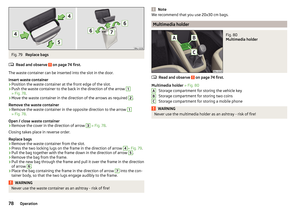 80
80 81
81 82
82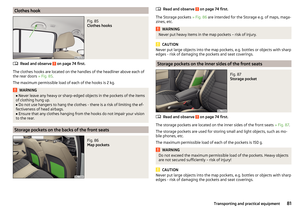 83
83 84
84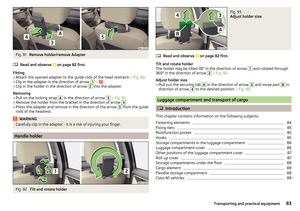 85
85 86
86 87
87 88
88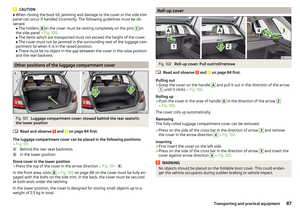 89
89 90
90 91
91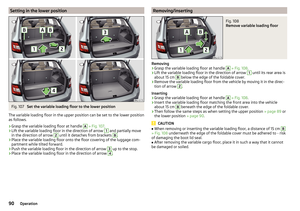 92
92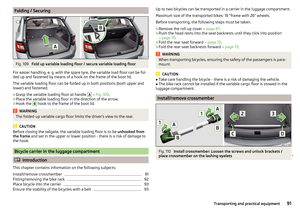 93
93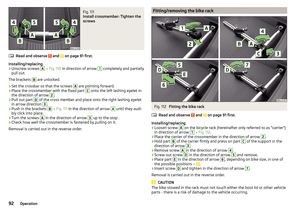 94
94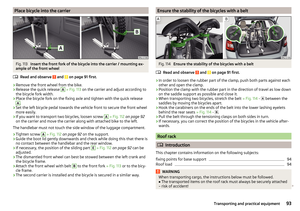 95
95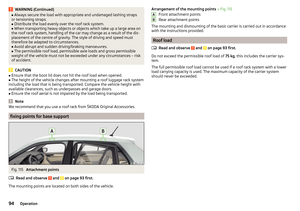 96
96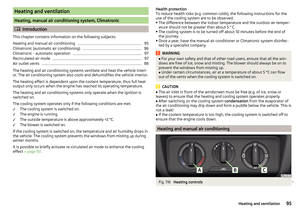 97
97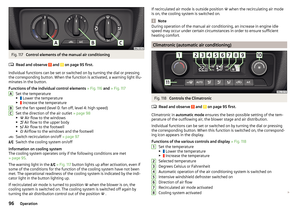 98
98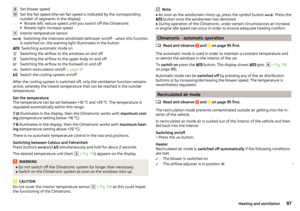 99
99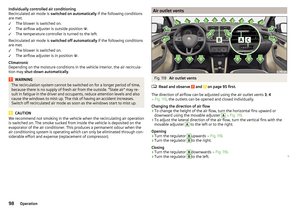 100
100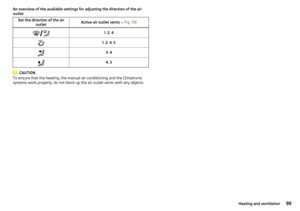 101
101 102
102 103
103 104
104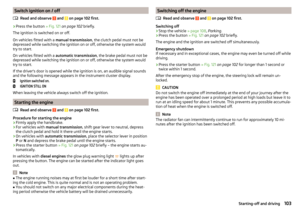 105
105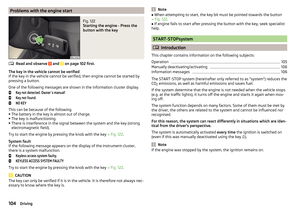 106
106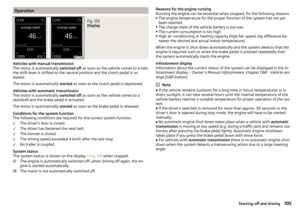 107
107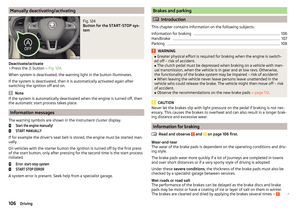 108
108 109
109 110
110 111
111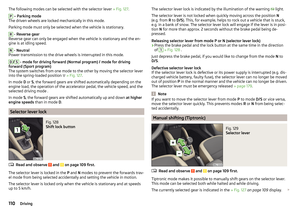 112
112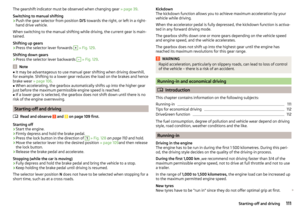 113
113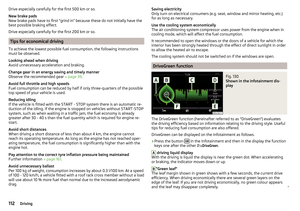 114
114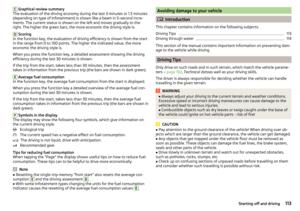 115
115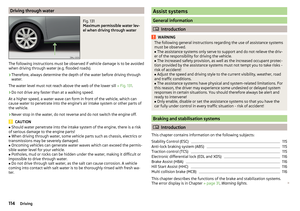 116
116 117
117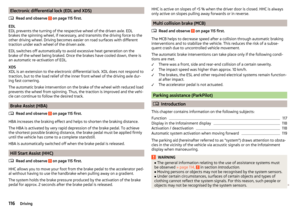 118
118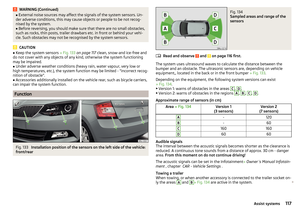 119
119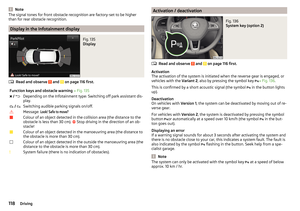 120
120 121
121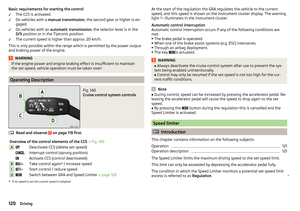 122
122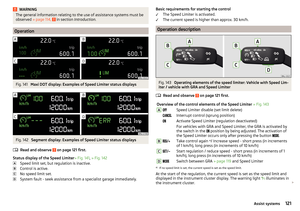 123
123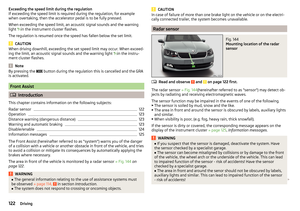 124
124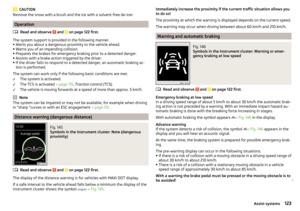 125
125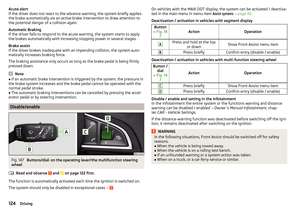 126
126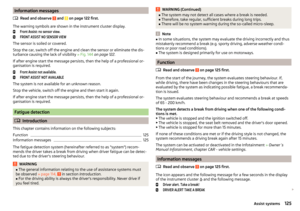 127
127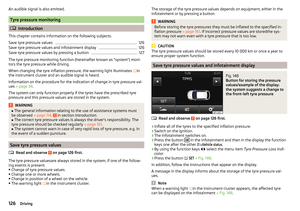 128
128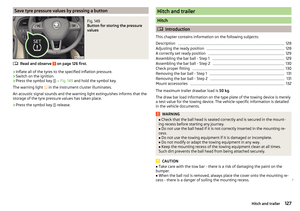 129
129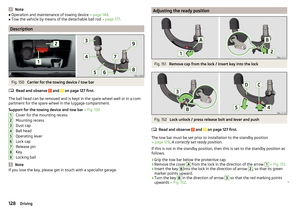 130
130 131
131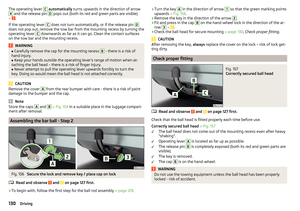 132
132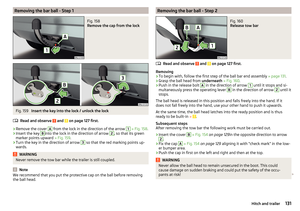 133
133 134
134 135
135 136
136 137
137 138
138 139
139 140
140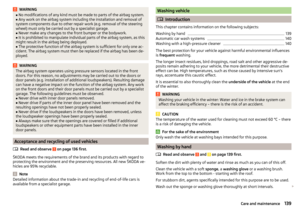 141
141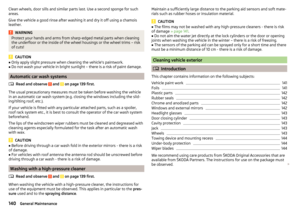 142
142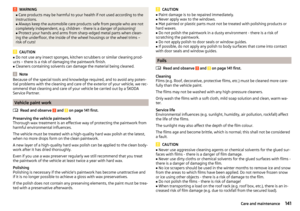 143
143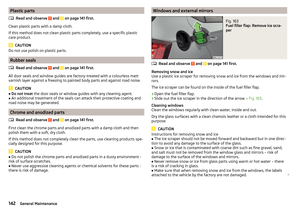 144
144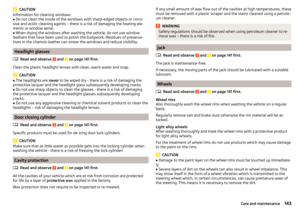 145
145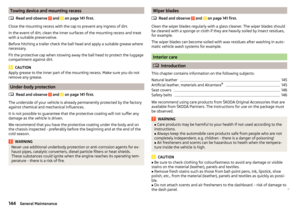 146
146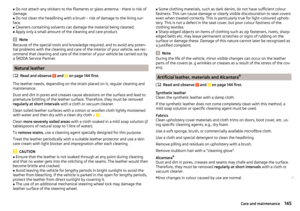 147
147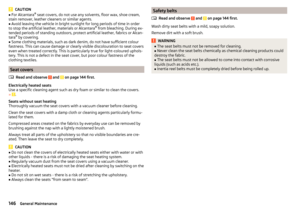 148
148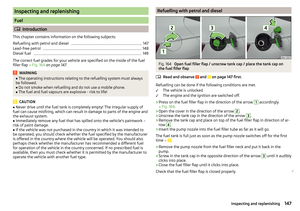 149
149 150
150 151
151 152
152 153
153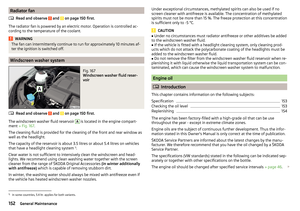 154
154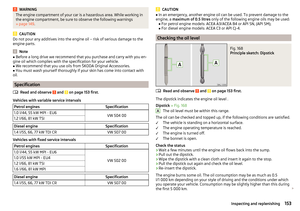 155
155 156
156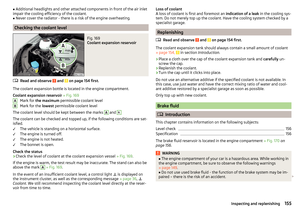 157
157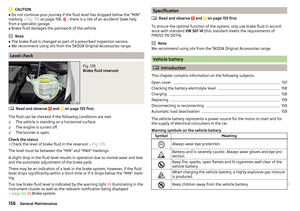 158
158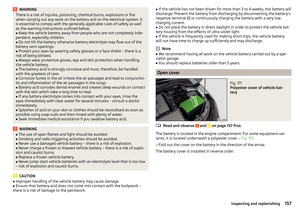 159
159 160
160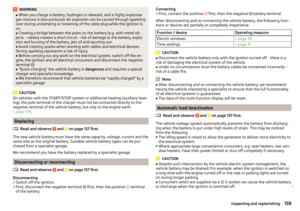 161
161 162
162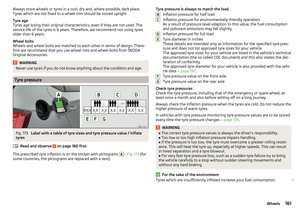 163
163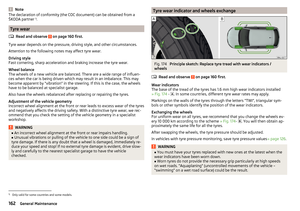 164
164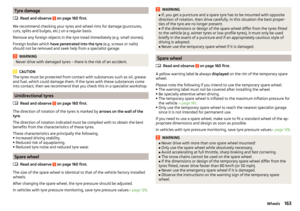 165
165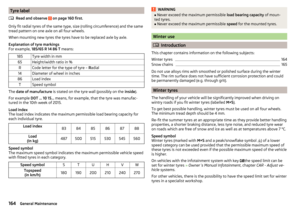 166
166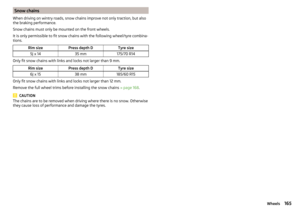 167
167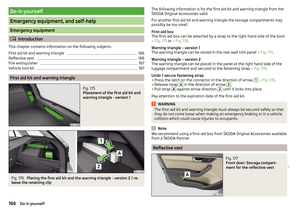 168
168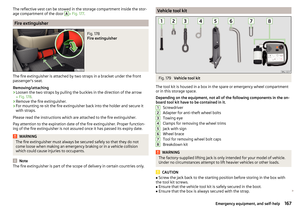 169
169 170
170 171
171 172
172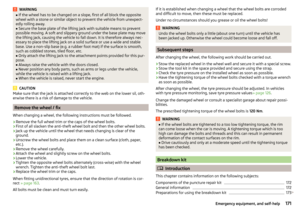 173
173 174
174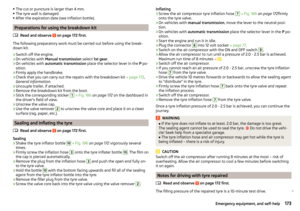 175
175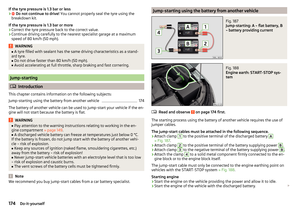 176
176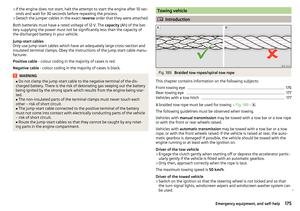 177
177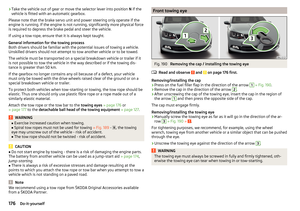 178
178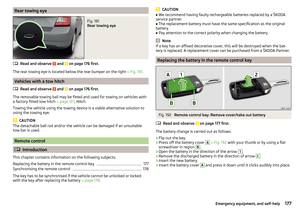 179
179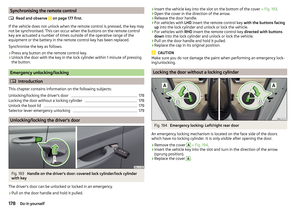 180
180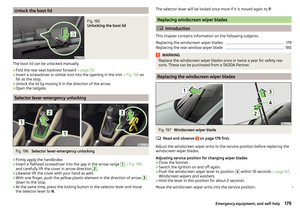 181
181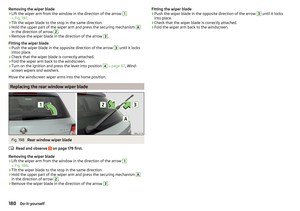 182
182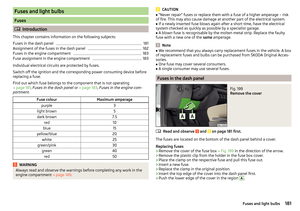 183
183 184
184 185
185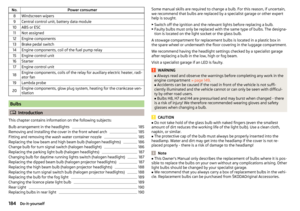 186
186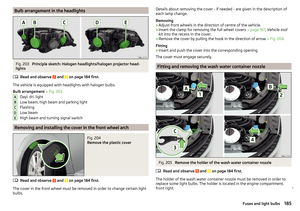 187
187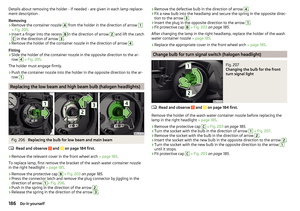 188
188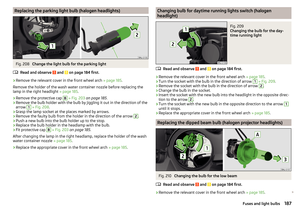 189
189 190
190 191
191 192
192 193
193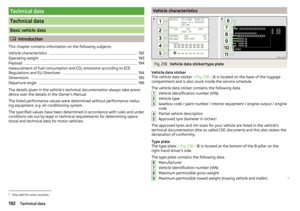 194
194 195
195 196
196 197
197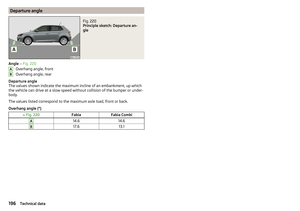 198
198 199
199 200
200 201
201 202
202 203
203 204
204 205
205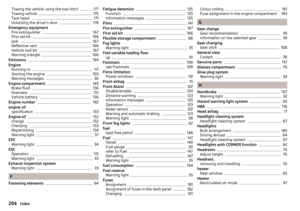 206
206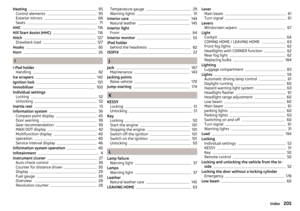 207
207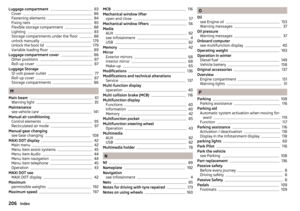 208
208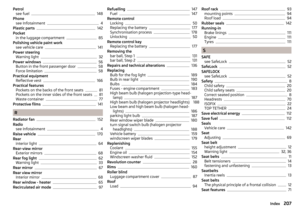 209
209 210
210 211
211 212
212 213
213 214
214 215
215 216
216 217
217 218
218 219
219