Page 217 of 262
 Coolant/Hot water heater fluid 9-6 Vehicle care and maintenance
9
The coolant level in th
is reservoir should be
kept between the “F (FULL)” and the “L(LOW)” marks when measured while the el")
Coolant/Hot water heater fluid 9-6 Vehicle care and maintenance
9
The coolant level in th
is reservoir should be
kept between the “F (FULL)” and the “L(LOW)” marks when measured while the electric motor is cold. If necessary, add cool- ant. Refer to “To add coolant” on page 9-6.
N00955900024
Mitsubishi Motors Genui
ne Coolant provides
excellent protection against corrosion and rust formation on all metals, including alumi- num.
If you need to add coolant often, the cooling system should be pressure-tested for leaks.Take your vehicle to a certified i-MiEV dealer for testing.
N00955800010
The reservoir cap (E) must be tightly sealedto prevent losing coolant which may result in electric motor or nearby parts of the roomunder the hood damage. Only use a Genuine Mitsubishi Parts rese
rvoir cap, or an
approved equivalent.
N00955700019
Do not overfill the reservoir. Your vehicle uses a special reservoir cap that stays sealed and keeps the pressure inthe reservoir below the allowable pres- sure. If you need to change the cap, use the exact same kind. Check the coolant freeze point in the radi- ator with the proper gauge, and only when it is safe. If you add antifreeze, the con-tents of the reservoi
r must be protected
against freezing. Keep the front of the radiator and con- denser clean.
To add coolant Use “Mitsubishi Motors
Genuine Super Long
Life Coolant Premium”
or an equivalent
*.
* : similar high qual
ity ethylene glycol
based non-silicate, non-amine, non-nitrate and non-borate coolant with long life hybrid organic acid technologyFULL LOW
CAUTION Do not use alcohol or
methanol antifreeze or
any coolants that c
ontain them. Using the
wrong antifreeze can corrode aluminumparts. The required concentration of anti-freeze dif- fers depending on the
expected ambient tem-
perature. Above -31 °F (-35 °C):
50 % concentration
of anti-freeze Below -31 °F (-35 °C): 60 % concentration of anti-freezeYou can check the concen
tration level with a
gauge from an automotive supply store, or a certified i-MiEV dealer or service station cancheck it for you. Do not use water to adjust the concentration of coolant. Do not top off the tank with plain water only. Water by itself boils at a lower temperature and does not stop rust or freezing. If the water freezes, it will
damage your cooling
system. Do not use tap water. It can cause corrosion and rust.
Reservoir cap
WA R N I N G Wait for the electric motor to cool down before opening the re
servoir cap. Other-
wise hot steam or bo
iling coolant could
spray up from the re
servoir and scald you.
Points to remember
BK0209800US.book 6 ページ 2014年1月14日 火曜日 午前9時26分
Page 218 of 262
 Washer fluid
Vehicle care and maintenance 9-7
9
N00938600303
The windshield washer fluid reservoir is under the hood. Check the washer fluid level at regular inter-vals and add washer fluid to reserv")
Washer fluid
Vehicle care and maintenance 9-7
9
N00938600303
The windshield washer fluid reservoir is under the hood. Check the washer fluid level at regular inter-vals and add washer fluid to reservoir if nec- essary. Open the reservoir cap and check the fluidlevel. When freezing weather is anticipated, flush out the water in the reservoir by operating the pump. Fill the reservoir with windshield anti-freeze (not radiator
antifreeze), and operate
the system for a few se
conds to flush out the
residual water.
N00938700261
The brake fluid level must be between the “MAX” and “MIN” marks on the reservoir. The brake fluid level fa
lls slightly with wear
of the brake pads, but
this does not indicate
any abnormality. The brake fluid in the master cylinder should be checked when doing other work under the hood. The brake system should also bechecked for leaks at the same time. If the brake fluid level falls markedly in a short length of time, it indicates a leak in thebrake system.
If this occurs, have the vehicle checked by a certified i-MiEV dealer. Use the recommended brake fluid conform- ing to DOT 3 or DOT 4. The reservoir capmust be tightly sealed
to keep dirt and water
out.
N00939100914
The condition of the 12V starter battery is very important to keep the vehicle’s electricalsystem working properly. Check the 12V starter battery regularly.
Washer fluid During cold weather
FULL 1/2
Brake fluid To check the fluid level
Fluid type
CAUTION Do not let any petrol
eum-based fluid touch,
mix with, or get into the brake fluid. This will damage the seals. Be careful when handling brake fluid. It can damage painted surfaces. Use only the listed brake fluid. Different brands of brake fluid have different addi-tives, and these can cause a chemical reac- tion. Do not mix brands of brake fluid. Keep the reservoir ta
nk cap closed to keep
the brake fluid from evaporating.
12V starter battery
BK0209800US.book 7 ページ 2014年1月14日 火曜日 午前9時26分
Page 219 of 262
 12V starter battery 9-8 Vehicle care and maintenance
9
N00901300054
1. Turn the plastic nut (A) counterclockwise, and then remove the 12V starter battery upper cover (B).
1. Install the 12V starter b")
12V starter battery 9-8 Vehicle care and maintenance
9
N00901300054
1. Turn the plastic nut (A) counterclockwise, and then remove the 12V starter battery upper cover (B).
1. Install the 12V starter battery upper cover (B) onto the 12V starter battery, and then push the plastic nut (A) in the direction shown by the arrows to secure the cover.
N00901500069
Before checking the 12V starter battery elec-trolyte level, remove th
e 12V starter battery’s
upper cover. The electrolyte level
must be between the
limits shown on the outside of the 12V starterbattery. Fill it with distilled water as needed. The inside of the 12V starter battery is divided into several compartments. Take the cap off of each compartment and fill to the mark.Do not fill above the t
op line because a spill
during driving could cause damage.
Removing and installing the 12V starter battery upper cover To r e m o v e
NOTE
Be careful not to lose the removed plastic nut.
To install
CAUTION Be sure to install the 12V starter battery upper cover. Otherwise,
the battery electro-
lyte may spill and
cause a malfunction.
When installing the 12V
starter battery upper
cover and plastic nut
do not touch the cool-
ing fan or other moving parts under the hood.Be especially carefu
l that the cables, your
clothing or hair, etc.,
do not get caught in the
cooling fan or ot
her moving parts.
NOTE
Be sure to install the plastic nut in the correct direction.
Checking 12V starter battery electrolyte level
WA R N I N G If the 12V starter battery goes flat, be sure to check the 12V star
ter battery electro-
lyte level before connecting booster cables.
BK0209800US.book 8 ページ 2014年1月14日 火曜日 午前9時26分
Page 220 of 262
 12V starter battery
Vehicle care and maintenance 9-9
9
N00901600057
The 12V starter battery is weaker in cold tem- peratures. This has to do with its chemicaland physical propertie
s and is why a ve")
12V starter battery
Vehicle care and maintenance 9-9
9
N00901600057
The 12V starter battery is weaker in cold tem- peratures. This has to do with its chemicaland physical propertie
s and is why a very
cold 12V starter battery, especially one with a
low charge, will have a hard time starting your vehicle.It is recommended that you have your 12V starter battery and charging system checked by a certified i-MiEV dealer before the startof cold weather. If necessary, have it charged. This will guarantee more reliable starting, and longer 12V starter battery life.
N00901701114
To disconnect the 12V starter battery cable,stop the electric motor.
Disconnect the nega-
tive (-) terminal first, then the positive (+) ter- minal. To reconnect th
e 12V starter battery,
first connect the positi
ve (+) terminal and
then the negative (-) terminal, before starting the vehicle.
After checking the 12V starter battery electrolyte level, make sure the caps arefitted securely. If any of the caps cannot be re-secured to the 12V starter battery, replace the 12Vstarter battery. Electrolyte (battery acid) is made of corro- sive diluted sulfuric acid. If it spills on nearby parts, it can crack, stain, or dis- color them. And if gets on your skin or inyour eyes, it can cause burns or blindness. Please observe the following handling instructions:• If electrolyte gets on plastic parts orother nearby parts, wi
pe it off with a soft
cloth or chamois soak
ed in a solution of
water and neutral detergent then imme- diately rinse the affected parts withplenty of water.• If electrolyte gets on your hands orclothes, rinse thoroughly with water. If electrolyte gets in your eyes, flush them with water immediat
ely and get immedi-
ate medical attention.
During cold weather
WA R N I N G
Disconnection and connection
WA R N I N G Never disconnect the
12V starter battery
while the electric motor unit is running, or you could damage the
vehicle’s electrical
parts. Never short-circuit
the 12V starter bat-
tery. This could cause it to overheat and be damaged. Keep sparks, cigarette
s, and flames away
from the 12V starter battery because the 12V starter battery could explode.
When installing the
12V starter battery,
start connection with the positive (+) ter-minal. If connection is started from thenegative (-) terminal,
sparks will occur if
the positive (+) termin
al touches any other
parts, and this may cause the 12V starterbattery to explode.NOTE
Remove the 12V starte
r battery upper cover
before disconnecting the terminal of 12V starter battery. Refer to “Removing and installing the 12V st
arter battery upper
cover” on page 9-8. Open the terminal cover (A) before discon- necting or connecting the positive (+) termi- nal of the 12V
starter battery.
Loosen the nut (B), and then disconnect the 12V starter batt
ery cable from the positive
(+) terminal.WA R N I N G
BK0209800US.book 9 ページ 2014年1月14日 火曜日 午前9時26分
Page 221 of 262
 Tires 9-10 Vehicle care and maintenance
9
N00939201619
It is important to familiarize yourself with the following terms: Cold tire pressure: • The measured pressure after the vehiclehas been par")
Tires 9-10 Vehicle care and maintenance
9
N00939201619
It is important to familiarize yourself with the following terms: Cold tire pressure: • The measured pressure after the vehiclehas been parked for
at least three hours,
or • The measured pressure when the vehicleis driven less than 1 mile (1.6 km) after having been parked for three hours.
Maximum inflation pressure: the maxi- mum permissible cold
tire inflation pres-
sure for this tire. Recommended inflation pressure: the inflation pressure for optimum tire perfor- mance.
WA R N I N G Open doors and wind
ows in any closed
space where you may be charging orworking with the 12V starter battery. Always wear protective clothing and gog- gles when working wi
th the 12V starter
battery, or have a sk
illed automobile tech-
nician do it. If you are quick-charging your 12V starter battery, first disconnect the 12V starter battery cables. In order to prevent a short circuit, be sure to disconnect the negative (-) terminalfirst, and reconnect it last. If the electrolyte level
is very low, have the
12V starter battery checked at a certified i-MiEV dealer. 12V starter battery te
rminals and related
accessories contain
lead and lead com-
pounds. Wash hands after handling. CAUTION When replacing the
12V starter battery,
remove the connected
positive (+) and nega-
tive (-) terminals after turning the electric motor switch to the “LOCK” position andwaiting at least 1 minut
e. If the 12V starter
battery terminal is removed just after the electric motor switch is turned to the “LOCK” position, this
may cause damage to
components of the electric motor unit.
NOTE
Before cleaning the 12V starter battery, tighten all the filler port
caps to keep dirt and
moisture out. Check each 12V starter battery terminal for corrosion. If necessary, clean the terminalswith a solution of baking soda and water. Grease the posts and cl
amps after cleaning or
tightening them. Check to see that the 12V starter battery is securely installed and
cannot be moved. Also
check each terminal for tightness. If you will not be driv
ing your vehicle for a
long period of time, re
move the 12V starter
battery and store it in a place where the 12V starter battery fluid wi
ll not freeze. Memory
data for settings made by the user may be erased when the 12V starter battery is removed. If this happens, reset the settingsagain using the releva
nt procedures. The
12V starter battery
only should be stored
with a full charge.
Tires
WA R N I N G Driving with tires that are worn, damaged or improperly inflated is dangerous.These type tire conditions will adversely affect vehicle performance. These type tire conditions can also cause atread separation or blowout which may result in an accide
nt causing serious
injury or death. Tires degrade over ti
me with age even
when they are not being used. It is recom-mended that tires ove
r 6 years generally
be replaced even if
damage is not obvious.
BK0209800US.book 10 ページ 2014年1月14日 火曜日 午前9時26分
Page 222 of 262
 Tires
Vehicle care and maintenance 9-11
9
Intended outboard sidewall: • The sidewall that c
ontains a whitewall,
bears white letteri
ng or bears manufac-
turer, brand, and/or model name mol")
Tires
Vehicle care and maintenance 9-11
9
Intended outboard sidewall: • The sidewall that c
ontains a whitewall,
bears white letteri
ng or bears manufac-
turer, brand, and/or model name molding that is higher or deeper than the samemolding on the other sidewall of the tire, or • The outward facing si
dewall of an asym-
metrical tire that has a particular side that must always face outward when mounted on a vehicle.
Passenger car tire: a
tire intended for use
on passenger cars, multipurpose passen-ger vehicles, and trucks, that have a gross vehicle weight rati
ng (GVWR) of 10,000
pounds or less. Light truck (LT) tire: a tire designated by its manufacturer as primarily intended for use on lightweight truc
ks or multipurpose
passenger vehicles. Tread: portion of a tire that comes into contact with the road. Tread rib: a tread se
ction running circum-
ferentially around a tire. Tread separation: pulling away of the tread from the tire carcass. Carcass: the tire structure, except tread and sidewall rubber which, when inflated,bears the load. Sidewall: portion of
a tire between the
tread and bead.
Section width: the line
ar distance between
the exteriors of the sidewalls of aninflated tire, excluding elevations due to labeling, decoration, or protective bands. Bead: the part of the tire that is made of steel wires, wrapped
or reinforced by ply
cords and that is shaped to fit the rim. Ply: a layer of rubber-coated parallel cords. Cord: the strands forming the plies in the tire. Rim: a metal support for a tire or a tire and tube assembly upon which the tirebeads are seated. Rim diameter: nominal diameter of the bead seat. Groove: the space between two adjacent tread ribs.
EXAMPLE:P215/65R15
Tire Markings
Size Designation P
Passenger car tire size based on U.S.A. design standards
215
Section width in millimeters (mm.)
65
Aspect ratio in percent (%) Ratio of section height to section width of tire.
R
Construction code •“R” means radial construc- tion.
• “D” means diagonal or bias construction.
15 Rim diameter in inches (in)
BK0209800US.book 11 ページ 2014年1月14日 火曜日 午前9時26分
Page 223 of 262
 Tires 9-12 Vehicle care and maintenance
9
EXAMPLE: 95H
Maximum load indicates the maxi- mum load this tire is designed to carry. Maximum Pressure indicates the maximum permissible cold tire infla-tio")
Tires 9-12 Vehicle care and maintenance
9
EXAMPLE: 95H
Maximum load indicates the maxi- mum load this tire is designed to carry. Maximum Pressure indicates the maximum permissible cold tire infla-tion pressure for this tire. The TIN may be found on one or both sides of the tire but the date
NOTE
European/Japanese metric tire sizing is based on European/Jap- anese design standards. Tires designed to these standards havethe tire size molded into the sidewall beginning with the sec- tion width. The letter “P” isabsent from this tire size desig- nation. Example: 215/65R15 96H.LT (Light Truck) -metric tiresizing is based on U.S.A. designstandards. The size designation for LT-metric tires is the same as for P-metric tires except for theletters “LT” that are molded into the sidewall preceding the size designation. Example:LT235/85R16.
Service Description 95
Load index A numerical code associ- ated with the maximum load a tire can carry.
H
Speed symbol A symbol indicating the range of speeds at which a tire can carry a load corre- sponding to its
load index
under certain operating con-ditions.The maximum speed corre- sponding to the speed sym- bol should only be achieved under specified operating conditions. (i.e. tire pressure, vehicle loading, road condi-tions and posted speed lim- its)
Maximum Load
WA R N I N GOverloading of your tire is dangerous. Overloading cancause tire failure, affect vehi- cle handling, and increase your stopping distance. Usetires of the recommended load capacity for your vehicle. Never overload them.
Maximum Pressure Tire Identification Number (TIN)
BK0209800US.book 12 ページ 2014年1月14日 火曜日 午前9時26分
Page 224 of 262
 Tires
Vehicle care and maintenance 9-13
9
code may only be on one side. Look for the TIN on the outboard side of tires as mounted on the vehicle. If the TIN is not found on the outboard sidethen you")
Tires
Vehicle care and maintenance 9-13
9
code may only be on one side. Look for the TIN on the outboard side of tires as mounted on the vehicle. If the TIN is not found on the outboard sidethen you will find it on the inboard side of the tire. EXAMPLE: DOT MA L9 ABCD 1504
The treadwear grade is a comparative rating based on the wear rate of the tire when testedunder controlled conditions on a specified government test course
. For example, a tire
graded 150 would wear one and one-half (11/2) times as well on the government course
as a tire graded 100. The relative performance of tires depends upon the actual conditions of their use, however, and may depart signifi-cantly from the norm due to variations in driving habits, service practices and differ- ences in road characteristics and climate. The traction grades, from highest to lowest, are AA, A, B and C. Those grades represent the tire’s ability to stop on wet pavement as measured under contro
lled conditions on
specified government te
st surfaces of asphalt
and concrete. A tire marked C may have poor traction performance. The temperature grades are A (the highest), B and C, representing the ti
re’s resistance to the
generation of heat and it
s ability to dissipate
heat when tested u
nder controlled conditions
on a specified indoor
laboratory test wheel.
Sustained high temperature can cause the material of the tire to
degenerate and reduce
tire life, and excessive temperature can lead to sudden tire failure. The grade C corre-sponds to a level of
performance which all
passenger car tires must
meet under the Fed-
eral Motor Vehicle Safety Standard No. 109.Grades B and A represent higher levels of performance on the laboratory test wheel than the minimum required by law.
N00939300873
Proper tire inflation pre
ssure is essential for
the safe and satisfac
tory operation of your
vehicle. The wrong tire pressure will cause problems in three major areas:
DOT
Department of Transporta- tion This symbol certifies that the tire is in compliance with the U.S.
Department
of Transportation tire safety standards, and is approved for highway use.
MA
Code representing the tire manufacturing location. (2 digits)
L9 ABCD
Code representing the tire size. (2 digits)Code used by tire manufac- turer. (1 to 4 digits)
15
Number representing the week in which the tire was manufactured. (2 digits)
04
Number representing the year in which the tire was manufactured. (2 digits)
Treadwear, Traction and Temper- ature Grades Treadwear Tr a c t i o n
TemperatureTire inflation pressures
BK0209800US.book 13 ページ 2014年1月14日 火曜日 午前9時26分
 1
1 2
2 3
3 4
4 5
5 6
6 7
7 8
8 9
9 10
10 11
11 12
12 13
13 14
14 15
15 16
16 17
17 18
18 19
19 20
20 21
21 22
22 23
23 24
24 25
25 26
26 27
27 28
28 29
29 30
30 31
31 32
32 33
33 34
34 35
35 36
36 37
37 38
38 39
39 40
40 41
41 42
42 43
43 44
44 45
45 46
46 47
47 48
48 49
49 50
50 51
51 52
52 53
53 54
54 55
55 56
56 57
57 58
58 59
59 60
60 61
61 62
62 63
63 64
64 65
65 66
66 67
67 68
68 69
69 70
70 71
71 72
72 73
73 74
74 75
75 76
76 77
77 78
78 79
79 80
80 81
81 82
82 83
83 84
84 85
85 86
86 87
87 88
88 89
89 90
90 91
91 92
92 93
93 94
94 95
95 96
96 97
97 98
98 99
99 100
100 101
101 102
102 103
103 104
104 105
105 106
106 107
107 108
108 109
109 110
110 111
111 112
112 113
113 114
114 115
115 116
116 117
117 118
118 119
119 120
120 121
121 122
122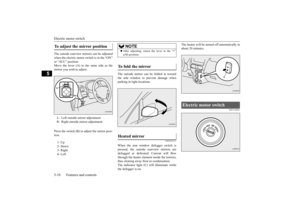 123
123 124
124 125
125 126
126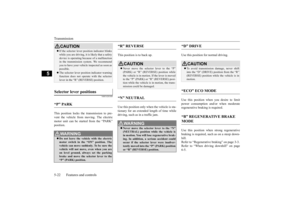 127
127 128
128 129
129 130
130 131
131 132
132 133
133 134
134 135
135 136
136 137
137 138
138 139
139 140
140 141
141 142
142 143
143 144
144 145
145 146
146 147
147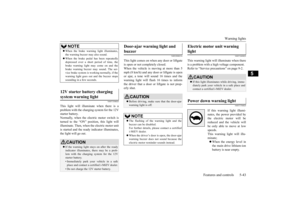 148
148 149
149 150
150 151
151 152
152 153
153 154
154 155
155 156
156 157
157 158
158 159
159 160
160 161
161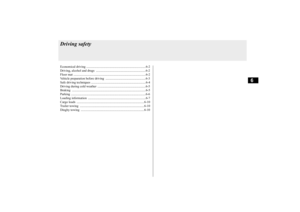 162
162 163
163 164
164 165
165 166
166 167
167 168
168 169
169 170
170 171
171 172
172 173
173 174
174 175
175 176
176 177
177 178
178 179
179 180
180 181
181 182
182 183
183 184
184 185
185 186
186 187
187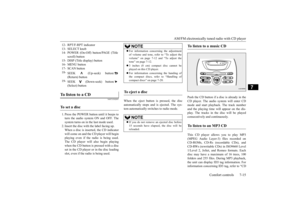 188
188 189
189 190
190 191
191 192
192 193
193 194
194 195
195 196
196 197
197 198
198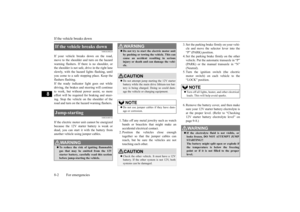 199
199 200
200 201
201 202
202 203
203 204
204 205
205 206
206 207
207 208
208 209
209 210
210 211
211 212
212 213
213 214
214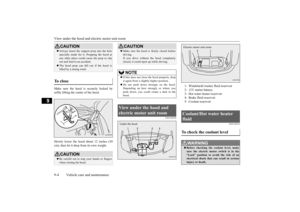 215
215 216
216 217
217 218
218 219
219 220
220 221
221 222
222 223
223 224
224 225
225 226
226 227
227 228
228 229
229 230
230 231
231 232
232 233
233 234
234 235
235 236
236 237
237 238
238 239
239 240
240 241
241 242
242 243
243 244
244 245
245 246
246 247
247 248
248 249
249 250
250 251
251 252
252 253
253 254
254 255
255 256
256 257
257 258
258 259
259 260
260 261
261