Page 57 of 214

Calling up the climate control menu
X
To switch to the climate control bar: slide
6 the controller.
X To select from climate control bar 0044: turn
and press the controller.
The menu for selecting climate control
functions is activated.
X To select the desired climate control func-
tion: turn and press the controller.
The selected climate control function
appears.
The following climate control functions can
also be called up directly from the climate
control bar:
R Temperature, left and right, displayed as
the actual temperature, e.g. 68 ‡ (20 †).
R Airflow left and right, displayed as 0096and
the current setting, e.g. 1.
R Air distribution left and right, displayed by
the current setting, e.g. 009B.
Setting the temperature X
To select the current temperature in the
climate control bar on the left or right: turn
and press the controller.
The temperature setting scale appears.
X To change the setting: turn the controller.
X To close the temperature setting scale:
press the controller.
i You can also use the climate control menu
to set the temperature. Setting the airflow
X
To select 0096on the left or right in the
climate control bar: turn and press the con-
troller.
The airflow setting scale appears.
X To change the setting: turn the controller.
X To close the temperature setting scale:
press the controller.
i You can also use the climate control menu
(Y page 56)to set the airflow.
Setting the air distribution X
To select the current air distribution display
on the left or right in the climate control bar,
e.g. 009B: turn and press the controller.
The air distribution setting scale appears.
X To change the setting: turn the controller.
X To close the temperature setting scale:
press the controller.
i You can also use the climate control menu
(Y page 56)to set the air distribution. Climate control settings
55Vehicle functions
Page 58 of 214

Settings in the climate menu
Switching climate control on/off X
Call up the climate control menu
(Y page 54).
X To switch to the footer: slide 6the con-
troller.
X To select 0073
0073 Climate Ctrl On Climate Ctrl On: turn and
press the controller.
The climate control is switched on 0073or off
0053 depending on the settings.
If the climate control is switched off:
R the adjustment functions are deactivated.
R the blower is switched off.
R the air recirculation flaps are closed.
Switching cooling with air dehumidifi-
cation on/off i
Activating the cooling with air dehumidi-
fication facilitates the cooling of the vehicle
interior even with high outside tempera-
tures.
X Call up the climate control menu
(Y page 54).
X To switch to the footer: slide 6the con-
troller.
X To select A/C
A/C: turn and press the controller.
X Switch cooling with air dehumidification on
0073 or off 0053.
i The current status of the cooling function
is displayed in the climate control bar: AC
on – activated, AC off – deactivated
(Y page 54). i
Deactivating the cooling with air dehu-
midification function reduces fuel con-
sumption.
Synchronizing the climate control set-
tings With the synchronize option, you can decide
whether you wish to activate the climate
control settings for all zones together or sep-
arately.
X
Call up the climate control menu
(Y page 54).
X To switch to the footer: slide 6the con-
troller.
X To select Sync. Sync.: turn the controller and
press to confirm.
X Switch the synchronization function on
0073 (left and right synchronized) or off 0053
(left and right separate).
With the synchronization function switched
off, you can alternate between driver and
front passenger.
X To switch from the footer to the main area:
slide 5the controller.
X To switch between left and right: slide
1 the controller.
Not all climate control functions allow
switching between the driver and front
passenger.
i The synchronization function can also be
deactivated by sliding the controller to the
left or right in the main area. The setting
elements for the driver and front passenger
are then shown separately once again.
Further information (see the vehicle Opera-
tor's Manual).
Adjusting the climate mode settings You can use the climate control bar
(Y
page 54) to access the climate control
menu. 56
Climate control settingsVehicle functions
Page 59 of 214

The following settings can be made in the cli-
mate control menu:
R Temperature
R Air distribution
R Climate mode (airflow setting)
R Airflow Setting the climate mode (airflow setting)
determines the airflow. The setting is only
active when the air-conditioning system is set
to "AUTO".
X Call up the climate control menu
(Y page 54).
X To select Climate Mode
Climate Mode: turn and press
the controller.
X If necessary, change sides: slide 1the
controller.
X To change the setting: turn and press the
controller.
Exiting a menu
X Press the 0038button.
The current airflow setting is shown in the cli-
mate control bar: DIFFUSE, MEDIUM or
FOCUS (Y page 54). Starting/stopping the perfume atom-
izer The perfume atomizer makes it possible to
scent the air in individual compartments in
the vehicle interior. Further information (see
the vehicle Operator's Manual).
X
Call up the climate control menu
(Y page 54).
X To select Air Freshener Air Freshener: turn and press
the controller.
Depending on the previous status, you start
or stop the perfume atomizer.
X To set the intensity: turn the controller
when the atomizer is switched on.
Exiting a menu
X Press the 0038button.
Switching the ionization on/off The ionization has a cleansing effect on the
air in the vehicle interior. Further information
(see the vehicle Operator's Manual). Climate control settings
57Vehicle functions
Page 60 of 214

X
Call up the climate control menu
(Y page 54).
X To select Ionization Ionization: turn and press the
controller.
You switch it on or off, depending on the
previous status.
Exiting a menu
X Press the 0038button.
Auxiliary heating You can pre-set three departure times for
automatic activation of the auxiliary heating.
Selecting the pre-set time:
X Call up the climate control menu
(Y page 54).
X To select Auxiliary Heating
Auxiliary Heating: turn and
press the controller.
X Turn the controller.
Changing the pre-set time:
X Call up the climate control menu
(Y page 54).
X To select Auxiliary Heating Auxiliary Heating: turn and
press the controller.
X To select the departure time that will be
changed: turn and press the controller.
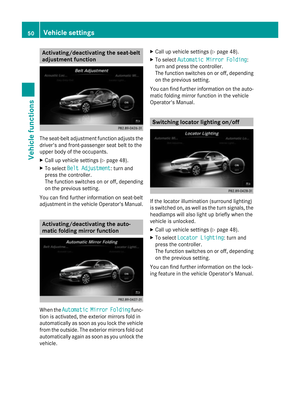
A menu for changing the time opens. X
To select the required setting element (ana-
log clock, hours or minutes): slide 5and
9 the controller.
X To change the setting: turn the controller.
X To exit the menu: press the controller. AGILITY SELECT
General notes
With the AGILITY SELECT menu you can con-
figure the drive, suspension and steering set-
tings for the Individual
Individual drive program. The
configuration you have programmed only
takes effect once you have activated the
Individual Individual drive program using the AGILITY
SELECT switch (see the vehicle Operator's
Manual). Configuration via the controller
X Press the 00D4button.
The vehicle menu is displayed.
X To select AGILITY SELECT AGILITY SELECT : turn and press
the controller.
The menu for setting the Individual Individualdrive
program appears.
X To select Drive
Drive,Suspension
Suspension orSteer‐
Steer‐
ing
ing : turn and press the controller.
X To select individual settings: turn the con-
troller and press to confirm. 58
AGILITY SELECTVehicle functions
Page 61 of 214
Configuration via the AGILITY SELECT
switch
X Using the AGILITY SELECT switch, select
the Individual
Individual drive program (see the
vehicle Operator's Manual).
A window appears after a short while.
X To confirm Adjust Adjust: press the controller.
The menu for setting the Individual
Individual drive
program appears.
X To select Drive
Drive, Suspension
Suspension orSteer‐
Steer‐
ing
ing : turn and press the controller.
X To select individual settings: turn the con-
troller and press to confirm. Setting options
You can choose from the following settings
for the drive: C Comfort
S Sport
S+ Sport +
M Manual
E Eco
You can make the following settings for the
suspension:
C Comfort
S Sport
S+ Sport +
You can make the following settings for the
steering:
C Comfort
S Sport
You can find further information on the indi-
vidual drive program in the vehicle Operator's
Manual. AGILITY SELECT
59Vehicle functions
Page 62 of 214
Page 63 of 214
Your COMAND equipment
..................62
Introduction ......................................... 62
Basic settings ...................................... 64
Destination input ................................ 67
Route guidance ................................... 79
Real-time traffic reports .....................85
Storing destinations ...........................89
Map functions ..................................... 91
Navigation functions ..........................97
Problems with the navigation sys-
tem ....................................................... 99 61Navigation
Page 64 of 214

Your COMAND equipment
These operating instructions describe all
standard and optional equipment available
for your COMAND system at the time of pur-
chase. Country-specific differences are pos-
sible. Please note that your COMAND system
may not be equipped with all the features
described. This also applies to safety-relevant
systems and functions. Therefore, the equip-
ment on your COMAND system may differ
from that in the descriptions and illustrations.
Should you have any questions concerning
equipment and operation, please consult an
authorized Mercedes-Benz Center. Introduction
Important safety notes
G
WARNING
If you operate information systems and com-
munication equipment integrated in the vehi-
cle while driving, you will be distracted from
traffic conditions. You could also lose control
of the vehicle. There is a risk of an accident.
Only operate the equipment when the traffic
situation permits. If you are not sure that this
is possible, park the vehicle paying attention
to traffic conditions and operate the equip-
ment when the vehicle is stationary.
You must observe the legal requirements for
the country in which you are currently driving
when operating COMAND.
COMAND calculates the route to the destina-
tion without taking account of the following,
for example:
R traffic lights
R stop and yield signs
R merging lanes
R parking or stopping in a no parking/no
stopping zone
R other road and traffic rules and regulations
R narrow bridges COMAND can give incorrect navigation com-
mands if the actual street/traffic situation
does not correspond with the digital map's
data. Digital maps do not cover all areas nor
all routes in an area. For example, a route may
have been diverted or the direction of a one-
way street may have changed.
For this reason, you must always observe
road and traffic rules and regulations during
your journey. Road and traffic rules and reg-
ulations always have priority over the sys-
tem's driving recommendations.
Navigation announcements are intended to
direct you while driving without diverting your
attention from the road and driving.
Please always use this feature instead of con-
sulting the map display for directions. Look-
ing at the icons or map display can distract
you from traffic conditions and driving, and
increase the risk of an accident.
General notes
Operational readiness of the navigation
system The navigation system must determine the
position of the vehicle before first use or
whenever operational status is restored.
Therefore, you may have to drive for a while
before precise route guidance is possible.
GPS reception Among other things, correct functioning of
the navigation system depends on GPS recep-
tion. In certain situations, GPS reception may
be impaired, there may be interference or
there may be no reception at all, e.g. in tun-
nels or parking garages.
i Using roof carriers may impair the correct
functioning of a roof antenna (phone, sat-
ellite radio, GPS). 62
Int
roductionNavigation