Page 57 of 244

During brief stops, e.g. at a red light, wiper
motion will automatically be reduced to the
next lower speed. Wipers already turning at
low speed change to intermittent wiping.
When the ignition is turned on, the washer
jets are heated.
A WARNING
- Wiper blades are crucial for safe driving!
Only when they are in good condition are
they able to clear the windows properly
to provide uncompromising visibility .
Worn or damaged wiper blades are a safety hazard ¢
page 5 7, Replacing
windshield wiper blades!
- The light/rain sensor* is only designed to
assist and support the driver.
It remains
entirely the driver's responsibility to
monitor outside weather conditions and
to manually activate the wipers as soon as rain or drizzle reduces visibility
through the windshield.
- The windshield must not be treated with
water-repellent materials. They can in
crease glare under poor visibility condi
tions such as wetness, darkness, or when
the sun is low on the horizon. In addi
tion, they can cause the windshield wip
ers to chatter .
(I) Note
In freezing or near freezing conditions:
- Always check that the wiper blades are
not frozen to the glass before you turn
the wipers on . Loosen a wiper blade
which is frozen in place before operating
the wipers to prevent damage to the
wiper blade or the wiper motor.
- Do not use the wipers to clear a frosted window . Using the wipers as a conven
ient ice scraper will destroy the wiper
blades.
- Before you take your vehicle to an auto
matic car wash, make sure you have the
windshield wiper system switched off (lever in position 0), otherwise the wind
shield wiper system could get damaged
Clear vision 5 5
in the car wash if it should suddenly
come on.
(0 Tips
- The windshield wipers are switched off
when the ignition is turned off. Activate
the windshield wipers after the ignition
is switched back on by moving the wind
shield wiper lever to any position.
- Worn or dirty windshield wiper blades
cause smearing, which can affect the op
eration of the light/rain sensor* . Check
the condition of your windshield wiper
blades regularly.
- The rain sensor is part of the interval
wiping system . Turning off the ignition
will also deactivate the rain sensor. To re activate the sensor, switch off the inter
val wiping function, then switch it back
on again.
-Applies to vehicles with light/rain sen
sor : When the wipers are switched on
manually and in rain conditions, the au
tomatic headlights* turn on¢
page 48,
Switching the headlights on and off
or
off during the day when the wipers are
no longer operating. The automatic
headlights* function is available in this
case only when the light switch is in the
"AUTO" position¢
page 48, fig. 52.
-Make sure the washer fluid reservoir in
the engine compartment is topped off
before going on a long trip. Look up
¢
page 179 for checking and filling the
washer container .
- The wipers only operate with the hood
completely closed .
Headlight washer system
Applies to vehicles: with headlight washer system
The headlight washer system cleans the
headlights.
"'Operate the windshield wiper/washer sys
tem
o page 54, fig. 62 ® with the head
lights turned on by holding the lever for lon-
ger than one second . ..,.
Page 58 of 244

56 Clear vis ion
The washer jets extend forward out o f the
front bumper driven by water pressure to
spray the front headlights with water.
You shou ld inspect the headlights regularly
(for example when refueling) and clean
off
any solid dirt or insects from the lenses .
To ensure the system wo rks properly in wi nter,
keep the washer jets free of snow and remove
any ice using a de-icing spray.
Service position
It is only possible to change wiper blades if
you move the wiper arms to the service posi
tion .
In o rder to use the windsh ield wipers, t he
front lid mus t be comp lete ly closed.
Moving w iper blades to the service
position
• When there is a risk of frost, make s ure that
the wiper b lades a re not frozen to the wind
shield .
.. Switch the ignition on.
.. Move the wiper lever to position
0
c> page 54, fig. 62.
.. Press the I Reset I button until the Displa y
typ e
menu appears in the Driver Informa
t ion System display .
.. Us ing the rocker switch and the
! Reset ! but
ton, select the
S et > W iper s > Front > Serv
ice positi on on
function. The winds hield
wiper arms move to the service position.
Moving wiper blades to park position
.. Make certain that the wiper arms are lying
against the windshie ld .
.. Switch the ign ition on and move t he wiper
l ever from posi tion
O to 4 c> page 54,
fig . 62 .
The wiper arms will move back to
the park position.
«I) Note
Never drive yo ur vehicle when the w ind
shie ld w iper arms are in the service pos i
tion and pulled away from the windshie ld .
When you dr ive faste r than 4 mp h (6 km/ h), the wiper a
rms automatically return to
the park position and cou ld cause paint
damage to the front lid!
(D Tips
- Yo u can also turn on the se rvice posit ion,
for example, if yo u want to protect the
w indshield from icing by using a cover .
- The service posit ion moves to
off a uto
matically when you operate the w ind
shield wiper lever, or speed exceeds
4 mph (6 km/h).
Cleaning windshield wiper blades
Clean the windshie ld w iper blades when they
begin to leave streaks. Use a soft cloth and
glass cleaner to clean the windshield wiper
blades.
.. Place the windshie ld w iper arms in the serv
ice pos it ion . Refer to
c::> page 56 .
"' Lift the wiper arm away from the front win
dow.
_&. WARNING
Di rty windsh ield wiper b lades can impair
your view. This can lead to accidents .
-
Page 59 of 244

Replacing windshield wiper blades
Wiper blades in good condition help keep the
windshield clear .
Fig. 63 U nl atc hing wiper bla des
Fi g. 6 4 Remov ing wipe r bla des
Removing the wip er blade
• Move the wipers to the service position
c::> page 56.
• Fold the w indshield wiper arm away from
the g lass.
• On the upper end of the wiper a rm at the
corrugation, squeeze the plastic retainer to
gether on both sides in the direction of the
arrow c::>
fig. 63.
• Rotate the w iper blade in the direction of
the arrow @c::>
fig. 64 away from the w iper
arm .
• Lift the w iper blade off in the direction of
the a rrow @.
Inst alling the wiper blade
• Place the rounded end of the wiper onto the
end of the wiper arm in the
opposit e direc
t ion to the arrow @ c::>
fig. 64 .
• Swing the wiper in the opposite direction to
the a rrow @onto the wiper arm.
• Sq ueeze the corrugation on the w iper until
you hear it click in the wipe r arm .
Clear vi sion 5 7
• Fold the wiper arm back onto the wind
shield.
• Move the wipers to the park position
c::>
page 56.
The front wipe r blades measure left side
23 .20 in . (590 mm) and right side 18 .50 in.
(470 mm) in length.
C lean you r wiper blades regularly with a wind
shield washer solution to prevent streaking. If
the b lades are very dirty, for examp le with in
sects, carefully clean the b lades with a sponge
or a soft brush.
If the wiper blades begin to streak the wind
shield, this cou ld be caused by residue left on
the windshie ld by automatic car washes.
Fill the wi ndshield washe r container with a
spec ial solutio n availab le at your aut horized
Audi dealer to remove the resid ue .
Be sure to inspect t he condition of your wiper
blades regularly. For safety reasons, rep lace
your wiper blades once or twice a year if nec
essary . See yo ur authorized Aud i dealer for re
placement blades.
A WARNING
For your safety, you shou ld rep lace the
wiper b lades once or twice a yea r. See your
a uthorized Audi dealer for replacement
b lades.
(D Note
- The w indshie ld w iper blades must only
be replaced w hen in the service pos ition
c::>
page 56! Otherw ise, you risk damag
ing the paint on the hood or the wind
shield wiper mo to r.
- T o help p revent damage to the w iper sys
tem, always loos en blades wh ich are fro
z en to the windshield before operating
w ipers.
- T o help p revent damage to wiper blades,
do not use gaso line, kero sene, paint
t hinne r, or other solvents on o r near the
w iper blades.
Page 60 of 244

58 Clear vision
-To help prevent damage to the wiper
arms or oth er components, do not at
tempt to move the wipers by hand.
@ Tips
- Commercial hot waxes applied by auto
matic car washes aff ect the cleanability
of the glass surface .
- The front wiper blades are different
lengths; the blade on the driver's side is
longer .
Digital compass
Activating or deactivating the compass
Applies to vehicles: with digital compass
Fig. 65 Inside re ar view mirro r: di gital compass ac ti
va ted
• To activate or deactivate , hold the@
¢ fig. 65 button down until the red display
appears or disappears.
The digital compass only works with the igni
tion turned on . The directions are displayed as
initials:
N (North), NE (Northeast) , E (East),
SE (Southeast) , S (South), SW (Southwest),
W (West), NW (Northwest).
The compass has to be recalibrated if the dis
play is wrong or inaccurate
¢ page 58.
(j) Tips
-To avoid inaccurate directions, do not al
low any remote controls, electrical sys
tems, or metal parts close to the mirror.
- The correct magnetic deflection zone
must be set in order to display the direc
tions correctly.
Setting the magnetic deflection zone
Applies to vehicles: with digital compass
Fig. 66 North A meri ca : magn etic defle ction zo ne
bo undaries
• Hold the@¢ page 58, fig. 65 button down
until the number of the set magnetic deflec
tion zone appears on the interior rear view
mirror .
• Adjust the magnetic deflection zone by re
peatedly pressing on the@button. The set
mode automatically deactivates after a few
seconds.
Calibrating the compass
Applies to vehicles: with digital compass
• Hold the @button down until the letter C is
displayed on the interior rear view mirror .
• Drive in a circle at a speed of about S mph
(10 km/h) until a direction is shown on the
interior rear view mirror.
_&. WARNING
The digital compass is to be used as a di
rectional aid only. Even though you may
want to look at it while you are driving, you
must still pay attention to traffic, road and
weather conditions as well as other possi
ble hazards.
-
Page 61 of 244

Seats and storage
General recommen
dations
Why is your seat adjustment so important?
The safety belts and the airbag system can
only provide maximum protection if the front
seats are correctly adjusted.
There are various ways of adjusting the front
seats to provide safe and comfortable support
for the driver and the front passenger. Adjust
your seat properly so that :
- you can easily and quick ly reach all the
switches and controls in the instrument
panel
- your body is properly supported thus reduc ing physical stress and fatigue
- the safety belts and airbag system can offe r
maximum protection
¢ page 108.
In the following sections, you will see exactly
how you can best adjust your seats .
There are special regulations and instructions
for installing a child safety seat on the front passenger's seat. Always heed the informa
tion regard ing child safety provided in
¢ page 129, Child Safety.
A WARNING
Incorrect seating position of the driver and
all other passengers can result in serious
personal injury.
- Always keep your feet on the f loor when
the vehicle is in motion -never p ut your
feet on top of the instrument panel, out
of the w indow or on top of the seat cush
ion! This applies espec ially to the passen
gers . If your seating position is incorrect
you increase the r isk of injury in the case
of sudden braking or an acc ident. If the
airbag inflates and the seating position
is incorrect this could result in personal
injury or even death.
- It is important for bo th the driver and
front passenger to keep a distance of a t
Seat s an d sto rage 59
least 10 inches (25 cm) between them
selves and the steering wheel and/or in
strument panel. If you're s itting any
closer than th is, the airbag system can
not protect you properly. In addition to
this, the front seats and head restra ints
must be adjusted to yo ur body height so
that they can give you max imum prote c
tion.
- Always try to keep as much distance as
possible be tween yourself and the s teer
ing wheel o r instrument pane l.
- Do not adjust the driver's or front pas
senger's seat whi le the vehicle is moving.
Your seat may move unexpected ly, caus
ing sudden loss of vehicle control and
personal injury . If you ad just yo ur seat
while the veh icle is moving, you are out
of posit ion.
Driver's seat
The correct seat position is important for safe
and relaxed driving.
We recommend that you adjust the driver's
seat in the fo llowing manner:
.,. Adj ust the seat in fore and aft direction so
t ha t you can easily push the peda ls to the
floor whi le keeping your knee sligh tly bent
c::> A in Why is your seat adjustment so im
portant? on page 59 .
.,. Adjust the seatback so that when you sit
w ith your back against the seatback, you can
still grasp the top of the steering wheel.
.,. Pos it ion the head restrai nt accord ing to the
occupant 's height
c::> page 62 . For maxi
mum protection, the top of the head re
straint shou ld be at least at eye level, pref
erably higher and idea lly level with the top
of the head
¢ page 94, fig. 100 .
A WARNING
Never place any objects in the dr iver's foot
well. An object could get into the pedal
area and interfere with pedal funct ion. In
case of sudden braking or an acc ident, you
would not be able to brake or accelerate!
Page 62 of 244

60 Seats and stor age
Front passenger's seat
Always move the front passenger seat into
the rearmost position .
To avoid contact with the airbag while it is de
p loying, do not sit any closer to the instru
ment panel tha n necessary and always wear
the three-point safety belt provided ad justed
correctly . We recommend that you adjust the
passenger's seat i n the follow ing ma nner:
• Bring the back rest up to an (a lmost) upr ight
pos it ion.
Do not r ide w ith the seat reclined .
• The idea l position fo r the head restra int is
with the upper edge of the rest ra in t l eve l
with the top o f your head
¢ page 62. You
sho uld
not lower the top o f the restra int be
l ow the level of your eyes .
• Place your feet on the floor in front of the
passenger's seat .
Adjusting front seats
manually
Adjustment controls
Applies to vehicles: with manual seat adjustment
Various controls on the manual seats provide
a wide range for individual adjustments.
Fig . 67 Adj ust ment contro ls : locat ions o n dr ive r's seat
CD Mov ing the seat forward or backward
@ Ad justing the lumbar support
® Adjusting the seat height
© Adjusting the seatback angle
Some of the contro ls are fitted on certa in
models only or they are optional equip
ment.
Adjusting the manual seats
Applies to vehicles: with manual seat adjustment
Position, angle and shape of the manual
seats can be adjusted to provide safe and
comfortable seating .
Reed and heed all WARNINGS¢.&. before
you adjust your seat.
Moving the front seats forward or
backward
• Lift the leve r CD¢ page 60 , fig. 67 and slide
the seat to the desired position .
• Release the lever and then move the seat
fu rther until you fee l and hea r it engage.
Adjusting the seat height
• Pull the lever ® up and pump it to raise the
seat.
• Push the lever down and pump it to lower
the seat .
Adjusting the seatback angle
• Lean forward to take your weight off the
seatback.
• Turn the hand wheel © in the d irection you
want the seatback to tilt.
,&. WARNING ,--
- Never adjust the drive r's or front pas
senger's seat whi le the vehicle is moving.
If you do th is w hile the veh icle is moving,
you will be out of posi tion. A lways ad just
the dr iver's or front passenger's seat
when the vehicle is not moving.
- Be ca reful when adjustin g the seat
height . Check to see that no one is in the
way, or ser ious injury cou ld result!
- To reduce the risk of injury in the case of
sudden b raking o r accident, front pas
sengers must never r ide in a moving ve
h icle with the seatback reclined. Safety
be lts and the airbag system only offer
maximum protection when the seatback
is upr ight and the safety belts are prop
erly positioned on the body. The more
the sea tba ck is reclined, the gre ater the
risk of person al injury from a n incorrect
Page 63 of 244

seating position and improperly posi
tioned safety belts!
Power seats
Adjustment switches
App lies to vehicles: with power seats
The operating logic for the switches corre
sponds to the construction and function of the seat.
Fig . 68 Adjustment switches: locations on driver seat
The operating logic for the switches corre
sponds to the construction, the design and
the function of the seat . Push or pull either
switch in exactly the same direction you want
the corresponding part of the seat to move.
(!) Adjusting the lumbar support
@ Adjusting seat height and fore-and-aft po
sition
® Adjusting the angle of the seatback
Power seat adjustment
Applies to vehicles: with power seats
The switches can be moved in various direc
tions to allow precise adjustment.
Read and heed a ll warnings before you adjust
your seat.
~ &,.
Adjusting the curvature of the lumbar
support
"' Push the forward or rear depress ion on the
switch shell@~
page 61, fig. 68 to in
crease or decrease the backrest curvature.
Seats and storage 61
Adjusting the height of the lumbar
support
"'Push the top or bottom depression on the
switch shell(!) to raise or lower the support
in the backrest.
Moving the front seats forward or
backward
"' Press the switch @forwa rd or backward
horizontally.
Adjusting the seat height
"' Pull or push the switch@even ly at both
ends to raise or lower the seat.
Angling the seat cushion up and down
(front)
"' Pull or push the switch @at the front only
to raise or lower the seat.
Angling the seat cushion up and down
(rear)
"' Pull or push the switch@at the rear on ly to
raise or lower the seat.
Adjusting the seatback
"' Push or pull the switch @ in the same direc
tion you want the seatba ck to tilt.
LD._ WARNING
- Never adjust the driver's or front passen
ger seat while the vehicle is moving. If
you do this whi le the vehicle is moving,
you will be out of position. Always adjust
the dr iver's or front passenger seat when
the vehicle is not moving.
- Be careful when adjusting the seat he ight. Check to see that no one is in the
way, or ser ious injury could result!
- Because the seats can be e lectrically ad
justed with the ignition key removed,
never leave children unattended in the
veh icle. Unsupervised use of the electric
seat adjustments may cause serious in
Jury.
Page 64 of 244

62 Seats and storage
-To reduce the risk of injury in the case of
sudden braking or accident, front pas
sengers must never ride in a moving ve
hicle with the seatback reclined. Safety
belts and the airbag system offer maxi
mum protection only when the seatback
is upright and the safety belts are prop
erly posit ioned on the body. The more
the seatback is reclined, the greater the
risk of personal injury from an incorrect
seating position and improperly posi
tioned safety belts!
- Always make sure the front seatbacks are
in the upright position and securely
locked in place when driving.
Head restraints
Adjusting head restraints, front seats
The head restraints must be adjusted proper
ly to provide protection .
Fig. 69 Dr iver's seat head rest rain t: adjusting the
heigh t
The head restraints on the front seats can be
adjusted to provide safe support to head and
neck at the optimum he ight . When optimally
adjusted, the top of the restra int should be
leve l with the top of the head
q page 94,
Proper adjustment of head restraints.
.,. Grasp the sides of the head restra int with
both hands and slide it upward/downward
until you feel it click into place
c> fig. 69 .
_&, WARNING
-Driving without head restraints or with
head restraints that are not properly ad-
-
justed increases the risk of serious or fa
tal neck injury dramatically.
- Read and heed all WARNINGS
q page 94, Proper adjustment of head
restraints.
t@ Tips
Correctly adjusted head restraints and
safety belts are an extreme ly effective
combination of safety features.
Luggage compartment
Pass-through with Ski Bag
Using the pass-through and the removable
ski bag, you can transport long objects (e .g.
skis) neatly and without damaging the interi
or.
Fig. 70 Open storage compartme nt between the seat
backs
Fig. 71 Retainer fo r the ski bag between the seatbacks
Loading
.,. Open the flip cover to the storage compart
ment between the seatbacks
c> page 66.
.,. To unlock it, pull the handle and fold the
cover of the pass-through to the trunk
c> fig. 70.
.,. Flip the cover upward in the direction of the
arrow.
 1
1 2
2 3
3 4
4 5
5 6
6 7
7 8
8 9
9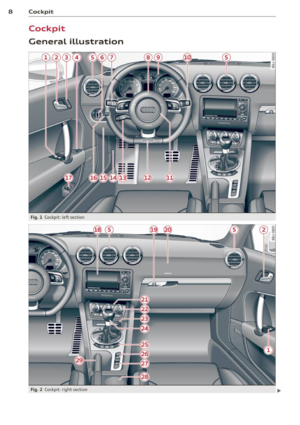 10
10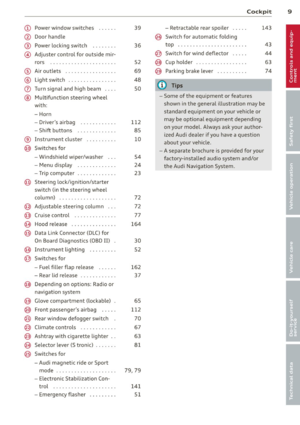 11
11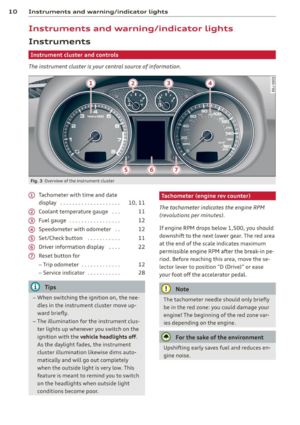 12
12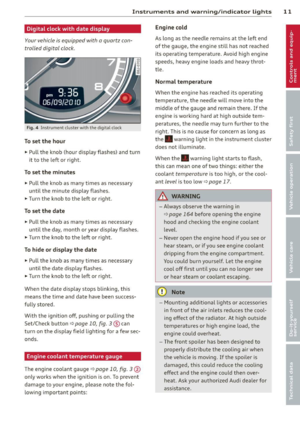 13
13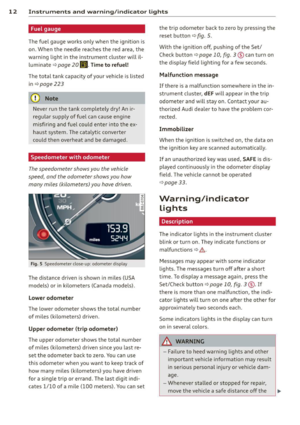 14
14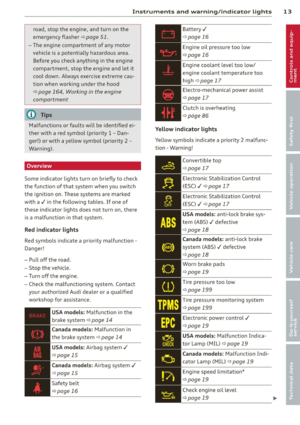 15
15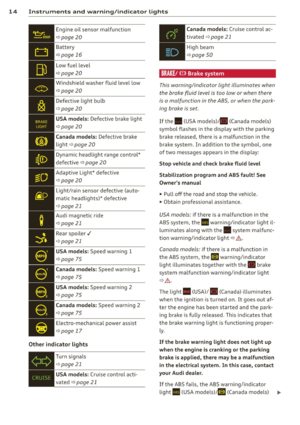 16
16 17
17 18
18 19
19 20
20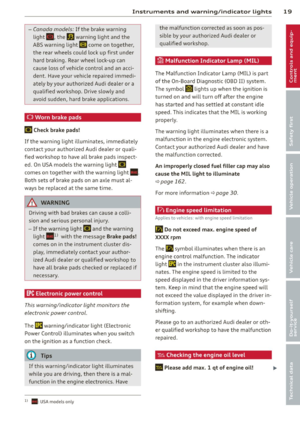 21
21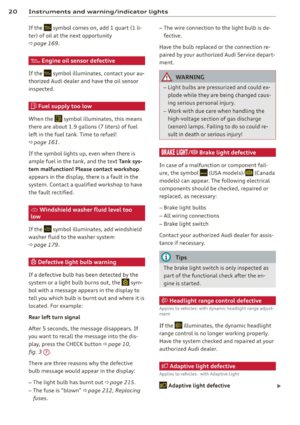 22
22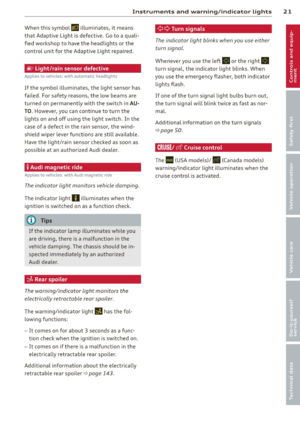 23
23 24
24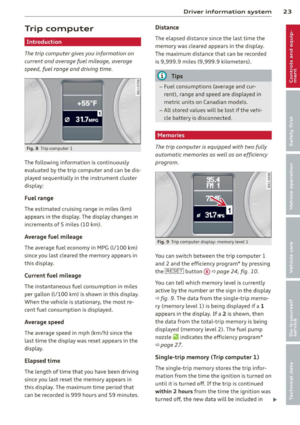 25
25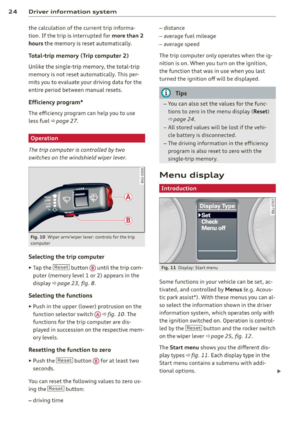 26
26 27
27 28
28 29
29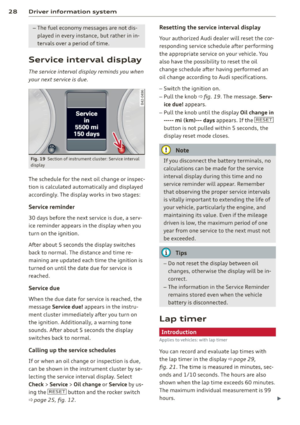 30
30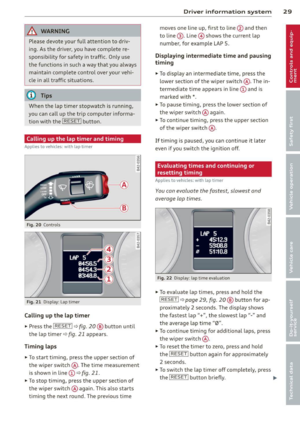 31
31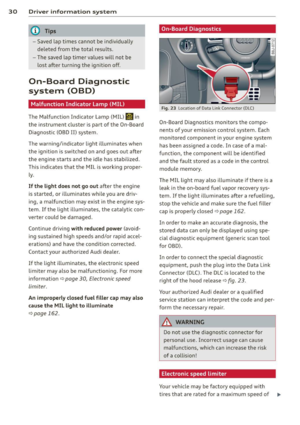 32
32 33
33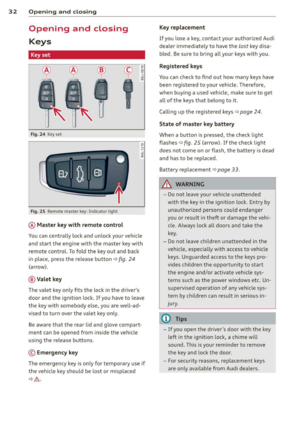 34
34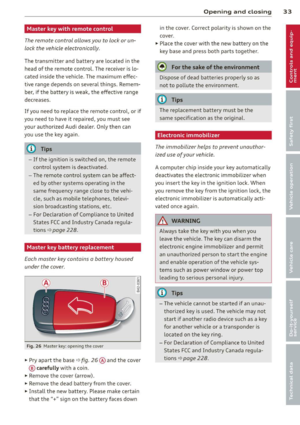 35
35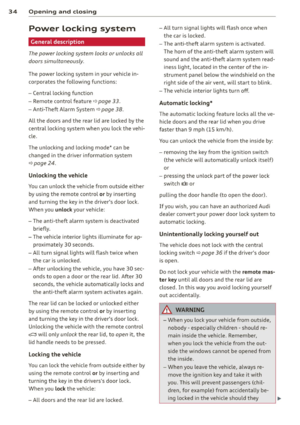 36
36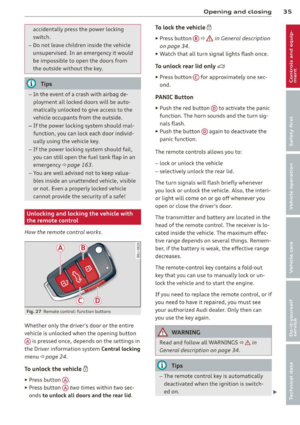 37
37 38
38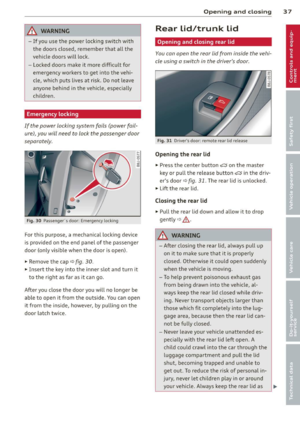 39
39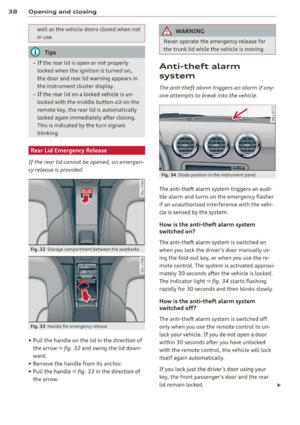 40
40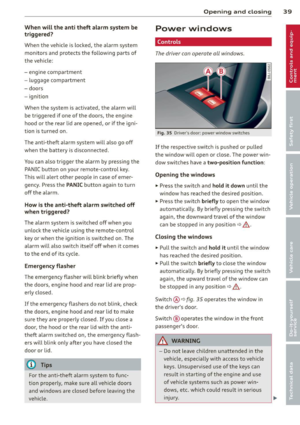 41
41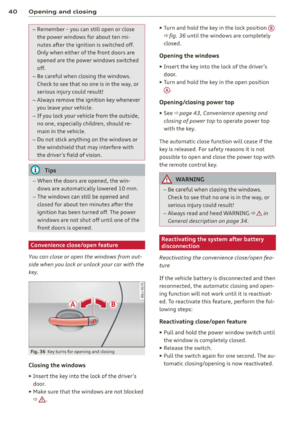 42
42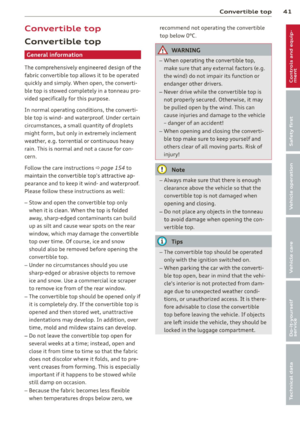 43
43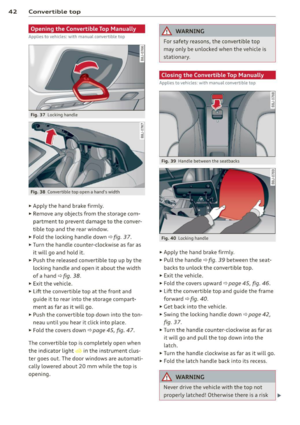 44
44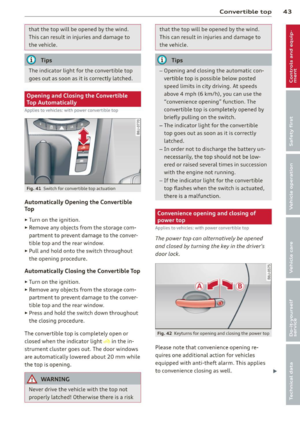 45
45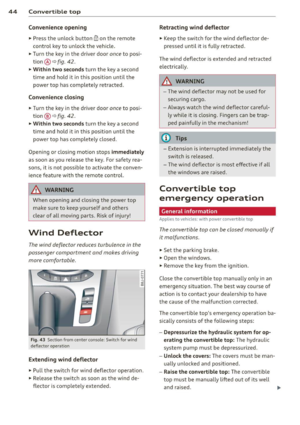 46
46 47
47 48
48 49
49 50
50 51
51 52
52 53
53 54
54 55
55 56
56 57
57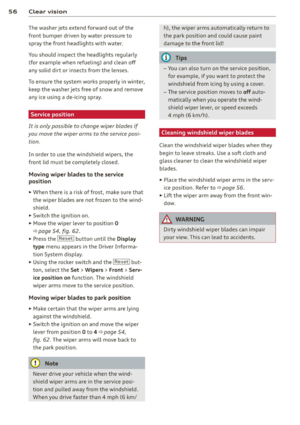 58
58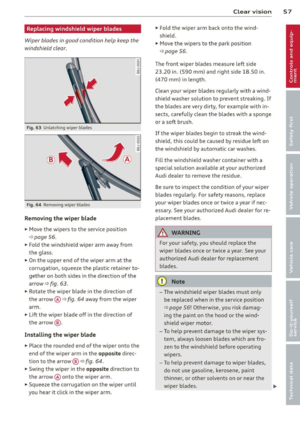 59
59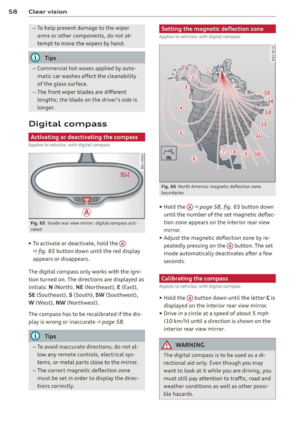 60
60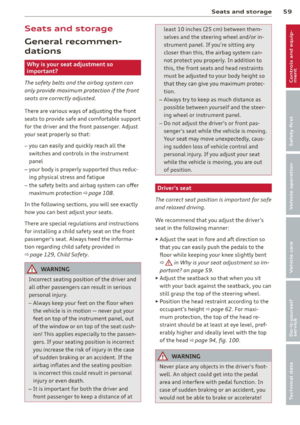 61
61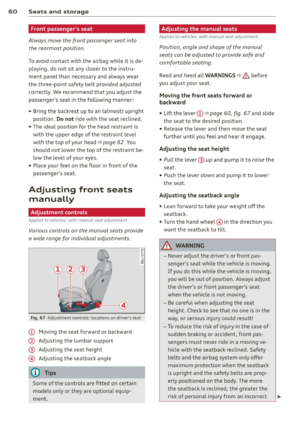 62
62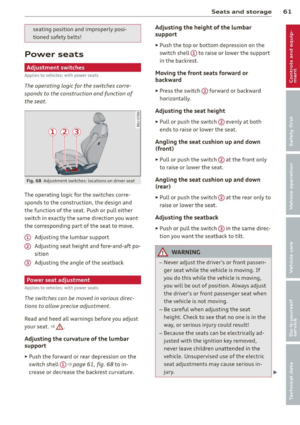 63
63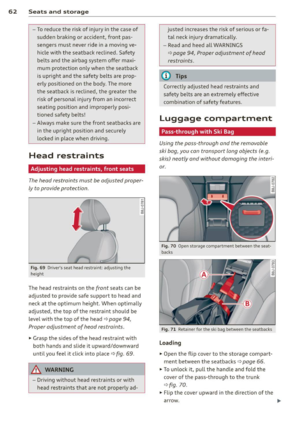 64
64 65
65 66
66 67
67 68
68 69
69 70
70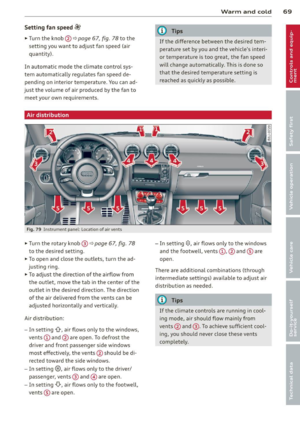 71
71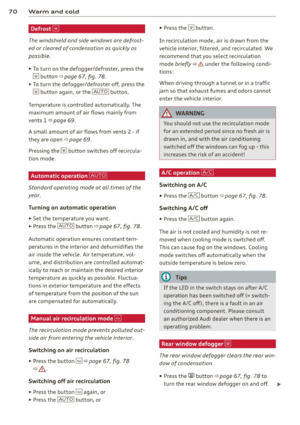 72
72 73
73 74
74 75
75 76
76 77
77 78
78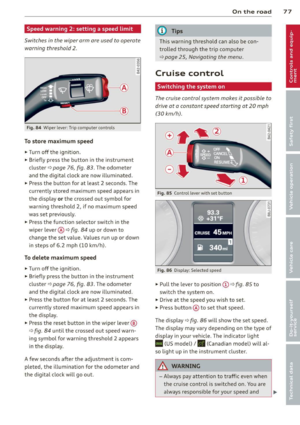 79
79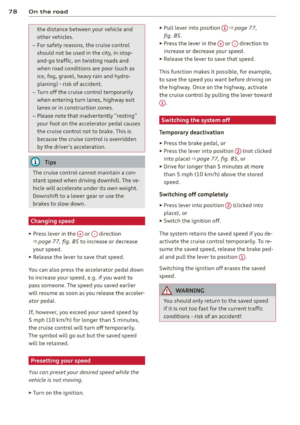 80
80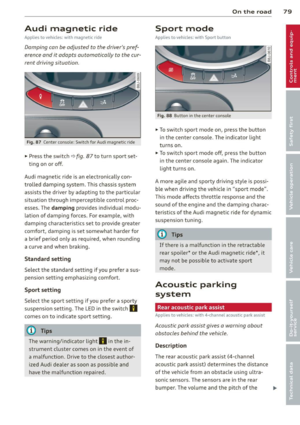 81
81 82
82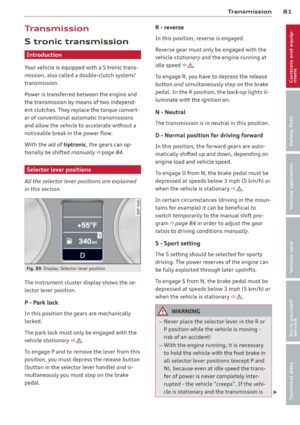 83
83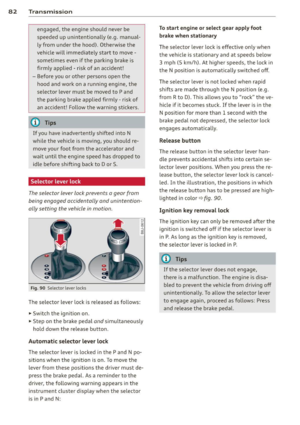 84
84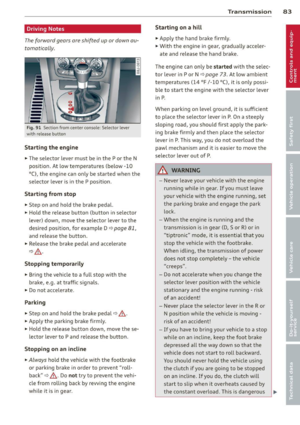 85
85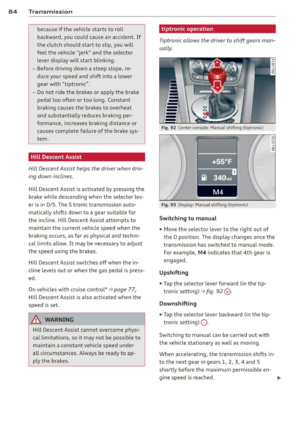 86
86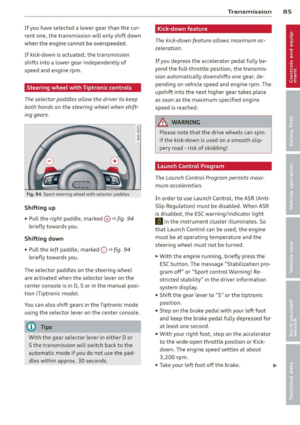 87
87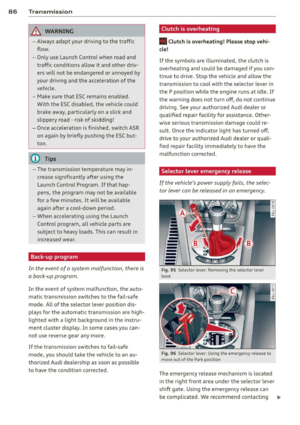 88
88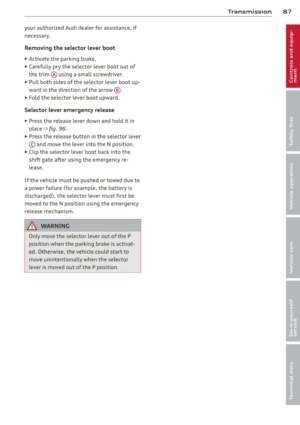 89
89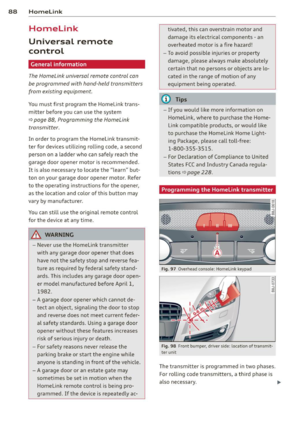 90
90 91
91 92
92 93
93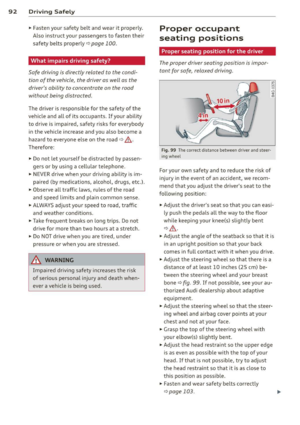 94
94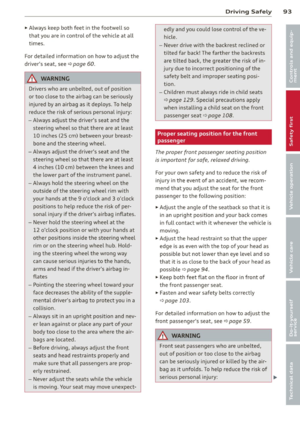 95
95 96
96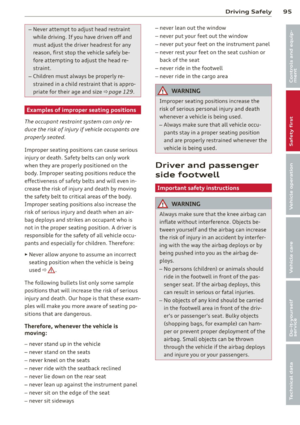 97
97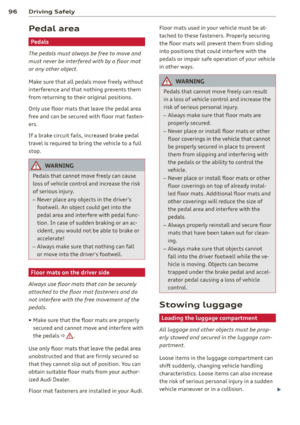 98
98 99
99 100
100 101
101 102
102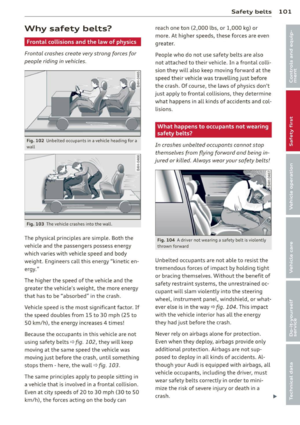 103
103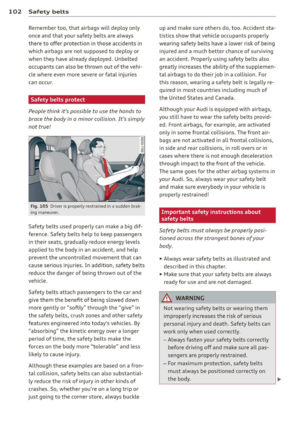 104
104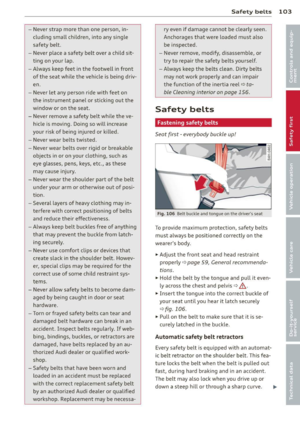 105
105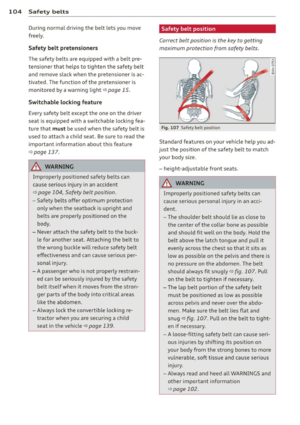 106
106 107
107 108
108 109
109 110
110 111
111 112
112 113
113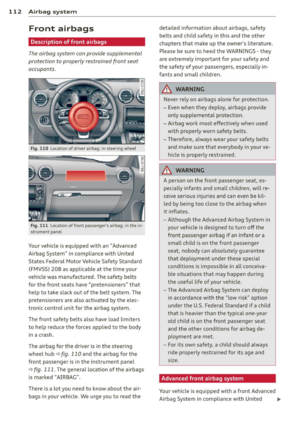 114
114 115
115 116
116 117
117 118
118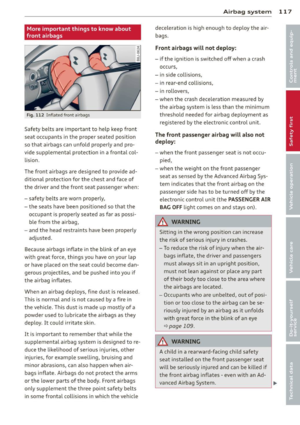 119
119 120
120 121
121 122
122 123
123 124
124 125
125 126
126 127
127 128
128 129
129 130
130 131
131 132
132 133
133 134
134 135
135 136
136 137
137 138
138 139
139 140
140 141
141 142
142 143
143 144
144 145
145 146
146 147
147 148
148 149
149 150
150 151
151 152
152 153
153 154
154 155
155 156
156 157
157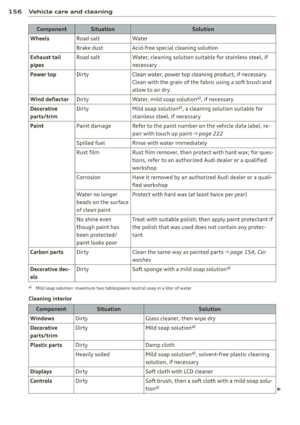 158
158 159
159 160
160 161
161 162
162 163
163 164
164 165
165 166
166 167
167 168
168 169
169 170
170 171
171 172
172 173
173 174
174 175
175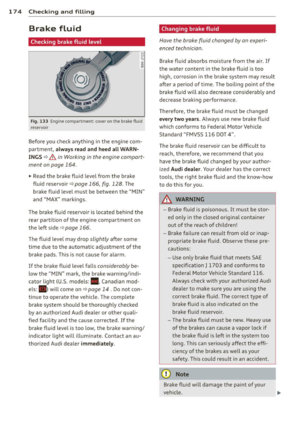 176
176 177
177 178
178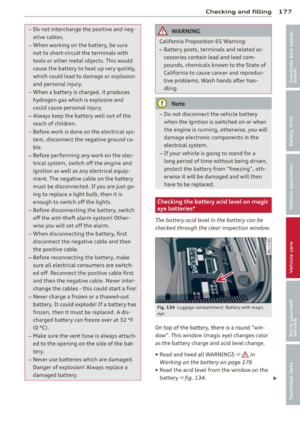 179
179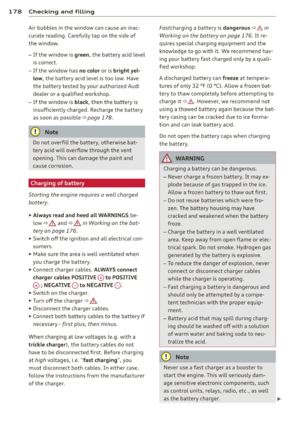 180
180 181
181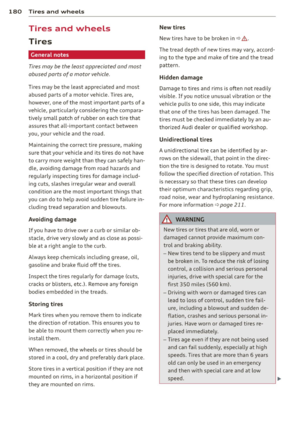 182
182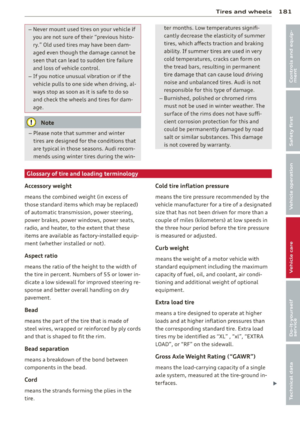 183
183 184
184 185
185 186
186 187
187 188
188 189
189 190
190 191
191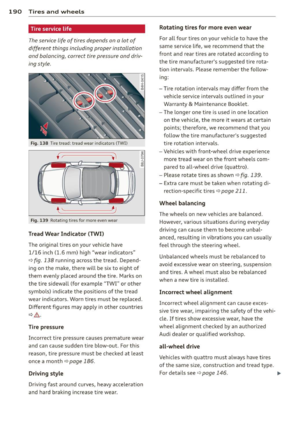 192
192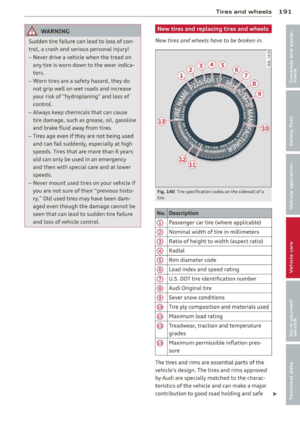 193
193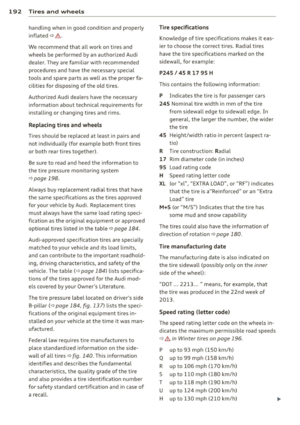 194
194 195
195 196
196 197
197 198
198 199
199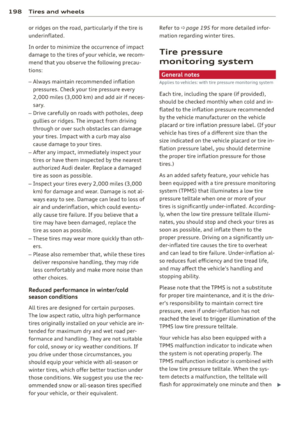 200
200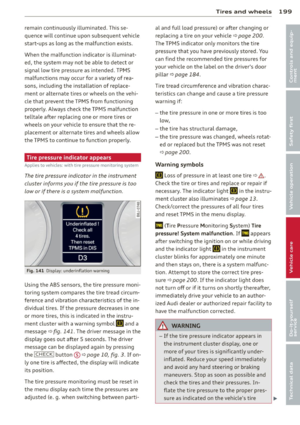 201
201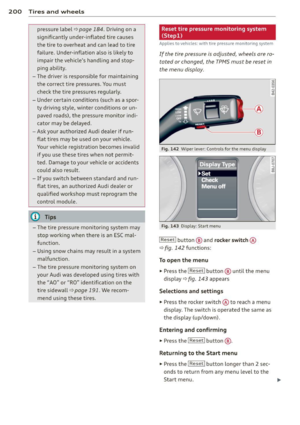 202
202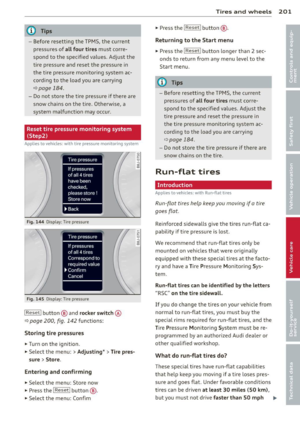 203
203 204
204 205
205 206
206 207
207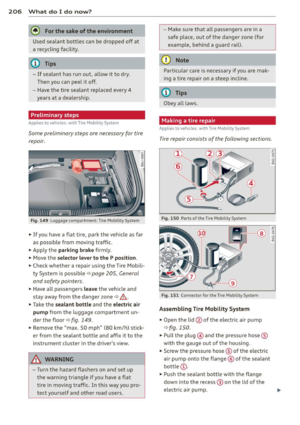 208
208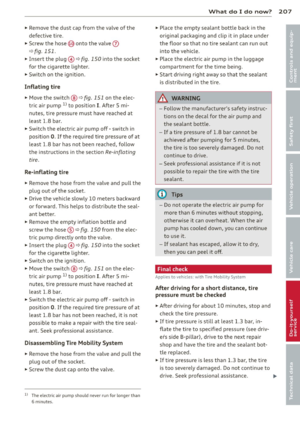 209
209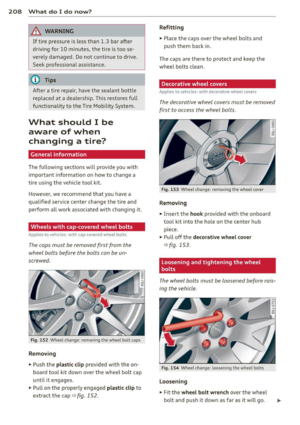 210
210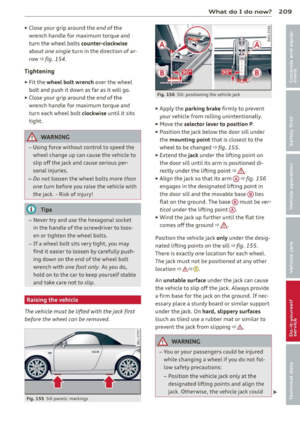 211
211 212
212 213
213 214
214 215
215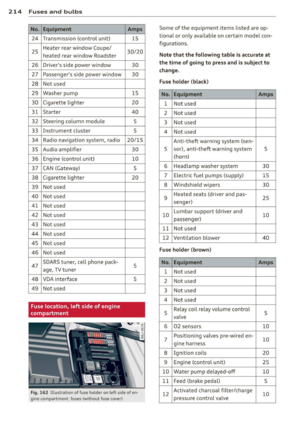 216
216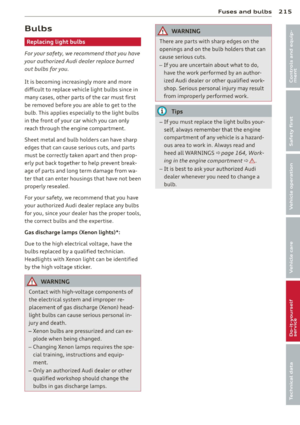 217
217 218
218 219
219 220
220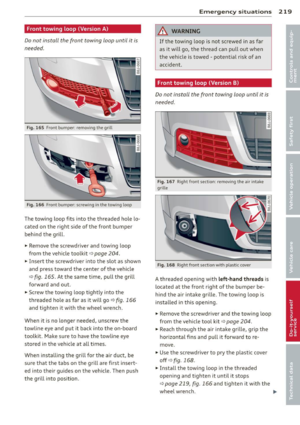 221
221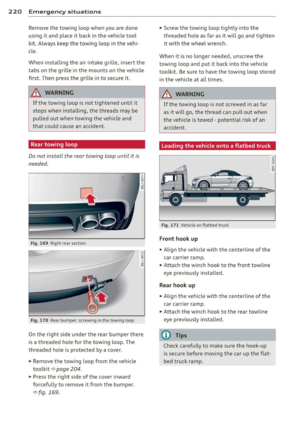 222
222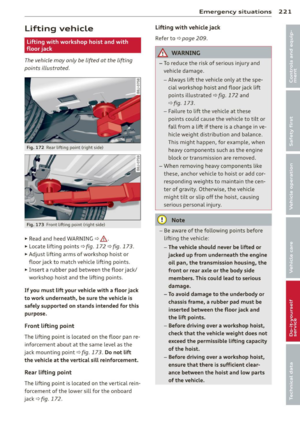 223
223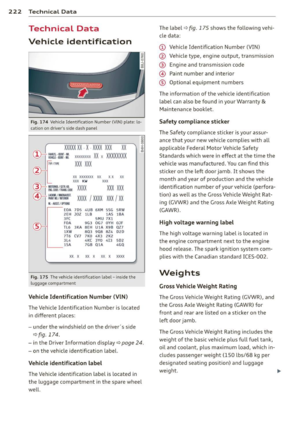 224
224 225
225 226
226 227
227 228
228 229
229 230
230 231
231 232
232 233
233 234
234 235
235 236
236 237
237 238
238 239
239 240
240 241
241 242
242 243
243